Honeywell RPWL4045A2000 Bedienungsanleitung
Honeywell
Türklingel
RPWL4045A2000
Lies die bedienungsanleitung für Honeywell RPWL4045A2000 (12 Seiten) kostenlos online; sie gehört zur Kategorie Türklingel. Dieses Handbuch wurde von 17 Personen als hilfreich bewertet und erhielt im Schnitt 4.4 Sterne aus 9 Bewertungen. Hast du eine Frage zu Honeywell RPWL4045A2000 oder möchtest du andere Nutzer dieses Produkts befragen? Stelle eine Frage
Seite 1/12

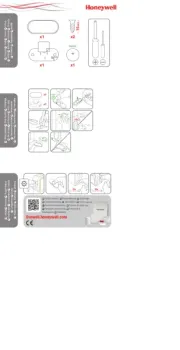
Installation Instructions
Wireless Doorbell Adapter
RPWL4045A2000
Read before installing
Preparation
Adapter
Wall Anchors
Round Head
Screws Phillips Screwdriver
Standard Screwdriver
Drill and 1/4 in. (6 mm) drill bit
To install you will needIn the box you will find
CR2032 Battery
Wall Plate
Safety
Turn Power OFF. To protect yourself and your equipment, turn off the power at
the breaker box that controls your doorbell.
Before proceeding with the installation, please note the following safety warnings:
• Always follow the manufacturer’s advice when using power tools and wear suitable
protective equipment (e.g. safety goggles) when drilling holes, etc.
• Before drilling holes in walls, check for hidden electricity cables and water pipes. The
use of a cable/pipe locator is advisable if in doubt.
For help please visit honeywellhome.com or call 1-800-468-1502.

Wiring
1. Make sure at least 1/3-inch of each wire is exposed for easy
insertion into the wire terminals.
2. Insert the wires into the appropriate terminals. Refer to the
wiring diagrams below.
3. Connect the wires to the adapter terminals.
You can connect one or two doorbell pushes and
transformers.
A1/A2 Connect to one push button
B1/B2 Connect to a second push button (if used)
AC1 Connect to one line voltage transformer (if used)
AC2 Not used
4. When the wiring is complete, turn the power back on.
1/3 in.
A
B
A
B
Wiring 1 (A only) or 2 (A and B) Pushes Wiring 1 (A o/nly) or 2 (A and B) Pushes
with 1 Transformer
Install Adapter
1. Pull the adapter apart from the wall plate.
2. Open the battery cover in the wireless adapter and install the
CR2032 battery.
3. Remove the existing doorbell chime from the wall.
4. Screw the wall plate to the wall using the included screws and
anchors (if not using the existing anchors).
Drill 1/4 inch holes for the anchors.
Choose a Location
Choose a location that is not near a heat
source or on somthing that moves (like a
door).

Pairing the Adapter and the Doorbell
1. Press and hold the Setting button on the doorbell for three seconds.
2. Press the button on the back of the adapter.
3. Within 12 seconds of pressing the button on the adapter, press the
Music button to select the ring for the doorbell.
4. Within 12 seconds of pressing the button on the adapter, press the Sunlight button to
select a halo light color (if available ) for that doorbell.
5. When the wiring is complete, snap the wireless adapter onto the wall plate.
Maintenance
Your adapter requires no maintenance except to periodically change the battery. If using
the correct battery, its life should be approximately:
• Up to 2 years; replace with CR2032 lithium battery
Low Battery Notification
When the adapter battery is low an LED on the front of the adapter gives 3 short ashes
until batteries are replaced.
Specications
Doorbell Adapter
Operating Temperature 32°F to 122°F (0ºC to 50ºC)
RF Frequency US/Canada 916.8 MHz
Range (open eld) Up to 350 ft. (106 m)
Sound Level (typical) -
RF Power <1mW
Battery Type CR2032 (3V)
Battery Life (5 activations/day) Up to 2 years
Produktspezifikationen
| Marke: | Honeywell |
| Kategorie: | Türklingel |
| Modell: | RPWL4045A2000 |
Brauchst du Hilfe?
Wenn Sie Hilfe mit Honeywell RPWL4045A2000 benötigen, stellen Sie unten eine Frage und andere Benutzer werden Ihnen antworten
Bedienungsanleitung Türklingel Honeywell
24 Juli 2025

9 August 2024

3 August 2024

2 August 2024

2 August 2024

1 August 2024

31 Juli 2024

30 Juli 2024

30 Juli 2024

29 Juli 2024
Bedienungsanleitung Türklingel
- Trust
- Inventum
- Karlik
- Sencor
- Eufy
- ORNO
- Orbegozo
- HQ
- Zmodo
- Merlin
- Franke
- Desa
- Sinji
- Homematic IP
- Aiphone
Neueste Bedienungsanleitung für -Kategorien-

6 August 2025
6 August 2025
6 August 2025

5 August 2025
5 August 2025
4 August 2025
4 August 2025
4 August 2025

4 August 2025

3 August 2025