Akasa Apache A-ATX08-A1B Bedienungsanleitung
Akasa Computergehäuse Apache A-ATX08-A1B
Lies die bedienungsanleitung für Akasa Apache A-ATX08-A1B (1 Seiten) kostenlos online; sie gehört zur Kategorie Computergehäuse. Dieses Handbuch wurde von 20 Personen als hilfreich bewertet und erhielt im Schnitt 4.1 Sterne aus 8 Bewertungen. Hast du eine Frage zu Akasa Apache A-ATX08-A1B oder möchtest du andere Nutzer dieses Produkts befragen? Stelle eine Frage
Seite 1/1
GB
CAUTION
Electrostatic discharge (ESD) can damage system components. If an ESD-controlled workstation is not
available, wear an antistatic wrist strap or touch an earthed surface before handling any PC components.
WARNING
Please be careful when unpacking and setting up this product as metal edges can cause injury if not handled
with care.
PT
CUIDADO
Descargas Eletroestáticas (ESD) podem danificar componentes do PC. Caso não tenha uma bancada
específica disponível, utilize uma pulseira anti-estática ou toque uma superfície aterrada antes de manusear
qualquer componente.
ATENÇÃO
Por favor tenha cuidado ao desembrulhar e montar este produto, as extremidades de metal podem
machucar, caso o mesmo não seja manuseado com cuidado.
User manual
Product Code: A-ATX08
Contents
Top Panel
Internal cable connectors
GB
Connect the case internal cable connectors to the corresponding motherboard
headers.
NOTE : If the connectors are not apparent on the board consult your motherboard
manual. Connecting the panel to the wrong headers may result in motherboard
damage.
PT
Conecte os cabos internos do gabinete, nas entradas correspondentes da
placa-mãe.
NOTA : No caso das entradas não estarem marcadas na placa-mãe, consulte o
manual da mesma. Conectar os cabos numa entrada errada, pode danificar a
placa-mãe.
Installation
2019/10/V1
GB
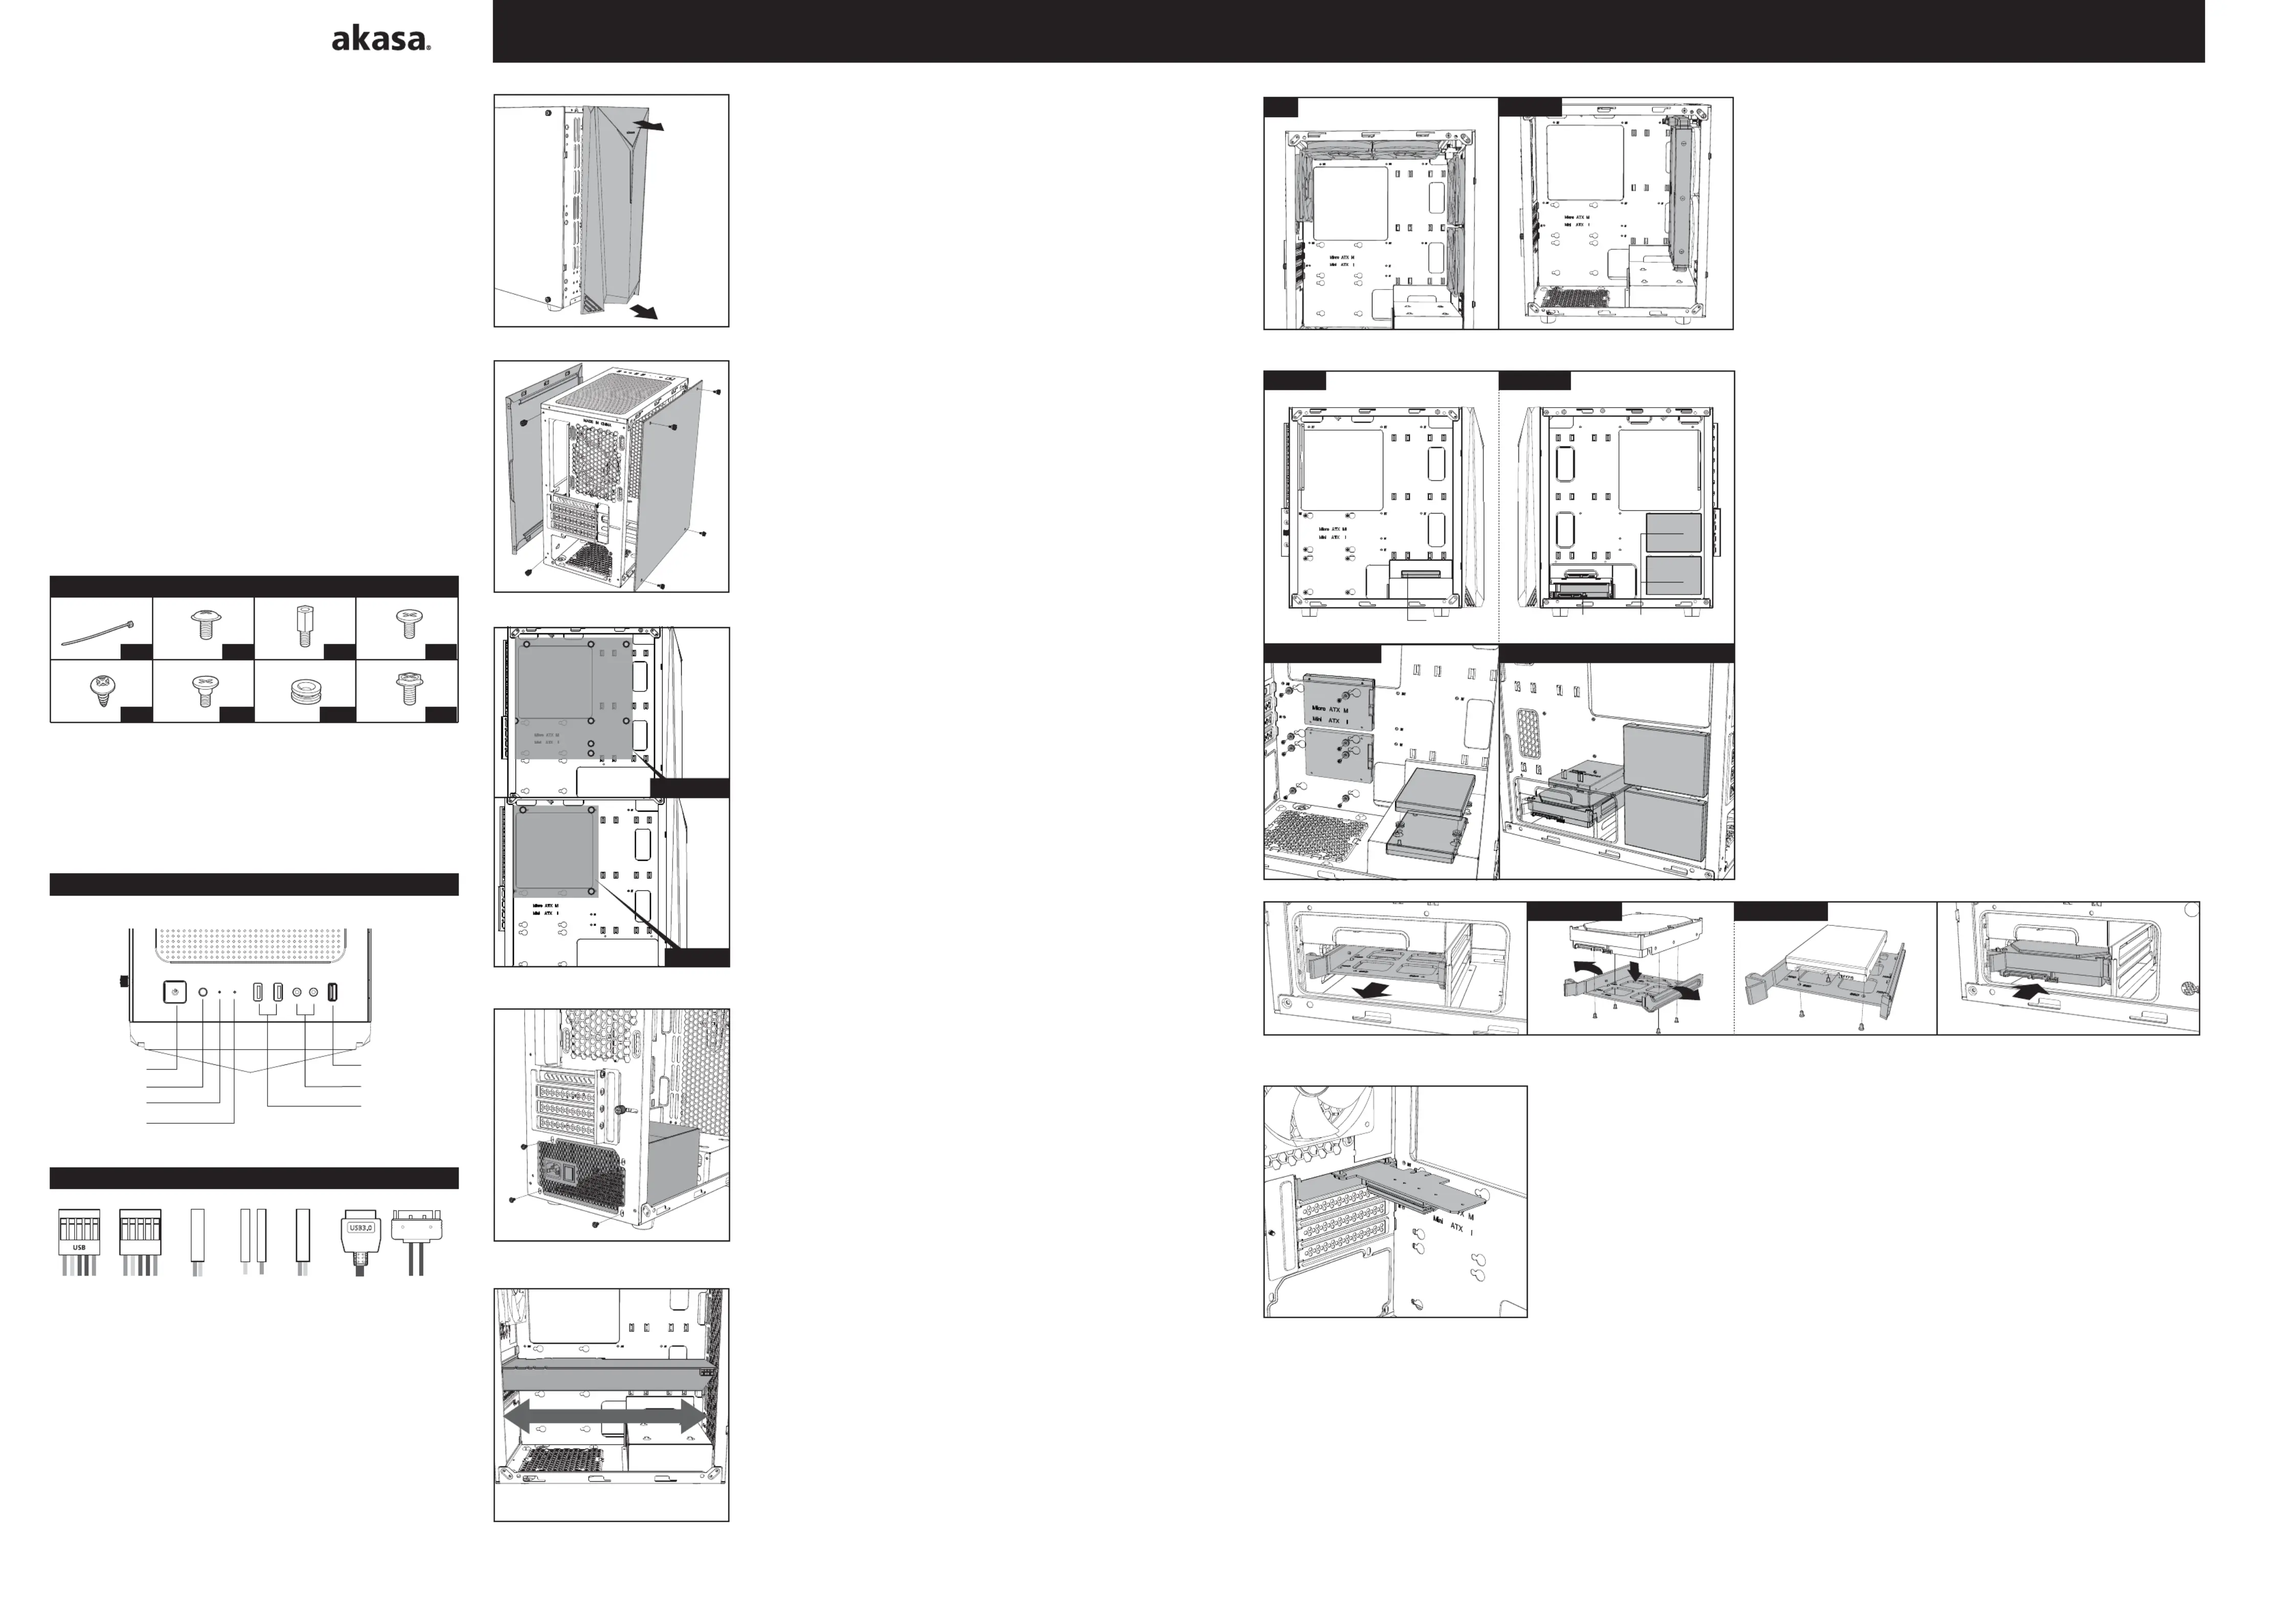
Remove the front panel by gently pulling the bottom
first, then the top.
PT
Remova o painel frontal puxando a parte de baixo
primeiro, em seguida a parte de cima.
GB
Remove both side panels by undoing the thumbscrews
and pulling the panels towards the rear.
PT
Remova as laterais soltado os parafusos
(pode ser com as mãos) e puxando as laterais para trás.
GB
Place the motherboard in the correct position, align the
holes and secure it by using motherboard screws.
PT
Coloque a placa-mãe na posição correta,
alinhando-a com os furos e fixe-a com os parafusos.
Front panel removal
Side panels removal
Motherboard
1
2
GB
Fasten the fan or radiator to the top, front, or rear of the case.
PT
Fixe os ventiladores ou o radiador do water cooler na parte superior, frontal
ou traseira do gabinete.
Cooling system support
HDD
GB
Remove the corresponding PCI backplate for the add on card,
install and secure with the PCI backplate screw.
PT
Remova o backplate PCI com o slot correspondente que será
utilizado na placa-mãe para instalação da placa. Instale a placa e
fixe-a com os parafusos para PSU / PCI.
Graphics cards
GB
Insert the PSU into its position and secure with PSU
screws.
PT
Encaixe a fonte de alimentação na posição correta e
fixe-a com os parafusos.
PSU
GB
Remove the corresponding PCI backplate before
installing the graphics card, secure with the PCI back-
plate screw.
PT
Remova o backplate PCI do slot correspondente que
será utilizado na placa-mãe para instalação, encaixe a
placa de vídeo e fixe com o parafuso.
PCIe / PCI / AGP cards
GB
HDD mounting hole
Place the HDD/SSD in the correct position, align the holes and secure it by
using the HDD screws.
HDD tray
Slide the tray out from the HDD cage. Secure the 2.5” HDD/SSD on to the tray
with the HDD screws or the 3.5" HDD with the screw-less mounting clip. Slide
the tray back into the HDD cage.
PT
Furo de fixação do HDD
Coloque o HDD/SSD na posição correta, alinhe a furação e fixe-o utilizando os
parafusos para HD.
Bandeja do HD
Deslize a bandeja para fora do compartimento do disco rígido, prenda o
HDD/SSD de 2,5" na bandeja com os parafusos ou use o clipe de montagem
sem parafusos para HDD de 3,5 ". Deslize a bandeja de volta ao
compartimento.
Fan
Mini ITX
Micro ATX
POWER LED+
POWER LED-
Power LED
connectors
H.D.D LED
HDD
activity LED
HD AUDIO
POWER SW
2-pin Power
Switch
connector
USB 2.0
connector
HD Audio
connector
USB 3.0
internal cable
SATA power
connector
❶❷❸❹
❺❻❼❽
x 5
x 2x 12x 12
x 8x 3x 8
x 8
GB
❶❷❸Cable tiesMotherboard screwsMotherboard standoffs
❹❺❻3.5” HDD screwsHDD tray screws 2.5" SSD rubber pad screws
❼❽2.5" SSD rubber padsPSU / PCI backplate screws
PT
❶❷❸Abraçadeirasparafusos para plca-mãeEspaçadores para placa-mãe
❹❺parafusos para HDD 3.5”parafusos da bandeja HDD
❻Parafusos de almofada de borracha SSD de 2,5 "
❼❽Almofadas de borracha SSD de 2,5 "Parafusos para PSU / PCI
Hard Drive LED
Power LED
Power switch
USB 3.0 port
Audio IN / OUT
USB 2.0 port
LED
Gaming Micro ATX Case
APACHE FLARE
up to 300mm
radiator
Right sideLeft side
2.5” HDD/SSD x 4 3.5” SSD/HDD x 1 + 2.5” SSD/HDD x 3
2.5”
HDD/SSD
2.5”
HDD/SSD x2
2.5” or 3.5”
HDD/SSD
2
1
1
3.5” HDD/SSD2.5” HDD/SSD
Produktspezifikationen
| Marke: | Akasa |
| Kategorie: | Computergehäuse |
| Modell: | Apache A-ATX08-A1B |
Brauchst du Hilfe?
Wenn Sie Hilfe mit Akasa Apache A-ATX08-A1B benötigen, stellen Sie unten eine Frage und andere Benutzer werden Ihnen antworten
Bedienungsanleitung Computergehäuse Akasa

28 Dezember 2025
28 Dezember 2025
28 Dezember 2025
27 Dezember 2025
25 Dezember 2025
24 Dezember 2025
23 Dezember 2025
23 Dezember 2025
23 Dezember 2025
22 Dezember 2025
Bedienungsanleitung Computergehäuse
Neueste Bedienungsanleitung für -Kategorien-
2 April 2026
30 März 2026
29 März 2026
29 März 2026
28 März 2026
27 März 2026
27 März 2026
27 März 2026
27 März 2026