Alora Harmony PD406414 Bedienungsanleitung
Alora Beleuchtung Harmony PD406414
Lies die bedienungsanleitung für Alora Harmony PD406414 (26 Seiten) kostenlos online; sie gehört zur Kategorie Beleuchtung. Dieses Handbuch wurde von 13 Personen als hilfreich bewertet und erhielt im Schnitt 4.1 Sterne aus 4 Bewertungen. Hast du eine Frage zu Alora Harmony PD406414 oder möchtest du andere Nutzer dieses Produkts befragen? Stelle eine Frage
Seite 1/26
Step 1
Remove fixture from its original package.
Step 2
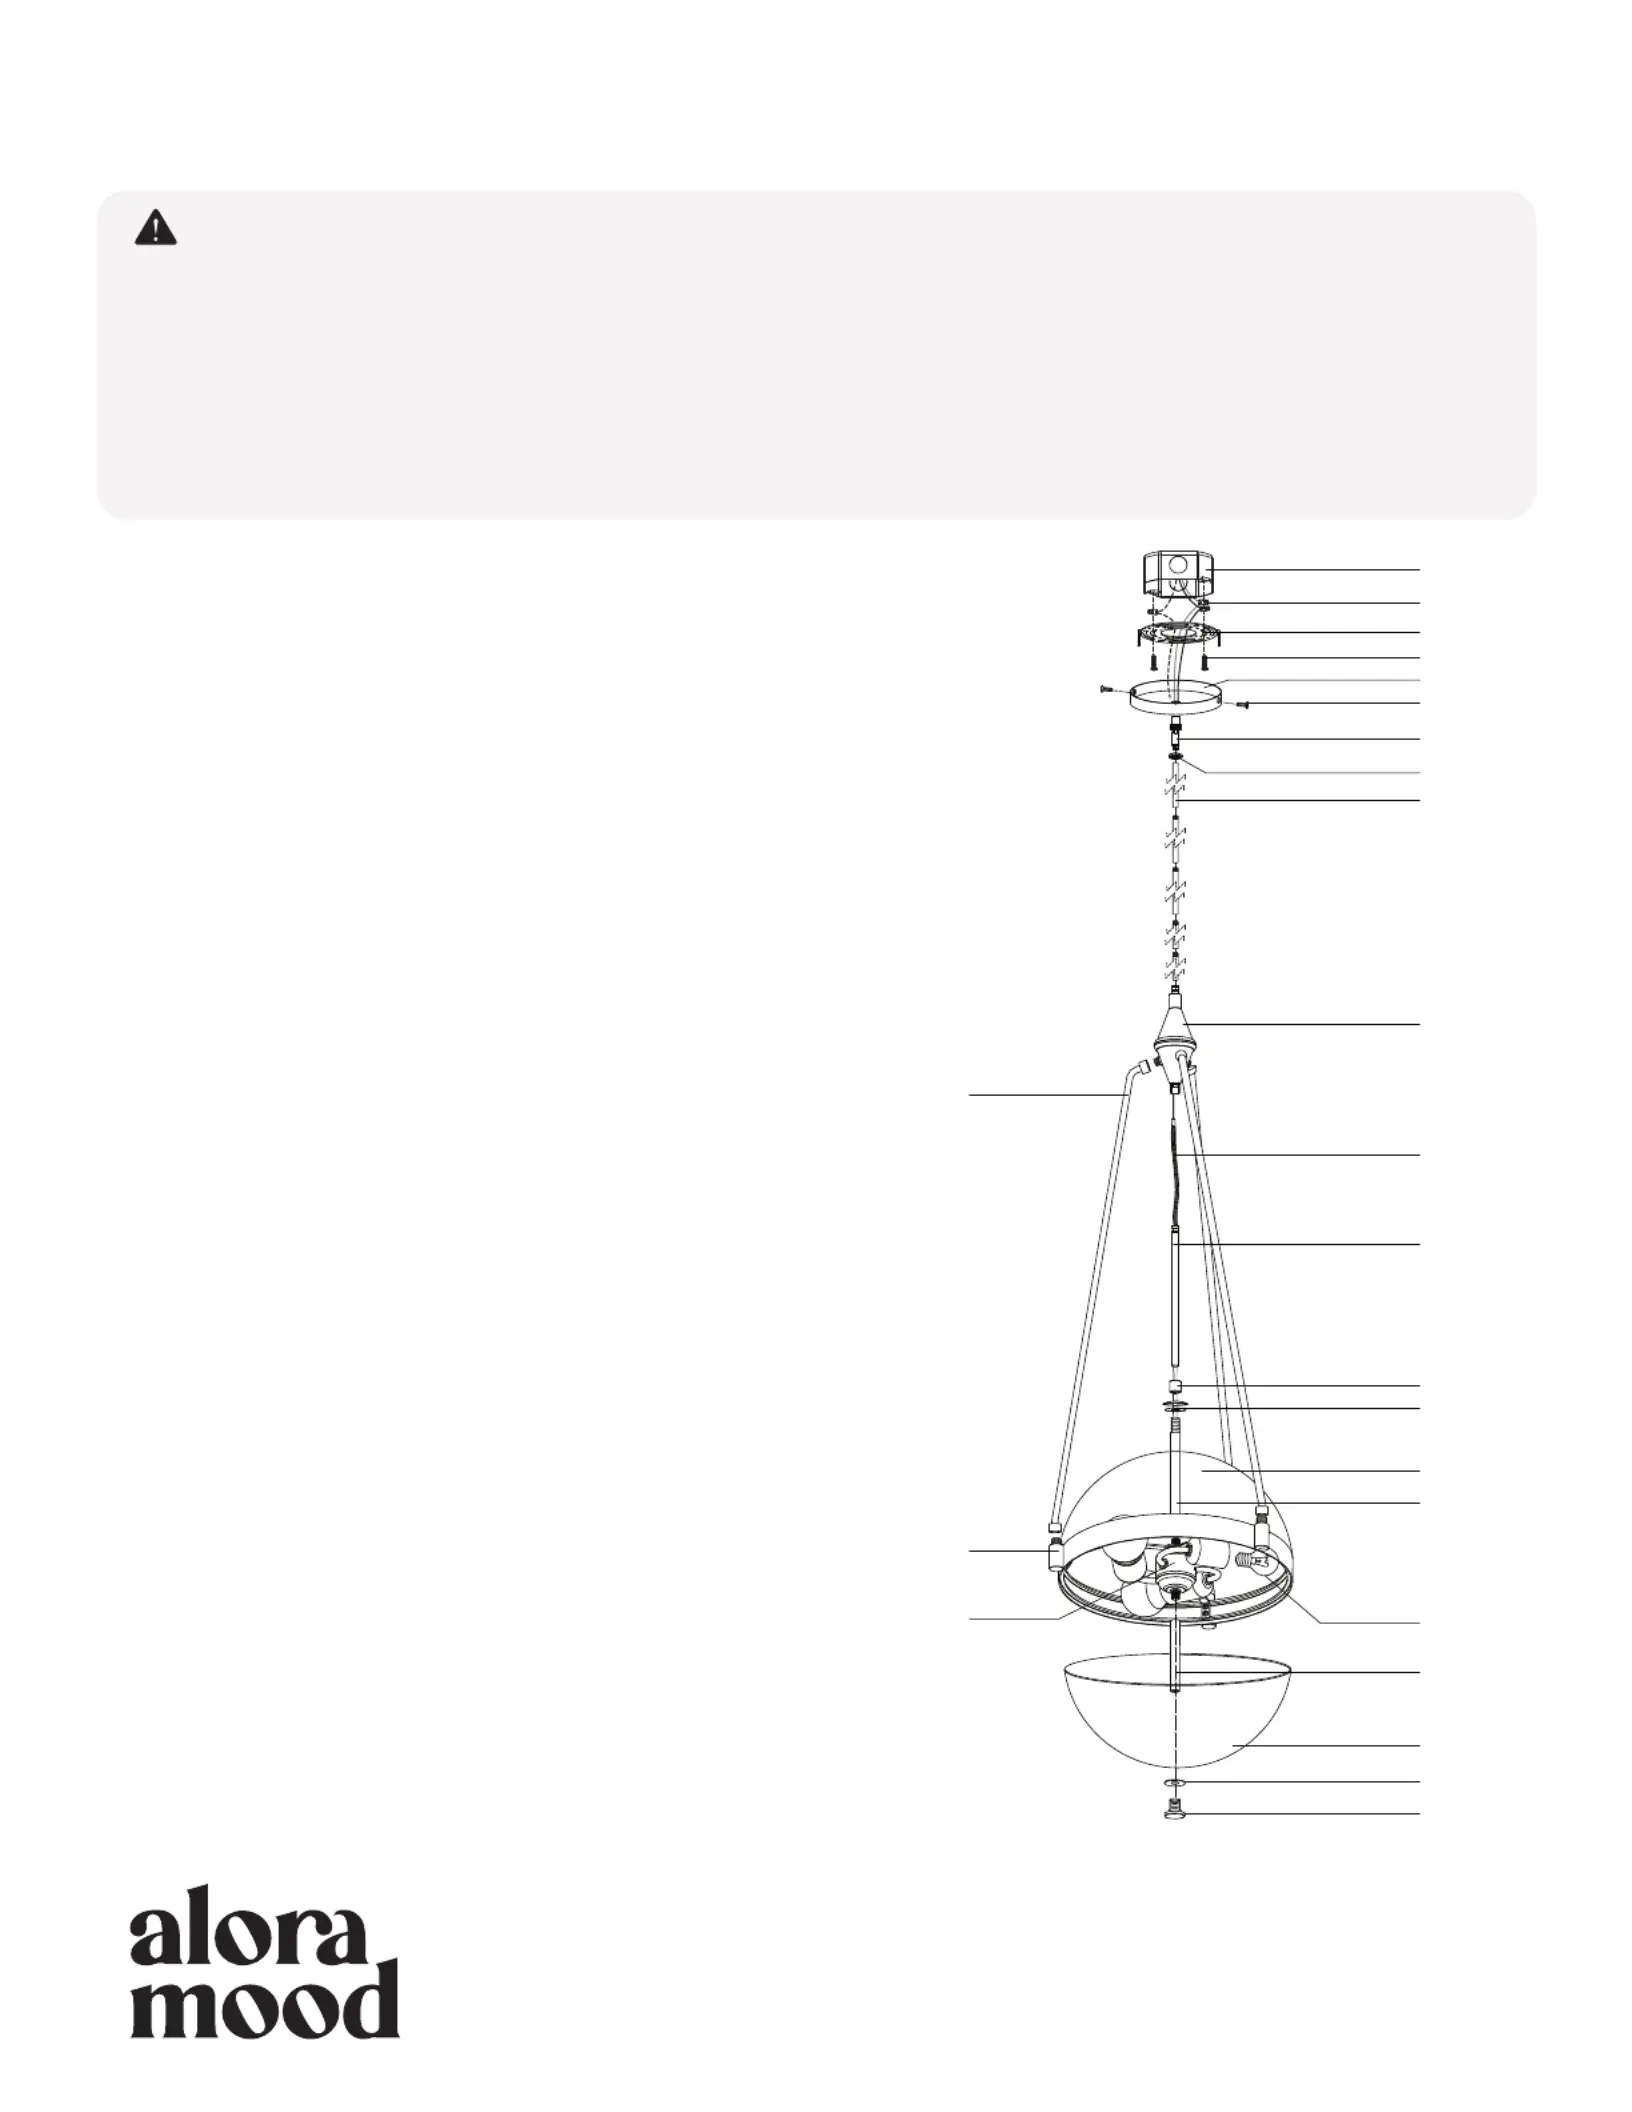
Separate mounting plate (1c) from canopy (2a) by removing canopy
screws (2b). Attach mounting plate (1c) to electrical junction box (1a)
using junction box screws provided (1e) in hardware package.
Step 3
Place the top shade (3a) on top of ring (3c). Secure suspension rods (2g)
to fixture hub (2f) and ring (3c) by threading clockwise. Run wires
through top stem (3b), washers (2k), lock nut (2j), center fixture rod (2i)
to fixture hub (2f). Attach center fixture rod (2i) to fixture hub (2f),
followed by lock nut (2j), washers (2k) and stem (3b) and secure to
socket assembly (3d) by threading clockwise.
Step 4
Secure canopy pivot (2c) to canopy (2a) with mounting collar nut (2e).
Determine hanging height of fixture by securing rods (2d) to canopy
pivot (2c) and fixture hub (2f) after feeding fixture wires through rods.
Step 5
Make proper electrical connections ( to “L”, to blackhotwhiteneutral
“N”, to ) with wire nuts (1b) provided in hardware ground“GND”
package. the black wire sleeve (2h) that is attached to the fixture Note:
wires can be removed after making proper electrical connections, as it is
not required to complete installation)
Step 6
Attach canopy (2a) to mounting plate (1c) with canopy screws (2b).
Step 7
Install the recommended lamp (4a) (not provided) (referred on the socket
label for maximum wattage and type) to fixture socket.
Step 8
Attach bottom stem (5a) to socket assembly (3d). Secure bottom shade
(5b) to ring (3c) with washer (5c) and finial (5d) by threading clockwise.
You are now ready to enjoy your fixture.
Harmony
PD406414
WD CAISARNINGANS UTON
· Make sure is at the fuse boxPOWERCOMPLETELY OFF
·Have your fixture installed by a qualified licensed electrician
· Prepare everything in a clear area
· Wear gloves at all times during this installation
· Read instructions carefully before you start assembly
· Keep this installation sheet for future reference
TECHNICPORTAL SUP
1.855.855.8926
tcalpprtlr.cechnisuo@aoalightingom
Please Note:
· 120V input
ASSEMBLY INSTRUCTIONS
NOTEIC
• T r far suct out t et caot heimpotantsaegudsandintrionslinedinhisshenn
cov le ct t that may occur.tst be er allpossibondiions andsituaions I mu
undeood hat tainbeoled.hesrsttcaut cerion and care factorsust m flow Te
inions idedsahighendstructarrove p foyor ur fet we y andly recomm that a
liensed,tricianintall hisnic tralecined e st ut.
• T ur tountcorrectlstall staard hisfixte is designedo be med on a y inednd
rouoco throur boxithaer T box nd or tagon bx ORgh a wiing w a plstr fame.he
mubesecounedhee heding.hest urely mt to t stcturruotf buil T c
rnd ossbar a
happliedshobeused,diingheherdware su uld rectly mount t fixture to t outlet
bomake le to correctl t ure.x y mait impossiby alignhefixt
P.
CDA:ANA19054 28 - Sur V3Z 6Mth Ave.,rey,C B3
USA:3035 ELiRd.Vs, N1. one Mountan - Las egaV 8908
www.aloram.comood
1.855.855.8926
20230109
5a.
5d.
5c.
5b.
1a.
1b.
1e.
2a.
1c.
2b.
2c.
2d.
2e.
2f.
2g.
3c.
3d.
2h.
2i.
2j.
2k.
3b.
3a.
4a.
Produktspezifikationen
| Marke: | Alora |
| Kategorie: | Beleuchtung |
| Modell: | Harmony PD406414 |
Brauchst du Hilfe?
Wenn Sie Hilfe mit Alora Harmony PD406414 benötigen, stellen Sie unten eine Frage und andere Benutzer werden Ihnen antworten
Bedienungsanleitung Beleuchtung Alora

10 März 2026
10 März 2026
25 Dezember 2025
21 Dezember 2025
10 Dezember 2025
9 Dezember 2025
9 Dezember 2025
9 Dezember 2025
9 Dezember 2025
9 Dezember 2025
Bedienungsanleitung Beleuchtung
Neueste Bedienungsanleitung für -Kategorien-
10 März 2026
10 März 2026
10 März 2026
10 März 2026
10 März 2026
10 März 2026
10 März 2026
10 März 2026
10 März 2026
10 März 2026