Alphacool Core RX 9070 XT Nitro+ Bedienungsanleitung

Alphacool Nicht kategorisiert Core RX 9070 XT Nitro+

Lies die bedienungsanleitung für Alphacool Core RX 9070 XT Nitro+ (4 Seiten) kostenlos online; sie gehört zur Kategorie Nicht kategorisiert. Dieses Handbuch wurde von 6 Personen als hilfreich bewertet und erhielt im Schnitt 4.7 Sterne aus 3.5 Bewertungen. Hast du eine Frage zu Alphacool Core RX 9070 XT Nitro+ oder möchtest du andere Nutzer dieses Produkts befragen? Stelle eine Frage

Seite 1/4
Alphacool
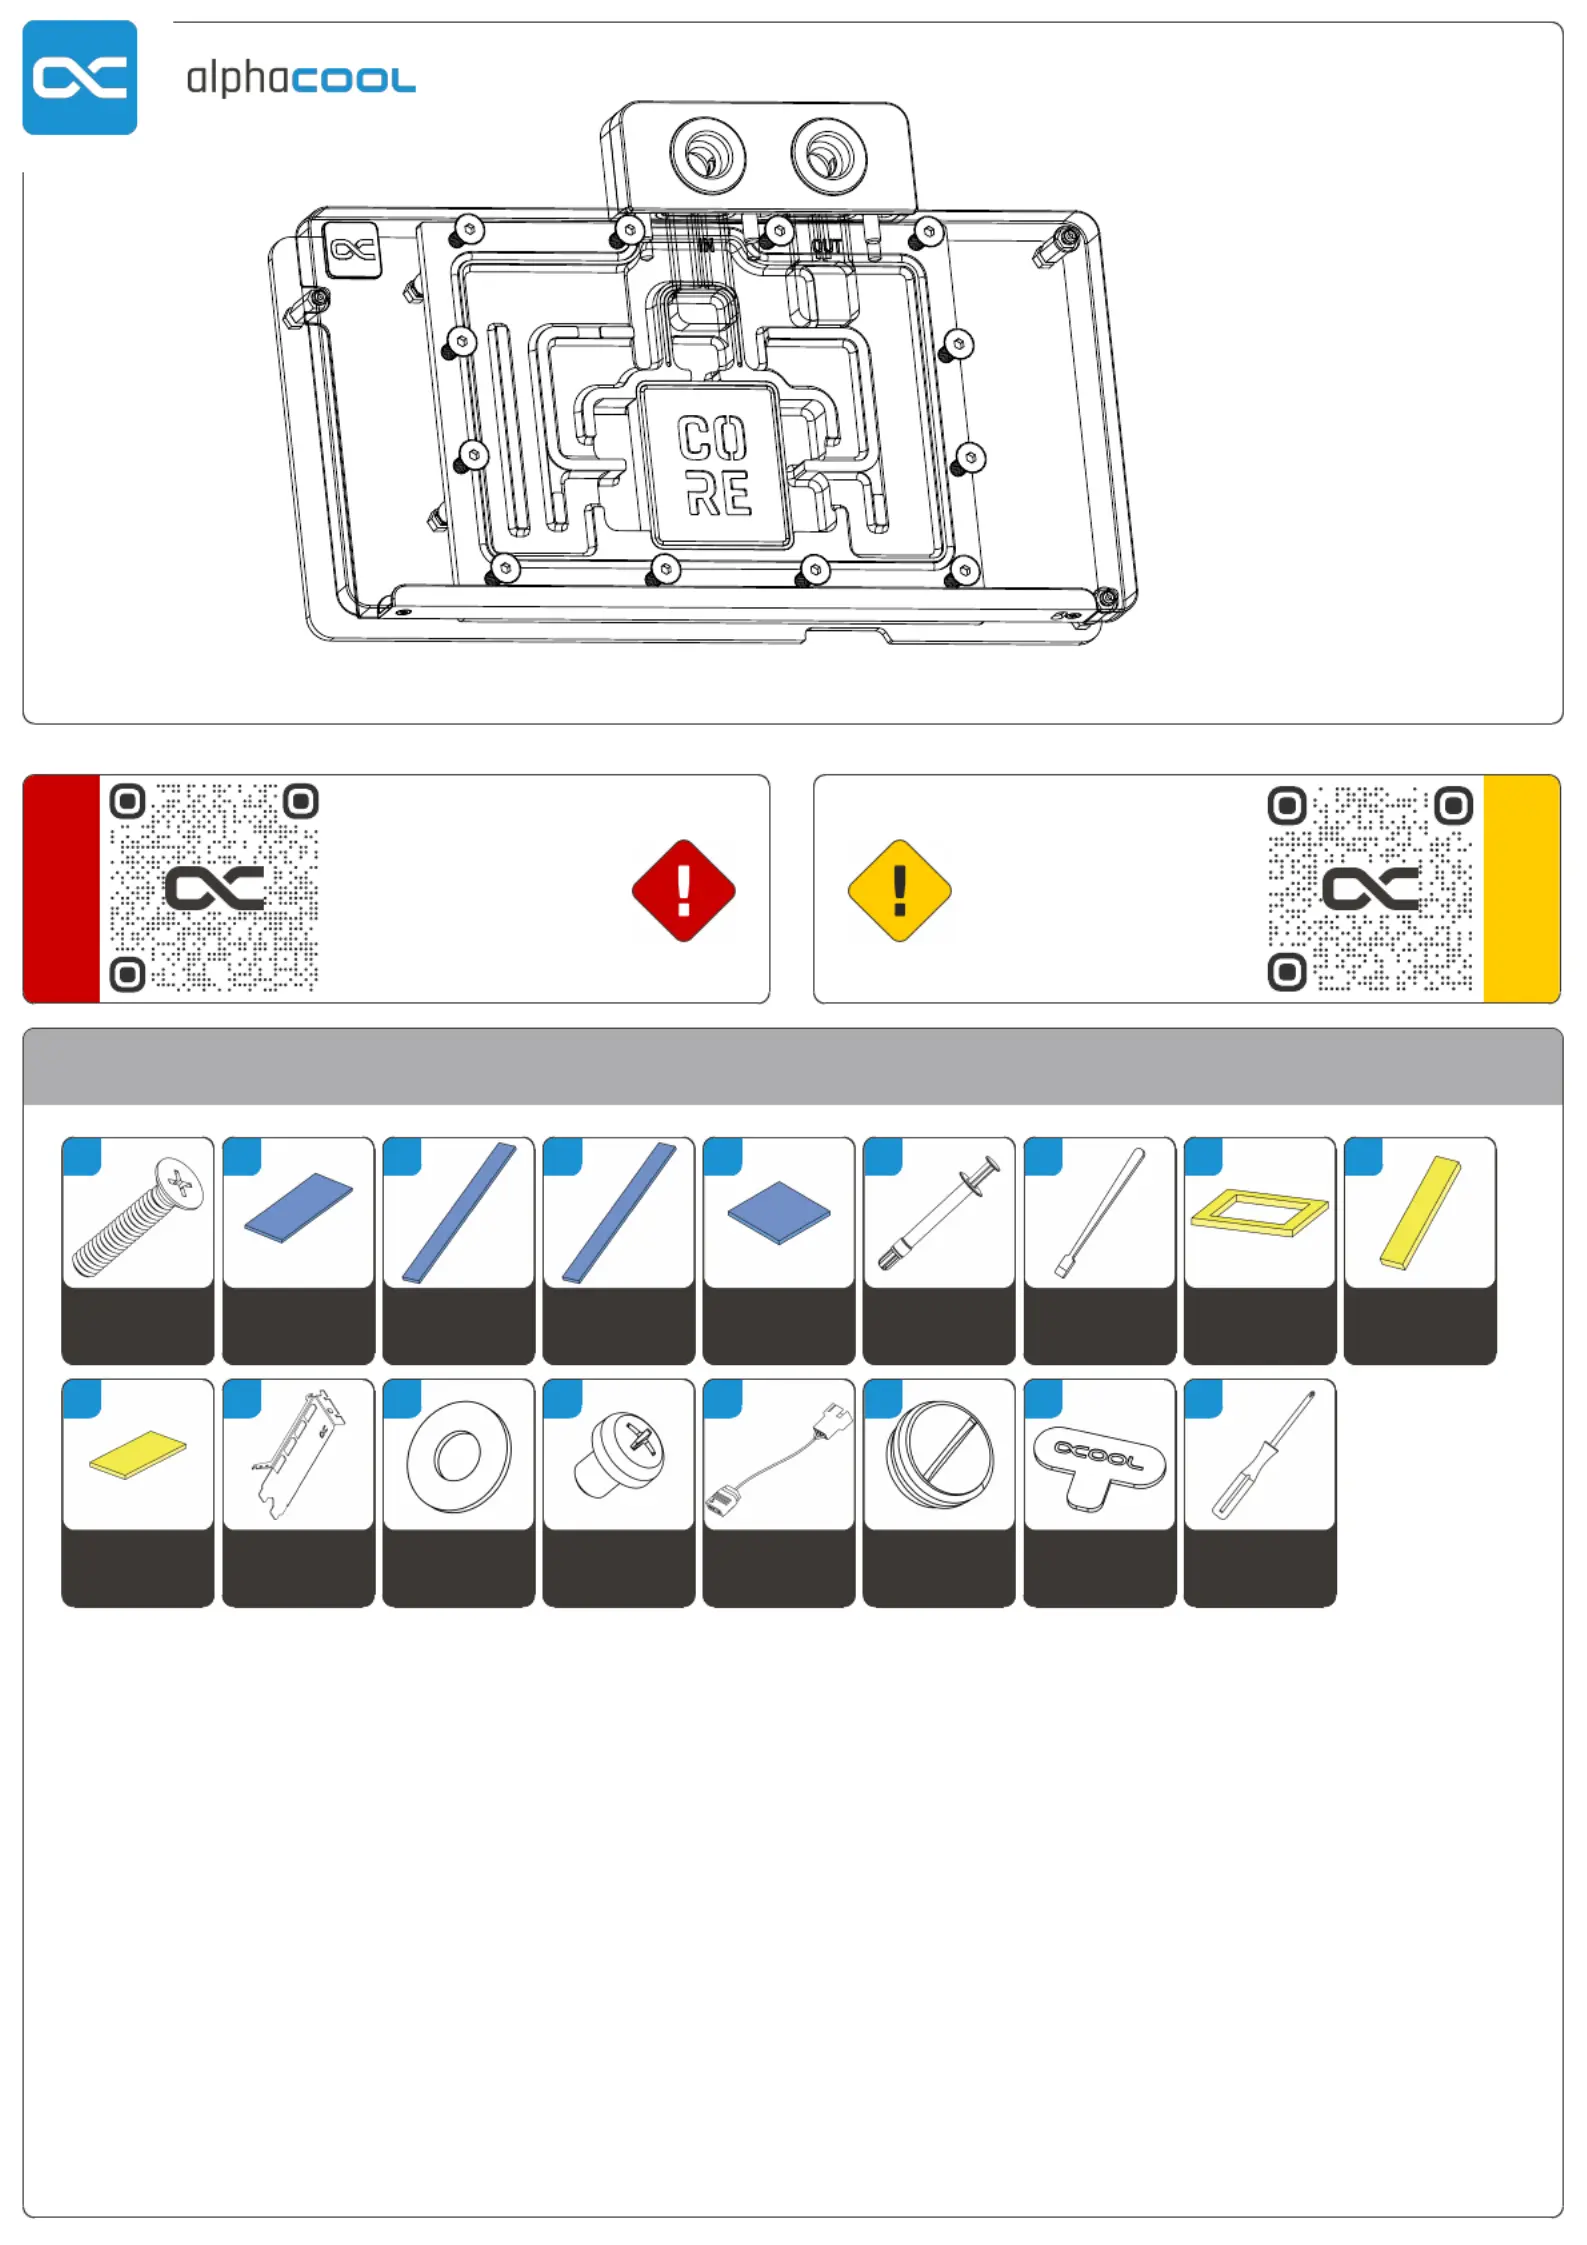
CORE GPU BLOCK SERIES
Model: 14778
V. 1.000 // 03.2025
Safety instructions
Sicherheitshinweise
Avis de sécurité
Digital guide
Guide digital
EN
Accessories
DE
Zubehör
FR
Accessoires
11x
M2x10mm
Screw
A
3x
40x15x1mm
Pad
B
1x
66x8x1mm
Pad
C
1x
76x8x1mm
Pad
D
2x
8x8x1mm
Pad
E
1x
Thermal
Grease
F
1x
Putty tool
G
1x
45x45x3mm
GPU-Pad
H
3x
40x8x3mm
Pad
I
1x
20x8x3mm
Pad
J
1x
PCI Bracket
K
1x
Washer
L
1x
M3x4mm
Screw
M
1x
ARGB
Adapter
N
2x
G1/4 Plug
O
1x
Plug tool
P
1x
Screwdriver
Q
EN
Check compatibility and prepare graphics
card
DE
Kompatibilität prüfen und Grafikkarte
vorbereiten
FR
Vérification de compatibilité et préparer la
carte graphique
Check compatibility
Before starting the cooler assembly, compare
your card with the pictures in our configurator.
To do so, visit https://gpu.alphacool.com and
search for your graphics card or cooler model.
For a definitiv identification, you can also
compare the PCB number. The cooler was
designed for a special PCB layout. Occasionally,
graphics card manufacturers may revise the
design of their card slightly, causing the cooler
not to fit on later models. During assembly,
please make sure taller parts have enough
space around them and that the cooler does not
damage your graphics card.
Kompatibilität prüfen
Bevor Sie mit der Montage des Kühlers
beginnen, vergleichen Sie Ihre Platine mit den
Fotos in unserem Konfigurator. Besuchen Sie
dafür https://gpu.alphacool.com und suchen Sie
nach Ihrem Grafikkarten- oder Kühlermodell.
Zur eindeutigen Zuordnung kann dort auch die
PCB Nummer verglichen werden. Der Kühler
wurde für ein spezielles PCB Layout konstruiert.
Es kommt vor, dass Grafikkartenhersteller über
Revisionen den Aufbau leicht abändern und der
Kühler auf spätere Modelle nicht mehr passt.
Achten Sie auch bei der Montage darauf, dass
hohe Bauteile frei liegen und der Kühler die
Grafikkarte nicht beschädigt.
Vérification de compatibilité
Avant de commencer l'assemblage du
refroidisseur comparez votre carte avec les
images de notre configurateur. Pour ce faire,
visitez https://gpu.alphacool.com et
cherchez votre carte graphique ou votre modèle
de refroidisseur. Pour une identification précise,
vous pouvez également comparer le numéro de
la PCB. La refroidisseur a été conçu pour une
disposition spéciale du PCB. Il est possible que
le fabricant change des détails dans la
disposition de ses composants lors d’une
révision et que le bloc de refroidissement ne soit
plus compatible. Veillez lors de l’installation au
fait que les composants hauts ne touchent pas le
bloc de refroidissement et que le bloc
n’endommage pas la carte graphique.
Alphacool International GmbH is not liable for
assembly errors occurring due to negligence,
such as selecting an incompatible cooler.
Alphacool International GmbH haftet nicht bei
fahrlässigen Montagefehlern, wie die Wahl eines
inkompatiblen Kühlers.
Alphacool International GmbH n’est pas
responsable ni des erreurs d’installation ni du
choix d’un refroidisseur incompatible.
Prepare graphics card
Put the hardware on an antistatic mat. Begin
dismantling the original cooler. Depending on
the structure of the cooler, remove the screws at
the back of the card and carefully unhook the fan
connector first. If the original cooler uses
thermal glue, extreme care should be taken as
you can easily damage parts. Pick up all the
items carefully. Next, clean the hardware of
thermal paste or pad residues with a solvent
(e.g. isopropanol alcohol).
Grafikkarte vorbereiten
Legen Sie die Hardware auf eine antistatische
Unterlage. Beginnen Sie mit der Demontage des
Original-Kühlers. Je nach Aufbau des Kühlers
sind zuerst die Schrauben des Lüfters zu
entfernen und die Blenden zu lösen. Bei
aufgeklebten Kühlern ist äußerste Sorgfalt
geboten. Es können leicht Bauteile abgerissen
werden. Heben Sie alle Einzelteile sorgfältig auf.
Reinigen Sie anschließend die Hardware von
Resten der Wärmeleitpaste oder Pads mit einem
Lösemittel (z.B. Isopropanol-Alkohol).
Préparer la carte graphique
Posez le matériel sur un tapis antistatique.
Commencez par le démontage du refroidisseur
d’origine. Selon la configuration du radiateur les
vis du ventilateur et les caches doivent être
enlevés d’abord. S’il s’agit d’un refroidisseur
collé il faut travailler très doucement. Sinon des
composants peuvent s’arracher. Conservez tous
les pièces soigneusement. Ensuite, nettoyer le
matériel de résidus de la pâte thermique ou de
pads avec un solvant (alcool isopropanol par ex.).
EN
Remove transport spacer
DE
Transportabstandshalter entfernen
FR
Enlever l'entretoise de transport
EN
Place thermal pads on cooling block
DE
Wärmeleitpads auf dem Kühlblock
platzieren
FR
Placer les pads thermique sur le bloc
EN
Apply Thermal Grease
DE
Wärmeleitpaste auftragen
FR
Appliquer la pâte thermique
EN
Install PCB
DE
PCB montieren
FR
Installer PCB
EN
Place the thermal pads on the PCB
backside
DE
Wärmeleitpads auf der PCB-Rückseite
platzieren
FR
Positionner les pads thermiques
soigneusement sur le PCB à l’arrière


Produktspezifikationen

Marke: Alphacool
Kategorie: Nicht kategorisiert
Modell: Core RX 9070 XT Nitro+

Brauchst du Hilfe?

Wenn Sie Hilfe mit Alphacool Core RX 9070 XT Nitro+ benötigen, stellen Sie unten eine Frage und andere Benutzer werden Ihnen antworten