Canarm BI-12RM Bedienungsanleitung
Canarm
Dunstabzugshaube
BI-12RM
Lies die bedienungsanleitung für Canarm BI-12RM (4 Seiten) kostenlos online; sie gehört zur Kategorie Dunstabzugshaube. Dieses Handbuch wurde von 3 Personen als hilfreich bewertet und erhielt im Schnitt 4.7 Sterne aus 2 Bewertungen. Hast du eine Frage zu Canarm BI-12RM oder möchtest du andere Nutzer dieses Produkts befragen? Stelle eine Frage
Seite 1/4

BI_BIRM_UserGuide Page 1 of 4
BI SERIES – UTILITY BLOWERS
Operation Instructions & Parts Manual
MODELS: BI-10 – BI-36; BI-10RM – BI-36RM
READ AND SAVE THESE INSTRUCTIONS
GENERAL SAFETY
Rotating parts on fans should not be exposed. cabinets Where these components are not protected by ductwork, or
covers, appropriate guards should be employed to restrict exposure to rotating parts. Access doors should not be
opened with the fan operating to avoid foreign objects being drawn into the system. On initial start-up a careful
inspection should be carried out to ensure no foreign material is present which could become airborne in the system.
Read carefully or installation and operation instructions before attempting to install, operate service Canarm/Delhi
BI/BI –RM series blowers. Failure to comply with instructions could result in personal injury and/or property damage.
UNIT DESCRIPTION
Canarm/Delhi BI series blowers are specifically designed as a quiet and efficient blower. The BI series incorporates a
backwardly inclined (BI) blade configuration to generate air moving performance. The BI iser es are single inlet blowers,
which have a standard CCW rotation and bottom horizontal discharge. The discharge direction may be easily altered to
any one of eight positions without removal of venturi the wheel or housing.
Complete access for motor and drive installations and servicing may be completed by partial removal of the drive
compartment cover assembly. Pre-lubricated ball bearings, motor adjustment hardware and a dynamically balanced
wheel are standard equipment. Operating temperature range is - 65 to 220 deg. F.
UNIT DESCRIPTION
Inspect unit for damage and report any shipping damage to carrier. Check all fasteners and re-tighten as required. Rotate
the blower wheel by hand to ensure free rotation. If rubbing occurs, loosen the inlet venturi bolts, re-position the venturi
to establish clearance, re-tighten bolts.
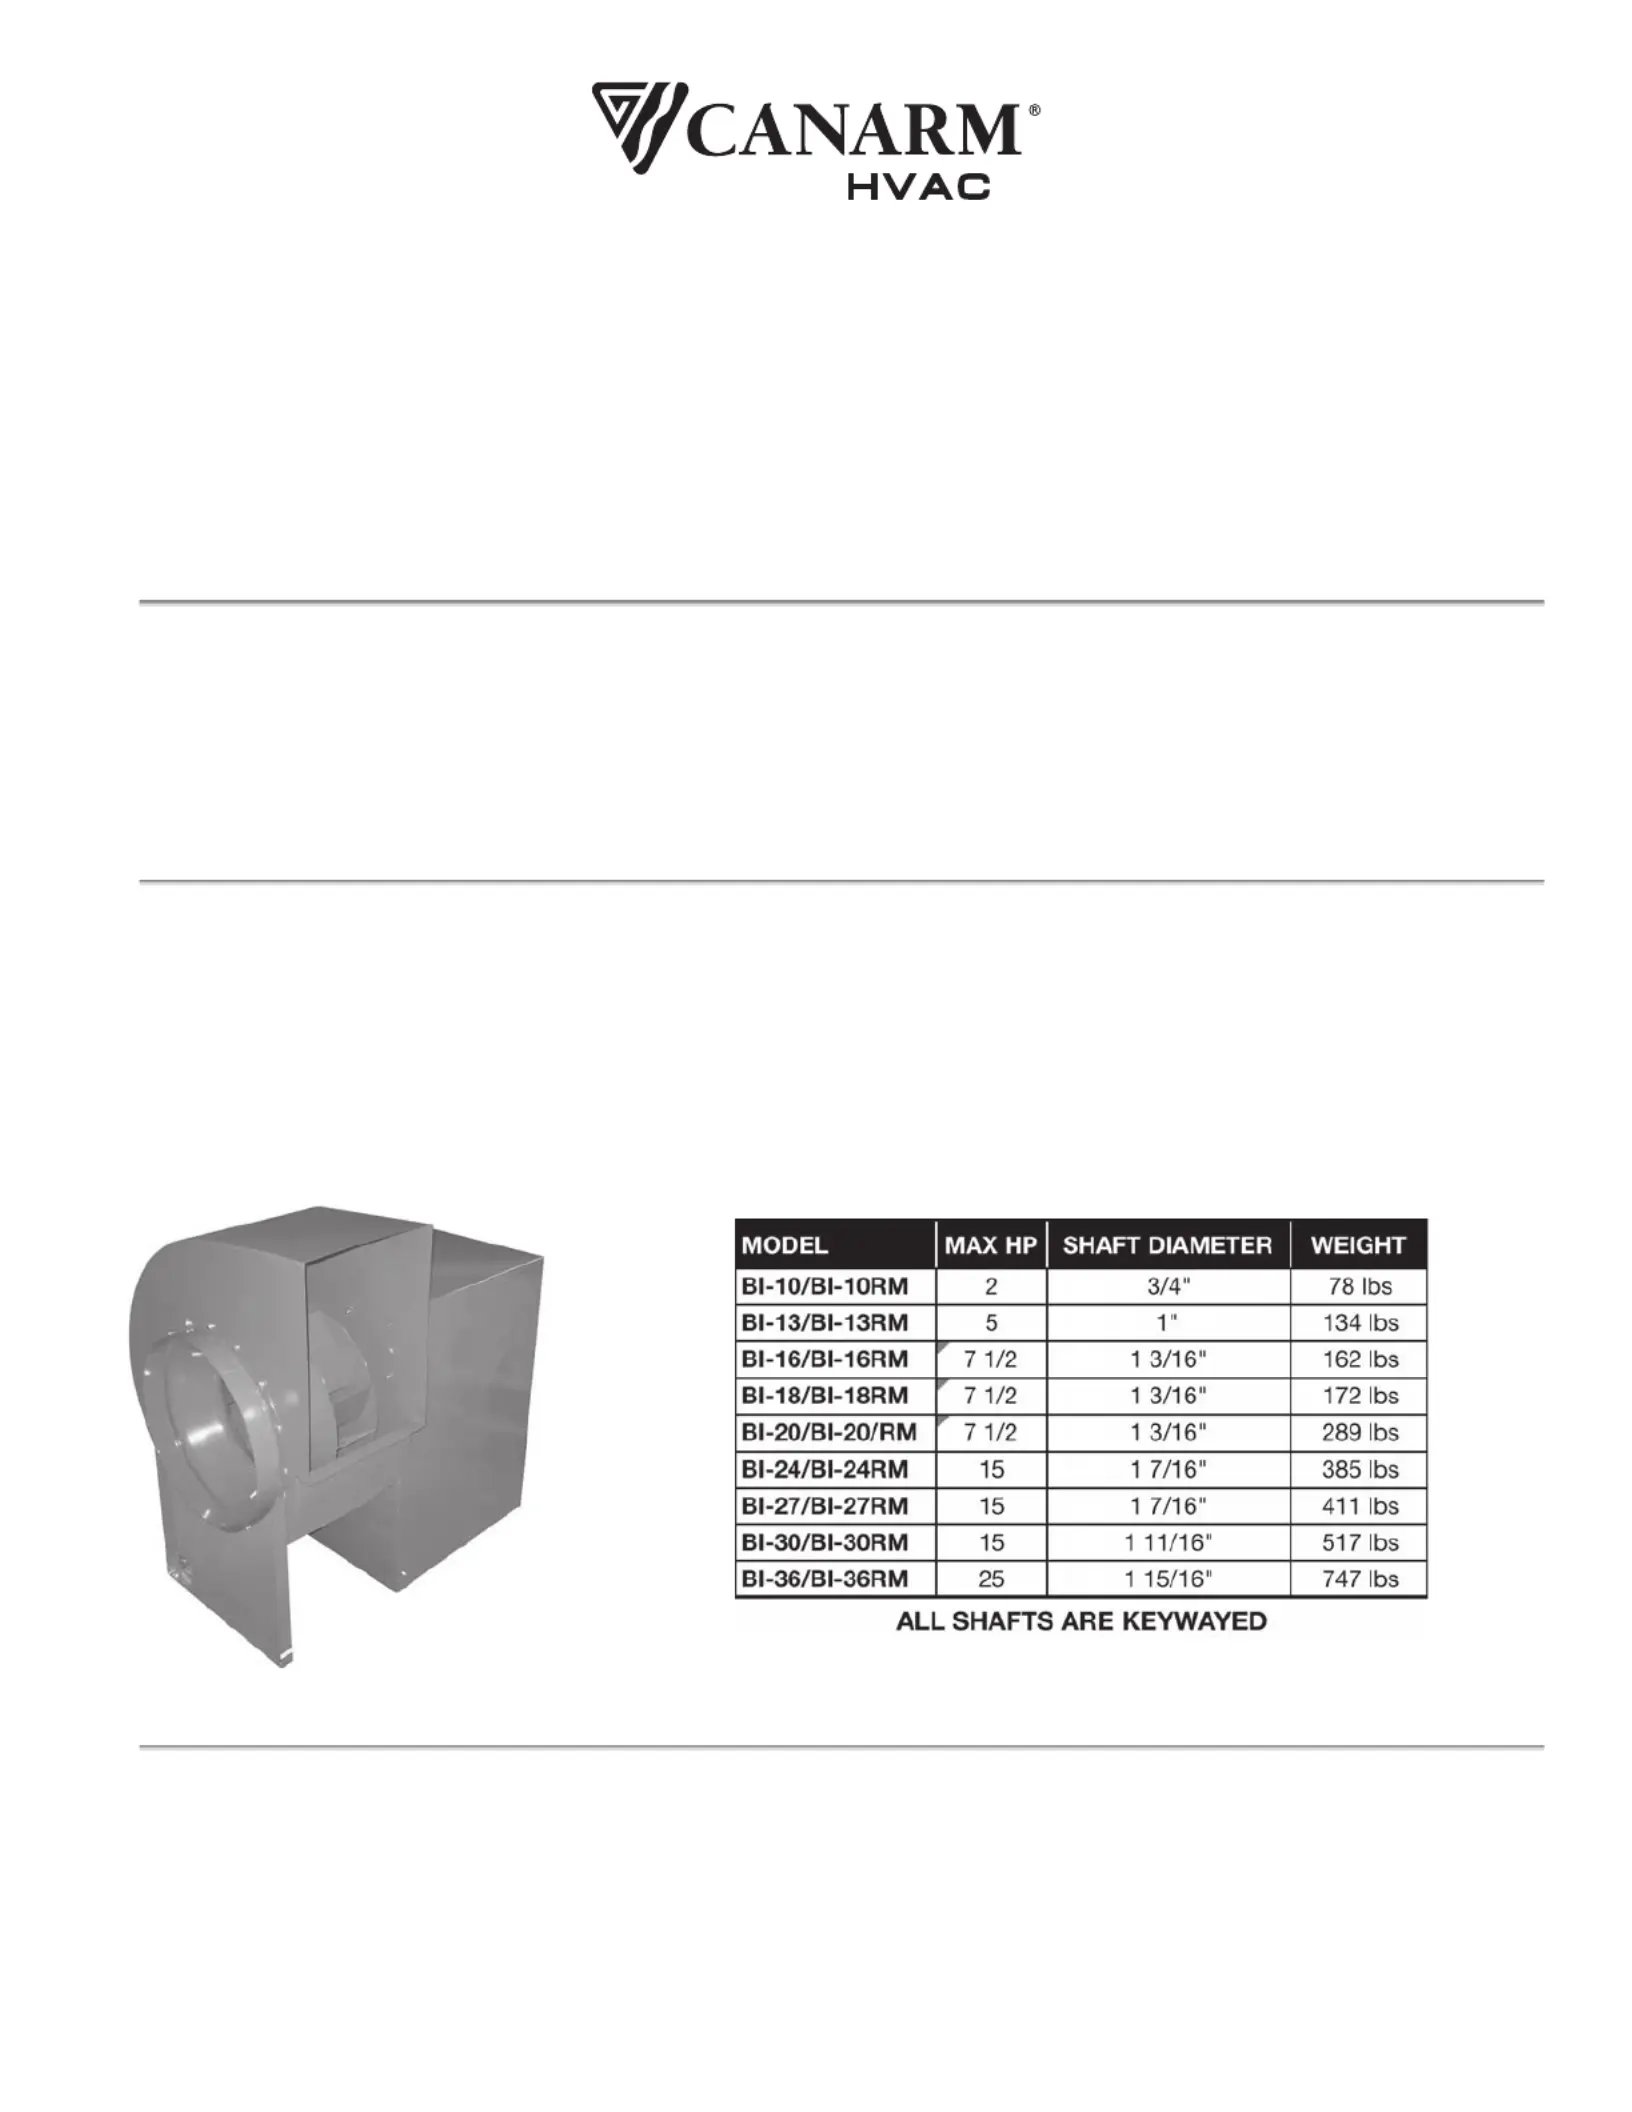
FIGURE 1

BI_BIRM_UserGuide Page 2 of 4
IN TALLATIS ON
1. Secure the exhauster to the curb cap or sleepers (supplied by others) through the 3/4” diameter holes provided in the
base of the motor compartment and leg. For proper motor compartment ventilation, if the unit is mounted on a floor or
solid surface, provide a minimum 1” clearance to the motor cabinet bottom. Install spring isolators or duct isolators
where required.
2. Complete all subsequent duct connections.
3. Rotate the blower wheel by hand. It should not rub against the housing inlet. If rubbing occurs, loosen the setscrews
on the wheel hub and shift the wheel to obtain clearance. Re tighten all set- -screws.
4. Insert the four motor nuts and bolts up through the bottom of the sliding motor platform to match the bolting
configuration of the motor to be installed. The master hole for smaller motor frames is located at the top left hand
corner of the motor platform furthest from the blower housing. The master hole for 213T, 215T and 254T frame
motors is 2” inset from the fore mentioned master hole for smaller frame motors.
5. Mount the blower sheave on the blower shaft and tighten its set screw securely on the key of the shaft. (See Table 1 -
for drive data).
6. Mount the motor sheave on the motor shaft. Leave some clearance between the pulley and the motor end bell.
Tighten the set-screws on the key of the motor shaft.
7. With the motor platform in its highest position install the V belt within the sheave grooves. Ad ust the sheave on the j
blower shaft to ensure proper pulley alignment (see figure 2) and secure in place. A straight edge across the face of
the driven pulley should be parallel to the belt once proper alignment has been achieved.
WAR I GN N :
Excessive belt tension is the most frequent
cause of bearing wear and resulting noise.
Proper belt tension is critical for quiet, efficient
operation.
8. Loosen the four clamping bolts around the motor platform and slide the motor platform within the slotted rails to
adjust belt tension. Ideal belt tension is the lowest tension at which the belt will not slip during start up. As rule of
thumb suggests that 3/4” of deflection mid span under medium finger pressure (2 3 lbs.) for every foot of span is -
approximately proper belt tension. Tighten the motor platform clamping bolts once proper belt tension has been
achieved.
ELECTRICAL
WAR I GN N : Ensure power supply is disconnected and locked out prior to making electrical connections.
Before connecting the motor to the electrical supply, check the electrical characteristics and wiring instructions as
indicated on the motor nameplate or as shown below. Complete electrical connections as indicated.
WAR I GN N : A ground wire must be connected from the motor housing to a suitable electrical ground.
O OPERATI N
1. After electrical connections are completed, energize the unit momentarily and ensure that the rotation of the wheel is
correct. Apply full power.
2. With the air systems in full operation and all ducts and access panels attached, measure current input to the motor
and ensure that it is less than the rated full load motor amperage.
3. Proper ad ustment to the belt tension is critical for quiet efficient operation. j
F UIG RE 2 – PULLEY ALIGNM NT E

BI_BIRM_UserGuide Page 3 of 4
T B A LE 1: D SRIVE ELECTION
B 7 ased on 1 25 RPM Motor
Produktspezifikationen
Marke: | Canarm |
Kategorie: | Dunstabzugshaube |
Modell: | BI-12RM |
Brauchst du Hilfe?
Wenn Sie Hilfe mit Canarm BI-12RM benötigen, stellen Sie unten eine Frage und andere Benutzer werden Ihnen antworten
Bedienungsanleitung Dunstabzugshaube Canarm
21 August 2025
21 August 2025
21 August 2025
21 August 2025
21 August 2025
21 August 2025
21 August 2025
21 August 2025
21 August 2025
21 August 2025
Bedienungsanleitung Dunstabzugshaube
- Küppersbusch
- Parmco
- PKM
- Haier
- Blaupunkt
- Hoffman
- ElectriQ
- LG
- High One
- Helios
- Miele
- Venmar
- Viali
- Belion
- Unox
Neueste Bedienungsanleitung für -Kategorien-
21 August 2025
21 August 2025
21 August 2025
21 August 2025
21 August 2025
21 August 2025
21 August 2025
21 August 2025
21 August 2025
21 August 2025