Canarm SIG910150 Bedienungsanleitung
Canarm
Dunstabzugshaube
SIG910150
Lies die bedienungsanleitung für Canarm SIG910150 (5 Seiten) kostenlos online; sie gehört zur Kategorie Dunstabzugshaube. Dieses Handbuch wurde von 19 Personen als hilfreich bewertet und erhielt im Schnitt 4.0 Sterne aus 10 Bewertungen. Hast du eine Frage zu Canarm SIG910150 oder möchtest du andere Nutzer dieses Produkts befragen? Stelle eine Frage
Seite 1/5
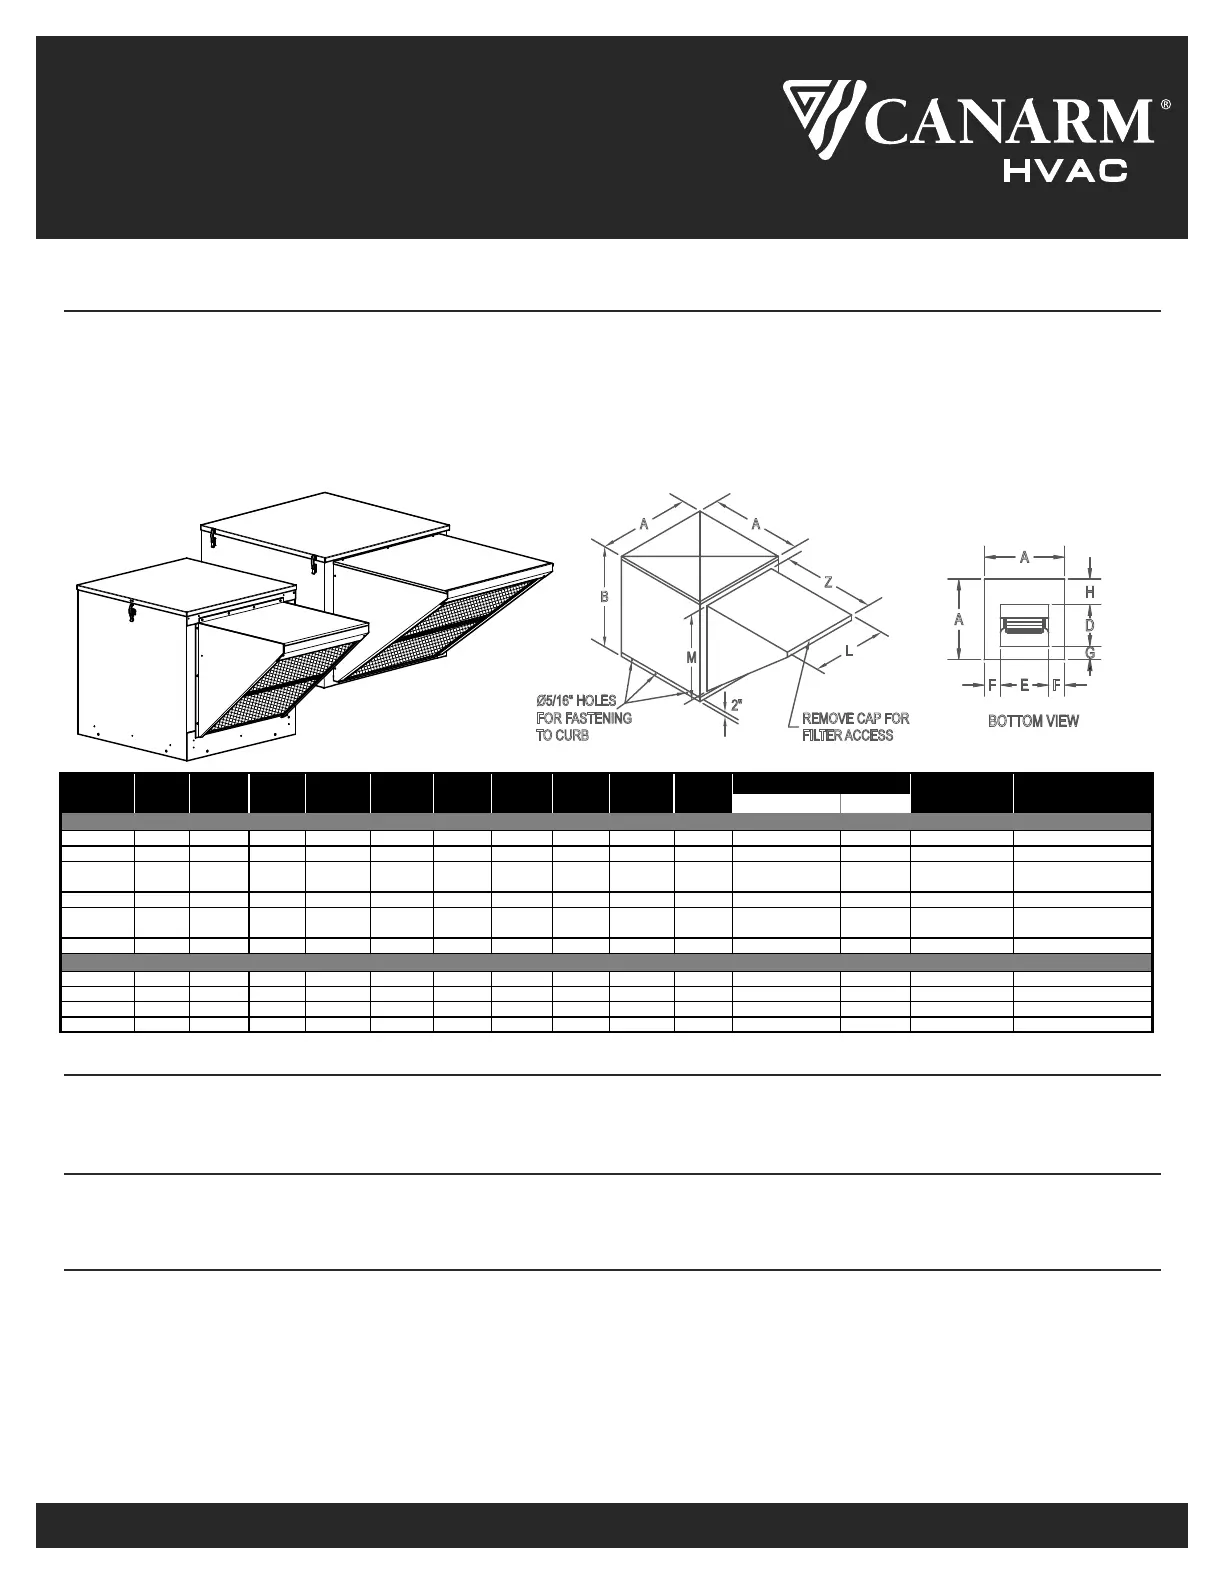
SIS/SIG SERIES
SIDE INTAKE SUPPLY UNIT /
SIDE INTAKE GALVANIZED SUPPLY UNIT
OPERATION INSTRUCTIONS AND PARTS MANUAL
SIS SERIES MODELS: SIS-9, SIS-10, SIS-12, SIS-15, SIS-18, SIS-20
SIG SERIES MODEL: SIG-9, SIG-10, SIG-12, SIG-15
GENERAL SAFETY
Rotating parts, (pulleys, shafts and belts) on fans should not be exposed. Where these components are not protected by ductwork, cabinets
or covers, appropriate guards should be employed to restrict exposure to rotating parts. Access doors should not be opened with the fan
operating to avoid foreign objects being drawn into the system. On initial start-up, a careful inspection should be carried out to ensure no
foreign material is present which could become airborne in the system.
Read installation and operation instructions carefully before attempting to install, operate or service Canarm/Delhi SIS/SIG Series Blowers.
Failure to comply with instructions could result in personal injury and/or property damage. Retain instructions for future reference.
BEFORE YOU BEGIN
Inspect unit for damage, report any shipping damage to carrier. Check all fasteners, re-tighten as required. Rotate the blower wheel by
hand to ensure free rotation. If rubbing occurs, loosen the set screw(s), re-position the wheel to the shaft center, re-tighten set screws.
INSTALLATION
Remove hood and filters from inside the cabinet. Caulk top of curb before setting unit in place. (Curb must be smaller than unit “A”
dimension). Secure unit to curb through holes located around the bottom of the unit. Tighten wheel set screw.
A
A
F
E
F
G
D
H
BOTTOM VIEW
SIZE QUANTITY
SIS-9 24 3/8" 19 3/8" 10 1/4" 11 13/16" 6 9/32" 7 1/16" 7 1/16" 19 1/4" 16 9/16" 21 1/4" 16" x 24" x 1" 1
24"x 24" 70
SIS-10 28 3/8" 21 3/8" 11 3/8" 13 1/8" 7 5/8" 8 1/2" 8 1/2" 20 1/2" 18 9/16" 25 3/4" 15" x 20" x 1" 2
28"x 28" 87
SIS-12 32 3/8" 24 5/8" 13 7/16" 15 5/8" 8 3/8" 9 15/32" 9 15/32" 25 3/8" 21 9/16" 30 3/4"
20" x 25" x 1" &
16" x 25" x 1"
1 & 1 32"x 32" 117
SIS-15 36 3/8" 28 3/8" 15 7/8" 18 5/8" 8 7/8" 8" 12 1/2" 31 3/16" 25 13/16" 33 1/2" 20" x 28 1/2" x 1" 2
36"x 36" 175
SIS-18 36 3/8" 42 1/2" 18 7/8" 21 7/8" 7 1/4" 6 1/4" 11 1/4" 35 5/8" 32 11/16" 40 1/4"
20" x 25" x 1" &
16" x 25" x 1"
2 & 2 36"x 36" 262
SIS-20 44 3/8" 49" 24 3/4" 24 3/4" 9 13/16" 5 3/16" 14 7/16" 38 5/8" 35 9/16" 45 1/2"** 20" x 25" x 1" 6
44"x 44" 497
SIG-9 22" 24" 10 1/4" 11 7/8" 5" 3 7/8" 7 7/8" 16" 18 1/8" 19 7/8" 16" x 25" x 1" 1 21 7/8" x 21 7/8" TBA
SIG-10 22" 24" 11 7/8" 13 1/4" 4 7/16" 3 1/4" 6 7/8" 16" 18 1/8" 19 7/8" 16" x 25" x 1" 1 21 7/8" x 21 7/8" TBA
SIG-12 32" 32" 13 3/4" 15 7/8" 8 1/16" 4 1/4" 14" 25" 24 5/8" 25"
16" x 25" x 1" 2
31 7/8" x 31 7/8" TBA
SIG-15 32" 32" 16 1/8" 18 7/8" 6 9/16" 3" 12 7/8" 25" 24 5/8" 25" 16" x 25" x 1" 2 31 7/8" x 31 7/8" TBA
* Curb size to be smaller than inside cabinet to allow for flashing and roofing.
** Includes filter section
*INSIDE
CABINET
UNIT WEIGHT (LBS)
(without motors & drives)
SIG MODELS
SIS MODELS
GHLMZ
FILTERS
MODEL A B D E F
SIS_SIG-M-07_20_16 Page 1 of 5
AA
B
Z
L
REMOVE CAP FOR
FILTER ACCESS
2"
Ø5/16" HOLES
FOR FASTENING
TO CURB
M
MOTOR, PULLEYS & BELTS (See Table next page)
1. Mount the blower pulley on the blower shaft and tighten the set screw securely on the key of the shaft.
2. Mount the motor pulley on the motor shaft. Leave some clearance between the pulley and the motor end bell. Tighten the set screws
on the key of the motor shaft.
3. Install the motor on the motor platform using the hardware provided.
4. With the platform in its minimum position, install the V-belt within the pulley grooves. Position the motor on the motor platform to
ensure proper pulley alignment (see Figure 1) and secure to the motor platform. (A straight edge across the face of the driven pulley
should be parallel to the belt once proper alignment has been achieved).
Note: Adjustments in the variable speed pulley require pulley re-alignment.
SIS SERIES
SIG SERIES
Produktspezifikationen
| Marke: | Canarm |
| Kategorie: | Dunstabzugshaube |
| Modell: | SIG910150 |
Brauchst du Hilfe?
Wenn Sie Hilfe mit Canarm SIG910150 benötigen, stellen Sie unten eine Frage und andere Benutzer werden Ihnen antworten
Bedienungsanleitung Dunstabzugshaube Canarm

10 Januar 2026
10 Januar 2026
9 Januar 2026
9 Januar 2026
8 Januar 2026
6 Januar 2026
5 Januar 2026
5 Januar 2026
5 Januar 2026
4 Januar 2026
Bedienungsanleitung Dunstabzugshaube
- Euromaid
- Sedona
- Halifax
- Cookology
- Unox
- Lynx
- SIBIR
- Profilo
- Saivod
- Sauber
- Helios
- Mepamsa
- Zanussi
- ARC
- Hoffman
Neueste Bedienungsanleitung für -Kategorien-
21 Januar 2026
21 Januar 2026
21 Januar 2026
21 Januar 2026
21 Januar 2026
20 Januar 2026
20 Januar 2026
20 Januar 2026
20 Januar 2026
19 Januar 2026