Dometic SinePower Accessory MCR9 Bedienungsanleitung
Lies die bedienungsanleitung für Dometic SinePower Accessory MCR9 (2 Seiten) kostenlos online; sie gehört zur Kategorie Ladegerät. Dieses Handbuch wurde von 14 Personen als hilfreich bewertet und erhielt im Schnitt 4.5 Sterne aus 2 Bewertungen. Hast du eine Frage zu Dometic SinePower Accessory MCR9 oder möchtest du andere Nutzer dieses Produkts befragen? Stelle eine Frage
Seite 1/2
Europe
Dometic Austria GmbH
Neudorferstrasse 108
2353 Guntramsdorf
℡+43 2236 908070
+43 2236 90807060
Mail: info@waeco.at
Dometic Switzerland AG
Riedackerstrasse 7a
CH-8153 Rümlang (Zürich)
℡+41 44 8187171
+41 44 8187191
Mail: info@waeco.ch
Dometic Denmark A/S
Tværvej 2
DK-6640 Lunderskov
℡+45 75585966
+45 75586307
Mail: info@waeco.dk
WAECO Ibérica S.A.
Camí del Mig, 106
Poligono Industrial Les Corts
E-08349 Cabrera de Mar
(Barcelona)
℡+34 93 7502277
+34 93 7500552
Mail: info@waeco.es
WAECO Distribution SARL
ZA du Pré de la Dame Jeanne
F-60128 Plailly
℡+33 3 44633500
+33 3 44633518
Mail: info@waeco.fr
Dometic Finland OY
Mestarintie 4
FIN-01730 Vantaa
℡+358 20 7413220
+358 9 7593700
Mail: waeco@waeco.fi
WAECO Italcold SRL
Via dell’Industria, 4/0
I-40012 Calderara di Reno (BO)
℡+39 051 4148411
+39 051 4148412
Mail: sales@waeco.it
Dometic Norway AS
Leif Weldingsvei 16
N-3208 Sandefjord
℡+47 33428450
+47 33428459
Mail: firmapost@waeco.no
Dometic Benelux B.V.
Ecustraat 3
NL-4879 NP Etten-Leur
℡+31 76 5029000
+31 76 5029090
Mail: info@dometic.nl
Dometic Scandinavia AB
Gustaf Melins gata 7
S-42131 Västra Frölunda
(Göteborg)
℡+46 31 7341100
+46 31 7341101
Mail: info@waeco.se
WAECO UK Ltd.
Dorset DT2 8LY · Unit G1
Roman Hill Business Park
UK-Broadmayne
℡+44 1305 854000
+44 1305 854288
Mail: sales@waeco.co.uk
A
CH
DK
E
F
FIN
I
N
NL
S
UK
Overseas + Middle East
WAECO Pacific Pty. Ltd.
1 John Duncan Court
Varsity Lakes QLD 4227
℡+61 7 55076000
+61 7 55076001
Mail: sales@waeco.com.au
WAECO Impex Ltd.
Suites 3210-12 · 32/F · Tower 2
The Gateway · 25 Canton Road,
Tsim Sha Tsui, Kowloon
Hong Kong
℡+852 24632750
+852 24639067
Mail: info@waeco.com.hk
WAECO Impex Ltd.
Taipei Office
2 FL-3 · No. 56 Tunhua South Rd, Sec 2
Taipei 106, Taiwan
℡+886 2 27014090
+886 2 27060119
Mail: marketing@waeco.com.tw
WAECO Middle East FZCO
R/A 8, SD 6
Jebel Ali, Dubai
℡+971 4 8833858
+971 4 8833868
Mail: waeco@emirates.net.ae
AUS
HK
ROC
UAE
Dometic WAECO International GmbH
Hollefeldstraße 63 · D-48282 Emsdetten
℡ +49 (0) 2572 879-195 · +49 (0) 2572 879-322
Mail: info@waeco.de · Internet: www.waeco.de
D
www.waeco.com
Notice d’utilisation
La télécommande MCR-9 convient pour la mise en marche / à l’arrêt des onduleurs suivants,
via le «Remote PortII» (voir également la notice d’utilisation de l’onduleur) :
•PP1000, PP2000
•MSP160, MSP350, MSP700, MSP1000, MSP1500, MSP2000, MSP2500
•SP700, SP1000, SP1500, SP2000, SP3000
Affichages
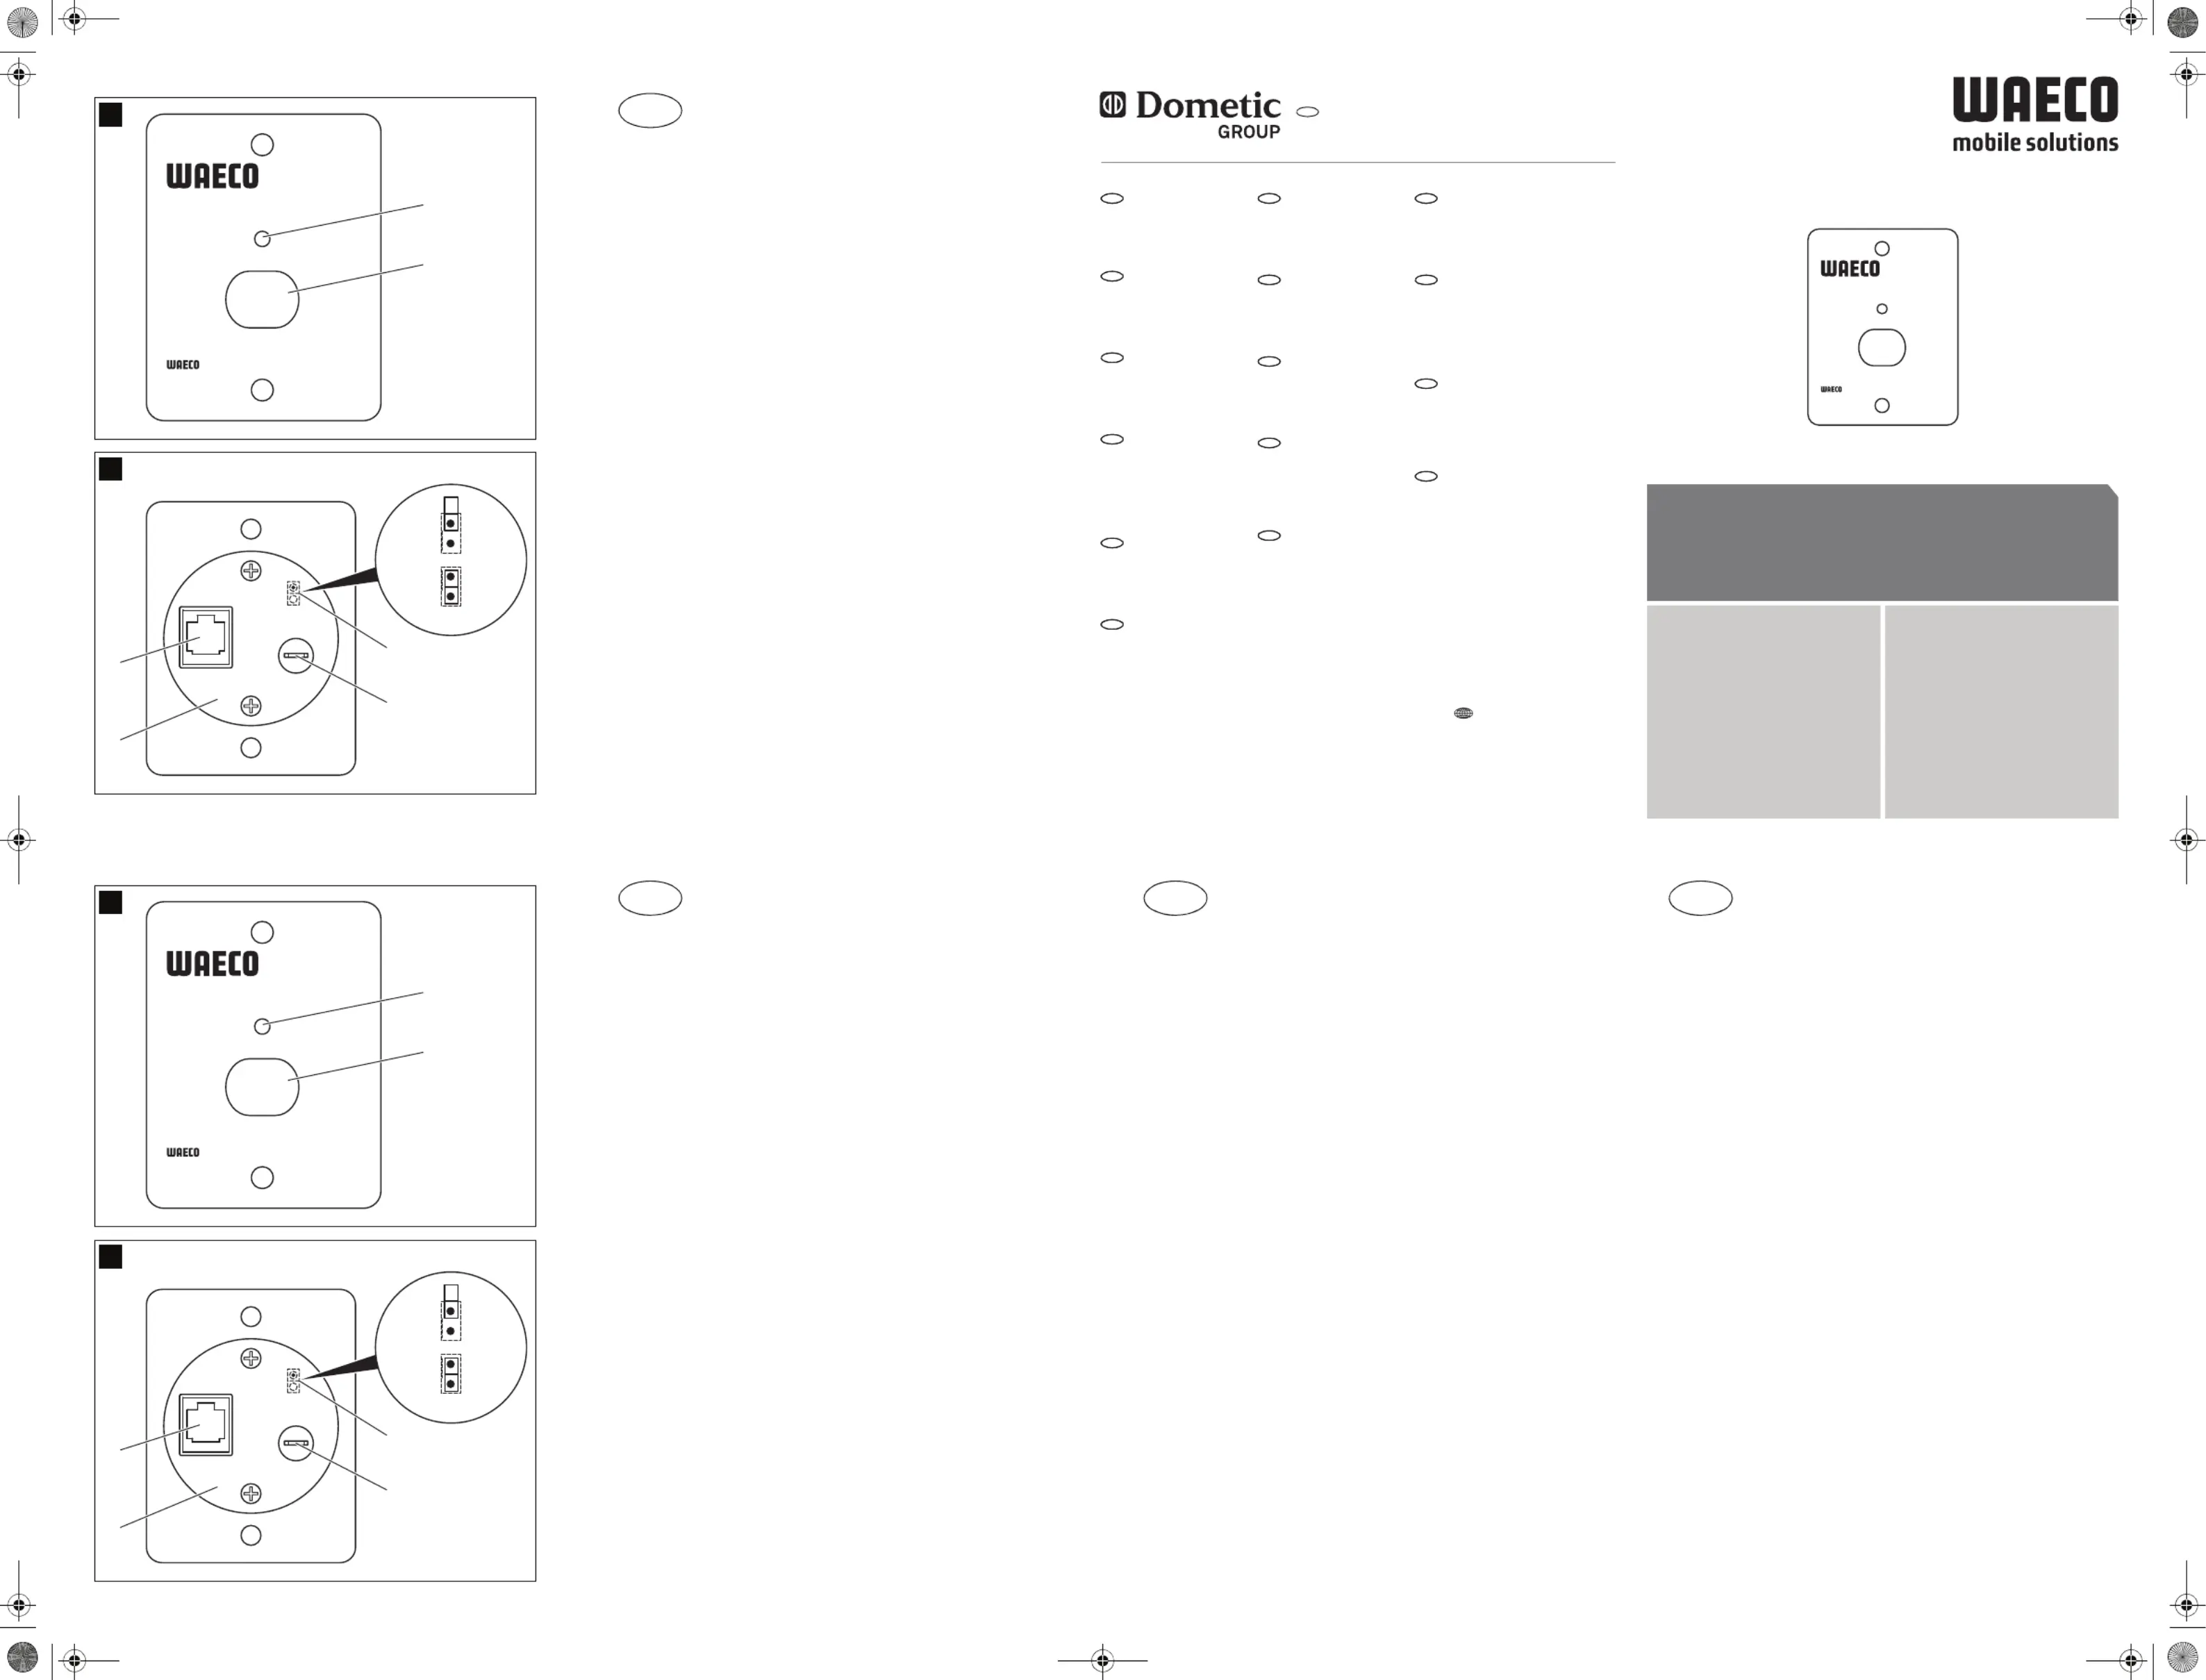
La DEL rouge (Fig. 11) sur la face avant indique les états suivants :
•Allumage continu : l’onduleur est en marche.
•Clignotement rapide :mise en marche de l’onduleur par la tension positive de la
batterie.
•Clignotement lent :mise à l’arrêt de l’onduleur par la tension positive de la batterie.
Raccordement
•Branchez une extrémité du câble RJ-11 dans la douille «To Inverter» (Fig. 22).
•Branchez l’autre extrémité du câble RJ-11 dans le «Remote PortII» de l’onduleur.
Mise en marche / à l’arrêt par un signal externe
La télécommande permet d’utiliser une option de mise en marche / à l’arrêt de l’onduleur par
un signal externe
•Desserrez les deux vis cruciformes et retirez le capuchon de protection (Fig.21).
•Au niveau du cavalier (Fig. 23), réglez le raccordement souhaité :
–cavalier ouvert (A) : mise en marche de l’onduleur par la tension positive de la
batterie
L’onduleur est mis en marche lorsqu’un signal positif est présent sur la ligne de
commande.
–cavalier fermé (B) : mise à l’arrêt de l’onduleur par la tension positive de la batterie
L’onduleur est mis à l’arrêt lorsqu’un signal positif est présent sur la ligne de comman-
de (idéal p. ex. pour les climatiseurs de toit). Lorsqu’il n’y a aucun signal, l’onduleur
fonctionne selon la fonction activée précédemment.
•Montez le capuchon de protection (Fig.21).
Attention !
La ligne de commande doit être protégée par un fusible adapté (≤1A).
•Raccordez la ligne de commande (12V ou 24V) au raccordement (Fig. 14) de la
télécommande.
Utilisation
•Mettez l’onduleur en marche ou à l’arrêt en appuyant sur la touche «Push» (Fig. 12).
Spécifications sous réserve de modifications dues aux progrès techniquex et à la
disponibilités de livraison.
F
Operating manual
The remote control MCR-9 is suitable to switch on/off the following inverters via the “Remote
PortII” (also see the operating manual for the inverter):
•PP1000, PP2000
•MSP160, MSP350, MSP700, MSP1000, MSP1500, MSP2000, MSP2500
•SP700, SP1000, SP1500, SP2000, SP3000
Displays
The red LED (fig. 11) on the front panel displays the following conditions:
•Constant glow: The inverter is switched on.
•Quick flashing: The inverter is switched on by positive battery voltage.
•Slow flashing: The inverter is switched off by positive battery voltage.
Connect
•Insert one side of the RJ-11-cable in the socket “To inverter” (Fig. 22).
•Insert the other side of the RJ-11-cable into the “Remote PortII” of the inverter.
Switched on/off by an external signal
The remote control enables the optimal switching on/off of the inverter by an external signal:
•Loosen both Phillips screws and take off the cap (fig.21)
•Set the desired connection on the jumper (fig.23):
–Jumper open (A): The inverter is switched on by positive battery voltage
When a plus-signal is present on the control cable, the inverter is switched on.
–Jumpers are connected (B): The inverter is switched off by positive battery voltage
When a plus-signal is present on the control cable, the inverter is switched off (suitable
e.g. for roof air conditioners). If no signal is received, then the inverter works in the
previously activated function.
•Mount the cap (fig.21).
Caution!
The control cable has to be secured by a suitable fuse (≤1A).
•Connect the control cable (12V or 24V) at the (Abb. 14) remote control connection
Operation
•With the “Push” button (fig. 12) switch the inverter on or off.
Versions, technical modifications and delivery options reserved.
GB
Bedienungsanleitung
Die Fernbedienung MCR-9 eignet sich zum Ein-/Ausschalten folgender Wechselrichter über
den „Remote PortII“ (siehe auch die Bedienungsanleitung des Wechselrichters):
•PP1000, PP2000
•MSP160, MSP350, MSP700, MSP1000, MSP1500, MSP2000, MSP2500
•SP700, SP1000, SP1500, SP2000, SP3000
Anzeigen
Die rote LED (Abb. 11) auf der Vorderseite zeigt folgende Zustände an:
•Dauerlicht: Der Wechselrichter ist eingeschaltet.
•Schnelles Blinken: Wechselrichter-Einschaltung durch Plus-Batteriespannung.
•Langsames Blinken: Wechselrichter-Ausschaltung durch Plus-Batteriespannung.
Anschließen
•Stecken Sie eine Seite des RJ-11-Kabels in die Buchse „To Inverter“ (Abb. 22).
•Stecken Sie die andere Seite des RJ-11-Kabels in den „Remote PortII“ des Wechsel-
richters.
Über ein externes Signal ein-/ausschalten
Die Fernbedienung ermöglicht das optionale Ein-/Ausschalten des Wechselrichters über ein
externes Signal:
•Lösen Sie die beiden Kreuzschlitzschrauben und nehmen Sie die Schutzkappe
(Abb.21) ab.
•Stellen Sie am Jumper (Abb. 23) den gewünschten Anschluss ein:
–Jumper offen (A): Wechselrichter-Einschaltung durch Plus-Batteriespannung
Der Wechselrichter wird durch ein Plus-Signal an der Steuerleitung eingeschaltet und
bleibt eingeschaltet, solange das Plus-Signal anliegt.
–Jumper geschlossen (B): Wechselrichter-Ausschaltung durch Plus-Batterie-
spannung
Der Wechselrichter wird ausgeschaltet, wenn an der Steuerleitung ein Plus-Signal an-
liegt (geeignet z.B. für Dachklimaanlagen). Wenn kein Signal anliegt, arbeitet der
Wechselrichter in der vorher aktivierten Funktion.
•Montieren Sie die Schutzkappe (Abb.21).
Achtung!
Die Steuerleitung muss durch eine geeignete Sicherung (≤1A) abgesichert sein.
•Schließen Sie die Steuerleitung (12V oder 24V) am Anschluss (Abb. 14) der Fern-
bedienung an.
Bedienen
•Schalten Sie den Wechselrichter mit dem Taster „Push“ (Abb. 12) ein oder aus.
Ausführungen, dem technischen Fortschritt dienende Änderungen und Liefermöglichkeiten
vorbehalten.
D
Käyttöohje
Kaukosäädin MCR-9 sopii seuraavien vaihtosuuntaajien käynnistykseen/sammuttamiseen
”Remote Portin” kautta (katso myös vaihtosuuntaajan käyttöohje):
•PP1000, PP2000
•MSP160, MSP350, MSP700, MSP1000, MSP1500, MSP2000, MSP2500
•SP700, SP1000, SP1500, SP2000, SP3000
Näytöt
Punainen LED (kuva 11) etupuolella osoittaa seuraavia tiloja:
•Jatkuva valo: Vaihtosuuntaaja on kytketty päälle.
•Nopea vilkku:Vaihtosuuntaajan päällekytkentä plus-akkujännitteen kautta.
•Hidas vilkku: Vaihtosuuntaajan poiskytkentä plus-akkujännitteen kautta.
Liittäminen
•Työnnä RJ-11-johdon toinen puoli liittimeen ”To Inverter” (kuva 22).
•Työnnä RJ-11-johdon toinen puoli vaihtosuuntaajan ”Remote PortII” -liittimeen.
Käynnistys/sammutus ulkoisella signaalilla
Kaukosäädin mahdollistaa vaihtosuuntaajan optionaalisen päälle-/poiskytkennän ulkoisella
signaalilla:
•Avaa molemmat ristipääruuvit ja ota suojus (kuva21) pois.
•Aseta jumpperi (kuva 23) haluamaasi liitäntään:
–Jumpperi auki (A): Vaihtosuuntaajan päällekytkentä plus-akkujännitteellä
Vaihtosuuntaaja kytketään päälle, kun ohjausjohdossa on plussignaali.
–Jumpperi kiinni (): Vaihtosuuntaajan Bpoiskytkentä plus-akkujännitteellä
Vaihtosuuntaaja kytketään pois, kun ohjausjohdossa on plussignaali
(sopiiesim.kattoilmastointilaitteille). Jos signaalia ei ole, toimii vaihtosuuntaaja aikai-
semmin aktivoidulla toiminnolla.
•Asenna suojus (kuva21).
Huomio!
Ohjausjohto tulee olla suojattu sopivalla sulakkeella (≤1A).
•Liitä ohjausjohto (12V tai 24V) kaukosäätimen (kuva 14) liitäntään.
Käyttö
•Kytke vaihtosuuntaaja päälle tai pois näppäimellä ”Push” (kuva 12).
Oikeus mallimuutoksiin, teknistä kehitystä vastaaviin muutoksiin ja toimitusmahdollisuuksiin
pidätetään.
FIN
Push
On / Off
Inverter Remote
SinePower Accessory
1
2
1
A
B
3
4
1
2
2
Push
On / Off
Inverter Remote
SinePower Accessory
1
2
1
A
B
3
4
1
2
2
SinePower Accessory
MCR-9
DEFernbedienung
Bedienungsanleitung
ENRemote control
Operating Manual
FRTélécommande
Notice d’utilisation
ESControl remoto
Instrucciones d’uso
ITComando a distanza
Istruzioni per l’uso
NLAfstandsbediening
Gebruiksaanwijzing
DAFjernbetjening
Betjeningsvejledning
SVFjärrkontroll
Bruksanvisning
NOFjernkontroll
Bruksanvisning
FIKaukosäädin
Käyttöohje
3.03.20.0162601/2008
Push
On / Off
Inverter Remote
SinePower Accessory
faltblatt_10s_MCR-9.fm Seite 1 Dienstag, 8. Januar 2008 10:04 10
Produktspezifikationen
| Marke: | Dometic |
| Kategorie: | Ladegerät |
| Modell: | SinePower Accessory MCR9 |
Brauchst du Hilfe?
Wenn Sie Hilfe mit Dometic SinePower Accessory MCR9 benötigen, stellen Sie unten eine Frage und andere Benutzer werden Ihnen antworten
Bedienungsanleitung Ladegerät Dometic

1 Dezember 2025
1 Dezember 2025
10 August 2025
10 August 2025
10 August 2025
10 August 2025
10 August 2025
10 August 2025
10 August 2025
9 August 2025
Bedienungsanleitung Ladegerät
Neueste Bedienungsanleitung für -Kategorien-
28 März 2026
24 März 2026
22 März 2026
21 März 2026
21 März 2026
17 März 2026
15 März 2026
14 März 2026