DoorBird D1812 Bedienungsanleitung
DoorBird Nicht kategorisiert D1812
Lies die bedienungsanleitung für DoorBird D1812 (2 Seiten) kostenlos online; sie gehört zur Kategorie Nicht kategorisiert. Dieses Handbuch wurde von 8 Personen als hilfreich bewertet und erhielt im Schnitt 4.4 Sterne aus 8 Bewertungen. Hast du eine Frage zu DoorBird D1812 oder möchtest du andere Nutzer dieses Produkts befragen? Stelle eine Frage
Seite 1/2
Part of ASSA ABLOYErrors and omissions excepted. | Last update 09/2024 - Copyright © ASSA ABLOY – www.doorbird.com
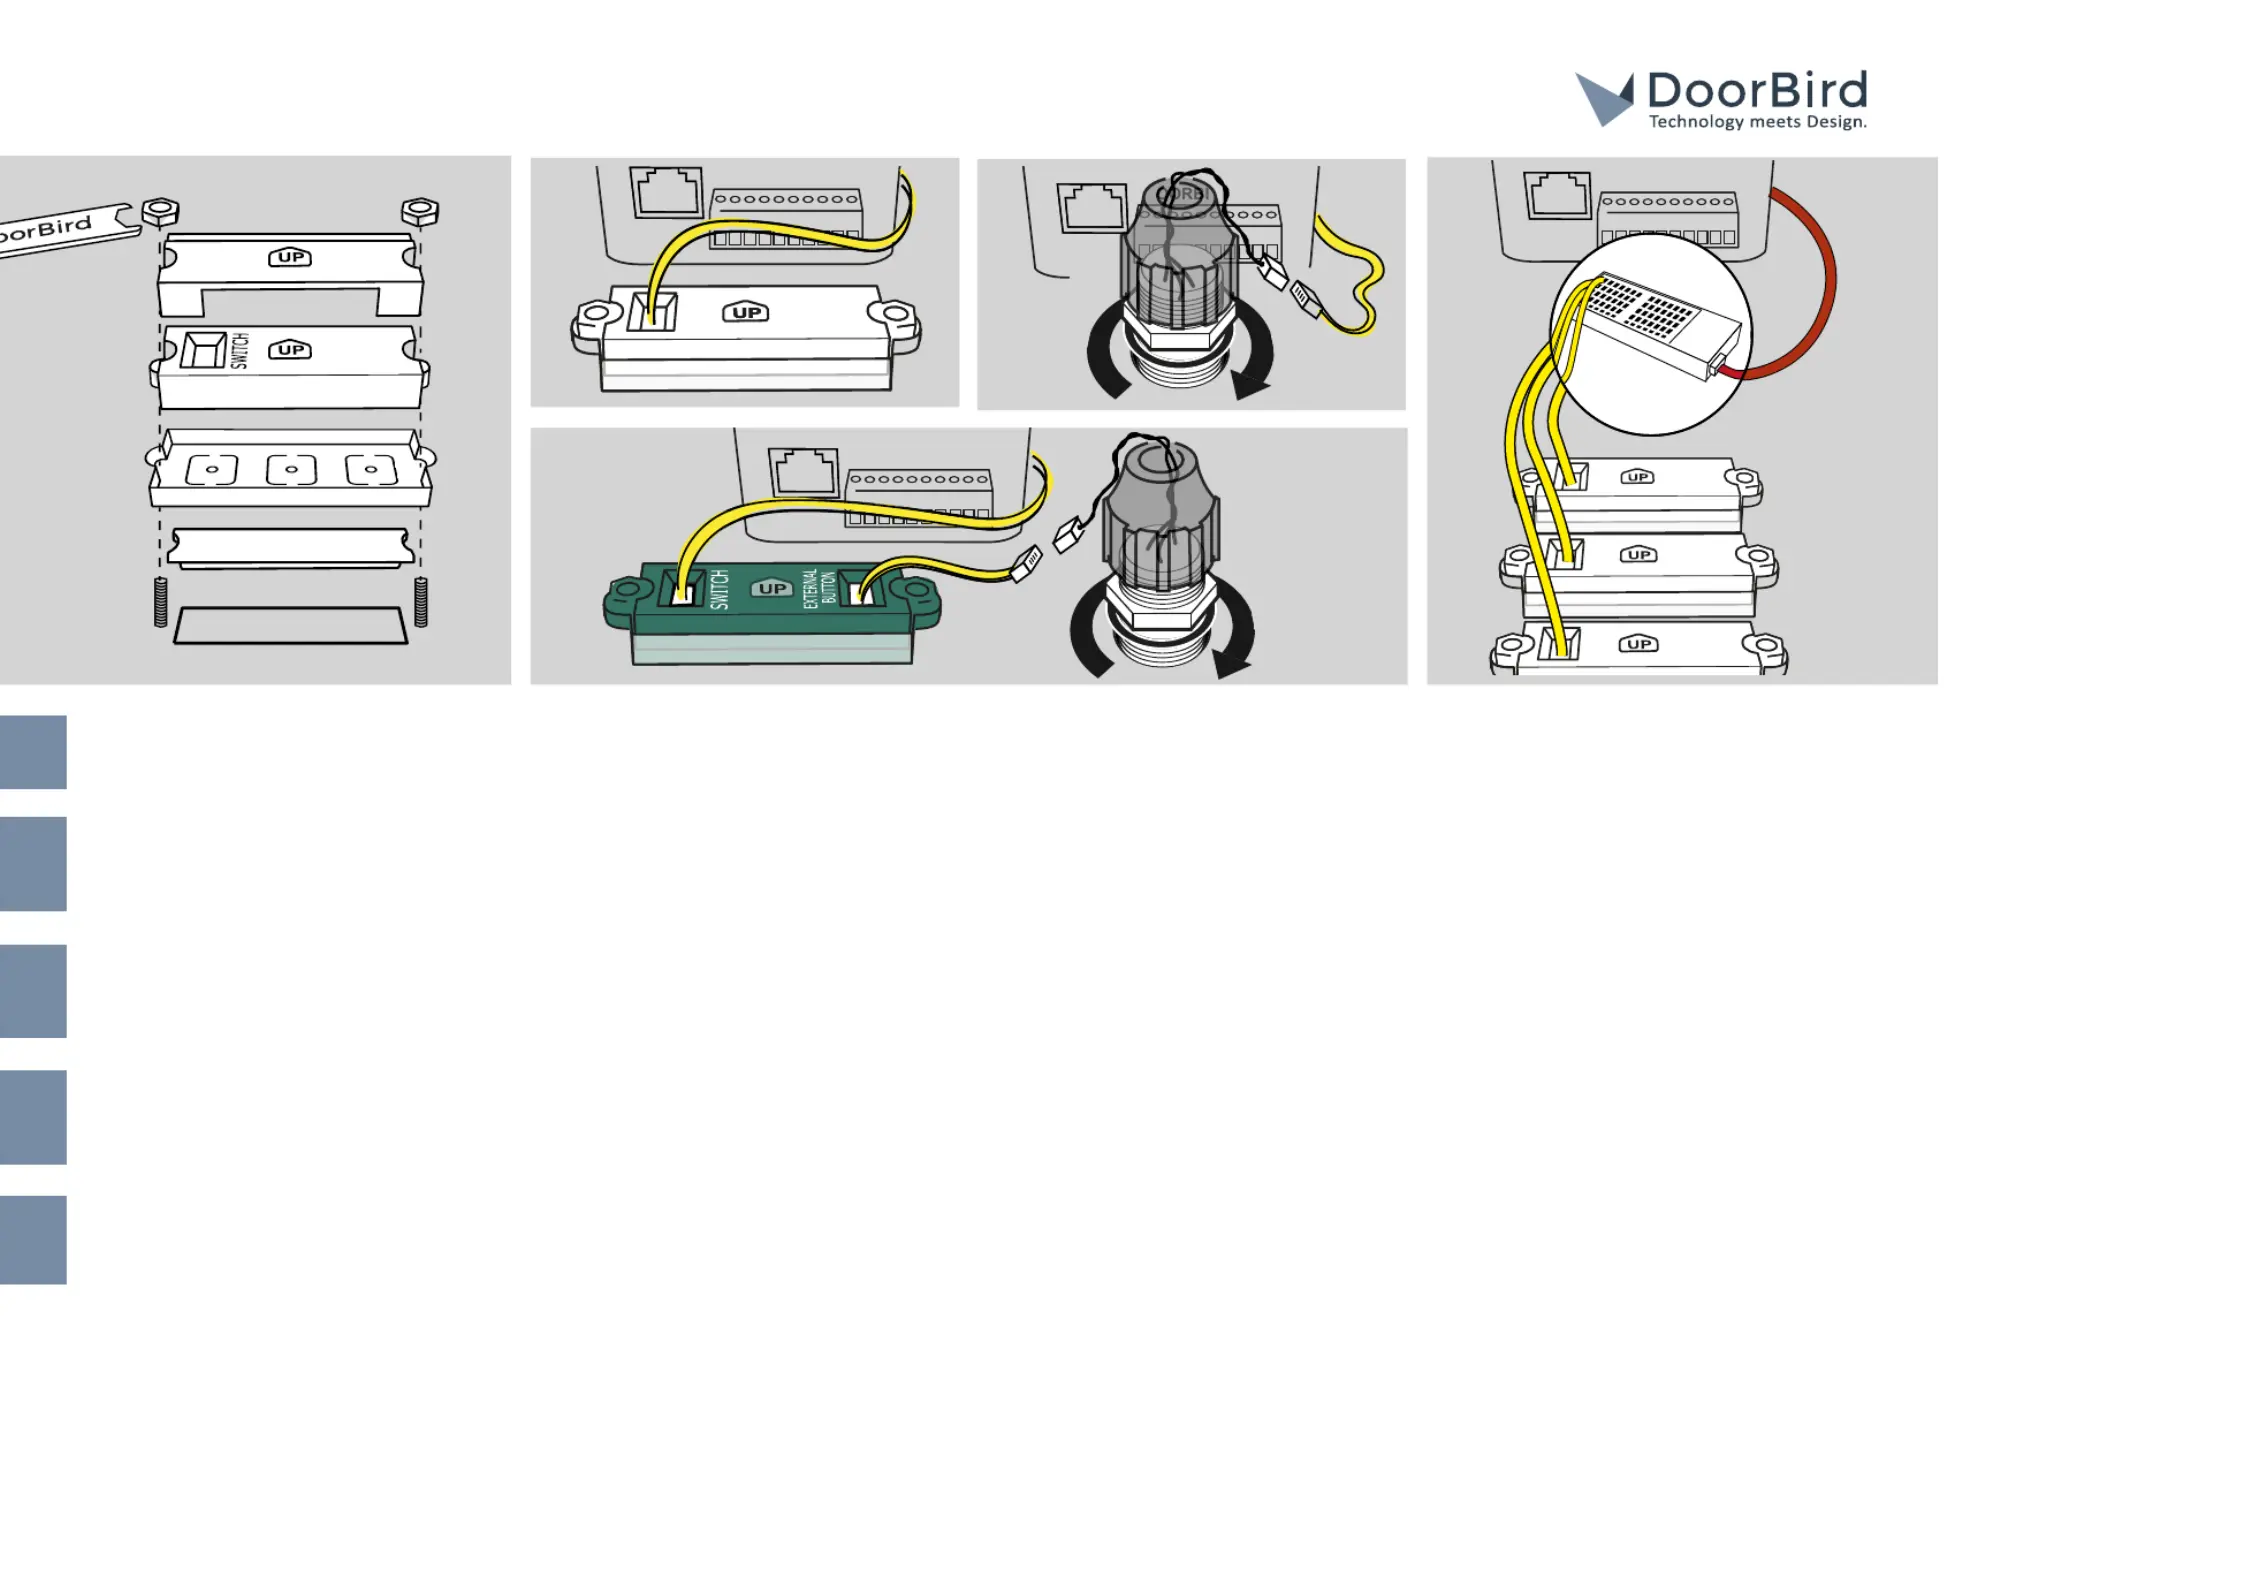
DX CALL BUTTONS INSTALLATION
D21X RUFTASTEN INSTALLATION
Use the yellow cable of the door station to connect a
single call button.
Verwenden Sie das gelbe Kabel der Türstation, um
eine einzelne Ruftaste zu verbinden.
Utilisez le câble jaune de l’interphone pour connecter
un seul bouton d’appel.
Utilice el cable amarillo del videoportero para
conectar un solo botón de llamada.
Make sure that the call button module is pointing
upward according to the “UP” mark and is encased
by the silicone seal.
Stellen Sie sicher, dass das
Ruftastenmodul ent sprechend der Markierung „UP“
nach oben orientiert und von der Silikondichtung
ummantelt ist.
Assurez-vous que le module de boutons d’appel est
orienté vers le haut selon le marquage „UP“ et qu’il
est enveloppé par le joint en silicone.
Asegúrese de que el módulo de botones de llamada
está orientado hacia arriba siguiendo la marca „UP“
y está recubierto por la junta de silicona.
EN
DE
FR
ES
DOORBIRD D21xDOORBIRD D21x
DRD D21x
DOORBIRD D21xDOORBIRD D21x
DOORBIRD D21xDOORBIRD D21x
For door stations with several call buttons, the
individual call buttons are connected to the ports of
the Multi-Tenant Module using the yellow cable.
Bei Türstationen mit mehreren Ruftasten werden die
einzelnen Ruftasten über das gelbe Kabel mit den
Ports des Mehrteilnehmer-Moduls verbunden.
Sur les interphones vidéo dotés de plusieurs boutons
d’appel, les différents boutons d’appel sont reliés
aux ports du module multi-utilisateurs par le câble
jaune.
En los videoporteros con varios botones de llamada,
los distintos botones de llamada se conectan a los
puertos del módulo multiusuario a través del cable
amarillo.
For call buttons with a separate nameplate, the
round call button is also connected to the nameplate
module. Make sure that the sealing rubber is seated
between the front panel and the nut.
Bei Ruftasten mit abgesetztem Namensschild
wird zusätzlich der runde Ruftaster mit dem
Namensschildmodul verbunden. Stellen Sie sicher,
dass der Dichtungsgummi zwischen Frontblende
und Mutter sitzt.
Pour les boutons d’appel disposant d’une plaque
nominative séparée, le bouton d’appel rond est
également connecté au module de l’étiquette.
Assurez-vous que le joint d’étanchéité est bien placé
entre la face avant et l’écrou.
En el caso de los botones de llamada con placa
de identificación separada, el botón de llamada
redondo también se conecta al módulo de la placa
de identificación. Asegúrese de que la junta de goma
está asentada entre la placal frontal y la tuerca.
Utilizzare il cavo giallo del citofono per collegare un
singolo pulsante di chiamata.
Accertarsi che l’unità del pulsante di chiamata sia
rivolta verso l’alto come da dicitura “UP” e che sia
provvista di guarnizione in silicone.
Nel caso dei citofoni con più pulsanti di chiamata,
i singoli pulsanti vanno collegati alle prese del
modulo condominiale tramite il cavo giallo.
Nel caso dei pulsanti di chiamata con targhetta
del nome in rilievo, il pulsante di chiamata rotondo
va inoltre collegato all’unità della targhetta stessa.
Accertarsi che la guarnizione sia posizionata tra il
pannello frontale e il dado.
IT
Produktspezifikationen
| Marke: | DoorBird |
| Kategorie: | Nicht kategorisiert |
| Modell: | D1812 |
Brauchst du Hilfe?
Wenn Sie Hilfe mit DoorBird D1812 benötigen, stellen Sie unten eine Frage und andere Benutzer werden Ihnen antworten
Bedienungsanleitung Nicht kategorisiert DoorBird

1 September 2025
13 August 2025
19 Juli 2025
19 Juli 2025
19 Juli 2025
19 Juli 2025
19 Juli 2025
18 Juli 2025
18 Juli 2025
18 Juli 2025
Bedienungsanleitung Nicht kategorisiert
Neueste Bedienungsanleitung für -Kategorien-
3 April 2026
3 April 2026
3 April 2026
3 April 2026
3 April 2026
3 April 2026
3 April 2026
3 April 2026
3 April 2026
3 April 2026