Drayton Lifestyle LP522 Bedienungsanleitung
Drayton Nicht kategorisiert Lifestyle LP522
Lies die bedienungsanleitung für Drayton Lifestyle LP522 (2 Seiten) kostenlos online; sie gehört zur Kategorie Nicht kategorisiert. Dieses Handbuch wurde von 28 Personen als hilfreich bewertet und erhielt im Schnitt 4.4 Sterne aus 2 Bewertungen. Hast du eine Frage zu Drayton Lifestyle LP522 oder möchtest du andere Nutzer dieses Produkts befragen? Stelle eine Frage
Seite 1/2
Chagthengsngintimi
PresseSET?bthutoutonandy’llsee‘T’.SEPROG?
Setallkdayswee
Ftusetthetirsyoimesthataregoingtobeesameforeachth
weekday,thenucanselecteachdaydidlyandmakeyoinviual
anyfurtheradjustments.Ifyouwantehytobeteacdaqui
dere,gosiffnttraitto‘Setehdghacay’.
PresseYESttthbuon,andthedplaywillask‘TNtoIisSEMOFR
PROG?’.
PranyoessSYEdu’llsee1,estartofyONthouhetirtfirsangperi-
od.Adjustitin1-mestepsgand+tns.inutusinthe–buto
Ifthand+tonseheldde–butarown,etechesinthimang
10-minutests.ep
PressSET?,andyou’llseeOFF1,theendofyrfitaoursheting
period.jtsinthesamey,sSET?,enrepAdusthiwaprestheat
thdueprocereforON2,F2,3d.OFONanOFF3
Sethyeacda
If,aftery’vesetOFF3youwanttoe-oufintuneoneormeor
weekds,essSET?untilyoufindestdayyouttoayprthfirwan
aust–thengothrdjougthduheoprcere,alteringanytimeyou
wiPreSEsh.ssT?tomoveontothextday.Whenyneou’ve
finiprshed,essSET?untilyousee‘TSATN?’.SESUPROG
Ifyoudon’twanttoalteranyialys,kpsingindivdudaeepres
SET?untyoilue‘SETSATN.seSUPROG?’
Setkendwee
PranessSYEdalter1,OFF1,ON2,,ON3dOFF3ONOFF2an
timesinesameway.th
Sethyeacda
If,aftery’vesetOFF3forthSAT&N,uttofine-ouboSUyowan
tuneSaturdayorSunday,ssSET?untilufindthefipreyorstyda
yoanuwttoadjust–thethugngorohtheocpredu,altererinangy
timeyouw.ssSET?tomoveontoentday.WnishPrethexhe
youpressSET?aftersetngyrtwerforSuntiouhoatdays,theo-pr
grammerllgocktonormaloperwibaation.
Ifyoudon’twanttoaltereitherday,keepgSET?preinss
uileommeresbacktonoalo.ntthprgragormperaonti
SAT
TH24MME12LP1hrTCELECRONIPROGRAER
LP1124h2–arpgr,withdctralheroamlinkeenatingandhot
wateronrupto3hegpfoatineriodseachy,andevyydaerda
thesame.
Ifetimthingshaven’eetbnsetry,enyfoouthourorpgrammer
wlstlbeonefay-setnililthctorstada24hrdrgr,withproam
ctralhegandhoteropenatinwaterinatgtogeththerone
samesettinfogsrevyyofthew.tit’seasytoerdaeekBu
machakengejustwests.s–follothinruionct
Wanttotimgasitis?PleaveainressSET?andmoveonto
thext.neone
Ifyoudtosetyrtimneereouingstoenrdgramthstadapro
andrt,ss’and‘+’togethertogoktostaagainpre‘SETbac
th-sepreetgrproam.
Ifyoudon’retpssanythtwinfogromtinu
es,egrammerthpro
automaticallygoenorerionsktobacmalopat.
Thesndardprramtaog
Yoursystemllcwiomeonrupto3angperdseryfohetiiove
24hrs.ON1set,OFF1isstartthfirsonefinheits,andsoon.
NoticetonthesnddramON2andF2aresetthataarprogOF
toesametime.*ismnsyrsyemts,thTheaoustwon’repond
butifyouwanttoactitetmideperiod,orchgeyvathadlanan
otrtimheinregs–ad.on
Changesngithtiming
PresseSET?bthutoutonandy’llsee‘T’.SEPROG?
PresseYESttthbuon,andy’llseeON1,esrtofyouthtaourtfirs
heatgperiod.Aindjustitin1-minestepsngthe–d+utusian
butts.Ifd+btonselddo,emeconthe–anutarhewnthtihagens
in10utesteps.-min
PressSET?,andyou’llseeOFF1,theendofyrfitaoursheting
period.jtsinthesamey,sSET?,enrepAdusthiwaprestheatthe
procedurefor2,OFF2,3andOFF3.ONON
WhesenuyoprsSET?aftersettingF3,eoammerwillOFthprgr
returntoal.normoperaonti
TH24MME41LP2hrTCELECRONIPROGRAER
LP2424h1–arpgr,withctralhegandhoterroamenatinwat
wgtlyrupto3hegdsehy,orkinindependenfoatinperioacda
andevydayee.erthsam
Ifetimthingshaven’eetbnsetry,enyfoouthourorpgrammer
wlstlbeonefay-setnililthctorstada24hrdrgr,withproam
ctralhegandhoteropenatinwaterinatgtogeththerone
sametimgsrevydayofthew.Butit’seytokeinfoereekasma
changes,andeheatganderwgdephavinwatorkininenendtly
–justwthes.folloinruionstct
Wanttotimgasitis?PleaveainressSET?andmoveonto
thext.neone
Ifyoudtosetyrtimneereouingstoenrdgramthstadapro
andrt,ss’and‘+’togethertogoktostaagainpre‘SETbac
th-sepreetgrproam.
If
youdtpon’ressangromythinfotwinutes,egrammerthpro
automaticallygoenorerionsktobacmalopat.
Thstndeaardramprog
Yoursymlleonruptstewicomfoo3heatingrisepeodve24ryhrs.
ONstartth1sefirst,OFF1fiesit,andso.Netonenishonotichaton
thstadarograONarendprm2andO2FFesettothemetersaimfo
bhalheotcentratingandhotwrate.*Tsmhieansursystemwon’tyo
respond,tifuwanttoacbuyotiatthadlvetmideperiod,orchange
anyhertiread.otmings–on
Cingthetimingshang
PresseSET?bthutoutonandy’llsee‘TG?’.SEPRO
DUAL
CHANNEL
SINGLE
CHANNEL
forheatinghotwaterOR
Technical Helpline: 0333 7000622
Email: [email protected]
Web: www.draytoncontrols.co.uk
forheatinghotwaterAND
InstallationInstructions
06490033001ISSL
DUAL
CHANNEL
SINGLE
CHANNEL
User’sInstructions
TIMESWITCHES
forheatinghotwaterOR
Technical Helpline: 0333 7000622
Email: [email protected]
Web: www.draytoncontrols.co.uk
forheatinghotwaterAND
UserInstructions
06490033001ISSL
INSTALLATNIIONSTCTRUIONS
PSETE:LEANOINSTALLATNTONLYBEIOMUS
CARRIEDOUTBYAQUALIFIELECTRICIAEDNOR
HEATINGIENGNEER.
MASURMAIKEENSINPUTSA3PSE.HAAMFU
TECNICAHLDATA
LifeesandTestylProgrammerimswconfithecsormtoeth
eialussentreqirementsoftheseDives:recti
2014/30/E U
– Electromagnetic C Directiveompatibility
2014/35/E U– Low V Directiveoltage
BEORINSALFETLATION
First,mesurethemaakinppswssulyisitcffhedo!
PROGRAONMMERLY
Theammermprogrusthtbettoseeeoftemitistocon-typsys
trlinol.ThekonthekoftheubacnitwtshaosettingsdG.–Pan
P=afullypuddcoompeanntrllsyedstem–allowing
hteainangdhotwatertobesety.seatelpar
G=avitygra-fedhotrsm–whwateysteichdoesnotallow
inependdensetinttgofhngouttwr,heatiwithhoatethoug
hoternbetda.watcaconrollelone
USINEXISTINGANGWALLLATE-P
Loosecrinscrewsentheugsontheoldgraerdpromman
uugit.Ccktts70mmaraetoerightofnplhehathere’clencth
thel,dme.Cckthecrtonewal-platean25mabovithehath
ntetoermisandifssary,cngeeexpagcompartenalnecehath
wigofthewallrin-platetoit.wugeLifestyleutosuNoplthniint
theledeneurings.wal-platantightthseccrews
Chke3Afuse,diecthanswtcinshonthema.
FITINNETGAWWALLLATE-P
Theillocationis4meflrlevel,thasonabledea1.abovoowire
lightingooaccessg,d,nocoendnsaonti,noextremesof
temperatreanu,dasuopprtingacetfullycoversthesurftha
bacnitkofeuth.
Poonh70mmclasitiwitearncrietoethght,25mmabove,dan
suiffcientroomtoseuringssundaccesthseccrewerneath.
F,hinalsatthe,eherdixwittermtopitirecttflatllusinglloawawa
pgsdNo.6x1”()wluan25mmoodscrews,oronaushmou-flnt
iningsgleuitxeUA1(BS4662)using5x14bolts.condbotypM3.
DOTFACENNGBOX.NOUSSUREAMOUTI
WIRINTIESWITCGETHMH
Makethegtwirinconnecionsas
ab.Notethattheouutovetp
cosevgntactaroltae-free,so
poredstobeputontowene
Termil1erbygmnaeithlinkinfro
TermilLoromasenafrparate
sulytha.ppwi3Aefus
WIRINPROGRAGETHMMER
Arrowednumsreetoberlat
thejuonbox.ncti
Coultbnsoilandooerhbk
fortlsofpumpdeai
ovunierrwirng.
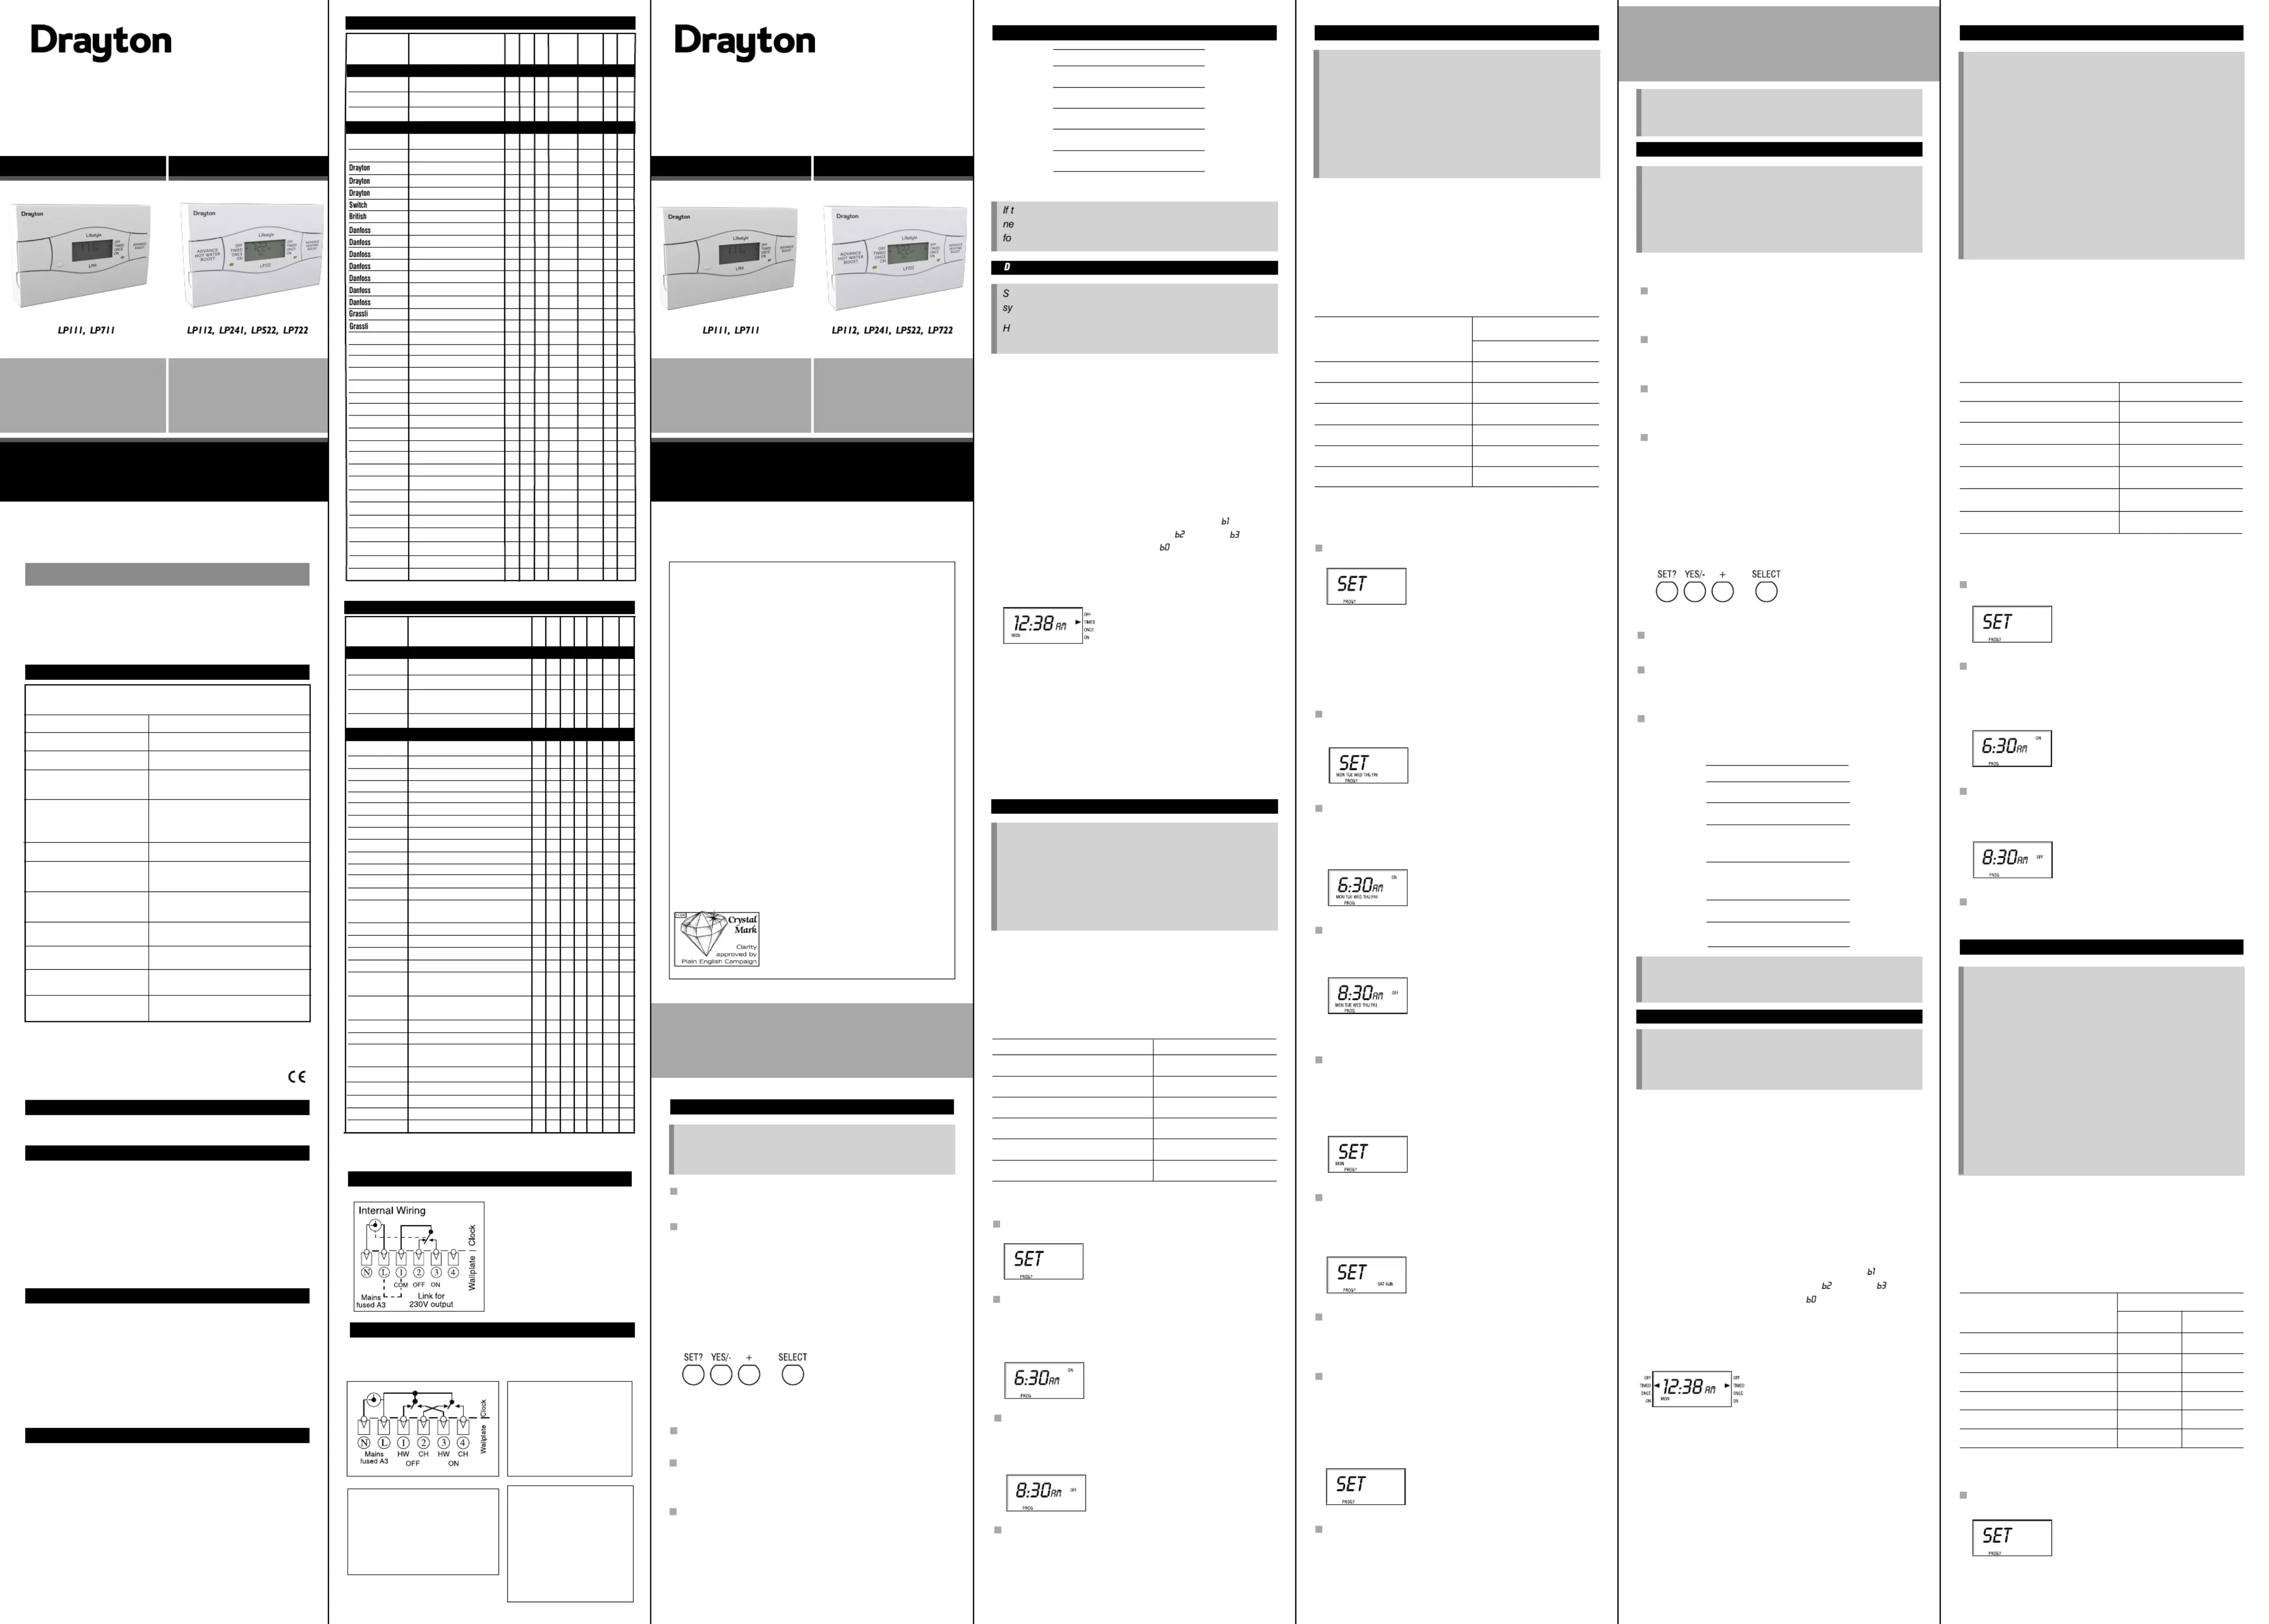
ConnectionCharts
WiringColourCodes
GReyGr
YYelwlo
BKBlkac
BLueBl
BRnBrow
RDdRe
WiteWh
OReOrang
YGYelenlow/Gre
CCoonmm
HClrHeatalfo
SsedSatifi
NNelutra
EEahrt
LveLi
*ThermostatKey
USINGDRAYTONASIMP-L-FIT,ALTHOUGH NOT
NECESSARY,INSTALLATIONWILLTHISMAKE EASIER.
SWITCHING
STAARDAMNDPROGR
CHHW
ON1–srtoftdodmmtafirstimeperi6.30a6.30a
OFF1–endoftdodmmfirstimeperi8.30a8.30a
ON2–srtofonddod*.m.mtasectimeperi1200p1200p
OFF2–endofonddod*mmsectimeperi12.00p12.00p
ON3–srtofddodmmtathirtimeperi4.30p4.30p
OFF3–flswinaitch-offofeymmthda10.30p10.30p
User’sInstructions
PROGRAMMERS
SWITCHINGSTAARDAMNDPROGR
ON1–srtoftdodmtafirstimeperi6.30a
OFF1–endoftdodmfirstimeperi8.30a
ON2–srtofonddod*mtasectimeperi12.00p
OFF2–endofonddod*msectimeperi12.00p
ON3–srtofddodmtathirtimeperi4.30p
OFF3–flswinaitch-offofeymthda10.30p
INTODUCTIOContRN...
SWITCHING
ON1–srtoftdodtafirstimeperi
OFF1–endofftdodirstimeperi
ON2–srtofonddodtasectimeperi
OFF2–endofonddodsectimeperi
ON3–srtofddodtathirtimeperi
OFF3–flswinaitch-offofeythda
INTODUCTIORN
LleTimeiteswlautomatiycifestyswchilcallonrotlyouremsyst
byitgitonandfattimeststyswchinofthauioureli.eThdght
onetofthetimethfronswtcshihowsenit’s.whon
LP12411–ahro,upthprgramo3eatinperiogds
eacdahy,dyythe.aneverdasame
LP77-daprogramallowinfo11–ay,grdifferent
timngisonhyofthewe,upto3hteacdaekeaingperiods
eacdahy.
Ifegthenineeasn’seyorhtturtimingfoyosry,ouurtiihmeswtc
wilworwitstanlkhadarprogradmthathasbntattheeese
facorty.Ifthis’tstu,it’syytocheit–doesnuiyovereasang
wnyheou’vreaedthisuintrodctorsecionsimpyt,lyturnto
theerurihmpagfoyotimeswtcodel.
Remember:
Makyoeurchsuangesingthe,,d+butt.SET?YES/-anons
Youtt1asthetgedcan’seONlastiminbeforminight,butuyo
caseOFFaftnt3erhgit’snotmethan23midnigt–providinor
hoursand59esr1.minutafteON
Youdtotthesine–.ON1,1,,neesetimingseqncuei.eOFFON2
OFFON3OFF3yoge2,,.Ifutoutofsequence,thelayldispwil
flashawa.rning
SINGLE
CHANNEL
Timeswitch
DUAL
CHANNEL
Programmer
Lifestyle
SINGLE
CHANNEL
Timeswitch
DUAL
CHANNEL
Programmer
Lifestyle
Whatiprogrammer?sa
...anexplanationforhouseholders
Programmersallowyoutoset‘On’and‘Off’timeperiods.
Somemodelsswitchthecentralheatinganddomestichot
wateronandoffatthesametime,whileothersallowthe
domestichotwaterandheatingtocomeonandgooffat
differenttimes.
Setthe‘On’and‘Off’timeperiodstosuityourownlifestyle.
Onsomeprogrammersyoumustalsosetwhetheryouwant
theheatingandhotwatertoruncontinuously,rununderthe
chosen‘On’and‘Off’heatingperiods,orbepermanentlyoff.
Thetimeontheprogrammermustbecorrect.Sometypes
havetobeadjustedinspringandautumnatthechanges
betweenGreenwichMeanTimeandBritishSummerTime.
Youmaybeabletotemporarilyadjusttheheatingpro-
gramme,forexample,‘Override’,‘Advance’or‘Boost’.These
areexplainedinthemanufacturer’sinstructions.
Theheatingwillnotworkiftheroomthermostathasswitched
theheatingoff.And,ifyouhavhot-watercylinder,theea
waterheatingwillnotworkifthecylinderthermostatdetects
thatthehotwaterhasreachedthecorrecttemperature.
eghenineerhassetyrgramandtimgouproins–youwton’
edtodoanythgse.stpthisgdeiinelJukeeuinasafeplace
fuurreferenrtece.
ometimesyoumightdtocngeeyyouuseyneehathwaour
stemtemaporrily–perduephapsetoanexctionllaycoldy.da
ere’showtodoiwitat–thouffeinctgetimgsinyrthinou
program.
AY-TO-DAYVARIATIONS
THELP11124hrELECTRONICTIMESWITCH
Sgonandoffwitchin
Over-ridinthrogrgepam
OFF=continuouslyf.of
TIMED=onrupto3ifoperoddasay.
ONCE=onfoperior1daday,mthetof1frostarON
totheendofF3.OF
ON=cinuoontusly.on
Attheeoftheythsiddisplaereare
fooperuratinodesgm:
UsSELeethECTbuttondeflanurtheptochgethee.anmod
Tstrthetisinurg,whhunhiwon’altemingyoproramicyoca
returntobyingD.selectTIME
LP111–a24hrgram,upto3hegseachy,proatinperiodda
andevydaytheme.ersa
Wanttotimgasitis?stssS?andmoveonleaveainJupreET
toext.thneone
Ifyoudtosetyrtimneereouingstotheardgramstandpro
andrta,ssET’and’togestaaginpre‘S‘+thertogobackto
thesetgram.pre-pro
Thstndeaardprogram
Yourmlleonrupto3hsystewicomfoeaintgpesevyrioder
24rsONstartfirsoneOFFfinish.1sthet,1hesit,dso.anon
Noticethat2d2ettoemeti*isONanOFFarsethsame.Th
meanyosysurstewon’respmtond,butifuttotyowanacivate
ttmhaiddlperioangottiinedorcheanyhermgs–reaond.
SWITCHINGSTAARDAMNDPROGR
ON1–srtoftdodmtafirstimeperi6.30a
OFF1–endofftdodmirstimeperi8.30a
ON2–srtofonddod*mtasectimeperi12.00p
OFF2–endofonddod*msectimeperi12.00p
ON3–srtofddodmtathirtimeperi4.30p
OFF3–flswinaitch-offofeymthda10.30p
PresstheYESbuttonanyo’lseON,dule1,thetofurstaryo
firstheainperiodtg.Adjustitinuteepsgthe–1-minstusin
antonsd+but.Ifthe–and+buttonsarehdd,theelown
timechangesinutee10-minstps.
PreSET?anyo’lss,dulseeF1,edofyrfithOFthenourseating
perodAdji.ustthisintheeway,s?,tsampresSETheneattherep
procedfoON2OFF2ONanOFurer,,3dF3.
Wnus?terg3,etisheyopresSETafsettinOFFthmewitcwihll
retnormaopurntoleration.
OnetoftheehththfrontimswitcereisanAdvance/Boostbutton.
Itsutohurmeronorf,sveofallowyoswitcyosysteeithofirrepecti
theam.Soifthehtprogreainofgisf,duwantmthnow,anyowar
yocaeitunher–
1.ssPreAdvancetohiton(ADVlbedswitcwilisplayed),anditwlil
stayonuntienlethdofthet.Orifeheanexperiodthtingison
anyodon’neeitprdutd,essaAdvncaneditlgofulewilofntith
begnninigofthetONi.nexperod
AdvncwilonloprataelyeeinDorEmes.TIMEONCod
2.sdtohonforanahour(&BSTwlPres&HolBoostswitcextril
be,thensnro()orthe()hours.displayed)Presagaifotwre
Tolst,sostagcanceBooPresBoain().Oriftheheagistin
alradoney,usinBooswilexgtltendthe
ONtimebyonetw,oor
the.rehours
Chaginngthestiming
Pressthe?bunduleET.SETttoanyo’lse‘SPROG?’
Ifegthenineerssetyhaourorpgramandtimingyous–
wtdtodoangse.stpisgdeifeonneeythinelJukeethuinasa
plertece.acfofuurreferen
INTRODUCTION
Theraree4modelsineLiferanthestylge:
LP11224hrgr–aproam,withlinkcentredalheatingandtho
wafoteronrupto3heatingperiodseachday,andydayever
thesame.
LP24124hrgr–aproam,withalheatingandcentr
hoattwerkginpendworindeentlyforupto3ahetingpesriod
ehy,andevacdaerydayesame.th
L2P52–a-dayprograma5/2llwinogfordintffere
tingsattheks,thcentimweeendwirahealtingandhotwarte
wkoriningdependentlyforupto3heatingperiodseachday.
LP7227-dayo–aprgramallgfordierentowinff
timingsoneachdayofeweek,withtralathcenhetingdan
hoattwerkginpendworindeentlyforupto3ahetingpesriod
ehy.acda
Iftheengineerhasn’tsetyourtimingsforyou,yourprogrammer
willworkwithastandardprogramthathasbeensetatthe
factory.Iftsdohiesn’titu,it’sveryeytoceit–suyoashang
wheneryou’veathdisintroductyseiorcton,simplygotoeth
siontttainsurrammermecthaconyoprogodel.
R:emember
Llepgraswifestyrommerillautomatcaswillyitchyrcouentral
hegandhotwateronandfattimeststy.atinofthauiou
Ddepeningonyourem,ctralhesystenatingandhoternwatca
eitherbothcomeonandfateetime,orwkofthsamor
indepenendtly.edtonetofepgrerThrelighthfronthroamm
shwhacowsemeheisonon
MayokeurchangesgeSET?,YEusinthS/an-,d+tonsonbut
the programmer, found under the bottom flap.
Youcan’tset1asthelastmingbeig,tyouONtieformidnhtbu
cansetF3aftermidvingit’stren23OFniproght–dinomotha
houanrsd59minutesafrON1.te
Youndtosetemingsinse–i.e.1,OeethtiequencONFF1,2,ON
OFONF2,3,OFF3.Ifutoutofqyogeseuence,thedisplayllwi
flwarnngashai.
SWITCHING
ON1–srtoftdodtafirstimeperi
OFF1–endoftdodfirstimeperi
ON2–srtofondd-tasectimeperi
od
OFF2–endofondd-sectimeperi
od
ON3–srtofddodtathirtimeperi
OFF3–flswinaitch-offofeythda
Thegrhassetyenineeouprorgramandtimingyous–
wtdtodoangse.stpisgeinaon’neeythinelJukeethuid
safeplacertfofuurreferenece.
Sometimesyoumitdtocngeeyyouuseyghneehathwaour
ctralhegorhoterteaenatinwatmporrilpery–hapsduetoan
unusuayclloldday,oretxcepionaldendrhoter.mafowat
Hshowtodoiere’t–withctouffetaingyouprorgr.am
Switchinangondfof
OntheontoftheoertrearetwofrprgrammheAdvance/Boost
buheatterlonons–focentratingdoneforhotwater.Tyanhe
allowyoutoswihursystemttcyoeiheronoroff,pecveofirresti
thogeprram.Soifeatgortterisoff,andyouwantthheinhowa
warmthorhotwaternow,ucaneitr–yohe
1.esstostchiton(ADVllbedild),anditPrAdvancewiwispaye
willstayonuntileendofthextperthneiod.Orifeheatithng/hot
waterisonandyoudon’tndit,ssAeanditllgoeepredvancwi
offuilthebegntinningofentONiod.thexper
AdvancwiellyopereinTIMEDorCEmod.onlatONes
2.ess&Holdtoswchonforantrar(&BSTwlPrBoostitexhouil
bedispl
ay),nssagainfortwo()orree()hours.edthePreth
ToelBoost,ssBoostagain().Oriftheang/cancPrehetihot
waterisalready,usingBstllexndeONtimebyoonoowitethne,
twoorers.threhou
Over-ridingtheprogram
Oneachsideofthedilaytsphereareuroatingmos–foperde
oneupforalheating,eotherforhotwer.Youcangrocentrthat
chemodeswangitimhmediateectbygeaateeffusinthppropri
SELECTbuttThion.stalteretwon’thimingsinuroyoprgram,
whhyoucanrntobylectgTID.icretuseinME
OFF=continlyoff.uous
TIMED=onrupto3periodsaday.fo
ONCE=onfor1periodaday,omthesfrtartof1ON
toedofF3.thenOF
ON=coinlyon.ntuous
DAY-TO-DAYVARIATIONS
THE117AYELTCMTCHLP7-DECRONITIESWI
LP71da1–a7-ypgrroam,awlloinfoifferengrdt
timingsonehdayofewactheek,upto3heatineriogpds
ehday.ac
Wanttotimgasitis?stpssS?andmoveonleaveainJureET
toext.thneone
Ifyoudtosetyrtimneereouingstoenrdgramandthstadapro
staagartin,pre‘SssET’and‘+’togeertogobacktotheth
psetgr.re-proam
Theaardpamstndrogr
Yoursystemllcwiomeonrupto3angperdseryfohetiiove
24hrs.ON1set,OFF1isstartthfirsonefinheits,andsoon.
NoticetON2andOFF2aresettoesthathamtieme.*This
meansyoursystemtre,butifuwanttoawon’spondyoctivate
thatmilepeodorcheanyoddriangthertimgins–rea
d.on
SWITCHING
STAARDAMNDPROGR
MON-FRISAT-SUN
ON1–srtoftdodmmtafirstimeperi6.30a7.00a
OFF1–endoftdodmmfirstimeperi8.30a9.00a
ON2–srtofonddod*m.mtasectimeperi12.00p1200p
OFF2–endofonddod*mmsectimeperi12.00p12.00p
ON3–srtofddodmmtathirtimeperi4.30p4.00p
OFF3–flswinaitch-offofeymmthda10.30p11.00p
on the programmer, found under the bottom flap.
LP241Si,Si&SiLP522LP722PROGRAMMERS
LPLP111Si&711SiTIMESCWITHES
Voeltag
2Va30.c10.+%-10%50Hz
ProerggrammRatin
2)A230Va.eachch(1.cswit
TimeswitRatinchg
2)A230Va.(1.c
Ambienttemp
Operating:0ºto45ºC
Stor-2age:0ºCto50ºC
Wutspithomainower
Displably:ank
Time:waysptalke
Programmties:aaysrlwpreseved
Progresogramminlution
1minute
Wgirin
Fixedwingonly,tocomplywhriit
centErurrIEegatulions
MaintnaneceMustbemntainedbaiyaqufaliied
electricianorngennrheatigiee
Pollution degree
Software class
Ball pressure test
temperature
Rated impulse voltage
2
2
75ºC
2.5kV
DraytonTempus6,7NL1234
Drayton LifestyleLP112,LP241,LP522,LP722NL1234
SwitchmasterNL431400,600
(noconnectiontoterminal4on600)
Switchmaster805, 900, 900iNL4231
ACLMP(Towerchron)21
ACLFP(Towerchron)21811610
Tempus3,4,6(oldmodels), ,7
DanfossRandall
C,CP7,15,7158P1515FPFP(Mk1
)ENL1234
DanfossRandall3020P,3060E7642
DanfossRandall4033(link1-6)E765342
DanfossRandall102,102E,102E5,102E7(link6-3)E5612
DanfossRandall701(linkL-5and5-6)ENL31
DanfossRandall702(linkL-5and5-6)ENL4231
DanfossRandall922,972(linkL-2and2-5)ENL1436
DanfossRandallENL3614SET2,SET2E,SET3E,SET3M,FP975
SET5(linkL-2and2-5)
GrasslinTowerchronDP72,QE2NL1234
HoneywellST699/799(linkL-5and5-8)NL7463
HoneywellST6200,ST6300,ST6400,ST6450NL1234
HoneywellST7100(linkL-3and3-6)NL7485
HorstmannENL3614525,527,425Diadem,H21,H27,
H121,Tiara(linkL-2and2-5)
LandiStaefa*s&NL1234RWB2,RWB2E,20,40,102,200,
252&270,RWB9
MysonMicrotimer(linkL-5and5-8)NL7463
PottertonMysonNL1234AllEP2000’s,EP3000’s,EP6000’s
(linkL-5andN-N)
PottertonMyson*MiniMinderNL1234
SunvicSelect207, SunPro 2000NL1234
SunvicSP50,SP100(linkL-3)NL1425
DraytonTempus1,2(newmodels)NL1234
Drayton Lifestyle
LP111,LP711, LP111Si, LP711Si
NL1234
Switchmaster300NL41
ACLTC(Towerchron)2147
Tempus1,2(oldmodels)NL1234
master980NL41
RandallTS15,75(Mk18)ENL1425/6
RandallTS715, TS715SiNL1423
RandallTS975ENL5461,2,3
RandallSET1,SET1EENL546
RandallSET4ENL546
Randall103,103E,103E5,103E7456312
Randall911,971ENL5642
nTowerchronQE1NL24
nTowerchronT2001,T2001QENL7
HoneywellST6100A,ST6100CNL142
HoneywellST7000B
HorstmannCentaurSC1,SC7
L
Horstmann
CentaurPlus,C11,C17, C17-ZW
NL243
HorstmannEmerald423,PearlAutoNL24
Horstmann517,Coronet,H11,H17ENL34
LandiStaefas&RWB3
NL43
LandiStaefas&RWB30,RWB50,100,152,170
NL443
LandiStaefas&RWB7
PottertonMysonEP4000,4001,4002,5002NL542
SangamoM6
SmithsCentrollerMk1,Mk2NL32
SmithsCentroller30123/4
SmithsCentroller300,980NL41
SunvicSelect107, SunProl1000NL1324
SunvicSP20,SP35NL3545
VennerVenneretteNLLINELOAD
THRMILMPASIMESWITCTENACORISON
Earth
Neutral
Live
Common
On
Off
Spare
MAKEMODEL
PAERRMILPANSROGRMMTENACOMRISO
CurrtModelsen
Earth
Neutral
Live
Ch1 on
Chl2 on
Ch3 on
Ch4 on
MAKEMODEL
Dntiscoind/Couempettoirs’delsMo
E
46
3
1
SalusEP101, SP120
4
3
NL
Myson
Myson
NL1324
MEPIC
4
Mictrotimer (link L-5 and 5-8)
ENL56
E
NL
4
2
3
3
32
NL1234
GasEMT2, UT1, UT2
NL1432
Drayton
NL1234
NL1234
NL1234
SM1
miGenie Wish 1
MiTimeMT711R, MiTime RF Pack1
CurrenodtMels
Ditsconinud/Comepetitors’Models
SangamoM5 (link 1-6)
NL1
8
NL1234
SalusEP200, SP220
MysonMEP2C
NL1234
Drayton
Drayton
Drayton
British Gas
SM2
miGenie Wish 2
MiTime MT721R, MiTimeRF Pack 2 & 3
EMP2, UP1, UP2
NL1234
NL1234
NL1234
NL1234
Cansimplyberemovedfromthebackplateandreplacedwithoutanydisturbancetotheexistingwiring.
Produktspezifikationen
| Marke: | Drayton |
| Kategorie: | Nicht kategorisiert |
| Modell: | Lifestyle LP522 |
Brauchst du Hilfe?
Wenn Sie Hilfe mit Drayton Lifestyle LP522 benötigen, stellen Sie unten eine Frage und andere Benutzer werden Ihnen antworten
Bedienungsanleitung Nicht kategorisiert Drayton

1 August 2025
1 August 2025
10 Juli 2025
6 September 2024
6 September 2024
6 September 2024
6 September 2024
6 September 2024
6 September 2024
6 September 2024
Bedienungsanleitung Nicht kategorisiert
Neueste Bedienungsanleitung für -Kategorien-
3 April 2026
3 April 2026
3 April 2026
3 April 2026
3 April 2026
3 April 2026
3 April 2026
3 April 2026
3 April 2026
3 April 2026