Emerson SA1-03001 Bedienungsanleitung
Emerson Nicht kategorisiert SA1-03001
Lies die bedienungsanleitung für Emerson SA1-03001 (2 Seiten) kostenlos online; sie gehört zur Kategorie Nicht kategorisiert. Dieses Handbuch wurde von 18 Personen als hilfreich bewertet und erhielt im Schnitt 4.2 Sterne aus 7 Bewertungen. Hast du eine Frage zu Emerson SA1-03001 oder möchtest du andere Nutzer dieses Produkts befragen? Stelle eine Frage
Seite 1/2
GEIST™ SWITCHAIR
AIRFLOW MANAGEMENT DEVICE
Quick Installation Guide
VM1192/590-2232-501A 1
Models:
SA1-03001
Switch Type:
Side air intake-front (port) exhaust
3U switch or three 1U switches
CAUTION: Ensure the required
airflow for safe operation of
equipment is not compromised
when installing the Geist SwitchAir
device.
WARNING: Take precaution to
avoid interference with the switch’s
input power cords when installing
behind a live switch.
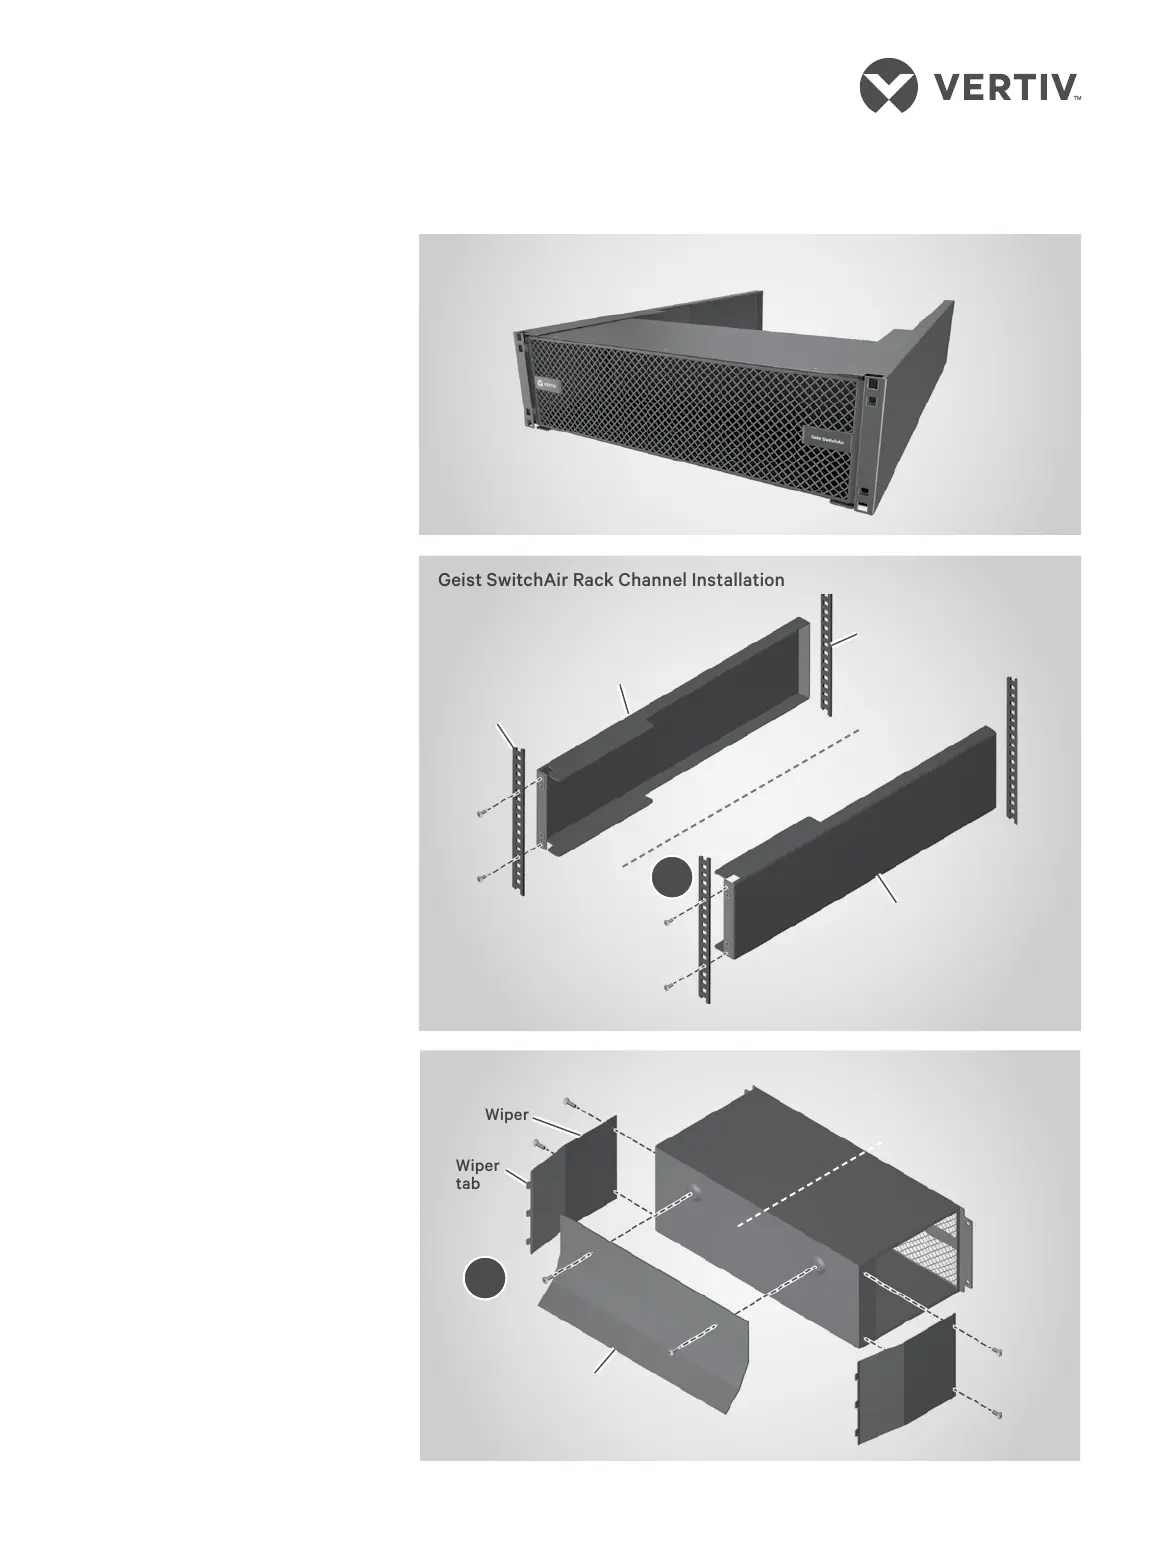
1. Installing the airflow
channels
Using customer-provided
hardware, insert the cage nuts
into the four holes on the front
of each channel.
Select a 3U space in the rack.
Position the left channel to the
inside of the left rack upright.
Orient it to face the centerline
of the rack.
Fasten the channel in place with
screws using only the top and
bottom holes of the 3U space.
Repeat the procedure for the
channel on the opposite rack
side.
2. Installing the wiper and
deflector
Attach the SwitchAir wipers on
the device using the provided
screws. Orient the wipers so
their tabs face away from the
centerline of the device.
Use the provided hardware to
attach the deflector to the back
of the SwitchAir device.
3. Installing the switch
Slide the network switch into
the rack’s 3U space at the
installed channel’s height. Using
customer-provided cage nuts
and screws, mount the switch
to the rear rack uprights.
Geist SwitchAir Rack Channel Installation
Wiper
Wiper
tab
Geist SwitchAir Wiper Installation
1
2
Rear rack
upright
Airflow
channel
Top and bottom holes
of 3U space
CENTERLINE
OF RACK
CENTERLINE
OF DEVICE
Airflow
channel
Front rack
upright
Geist SwitchAir Airflow Management Device
Deflector
Produktspezifikationen
| Marke: | Emerson |
| Kategorie: | Nicht kategorisiert |
| Modell: | SA1-03001 |
| Gewicht: | 10430 g |
| Produktfarbe: | Schwarz |
| Betriebsanleitung: | Ja |
| Rack-Einbau: | Ja |
| Nachhaltigkeitszertifikate: | RoHS |
| Rahmentyp: | Offener Rahmen |
| Kühlung: | Passiv |
| Rack-Kapazität: | 3U |
Brauchst du Hilfe?
Wenn Sie Hilfe mit Emerson SA1-03001 benötigen, stellen Sie unten eine Frage und andere Benutzer werden Ihnen antworten
Bedienungsanleitung Nicht kategorisiert Emerson

28 Oktober 2025
23 Oktober 2025
6 Oktober 2025
18 September 2025
18 September 2025
17 September 2025
17 September 2025
17 September 2025
17 September 2025
17 September 2025
Bedienungsanleitung Nicht kategorisiert
Neueste Bedienungsanleitung für -Kategorien-
3 April 2026
3 April 2026
3 April 2026
3 April 2026
3 April 2026
3 April 2026
3 April 2026
3 April 2026
3 April 2026
3 April 2026