Hunter Van Nuys 19307 Bedienungsanleitung
Hunter Beleuchtung Van Nuys 19307
Lies die bedienungsanleitung für Hunter Van Nuys 19307 (2 Seiten) kostenlos online; sie gehört zur Kategorie Beleuchtung. Dieses Handbuch wurde von 5 Personen als hilfreich bewertet und erhielt im Schnitt 4.2 Sterne aus 7 Bewertungen. Hast du eine Frage zu Hunter Van Nuys 19307 oder möchtest du andere Nutzer dieses Produkts befragen? Stelle eine Frage
Seite 1/2
INSTALLATION INSTRUCTIONS
INSTRUCCIONES DE INSTALACIÓN/ INSTRUCTIONS D’INSTALLATION
For Models:
Para los Modelos:
Pour les Modèles:
Here are the
tools you’ll
need to
complete your
installation:
Estas son las
herramientas
que usted
necesitará para
completar su
instalación:
Voici les outils
dont vous
aurez besoin
pour réaliser
l’installation:
Ladder
Escalera
Échelle
Pliers
Alicates
Pince
Wire Strippers
Pelacables
Pince à dénuder
READ AND SAVE THESE INSTRUCTIONS
These instructions are provided for your safety. It
is very important that they are read carefully and
completely before beginning installation of the
lighting xture.
LEA Y GUARDE ESTAS INSTRUCCIONES
Estas instrucciones se proporcionan para su
seguridad. Es muy importante leerlas detenid-
amente y completamente antes de comenzar la
instalación de la lámpara.
LISEZ ET CONSERVEZ CES INSTRUCTIONS
Ces instructions sont fournies pour votre sécurité.
Il est très important de les lire attentivement dans
leur intégralité avant d’entreprendre l’installation
du luminaire.
Fixture weight ±2 lbs:
Peso ±2 lb:
Poids xe ±2 lbs:
•
WARNING
• All wiring must be in accordance with national
and local electrical codes ANSI/NFPA 70. If you
are unfamiliar with wiring or in doubt, consult a
qualied electrician.
• To avoid possible electrical shock, before
installing your light xture, disconnect the power
by turning off the circuit breakers to the outlet box
associated with the wall switch location.
• The lighting xture must be grounded. If the
ground wire for the installation site is not present,
immediately STOP installation and consult a
qualied electrician.
•
• Todo el cableado debe realizarse de acuerdo con
los códigos eléctricos locales y nacionales ANSI/
NFPA 70. Si no está familiarizado con el cableado,
o si tiene duda, consulte a un electricista calicado.
• Para evitar una posible descarga eléctrica, antes
de instalar su lámpara, desconecte la energía
apagando los interruptores automáticos (breakers)
que alimentan la caja de salida asociada con la
ubicación del interruptor de pared.
ADVERTENCIA
• L’appareil d’éclairage doit être mis à la terre.
Si le l de terre du lieu d’installation n’est pas
présent, ARRÊTEZ immédiatement l’installation et
consultez un électricien qualié.
•
AVERTISSEMENT
•
Tout le câblage doit être conforme aux codes
électriques nationaux et locaux en vigueur et à la
norme ANSI/NFPA70. Si vous n'avez pas l'habitude
de faire ce câblage ou en cas de doute, adressez-
vous à un électricien qualié.
• Pour éviter tout choc électrique, avant d’installer
le luminaire, coupez le courant en éteignant les
disjoncteurs de la boîte électrique associée à
l’interrupteur mural.
•
Le luminaire doit être mis à la terre. Si le l
de terre du lieu d’installation n’est pas présent,
ARRÊTER immédiatement l’installation et
consulter un électricien qualié.
©2021 Hunter Fan Co.
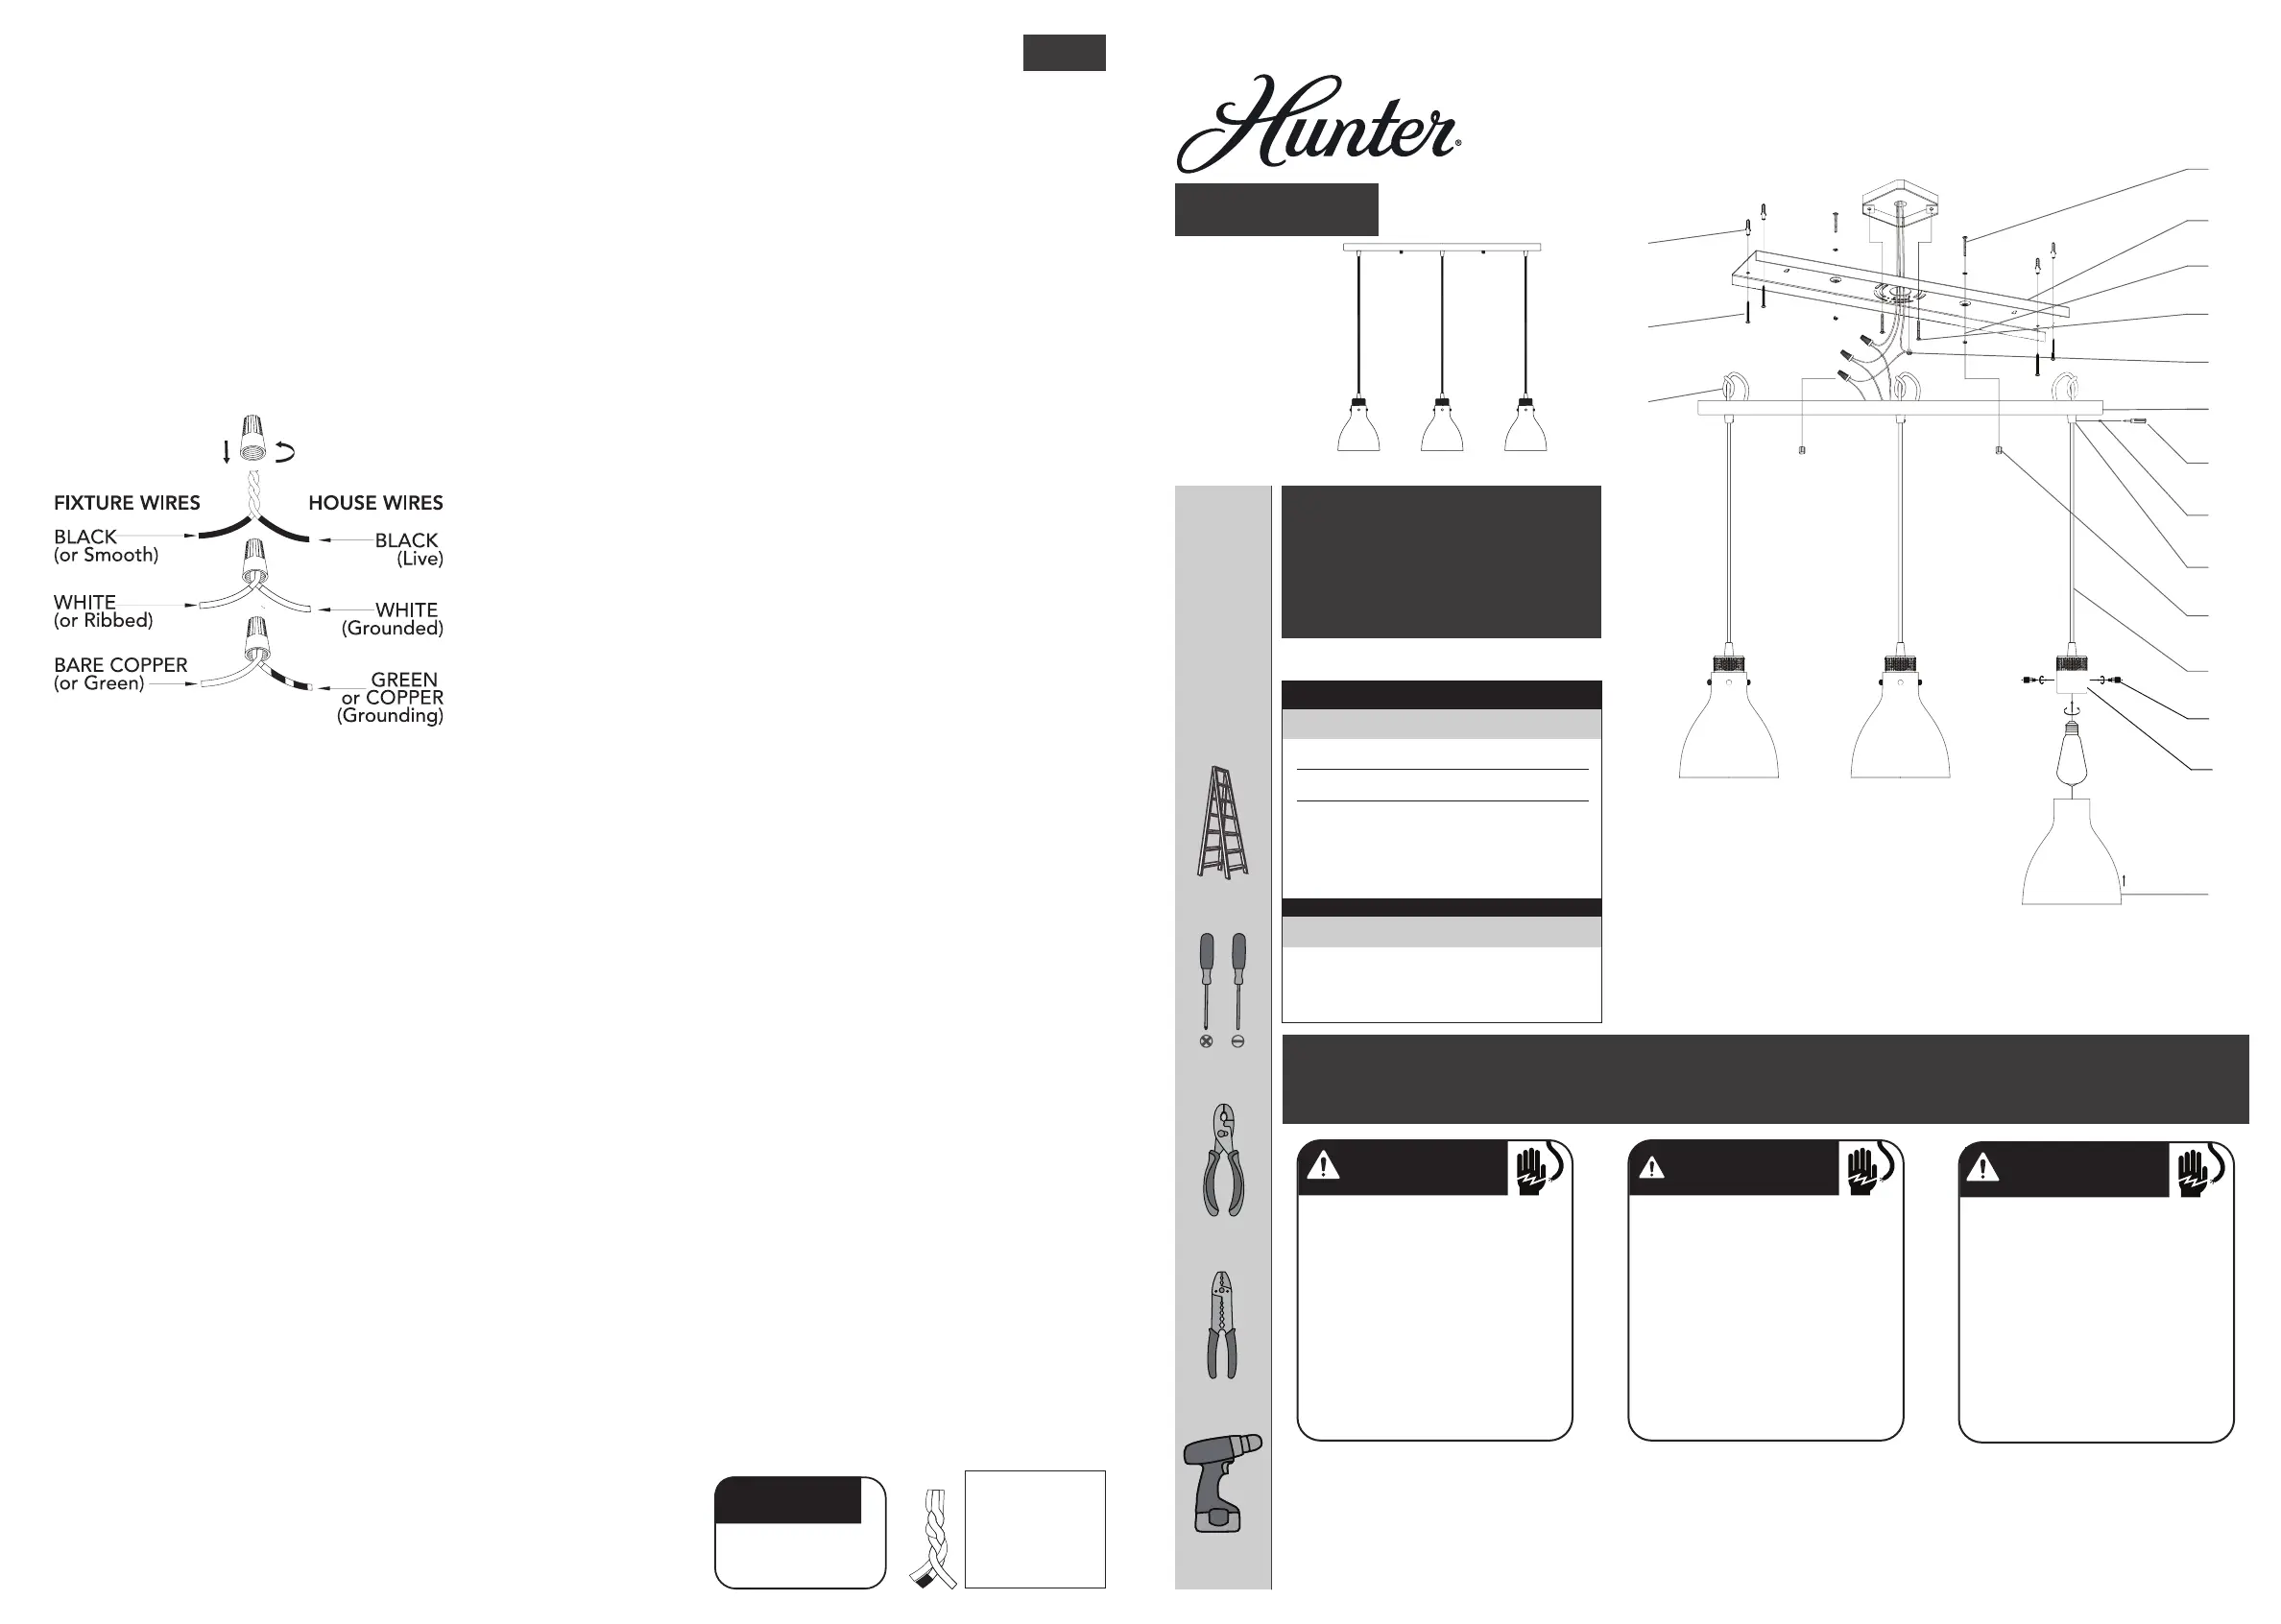
Light Cluster
Luz En Racimo
Lumière Grappe
Part #/Pieza #/Pièce #
Hardware Service Kit/Kit De Mantenimiento Del Equipo/Trousse De
Maintenance Quincaillerie
Glass/Domo De Vidrio/Verre
Part #/Pieza #/Pièce #
ENGLISH
NOTICE
Drill 9/64" pilot holes in
support structure to aid in
securing light xture.
Drill
Taladro
Foret
Finish/Finish/FiniModel/Modelo/Modèle
Type/Tipo/TypeModel/Modelo/ Modèle
Screwdriver
Destornilladore
Tournevis
Twist or tape wire ends
together to make it
easier to pass them
through the downrods.
Threaded post may also
be removed for easier
wire access.
Hunter Pro Tip:
I
J
Q
E
D
C
B
A
F
M
K
G
H
L
P
N
O
19307
19308
Van Nuys
KD80601L11
KD80601214
Alturas Gold/Alturas Gold/Or
d’Alturas
Brushed Nickel/Níquel Pulido/
Nickel Brossé
19307
19308
KD50801147
Clear Glass/Vidrio
Transparente/
Verre Transparent
19307
19308
ML087
R_052121
9.96 lbs(4.52 kg)
3
3
3
FINISHING THE INSTALLATION
CONNECTING THE WIRES
PREPARING FOR INSTALLATION
CLEANING TIPS
Treat the xture gently! Regular cleaning will reduce the need for deep cleaning. For regular cleaning, turn off the light
and wipe down the xture with a clean lint-free cotton or microber cloth. Never spray cleaner directly onto the xture.
Carefully remove all contents from the carton. Shut off the power at the circuit breaker and completely remove the old
xture from the ceiling, including the old mounting bracket. Remove the new mounting bracket assembly from the
bag. Remove cap nuts (L) from mounting screws (A). Mounting plate (B) contains several pairs of threaded holes. Find
the pair of holes that matches the spacing of the holes on the xture’s canopy. Attach two mounting screws (A) to the
mounting plate (B). Tighten nuts (C) to hold the screws in place. Put the drywall anchor (I) inside the hole in the ceiling,
then insert the drywall screw (J) through the mounting plate (B) into the drywall anchor (I). Place the mounting plate
(B) over the junction box so that mounting screws (A) and nuts (C) are visible. Pull the house wires through the center of
mounting plate (B). Secure mounting plate (B) to the junction box by tightening the screws (D).
Slide wire (M) through wire connector (K) to adjust the wire to
desirable length [screw (H) may need to be loosened rst]. Tighten
the screw (H) with the included screwdriver (G) to lock it tight. Tie a
knot in each wire (M) above the canopy for strain relief [see existing
knot (Q) for example]. Cut excess wire leaving enough length to reach
from each end to center cord to assure that the connections of each of
the 3 cords and house wiring can be made. Remove the outer jacket
of each wire (M) to expose individual wires (white, black, green). Strip
half an inch of jacket away from the ends of each individual wire. Have
a helper support the xture’s weight while completing the wiring.
Attach the xture’s wires [from all 3 cords (M)] to the power supply
wires from the junction box. Connect black to black (Live); white to white (grounded); grounding to grounding (green
or copper). Twist the ends of the wire groups together. Then twist on a wire connector. Make sure all twists are in the
same direction. Loop xture’s ground wire around grounding screw (E) and tighten. If there is no ground wire (green or
copper) from the junction box, contact a qualied electrician.
Raise canopy (F) to mounting plate (B) and mounting screws (A), so that they protrude through the openings of canopy
(F). Secure canopy (F) in place with cap nuts (L). Adjust alignment before installing glass. Secure glass (P) onto the
socket (O) with screws (N). Install light bulb (not included) in accordance with the xture’s specications. Do not exceed
the recommended wattage. Your installation is now complete. Turn on the power and test the xture.
Produktspezifikationen
| Marke: | Hunter |
| Kategorie: | Beleuchtung |
| Modell: | Van Nuys 19307 |
Brauchst du Hilfe?
Wenn Sie Hilfe mit Hunter Van Nuys 19307 benötigen, stellen Sie unten eine Frage und andere Benutzer werden Ihnen antworten
Bedienungsanleitung Beleuchtung Hunter

1 März 2026
1 März 2026
24 Februar 2026
24 Februar 2026
24 Februar 2026
24 Februar 2026
23 Februar 2026
23 Februar 2026
18 Februar 2026
17 Februar 2026
Bedienungsanleitung Beleuchtung
Neueste Bedienungsanleitung für -Kategorien-
3 April 2026
3 April 2026
3 April 2026
3 April 2026
3 April 2026
3 April 2026
3 April 2026
3 April 2026
3 April 2026
3 April 2026