Kohler Statement K-26300 Bedienungsanleitung
Kohler Nicht kategorisiert Statement K-26300
Lies die bedienungsanleitung für Kohler Statement K-26300 (96 Seiten) kostenlos online; sie gehört zur Kategorie Nicht kategorisiert. Dieses Handbuch wurde von 7 Personen als hilfreich bewertet und erhielt im Schnitt 4.9 Sterne aus 9 Bewertungen. Hast du eine Frage zu Kohler Statement K-26300 oder möchtest du andere Nutzer dieses Produkts befragen? Stelle eine Frage
Seite 1/96
1430513-2
Record your model number:
Noter le numéro de modèle :
Anote su número de modelo:
WARNING:Risk of scalding. High water temperature can cause
severe burns. Set the valve water temperature at or below 120°F (49°C).
Refer to the temperature adjustment instructions for the valve.
CAUTION:Risk of property damage. Spraying pressurized water
directly at the sprayface may cause water to leak behind the nished
wall. Do not spray pressurized water directly into the sprayface.
NOTE: The body spray can be installed vertically (shown) or horizontally.
NOTE: The steps are the same for single and multiple body spray
installations.
Follow all local plumbing and building codes.
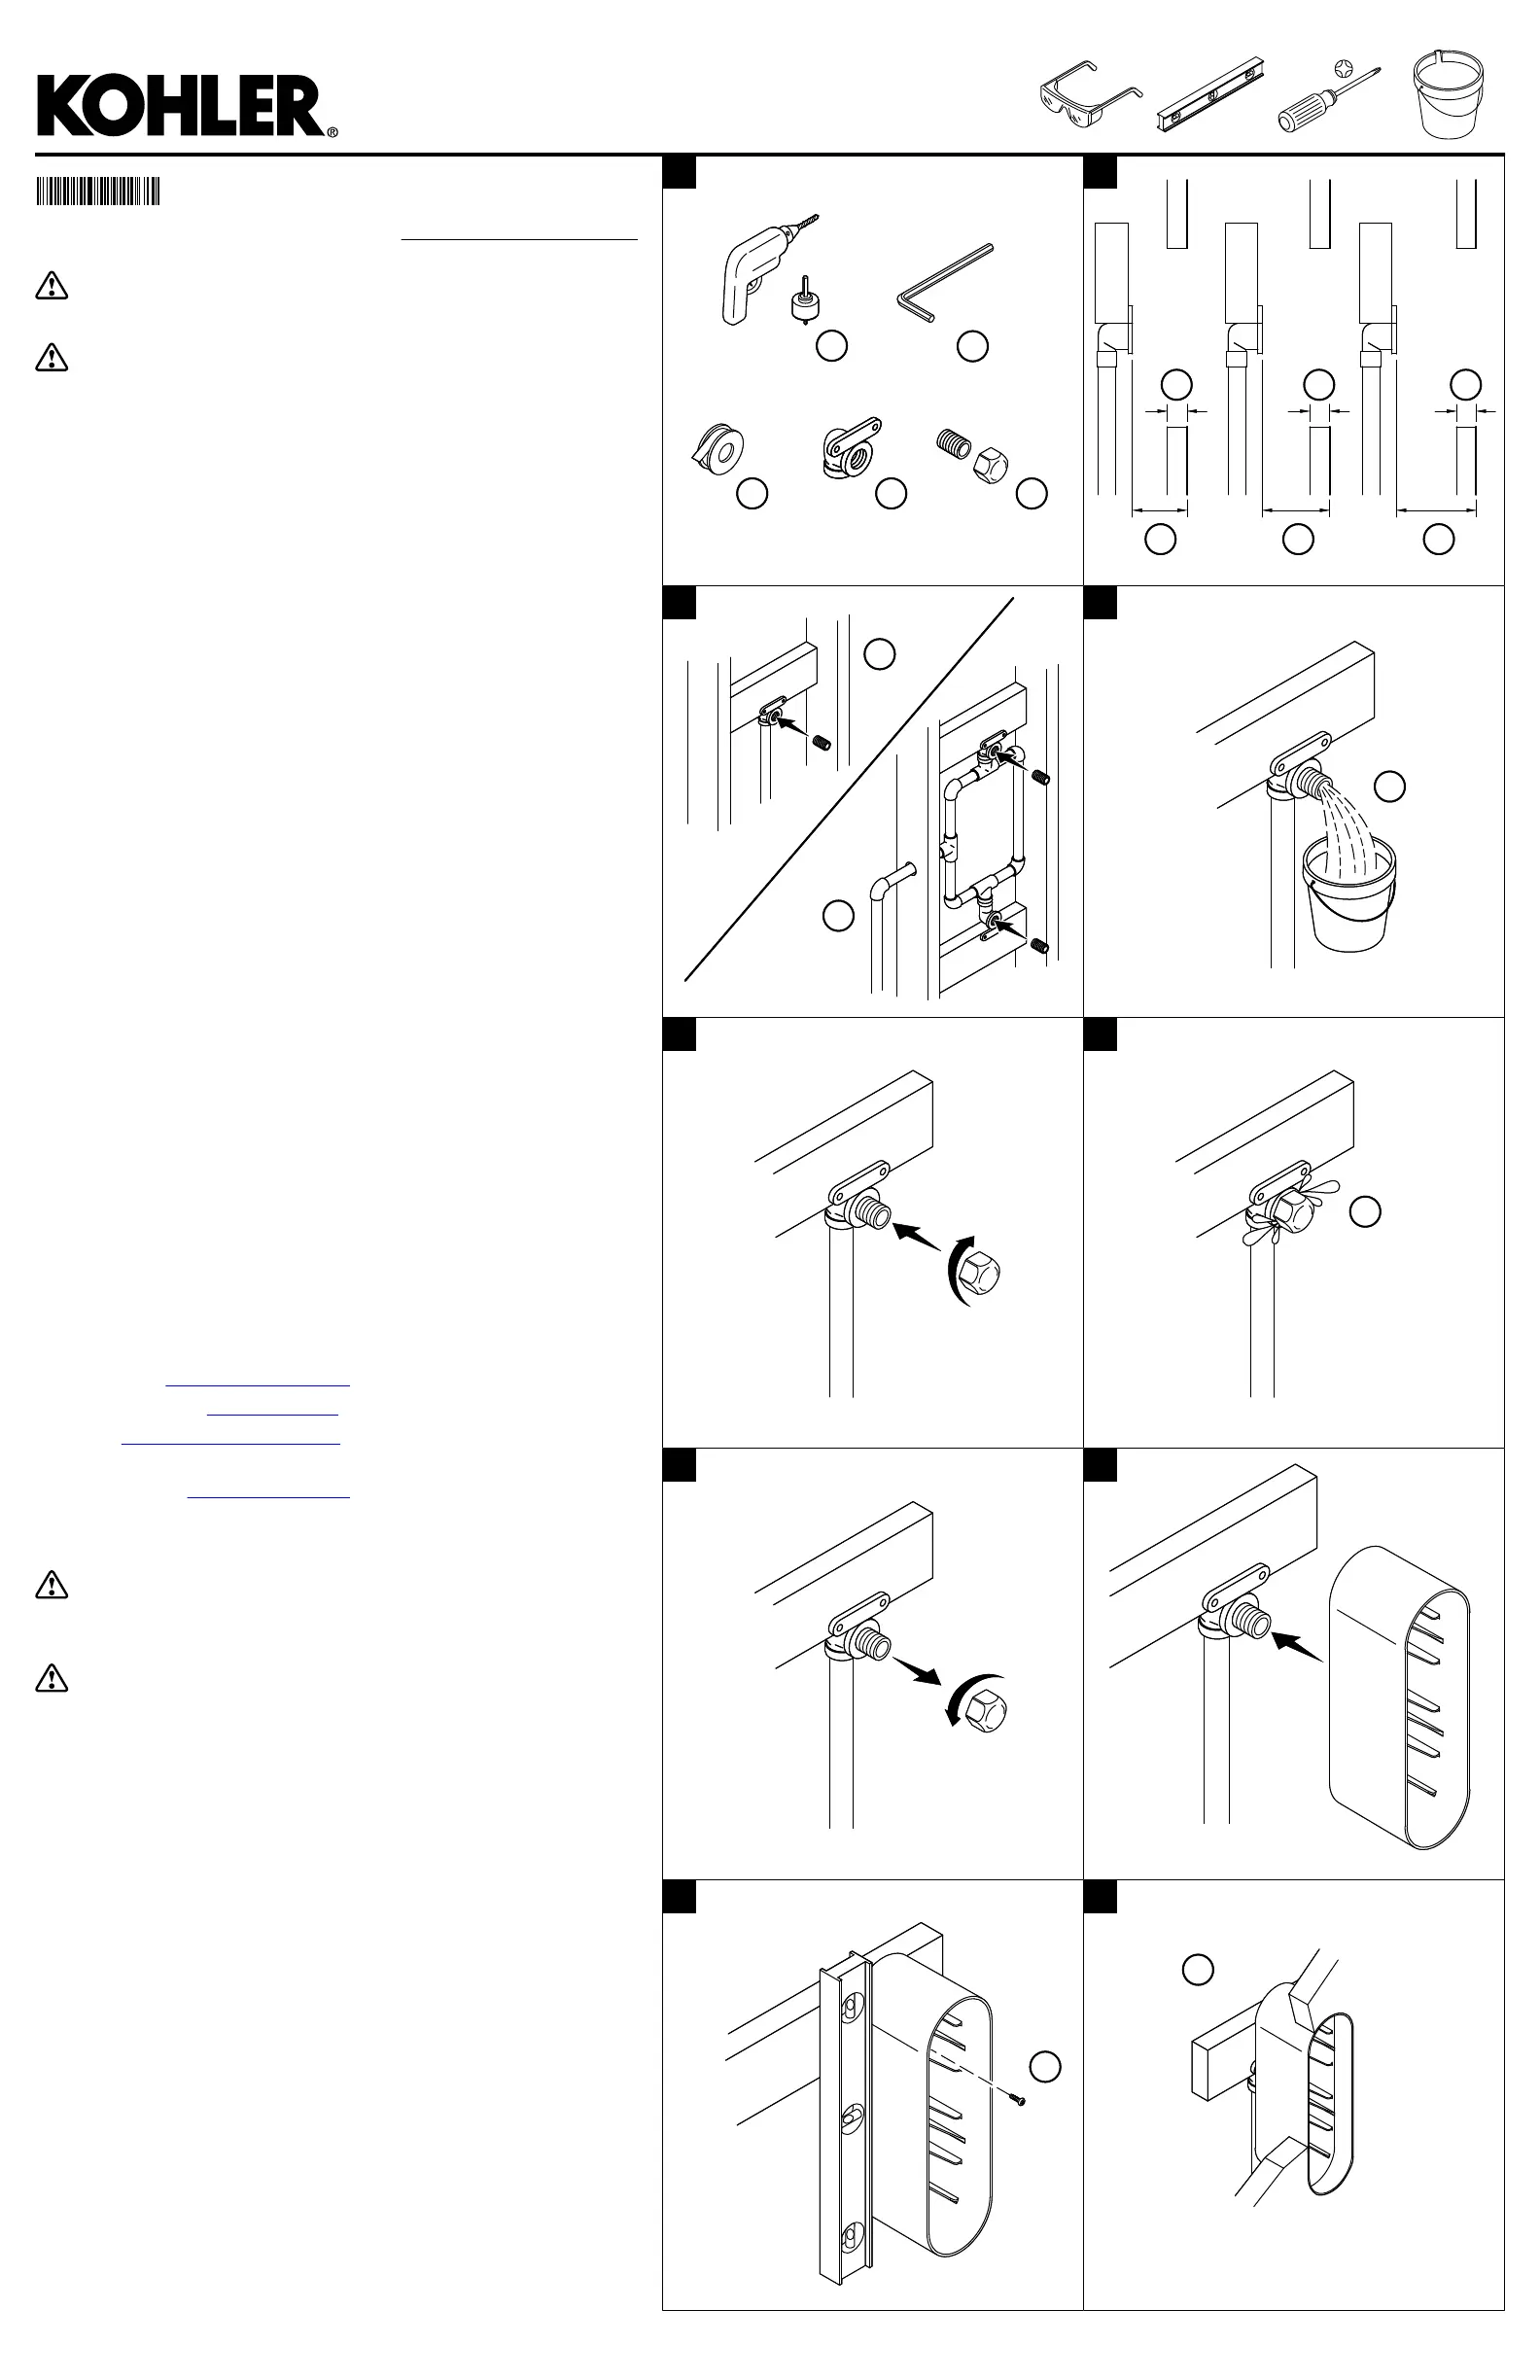
1A. 2-5/8″ Hole Saw
1B. 3/8″ Hex Wrench
1C. Sealant Tape
1D. Hy-set (Hy-ear) Elbow
1E. Temporary 1/2 NPT Nipple and Cap
2A. For an installation depth of 2-5/8″ (67 mm) - 3″ (76 mm), use a male
adapter.
2B. For an installation depth of 2-3/4″ (70 mm) - 3-1/4″ (83 mm), use a female
adapter and a close nipple.
2C. For an installation depth of 3-1/8″ (79 mm) - 3-5/8″ (92 mm), use a female
adapter and a 1-1/2 NPT nipple.
2D. Maximum wall thickness: 1-3/16″ (30 mm).
3A.Single Body Spray: Install an elbow and temporary nipple at the body
spray location.
3B.Multiple Body Sprays: Construct a pressure-balancing loop. Install an
elbow and temporary nipple at each body spray location.
4A. Flush hot and cold water for 1 minute to remove any debris.
6A. Turn ON the water supplies and check for leaks.
9A. Secure with two screws if installing horizontally (not shown).
10A. Install the nished wall.
13A. Measure the distance between the end of the adapter and the surface of
the nished wall. Verify that the distance is between 1-5/16″ (33 mm) - 1-7/8″
(48 mm).
14A. Verify that the adapter fully inserts into the housing. Select a dierent
adapter or pipe nipple if needed.
15A. Turn the four screws to engage the wing clamps and compress the
gasket against the wall.
17A. Position a weep hole at the boom.
Need help? Contact our Customer Care Center.
•
USA/Canada: 1-800-4KOHLER (1-800-456-4537) Mexico: 001-800-456-4537
Hours of Operation: Monday-Friday 8:00 AM -5:00 PM (CT)
Languages Spoken: English, Spanish, and translation services are available.
•
Service parts:kohler.com/serviceparts
•
Care and cleaning:kohler.com/clean
•
Patents:kohlercompany.com/patents
This product is covered under the KOHLER
®
Faucet Lifetime Limited
Warranty, found at
kohler.com/warranty. For a hardcopy of warranty terms,
contact the Customer Care Center.
AVERTISSEMENT :Risque de brûlures. Une température d'eau
élevée peut causer des brûlures graves. Régler la température de l'eau
du robinet à 120 °F (49 °C) ou moins. Consulter les instructions de réglage de
température pour le robinet.
ATTENTION :Risque de dommages matériels. La pulvérisation d'eau
sous pression directement au niveau de la face du pulvérisateur peut
créer des fuites d'eau à l'arrière du mur ni. Ne pas pulvériser de l'eau sous
pression directement dans la face du pulvériseur.
REMARQUE : Le jet corporel peut être installé verticalement (illustré) ou
horizontalement.
REMARQUE : Les étapes sont les mêmes pour des installations de plusieurs
jets corporels ou pour un seul jet.
Respecter tous les codes de plomberie et du bâtiment locaux.
1A. Scie cylindrique de 2-5/8 po
1B. Clé hexagonale de 3/8 po
1C. Ruban d'étanchéité
1D. Coude Hy-set (Hy-ear)
1E. Mamelon et capuchon NPT 1/2 temporaires
2A. Pour une profondeur d’installation de 2-5/8 po (67 mm) - 3 po (76 mm),
utiliser un adaptateur mâle.
2B. Pour une profondeur d’installation de 2-3/4 po (70 mm) - 3-1/4 po (83
mm), utiliser un adaptateur femelle et un mamelon simple.
2C. Pour une profondeur d’installation de 3-1/8 po (79 mm) - 3-5/8 po (92
mm), utiliser un adaptateur femelle et un mamelon NPT 1-1/2.
2D. Épaisseur de mur maximum : 1-3/16 po (30 mm).
3A.Jet corporel unique : Installer un coude et un mamelon temporaire à
l’emplacement du jet corporel.
12
34
56
78
910
E
A
B
CD
E
A
B
CD
ABC
DDD
ABC
DDD
B
A
B
A
AA
AA
AA
AA
1430513-2-B
1Kohler Co.
Produktspezifikationen
| Marke: | Kohler |
| Kategorie: | Nicht kategorisiert |
| Modell: | Statement K-26300 |
Brauchst du Hilfe?
Wenn Sie Hilfe mit Kohler Statement K-26300 benötigen, stellen Sie unten eine Frage und andere Benutzer werden Ihnen antworten
Bedienungsanleitung Nicht kategorisiert Kohler

10 März 2026
24 Februar 2026
23 Februar 2026
17 Februar 2026
16 Februar 2026
16 Februar 2026
16 Februar 2026
16 Februar 2026
16 Februar 2026
15 Februar 2026
Bedienungsanleitung Nicht kategorisiert
Neueste Bedienungsanleitung für -Kategorien-
3 April 2026
3 April 2026
3 April 2026
3 April 2026
3 April 2026
3 April 2026
3 April 2026
3 April 2026
3 April 2026
3 April 2026