Leisure NHL2 Bedienungsanleitung
Leisure Waschbecken NHL2
Lies die bedienungsanleitung für Leisure NHL2 (4 Seiten) kostenlos online; sie gehört zur Kategorie Waschbecken. Dieses Handbuch wurde von 36 Personen als hilfreich bewertet und erhielt im Schnitt 4.6 Sterne aus 9 Bewertungen. Hast du eine Frage zu Leisure NHL2 oder möchtest du andere Nutzer dieses Produkts befragen? Stelle eine Frage
Seite 1/4
1970-02
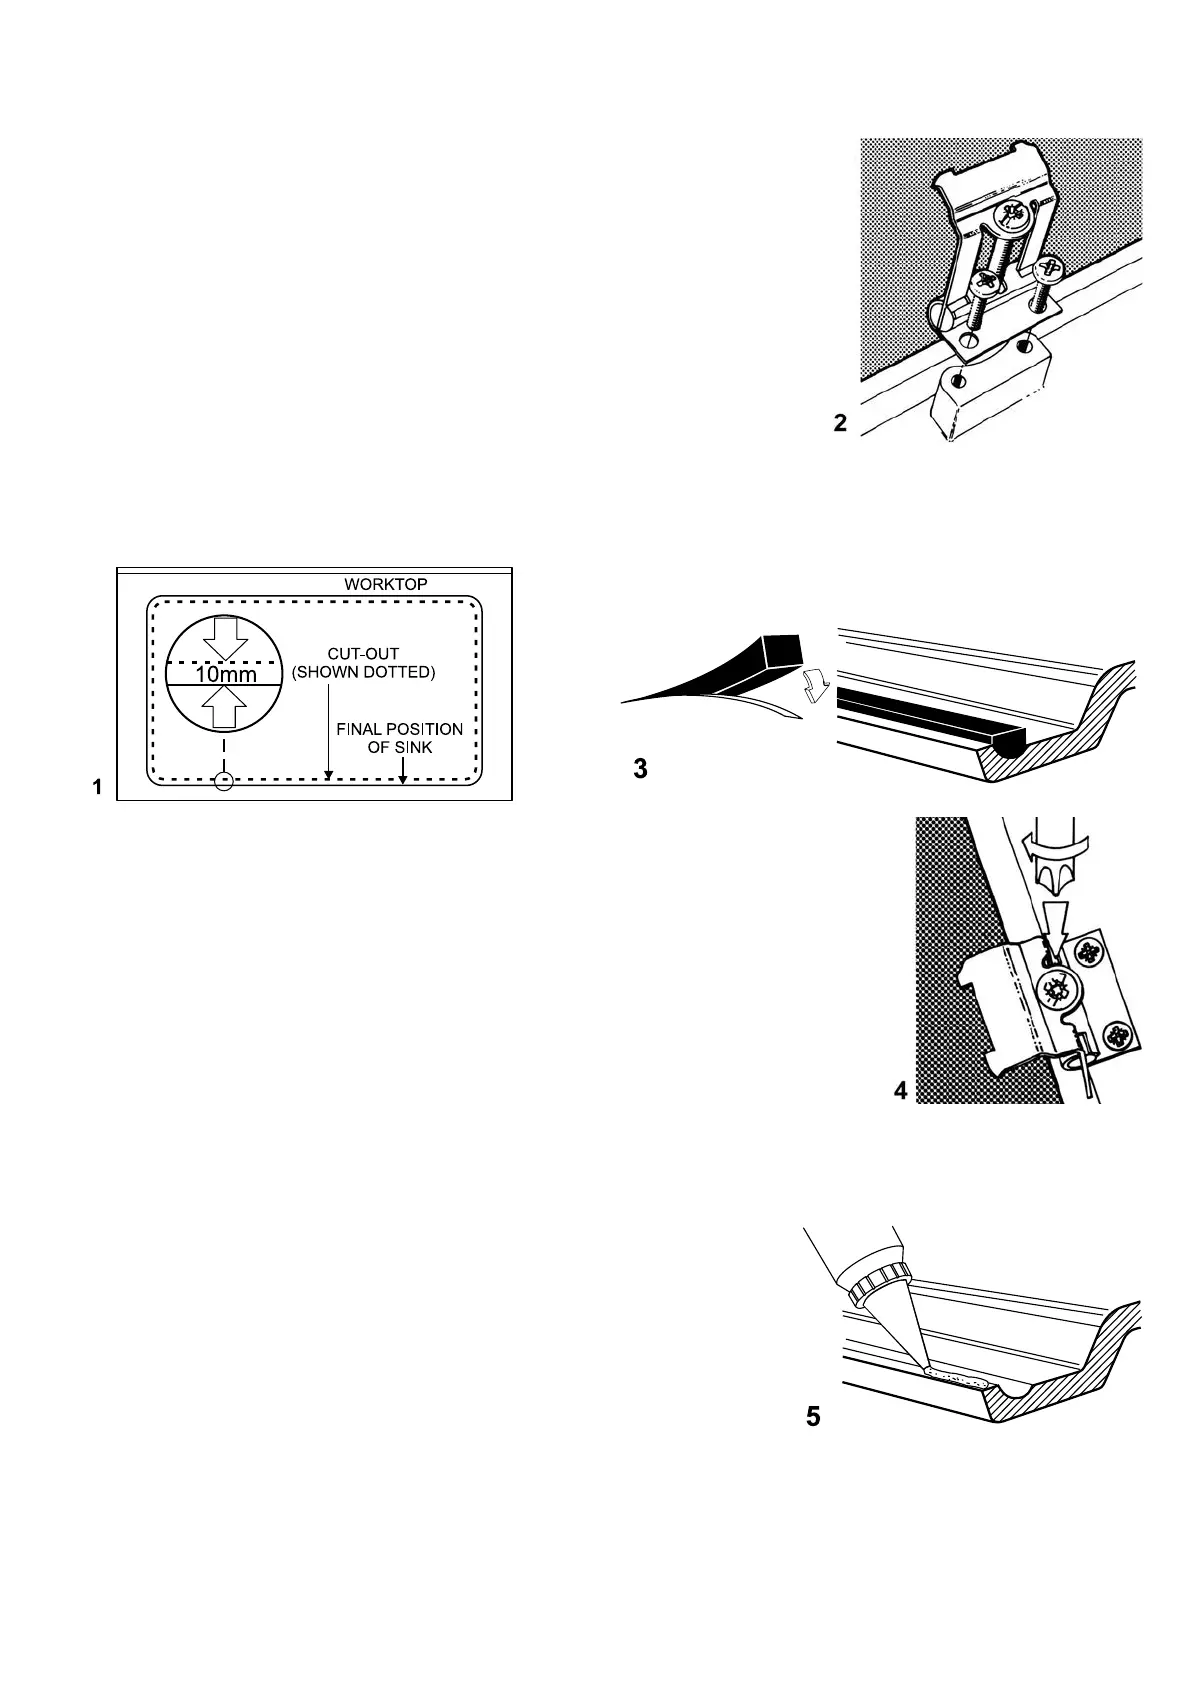
2.Fitthexingclipstothe
sinkusingthescrews
provided,asshownin
g.2andhingethem
backawayfromthe
sinkedge.
3.Atthispointtrythesink
inthecut-out,some
localisedenlargement
oftheholemaybe
necessaryaroundthe
clips.
4.Fitthetaptothe
sink.
5.Fitthewastestothesinkfollowingtheinstructions
packedwiththem.
6.Fitthefoamsealtotheedgeofthesink.Peeloffthepaper
backingstripandstickthesealtotherecessinthesink
asshowning.3.Ensurethataneatbuttjointisachieved
wheretheendsofthesealmeet.
FITTINGTHESINK
1.Positionthesinkinthecut
out.
2.Tensionthexingclipsas
showning.4.
Ensurethatthefoamseal
iscarefullycompressed
butdonotovertightenthe
clips.
3.Completetheplumbingof
thehotandcoldsupplyto
thetap.
ALTERNATIVEMETHODOFSEALING
1.Applysiliconesealant(notsupplied)totheundersideof
thesinkrim,asshowning.5.
2.Removesurplussealantfromaroundthesinkusingadamp
cloth.
NOTE:Duringinstallationcareshouldbetakentoensure
thesinkisprotectedfromscuffsandscratches.Strainingand
overtighteningofallplumbingxturesconnectedtothesink
shouldbeavoided.Installersshouldcarefullycheckthatthe
mouldingandtheedgesofthesinkaredeadlevelsothat
waterwillowoffthedrainer.
PLEASEREADTHOROUGHLYBEFOREATTEMPTINGTO
INSTALLSINK.
PREPARINGTHEWORKTOP
1.Itisrecommendedthattheinsetsinkisttedtotheworktop
beforebeingpermanentlyxedtothecabinet.
2.Placethesinkupsidedownonworktop.Positionthesink
relativetotheworktopasrequired,ensuringthatthecabinet
frameworkwillbeclearofallpartsofthesink.
Withasharpsoftpencildrawroundsinkasaccuratelyas
possible.Seeg.1.
3.Removethesinkanddrawanotherline10mminside
theout-lineofthesinktop.Thisisthecuttinglineforthe
aperture.
4.Drillaslargeaholeaspossibleinsidethecuttingline.Using
apadsaw,jigsaworsimilar,cutouttheaperture.Atthis
pointwewouldrecommendthattheworktopapertureis
sealed.Todothispaintoverwithap.v.a.adhesive,paint,
varnishorsmearwithsiliconesealant.
PREPARINGTHESINK
1.Ifatapholeisrequired,buthasnotbeensuppliedinthe
sink,proceedasfollows.
Decidewhetherthebowlistobeontheleftorrighthand
whenthesinkistted.Cuttheappropriatetapholeinto
thesink.Todothisyouwillneedaholesawortankcutter
settocutouta35mmdiameterholeandapilotdrill.On
thereversesideofthesinkyouwillndalocationpoint
forthepilotdrillinthecentreofthetapcut-out.Drillout
thepilothole.TurnthesinkoverandcarefullydrilLcOt4he
tap-hole.
WARNING: Velstra&Neostoneproductsincludeasilicaller.
Anymachiningoperationwillproduceneparticlesofdust.
Drillingorcuttingmustbecarriedoutinawell-ventilated
area.
INSTALLATIONDETAILSVELSTRA
®
&NEOSTONESINKS
Produktspezifikationen
| Marke: | Leisure |
| Kategorie: | Waschbecken |
| Modell: | NHL2 |
Brauchst du Hilfe?
Wenn Sie Hilfe mit Leisure NHL2 benötigen, stellen Sie unten eine Frage und andere Benutzer werden Ihnen antworten
Bedienungsanleitung Waschbecken Leisure

26 August 2024
26 August 2024
26 August 2024
26 August 2024
26 August 2024
26 August 2024
26 August 2024
26 August 2024
26 August 2024
26 August 2024
Bedienungsanleitung Waschbecken
Neueste Bedienungsanleitung für -Kategorien-
1 April 2026
30 März 2026
24 März 2026
1 März 2026
25 Februar 2026
24 Februar 2026
24 Februar 2026
24 Februar 2026
23 Februar 2026