Optex OVS-01GT Bedienungsanleitung
Lies die bedienungsanleitung für Optex OVS-01GT (1 Seiten) kostenlos online; sie gehört zur Kategorie Detektor. Dieses Handbuch wurde von 19 Personen als hilfreich bewertet und erhielt im Schnitt 4.6 Sterne aus 10 Bewertungen. Hast du eine Frage zu Optex OVS-01GT oder möchtest du andere Nutzer dieses Produkts befragen? Stelle eine Frage
Seite 1/1

Microwave Range
Sensor Mode
Calibration
Output Logic
N.O.
N.C.
2.5m
8’
3m
10’
3.5m
11.5’
4m
13’
4.5m
15’
5m
16’
5.5m
18’
2m
7’
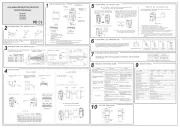
OVS-01GT(E) Quick Reference Guide
1. If used for Activation, go to section 2. If used for Vehicle protection, go to section 3.
2. If Activation function, find the installation location by referring the following chart.
Installation height has to be 500mm(20”) from the ground.
3. If Vehicle protection function, find the installation location by referring the following chart. Always recommended to install
700mm(71”
) far from barrier or slide gate. Installation height has to be 500mm(20”) from the ground.
[1] Make holes to mount the sensor. [2] Run a cable thru the post or pole.
[4] Mount the base using 4 screws. [5] Connect wires.
P r Sowe upply 12-24V
DC
Non-Volt e y Output N N.Cag Rela .O. / . Switchable
30VDC 0.3A or less sist e d)(re anc loa
Applicable Wire
Solid wire: 0.4-1.6mm (AWG 26-14)
Stranded wire: 0.13-2.0sq (AWG 26-14)
Signal GND
I unp t Active High / w Swit leLo chab
P rowe Outpu It nput
5.
Se the Mic ave t row e d S sor e arang an en mod s f ws:ollo
Angled : 5m(16’)
Perpendicular : 3.5m(11.5’) (factory default setting)
Usually, other settings can be default settings.
For detailed settings, refer to Advance Installation on page 17.
6. Perform sensor calibration in order to memorize the
background of the detection area. Ensure no
pedestrians or vehicles are present.
C ion Are heckal ratib a C
Sta dby
Area Check
De ctte ion
Cali rab tion
Cali rab tion Error
1. Press the Calibration button.
2. Operation indicator blinks in blue.
7. System operation check.
Check the entire coverage area by using actual vehicle.
Left side of the lane
Center of the lane
Right side of the lane
[6] Attach the sensor body to the base
and adjust the sensor angle.
8. Put the f cover t t of t base first, d attach it ront on he op he an
while spreading it open and pushing down the front cover.
9. Tighten the front cover retaining screw.
[3] n the ret g sc s on the bottom Loose ainin rew
of the f n cov ve the f nt ro t er and remo ro
cover, detach the sensor unit.
Hold here and
pull forward
Vehicle
Path
Gate Bar
Sensor mode : Perpendicular
Installation Height of 500mm(20in.)
Island
90°
Ticket Vending
Machine
4. Install the sensor, wire it and apply power.
GL+588(23.15)
Mounting
Pitch 32±1
(1.26±0.04)
Mounting Pitch
70±1(2.76±0.04)
5(0.20)
M4 Tap
Depending on the
cable diameter
[Unit : mm(inch)]
Gate
Sensor mode : Angled
Installation Height of 500mm(20in.)
30°
100
mm(4in.)
1100
mm
(43in.)
Secure sidePublic side
Vehicle
Path
Gate
90°
100
mm(4in.)
90°
Sensor mode : Perpendicular
Installation Height of 500mm(20in.)
Secure side
Public side
700
mm
(28in.)
700
mm
(28in.)
Vehicle
Path
90°
Gate Bar
150m
m
(6in.)
Island
700
mm(28in.)
Sensor mode : Perpendicular
Installation Height of 500mm(20in.)
Ticket Vending
Machine
Vehicle
Path
500mm(20in.) 500mm(20in.)
Barrier Gate Slide Gate
Barrier Gate Slide Gate
3. Step away from sensor and
outside detection area.
4. Green LED lights when done
correctly.
59-2954-0
Sensor Mode button
Microwave Range button
Produktspezifikationen
| Marke: | Optex |
| Kategorie: | Detektor |
| Modell: | OVS-01GT |
Brauchst du Hilfe?
Wenn Sie Hilfe mit Optex OVS-01GT benötigen, stellen Sie unten eine Frage und andere Benutzer werden Ihnen antworten
Bedienungsanleitung Detektor Optex

28 August 2024

27 August 2024

11 August 2024

5 August 2024

31 Juli 2024

20 Juli 2024

20 Juli 2024

19 Juli 2024

17 Juli 2024

28 April 2024
Bedienungsanleitung Detektor
- Dahua Technology
- JUNG
- BeeSecure
- Pioneer
- Inovonics
- Pyle
- Aqara
- MarQuant
- Kyoritsu
- Busch-Jaeger
- NEO Tools
- Vemer
- AcuRite
- Benewake
- V-TAC
Neueste Bedienungsanleitung für -Kategorien-
6 August 2025
4 August 2025
3 August 2025
1 August 2025
1 August 2025

30 Juli 2025
30 Juli 2025

28 Juli 2025
26 Juli 2025
22 Juli 2025