Pioneer CA-HM-GM.003 Bedienungsanleitung
Pioneer Nicht kategorisiert CA-HM-GM.003
Lies die bedienungsanleitung für Pioneer CA-HM-GM.003 (16 Seiten) kostenlos online; sie gehört zur Kategorie Nicht kategorisiert. Dieses Handbuch wurde von 38 Personen als hilfreich bewertet und erhielt im Schnitt 5.0 Sterne aus 4 Bewertungen. Hast du eine Frage zu Pioneer CA-HM-GM.003 oder möchtest du andere Nutzer dieses Produkts befragen? Stelle eine Frage
Seite 1/16
INSTALLATION INSTRUCTIONS FOR PART 99-3309B
APPLICATIONS
METRA. The World’s best kits.
™
metraonline.com1-800-221-0932
© COPYRIGHT 2004-2011 METRA ELECTRONICS CORPORATION
REV. 5/15/2013 INST99-3309B
CAUTION: Metra recommends disconnecting the
negative battery terminal before beginning any
installation. All accessories, switches, and especially
air bag indicator lights must be plugged in before
reconnecting the battery or cycling the ignition.
NOTE: Refer to the instructions included with the
aftermarket radio.
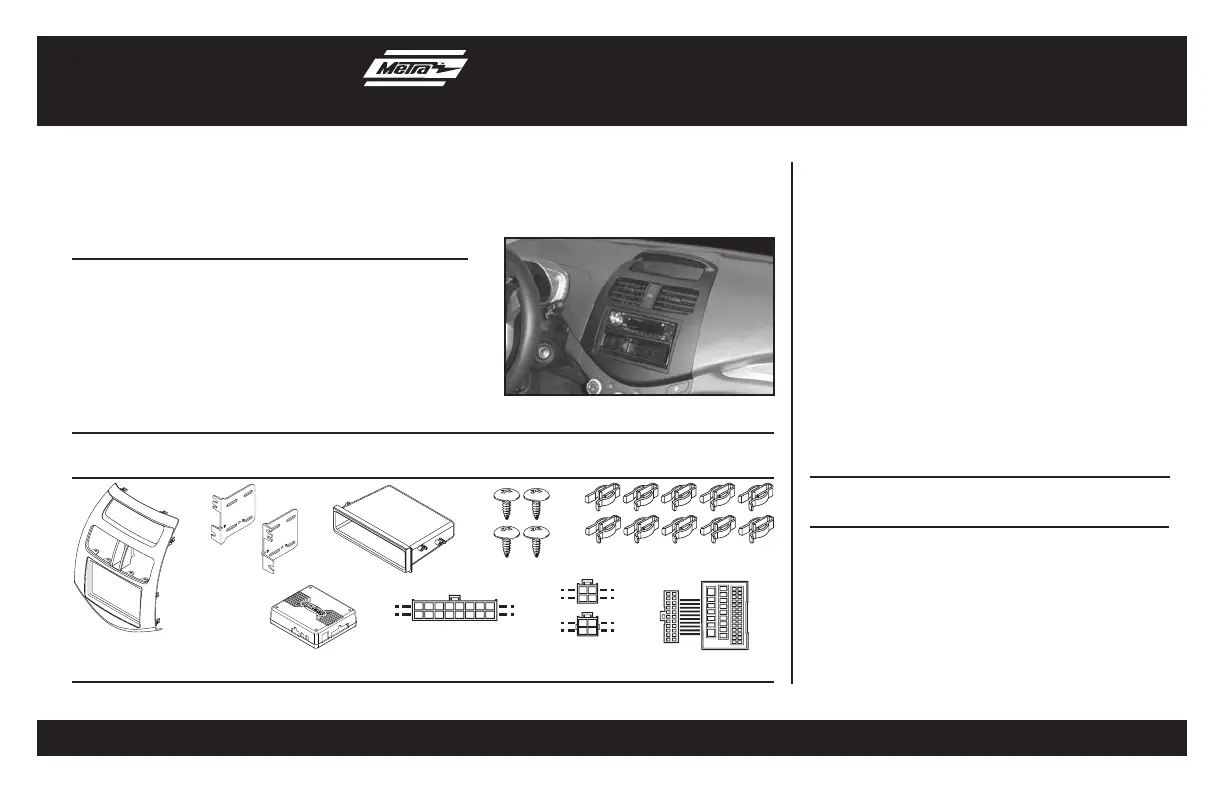
• A) Radio Trim Panel • B) Radio Brackets • C) Pocket • D) (4) #8 x 3/8” Phillips screws • E) (10) White Plastic Panel Clips
• F) Interface • G) 16-pin harness • H) 4-pin to 4-pin resistor pad • I) 22-pin to 44-pin harness
KIT FEATURES
KIT COMPONENTS
WIRING & ANTENNA CONNECTIONS (sold separately)
Wiring Harness: • Interface included Antenna Adapter: • 40-EU55 antenna adapter
• Panel removal tool • Phillips screwdriver
• Small flat-blade screwdriver
TOOLS REQUIRED
Chevrolet Spark 2013-up
99-3309B
A
BC
FGHI
DE
• ISO DIN head unit provision with pocket
• DDIN head unit provisions
• Interface included retains factory OnStar, Bluetooth,
and all warning chimes
• Provides a 12-volt accessory power and VSS,
parking brake, and reverse signals
• Painted Matte Black
Table of Contents
Dash Disassembly
–Chevy Spark 2013-up ..........................................2
Kit Assembly
–ISO radio provision with pocket ............................3
–DDIN radio provision ............................................4
Axxess Interface Installation
–Installing Interface.............................................5-6
–Vehicle Customization with Optional LCD ..............7
Produktspezifikationen
| Marke: | Pioneer |
| Kategorie: | Nicht kategorisiert |
| Modell: | CA-HM-GM.003 |
Brauchst du Hilfe?
Wenn Sie Hilfe mit Pioneer CA-HM-GM.003 benötigen, stellen Sie unten eine Frage und andere Benutzer werden Ihnen antworten
Bedienungsanleitung Nicht kategorisiert Pioneer

6 Februar 2026
5 Februar 2026
1 Februar 2026
31 Januar 2026
31 Januar 2026
30 Januar 2026
27 Januar 2026
27 Januar 2026
26 Januar 2026
26 Januar 2026
Bedienungsanleitung Nicht kategorisiert
Neueste Bedienungsanleitung für -Kategorien-
3 April 2026
3 April 2026
3 April 2026
3 April 2026
3 April 2026
3 April 2026
3 April 2026
3 April 2026
3 April 2026
3 April 2026