Powerplus POWX0760 Bedienungsanleitung
Lies die bedienungsanleitung für Powerplus POWX0760 (23 Seiten) kostenlos online; sie gehört zur Kategorie Säge . Dieses Handbuch wurde von 63 Personen als hilfreich bewertet und erhielt im Schnitt 4.3 Sterne aus 32 Bewertungen. Hast du eine Frage zu Powerplus POWX0760 oder möchtest du andere Nutzer dieses Produkts befragen? Stelle eine Frage
Seite 1/23

POWX0760 EN
Copyright © 2 VARO NV www.varo.com 014 P a g e | 1
1 APPLICATION .................................................................................. 4
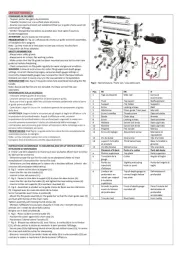
2 DESCRIPTION ................................................................................. 4
3 PACKAGE CONTENT LIST ............................................................. 5
4 SYMBOLS ........................................................................................ 5
5 GENERAL POWER TOOL SAFETY WARNINGS .......................... 6
5.1 Work area ................................................................................................................ 6
5.2 Electrical safety ....................................................................................................... 6
5.3 Personal safety 6 .......................................................................................................
5.4 Power tool use and care ......................................................................................... 7
5.5 Service ..................................................................................................................... 7
6 ADDITIONAL SAFETY INSTRUCTIONS FOR TABLE SAWS ....... 7
6.1 For both Mitre saw mode and table saw (bench saw) mode: ............................... 7
6.2 When using in Mitre saw mode: ............................................................................. 8
6.3 When using in the table saw (bench saw) mode: .................................................. 8
7 INSTALLATION ................................................................................ 9
7.1 Bench mounting (Fig. 1 & 3) ................................................................................... 9
7.1.1 For the fully-extended feet set up as the high table. .................................................. 9
7.1.2 For the folded feet set up as the low table ................................................................. 9
8 FUNCTIONAL DESCRIPTI ON ......................................................... 9
8.1 Blade guard (Fig. 4, 5 & 6) ...................................................................................... 9
8.2 Maintaining maximum cutting capacity (Fig. 7) .................................................. 10
8 Adjusting the Mitre angle (Fig. 9 & 10) .3 ................................................................. 11
8.4 Adjusting the bevel angle (Fig. 11 & 12) .............................................................. 11
8.4.1 In the Mitre saw mode ............................................................................................. 11
8.4.2 In the table saw mode (Fig. 13) ............................................................................... 11
8.5 Switch action (Fig. 14) .......................................................................................... 11
8.5.1 Switch for the table saw mode (B) ........................................................................... 11
8.6 Adjusting the depth of cut (Fig. 15 - 21) ..............................................................11
9 ASSEMBLY .................................................................................... 11
9.1 Socket wrench storage (Fig. 17) ...........................................................................11
9.2 Table height two-way set up ................................................................................. 12

POWX0760 EN
Copyright © 2 VARO NV www.varo.com 014 P a g e | 2
9.2.1 High table set up (Fig. 18) ....................................................................................... 12
9.2.2 Low table set up (Fig. 19) ........................................................................................ 12
9.3 Installing or removing saw blade ......................................................................... 12
9.4 Adjusting riving knife (fig 25,26 & 27) .................................................................. 12
9.5 Installing and adjusting rip fence (Fig. 28) .......................................................... 13
9.6 Installing and adjusting Mitre gauge (Fig. 35) ..................................................... 14
9.7 Dust bag (Fig 36, 37 & 38) ..................................................................................... 14
9.8 Securing workpiece .............................................................................................. 14
9.9 Setting up the tool in table saw mode ................................................................. 14
9.9.1 Securing the turn table (Fig. 41) .............................................................................. 15
9.9.2 Securing the tool head (Fig. 42) .............................................................................. 15
9.9.3 Releasing the lower limit stopper (Fig. 43) ............................................................... 15
9.9.4 Repositioning the riving knife (Fig. 44) ....................................................................15
9.9.5 Removing the lower blade guard (Fig. 45) ............................................................... 15
9.9.6 Locking the tool head at fully lowered position (Fig. 46) ...........................................15
9.9.7 Turning over the tool (Fig. 48) ................................................................................. 15
9.9.8 Installing the top blade guard (Fig. 49) .................................................................... 15
9.10 Setting up the tool in Mitre saw mode (Fig. 50) ................................................... 16
9.10.1 Removing the top blade guard ............................................................................16
9.10.2 Installing the lower blade guard C ...................................................................... 16
9.10.3 Turning over the tool .......................................................................................... 16
9.10.4 Releasing the tool head from fully lowered position ............................................ 16
9.10.5 Repositioning riving knife (Fig. 51) .....................................................................16
9.10.6 Installing or removing the sub fences R and L (Fig. 52) ...................................... 16
10 OPERATION ................................................................................... 17
10.1 Cutting as mitre saw ............................................................................................. 17
10.1.1 Press cutting ...................................................................................................... 17
10.1.2 Mitre cutting ....................................................................................................... 17
10.1.3 Bevel cut ............................................................................................................ 17
10.1.4 Compound cutting .............................................................................................. 18
10.1.5 Cutting aluminum extrusion (Fig. 56) .................................................................. 18
10.2 Cutting as table saw (bench mode) .....................................................................18

POWX0760 EN
Copyright © 2 VARO NV www.varo.com 014 P a g e | 3
10.2.1 Work helpers ...................................................................................................... 18
10.2.2 Push block (Fig. 57) ........................................................................................... 18
10.2.3 Auxiliary fence (Fig. 58) ...................................................................................... 18
10.2.4 Ripping ............................................................................................................... 19
10.2.5 Cross cutting (Fig. 63) ........................................................................................ 19
10.2.6 Mitre gauge ........................................................................................................ 19
10.2.7 Use of Mitre gauge (Fig. 64) ............................................................................... 19
10.2.8 Auxiliary wood facing (Mitre gauge) (Fig. 65) ...................................................... 19
10.2.9 Carrying tool (Fig. 66) ......................................................................................... 20
11 MAINTENANCE ............................................................................. 20
11.1 Adjusting the cutting angle .................................................................................. 20
11.1.1 Mitre angle ......................................................................................................... 20
11.1.2 Bevel angle ........................................................................................................ 20
11.2 Replacing carbon brushes (Fig. 73 & 74) ............................................................ 21
11.3 After use ................................................................................................................ 21
11.4 Service ................................................................................................................... 21
12 TECHNICAL DATA ........................................................................ 21
13 NOISE ............................................................................................. 22
14 STORAGE ...................................................................................... 22
15 WARRANTY ................................................................................... 22
16 ENVIRONMENT ............................................................................. 23
17 DECLARATION OF CONFORMITY .............................................. 23
Produktspezifikationen
| Marke: | Powerplus |
| Kategorie: | Säge |
| Modell: | POWX0760 |
| Eingangsleistung: | 1800 W |
| Energiequelle: | AC |
| Klingendurchmesser: | 255 mm |
| Leerlaufdrehzahl (max.): | 4200 RPM |
| Schallleistungspegel: | 105 dB |
Brauchst du Hilfe?
Wenn Sie Hilfe mit Powerplus POWX0760 benötigen, stellen Sie unten eine Frage und andere Benutzer werden Ihnen antworten
Bedienungsanleitung Säge Powerplus

28 Mai 2024

27 Mai 2024

5 Mai 2024

6 April 2024

1 April 2024

18 März 2024

26 Februar 2024

24 Februar 2024

24 Februar 2024

1 Januar 2024
Bedienungsanleitung Säge
- Ryobi
- Fieldmann
- Black And Decker
- Skil
- Urrea
- Silverline
- Flymo
- Holzmann
- Defort
- Pro-Cut
- Kraftixx
- Mafell
- Cotech
- Panasonic
- McCulloch
Neueste Bedienungsanleitung für -Kategorien-

19 Juni 2025

19 Juni 2025
19 Juni 2025

19 Juni 2025

19 Juni 2025

18 Juni 2025

18 Juni 2025

18 Juni 2025

18 Juni 2025

18 Juni 2025