Roland MDS-Standard 2 Bedienungsanleitung
Roland Nicht kategorisiert MDS-Standard 2
Lies die bedienungsanleitung für Roland MDS-Standard 2 (1 Seiten) kostenlos online; sie gehört zur Kategorie Nicht kategorisiert. Dieses Handbuch wurde von 23 Personen als hilfreich bewertet und erhielt im Schnitt 4.9 Sterne aus 5 Bewertungen. Hast du eine Frage zu Roland MDS-Standard 2 oder möchtest du andere Nutzer dieses Produkts befragen? Stelle eine Frage
Seite 1/1
NOTE
•Whensetting-uporadjustingthestand,takecarenottopinchyourngersbetweenmovablepartsandthemainunit.Ifusingthisinalocationwherechildrenarepresent,besuretoprovideadultsupervisionorguidance.
•Prepareanareainwhichyoucanperformtheassemblysafely.
•Donotuseapowertool(e.g.,anelectricscrewdriver)toassemblethestand.Youriskdamagingorstrippingthescrews.
•Whenremovingthepartsfromthepackingcarton,takecarethatyourboxcutterorothersharpimplementdoesnotscratchthepipes.
•Ifyouwillbeusingthisdrumstandforanextendedperiodoftimeinthesamelocation,werecommendthatyouuseadrummat(TDMseries)madebyRolandtopreventtherubberfeetfromsoilingthesurfaceonwhichtheyareplaced.
Beforeusingthisunit,carefullyread“USINGTHEUNITSAFELY”and“IMPORTANTNOTES.”Afterreading,keepthedocument(s)
whereitwillbeavailableforimmediatereference.
Roland,V-DrumsareeitherregisteredtrademarksortrademarksofRolandCorporationintheUnitedStatesand/orothercountries.
Owner’s Manual
©2019RolandCorporation
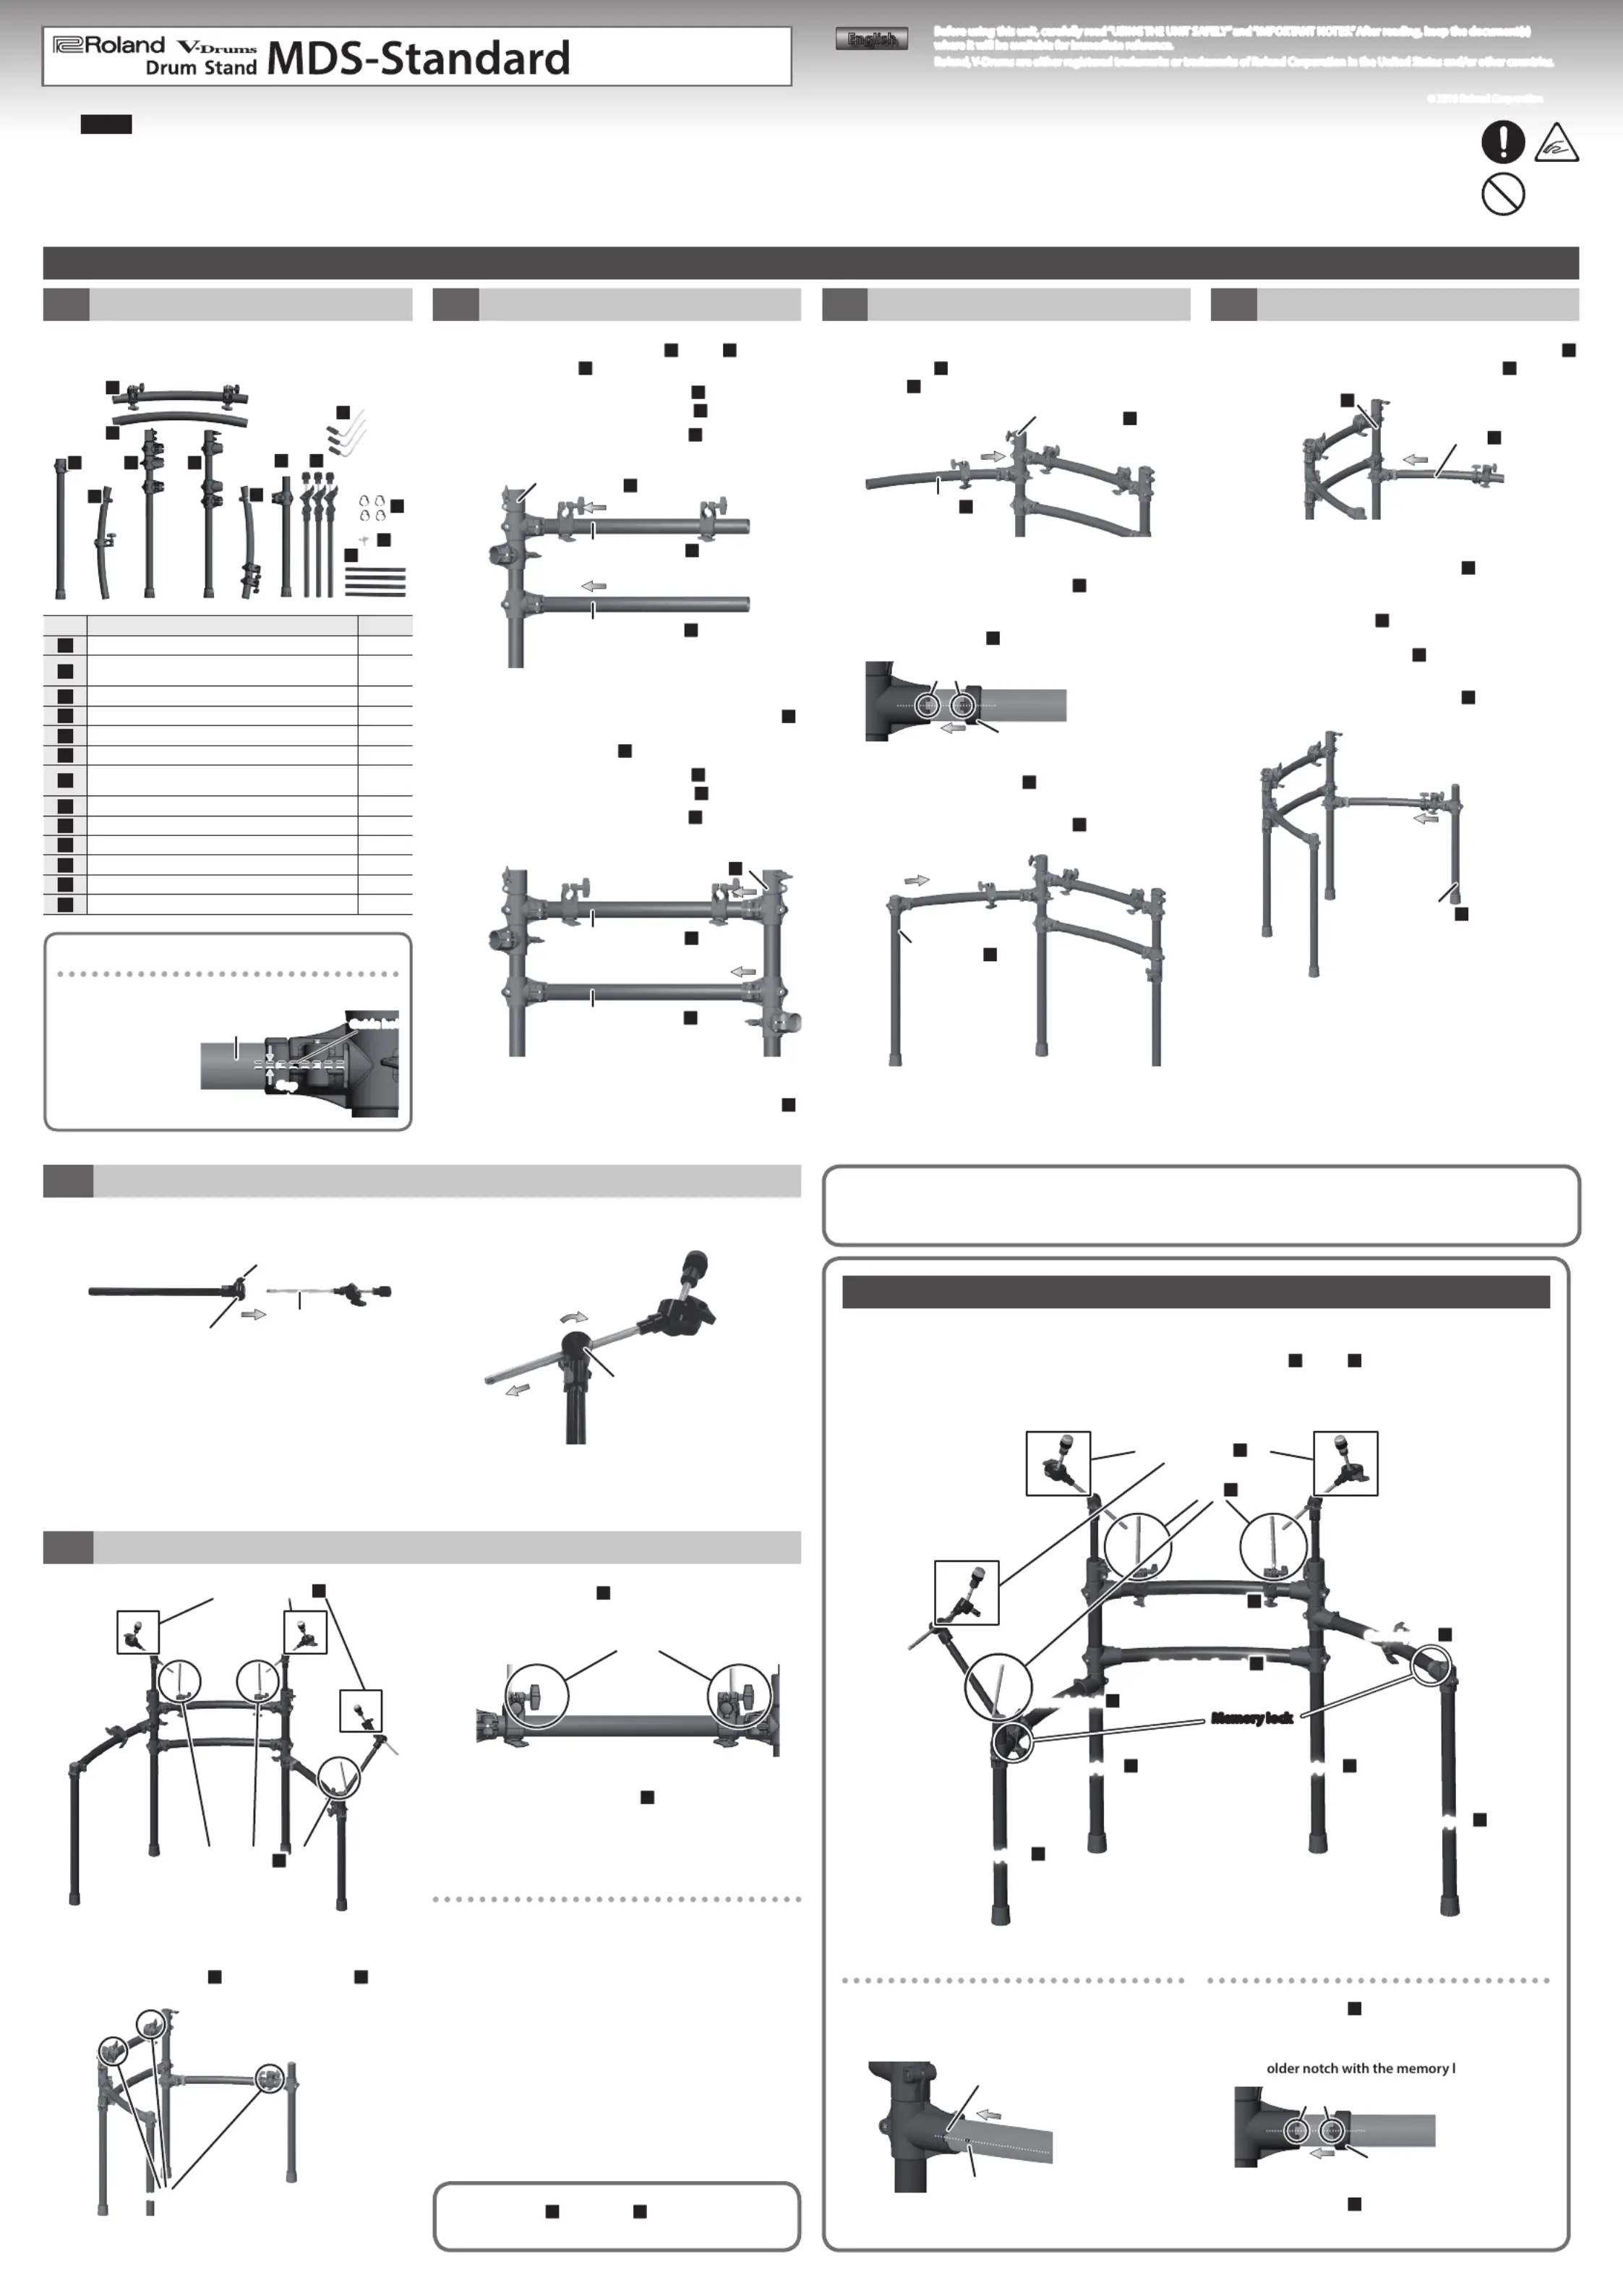
How to Set Up the Stand
1.
Check the parts
Beforeyoustartassemblingthestand,makesurethat
youhavealloftheparts.
1
2
3
4
56
7
8
10
9
11
12
13
NumberNameQuantity
1StraightpipeL(Long)1
2
CurvedpipeL
(withonepadmount,withonememorylock)
1
3Centerpipe(upper)(withtwopadmounts)1
4Centerpipe(lower)1
5MainunitpipeL(secondholderhigher)1
6MainunitpipeR(secondholderlower)1
7
CurvedpipeR
(withtwopadmounts,withonememorylock)
1
8StraightpipeR(Short)1
9Cymbalmount3
10Padmount3
11Cableclip4
12Drumkey1
13Cabletie4
2.
Assembling the center section
2–1. Attachthecenterpipes(upper
3
/lower
4
)tothe
mainunitpipeL
5
.
•Insertthecenterpipe(upper)
3
intothetop
holderofthemainunitpipeL
5
.
•Insertthecenterpipe(lower)
4
intothethird
holderfromthetop.
Center pipe (upper)
3
Main unit pipe L
5
Center pipe (lower)
4
Aligntheguideholewiththegapoftheholder,
andtighten(twolocations)usingthedrumkey
12
.
2–2. AttachthemainpipeR
6
.
•Insertthecenterpipe(upper)
3
intothetop
holderofthemainunitpipeR
6
.
•Insertthecenterpipe(lower)
4
intothe
secondholder.
Center pipe (upper)
3
Main unit pipe R
6
Center pipe (lower)
4
Aligntheguideholewiththegapoftheholder,
andtighten(twolocations)usingthedrumkey
12
.
3.
Attaching the left arm section
3–1. Positionthesecondholderfromthetopofthemain
unitpipeL
5
facingoutward,andinsertthecurved
pipeL
2
.
Curved pipe L
2
Main unit pipe L
5
Aligntheguideholewiththegapoftheholder,
andtightenusingthedrumkey
12
.
3–2. Alignthememorylockwiththeholder,andtighten
usingthedrumkey
12
.
Alignpositions
Memory lock
3–3. AttachthestraightpipeL
1
.
Aligntheguideholewiththegapoftheholder,
andtightenusingthedrumkey
12
.
Straight pipe L
1
4.
Attaching the right arm section
4–1. PositionthebottomholderofthemainunitpipeR
6
facingoutward,andinsertcurvedpipeR
7
.
Curved pipe R
7
Main unit pipe R
6
Aligntheguideholewiththegapoftheholder,
andtightenusingthedrumkey
12
.
4–2. Alignthememorylockwiththeholder,andtighten
usingthedrumkey
12
.
4–3. AttachthestraightpipeR
8
.
Aligntheguideholewiththegapoftheholder,
andtightenusingthedrumkey
12
.
Straight pipe R
8
4–4. Verifythatthefourverticalpipesaretrulyvertical.
Ifthestandwobbleswhenplacedontheoor,
loosentheholdersandmakeadjustments.
5.
Assembling the cymbal mount
5–1. Loosenthehandknobandpullouttherod.
Hand knob
Joint
Rod
5–2. Rotatethejointandinserttherod.
Joint
5–3. Tightenthehandknob.
6.
Attaching the pad mounts and cymbal mounts
Pad mounts
10
Cymbal mounts
9
6–1. Raisethemountholders(threelocations)ofthe
centerpipe(upper)
3
andthecurvepipeR
7
.
Mount holders
6–2. Attachpadmounts
10
totheholdersthatyouraised,
andtightenusingthehandknobs(threelocations).
Hand knobs
6–3. Attachthecymbalmounts
9
inthepositionsshown
intheillustration,andtightenusingthehandknobs
(threelocations).
Notes
•Whensettinguporstoringthestand,becarefulnot
topinchthengersyouusetohandlethestand.
•Regardingthewayofmountingadrumsound
module,pads,orcymbals,pleaserefertothesetup
guideofyourdrumkit.
Aligning the position of pipes and holders
Align the guide hole with the gap of the holder
Rotatetheinserted
pipe,adjustingitso
thattheguideholeis
visiblethroughthegap
oftheholder.
Guide hole
Gap
Rotate pipe to adjust
Usethecableclips
11
andcableties
13
tomanagethecables
neatlywhenattachingthepadsandthesoundmodule.
Whensettingup,payattentiontosafetysothatthestanddoesnotfallover.
Refertothesetupguideofyourdrumkit,andobservethesafetyprecautionswhensettingup.
Assembly for a Left-Handed Player
Forleft-handeduse,assemblethestandwithleftandrightreversedasshownintheillustration.
•Beforeyoubeginwork,loosenthememorylocksofcurvedpipesL
2
andR
7
.Whenyounishassembly,
adjustthepositionandretighten.
•Forthepositionatwhichtoattacheachmount,refertothesetupguideofyourdrumkit.
Straight pipe L
1
Center pipe (upper)
3
Center pipe (lower)
4
Main unit pipe L
5
Straight pipe R
8
Pad mount
10
Main unit pipe R
6
Cymbal mount
9
Memory lock
Curved pipe L
2
Curved pipe R
7
Aligning the position of pipes and holders
1. Turn the inserted pipe to align the guide hole with
the holder notch (the mark at which to align the
memory lock), and push it all the way in.
Holdernotch
Guidehole
Adjusting the memory lock
1. Use the drum key
12
to loosen the screw of the
memory lock.
2. Rotate the memory lock 180 degrees, and align
the hock mark.
Alignpositions
Memorylock
3. Use the drum key
12
to securely tighten the
memory lock screw.
2
English
Produktspezifikationen
| Marke: | Roland |
| Kategorie: | Nicht kategorisiert |
| Modell: | MDS-Standard 2 |
Brauchst du Hilfe?
Wenn Sie Hilfe mit Roland MDS-Standard 2 benötigen, stellen Sie unten eine Frage und andere Benutzer werden Ihnen antworten
Bedienungsanleitung Nicht kategorisiert Roland

22 Januar 2026
2 November 2025
2 Oktober 2025
17 September 2025
4 September 2025
4 September 2025
4 September 2025
4 September 2025
4 September 2025
3 September 2025
Bedienungsanleitung Nicht kategorisiert
Neueste Bedienungsanleitung für -Kategorien-
22 Januar 2026
22 Januar 2026
22 Januar 2026
22 Januar 2026
22 Januar 2026
22 Januar 2026
22 Januar 2026
22 Januar 2026
22 Januar 2026
22 Januar 2026