Samsung HG28NC673AF Bedienungsanleitung
Lies die bedienungsanleitung für Samsung HG28NC673AF (2 Seiten) kostenlos online; sie gehört zur Kategorie Fernseher. Dieses Handbuch wurde von 4 Personen als hilfreich bewertet und erhielt im Schnitt 4.5 Sterne aus 2.5 Bewertungen. Hast du eine Frage zu Samsung HG28NC673AF oder möchtest du andere Nutzer dieses Produkts befragen? Stelle eine Frage
Seite 1/2

To register this product please visit
www.samsung.com/register.
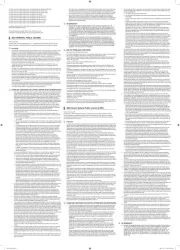
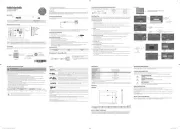
Quick Setup Guide
List of Parts
1
2
Power Cord Owner’s Instructions
Safety Guide
Viewing the Connection Panel
3
PILLOW
OUT
4
5
- SIDE -
HDMI IN 1
HDMI IN 2
(DVI)
2
(5V 0.5A)
/CLONING
1
AV IN
AUDIO
VIDEO
HDMI
IN 3
EX-LINK
AUDIO OUT
6
ANT IN
AIR/CABLE
1
8
7
➣ The product color and shape may vary depending on the model.
1 HDMI IN 1, 2(DVI), 3
2 USB (5V 0.5A) / CLONING
3 VIDEO / L-AUDIO-R
4 PILLOW OUT
5 EX-LINK
6 AUDIO OUT
7 ANT IN (AIR/CABLE)
8 DATA
When in Hotel mode (Interactive or Standalone), all Channel menu items in the Menu OSD except for the
Channel List aredeactivated. If you need to change the channel line up, use the Channel Setup item in the Hotel
options menu.
Notice
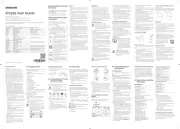
TV Controller
The TV’s Controller, a small joy stick like button on the rear right side of the TV, lets you control the TV without the
remote control.
TV Controller
The image is drawn
as if you are facing the
front side of the TV.
Power off
Function menu
Remote control sensor
Return
Selecting the
Media Play
Selecting the
Menu
Select a source.
List of Vendors and Compatible Data Cables Supplied with the TV
♦ Refer to the code label on the data cable.
Note the
labeled end.
Confirm the code
on the Code Label
Note the
labeled end.
Vendor Cable code
Samsung OCC
Enseo Guest-Tek
BN39-00865B
NXTV BN39-01011B
nStreams BN39-01110A
MTI BN39-01011C
Hotel Plug & Play
The Hospital Plug & Play function, which automatically performs the Hospital Mode selection, Country Setup, Clock
Setup, and Picture Mode Setup, runs once when power is fi rst turned ON. Setup also runs automatically after you
have executed a Service Reset.
♦ Hospital Plug & Play OSD
- Initially highlighted: Interactive
- If you select the Standalone Only button, Standalone hospital mode is set by default and the “Standalone mode is set”
OSD appears for 3 seconds.
- TV enters into RF mode automatically after displaying the “Standalone mode is set” OSD for 3 seconds.
- If you select Interactive mode, the Interactive Setup Menu is displayed. Press the power off key to exit the Interactive menu.
- If you select Standalone Plug & Play mode, the “Select Menu Language” OSD appears.
♦ Local Set
- Initially highlighted: US
- If you press the Enter key after selecting Change, you can change the country.
- If the country is changed, the TV automatically turns off and on.
- If you select Interactive mode, the Interactive Setup Menu is displayed. Press the power off key to exit the Interactive menu.
- If you select the incorrect country, execute TV Reset again after entering the Service section of the Hospital Menu.
♦ Select Menu Language OSD
- If you select Standalone from the “Select Hospital TV Mode” OSD, the “Select Menu Language” OSD appears.
- Initially highlighted: English
- Display time: OSD time out and operation are the same as Samsung’s consumer TV models.
- If you press the Enter key, the “Picture Mode” OSD appears
♦ Picture Mode OSD
- Initially highlighted: Standard.
- The TV displays the Picture Mode OSD where you can choose Dynamic or Standard Picture mode.
♦ Auto Search Mode OSD
- If you press the Enter key, the TV automatically searches for channels.
- The OSD Display time, which starts when the Auto Store operation is completed and continues until the Auto Sort function
starts, is 30 seconds.
♦ Set Clock Mode, DST(Daylight saving time), and Time Zone OSD
- Initially highlighted: Clock Mode : Auto, DST : Off, Time Zone : Eastern
- If the TV will be tuned to digital broadcast channels, and these channels transmit date and time information, set the Clock
Mode to Auto. The TV will set the date and time automatically.
- If the TV will not be tuned to digital broadcast channels, set the Clock Mode to Manual, and then set the date and time on
the TV manually.
- Set DST On or Off to apply or not apply daylight saving time to the TV.- - Select your time zone on the map appears.
Wall Mount Kit Specifi cations (VESA)
Wall or Ceiling Mounting
If you mount this product on a wall, it should be mounted only as recommended by the manufacturer. Unless it is correctly mounted, the product
may slide or fall, causing serious injury to a child or adult, and serious damage to the product.
Install your wall mount on a solid wall perpendicular to the fl oor. If you are attaching the wall mount to building
materials other than plaster board, contact your nearest dealer. If installed on a ceiling or slanted wall, the TV may fall
and cause severe personal injury.
➣ Standard dimensions for wall mount kits are shown in the table below.
➣ Samsung wall mount kits contain a detailed installation manual. All parts necessary for assembly are provided.
➣ Do not use screws that do not comply with the VESA standard screw specifi cations.
➣ Do not use screws that are longer than the standard dimension or do not comply with the VESA standard screw
specifi cations. Screws that are too long may cause damage to the inside of the TV set.
➣ For wall mounts that do not comply with the VESA standard screw specifi cations, the length of the screws may differ
depending on the wall mount specifi cations.
➣ Do not fasten the screws too fi rmly. This may damage the product or cause the product to fall, leading to personal
injury. Samsung is not liable for these kinds of accidents.
➣ Samsung is not liable for product damage or personal injury when a non-VESA or non-specifi ed wall mount is used or
the consumer fails to follow the product installation instructions.
➣ Do not mount the TV at more than a 15 degree tilt.
➣ Always have two people mount the TV onto a wall.
Product Family
TV size in
inches
VESA screw hole specs (A * B)
in millimeters
Standard Screw
(Length* Pitch in mm)
Quantity
LED-TV 28 100 X 100 M4
4
Do not install your Wall Mount Kit while your TV is turned on.
This may result in personal injury due to electric shock.
Specifi cations
Environmental onsiderations
Operating Temperature
Operating Humidity
Storage Temperature
Storage Humidity
50°F to 104°F (10°C to 40°C)
10% to 80%, non-condensing
-4°F to 113°F (-20°C to 45°C)
5% to 95%, non-condensing
Model Name
HG28NC673
Display Resolution
1366 x 768
Screen Size
(Diagonal)
28" Class
(28.0" measured diagonally)
Sound (Output)
5W x 2
Dimensions (WxDxH)
Body
25.3 x 15.6 x 2.5 inches
(643.4 x 396.5 x 62.9 (mm))
Weight
8.6 lbs (3.9 kg)
➣ Design and specifi cations are subject to change without prior notice.
➣ This device is a Class B digital apparatus.
WARNING: This product contains chemicals known to the State of California to cause cancer and reproductive toxicity.
Dimensions
HG28NC673
1
43
2
5
(unit: inches)
1 2 3 4 5
HG28NC673 25.3 24 13.7 15.6 2.5
NOTE TO CABLE TV INSTALLER
This reminder is provided to call the cable TV system installer’s attention to Article 820–40 of the National Electric
Code (U.S.A.). The code provides guidelines for proper grounding and, in particular, specifi es that the cable ground
shall be connected to the grounding system of the building, as close to the point of the cable entry as practical.
STOP
Please do not return
this unit
If you are having problems operating this TV,
Please call;
US : 1-866-894-0524
CANADA : 1-800-726-7864
For web support please visit
http://www.samsung.com/us/business
✎ The product color and shape may vary depending on the model.
✎ To exit the menu, press the Controller for more than 1 second.
✎ When selecting a function by moving the controller backwards/forwards/left/right, be sure not to press up on the controller. If you press up first, it will not
operate correctly.
Standby mode
Your TV enters Standby mode when you turn it off and continues to consume a small amount of electric power. To be
safe and to decrease power consumption, do not leave your TV in standby mode for long periods of time (when you
are away on vacation, for example). It is best to unplug the power cord.
Connecting a Pillow Speaker
You can connect a pillow speaker to the TV in the hospital using a jumper cable. The speaker functions as a remote
control and speaker.
POLLOW OUT
Pillow Speaker
Jumper Cable
TV Rear Panel
1. Connect the pillow speaker jumper cable (cable sold separately) from the television’s PILLOW
SPEAKER Port to the pillow speaker jack on the wall behind the television.
Pillow Speaker Jack Specifications
Output jack: RCA type
Input jumper pin: 1/8” 3-conductor stereo phone pin.
Signal specifi cations: Tip-Audio, Ring-Data/Channel change, Sleeve-Common
Tip Ring Sleeve
How to Use the Pillow Speaker
Analog type speaker: The pillow speaker has one key.
-Power On: press the key when the TV is in standby mode.
-Channel Up: press the key when the speaker is on.
-Power Off: press and hold the key for more than 3 seconds when the speaker is on.
-An Analog type speaker always works regardless of the Pillow Speaker Type value set in the Hospital mode setup menu.
Digital type speaker: The TV supports the Samsung, Philips, or Zenith code.
-This speaker is only compatible with a specified IR code. You can change the code in the Hospital mode setup menu.
-The TV gives priority to the Samsung remote control over the pillow speaker’s wired remote control.
-Option : Channel Menu Display.
Pillow Sound Control
Speaker Selection Menu TV Speaker Pillow Speaker
TV Speaker Sound Sound
External Speaker No Sound Sound
Connecting the TV with an SBB or STB
[TV Rear Panel]
Data Cable
ETH MODEM
1.
Connect the [DATA] jack of the TV to the [ETH MODEM]
jack of the STB (SBB) with the data cable.
✎ The “ETH MODEM” jack name that you connect
the Data Cable to may differ depending on the SBB
or STB type.
BN68-05850Q-02
MAINTENANCE AND SERVICING
Never remove the back cover of the TV; this can expose you to high voltage and other hazards. If the TV does not
operate properly, unplug it and call an authorized service center.
CLEANING AND DISINFECTING
Clean the exterior of this television by removing dust with a lint-free cloth.
CAUTION: To avoid damage to the surface of the television, do not use abrasive or chemical cleaning agents.
RAIN AND MOISTURE
WARNING: To avoid the hazards of fi re or electrical shock, DO NOT expose this television to
rain or moisture.
OXYGEN ENVIRONMENT
WARNING: Do not use in any oxygen tent or oxygen chamber.
Such use may cause a fi re hazard.
WET LOCATION
Apparatus shall not be exposed to dripping or splashing and no objects fi lled with liquids,
such as vases, shall be placed on the apparatus.
SERVICE INSTRUCTIONS
CAUTION: These servicing instructions are for use by qualifi ed service personnel only.
To reduce the risk of electric shock, do not perform any servicing other than contained in the operating instructions
unless you are qualifi ed to do so.
For 120 volt applications, use only a UL-Listed detachable power cord with NEMA confi guration 5–15P type (parallel
blades) plug cap.
For 240 volt applications, use only a UL-Listed detachable power supply cord with NEMA confi guration 6–15P type
(tandem blades) plug cap.
Warning - Wall of Ceiling Mounting
The product should be mounted to a wall or ceiling only as recommended by the manufacturer. The product may
slide or fall, causing serious injury to a child or adult, and serious damage to the product.
♦ UI Scenario
Self Diagnosis for TV
Self Diagnosis for HTV
SW Update
Service Pattern
ATV cable AGC Gain
OFF
DTV OpenCable AGC Gain
Default
Default
TV Reset
If you select
Change
If you select
Standalone Only
If you select
Interactive
TV will enter the RF mode.
Press Power OFF to exit.
Interactive
Hospitality Option Menu
appears.
If you don’t change the country of the Current Location
If you select Skip
If you select
Standalone Setup
Select your language
Press Power OFF to exit.
Select Picture mode
Select Clock Mode, DST, and your Time Zone
Select the channel
band to use for
Auto Program
After Searching
channels.
If you select Factory Reset, the TV resets all values to their factory
defaults and then displays the Hospital Plug & Play menu. Go to the
fi rst Hospital Plug & Play screen below.
The TV is automatically
turned off and on.
If you change the country
of the Current Location
Local Set
Change Locat Set if Located in North America, Latin America and Europe.
In other regions, Please press SKIP button move to the next step.
Current Localset : US
Change Skip
Local Set
Change Locat Set if Located in North America, Latin America and Europe.
In other regions, Please press SKIP button move to the next step.
Current Localset : US
Change Skip
Easy Set up
Intertactive
(Hotel Menu)
Standalone Setup
(Continue Setup)
Standalone Only
(End Setup)
If you select this, the
setup process will be
completed and go to
hotel menu
c
Select your Language
Select your language to start the on screen setup.
The Language Setting will be applied to Main Menu and not Plug and Play.
Press the ▲▼◄►
buttons to move the
highlight.
Press the enter button to
select.
English
Español
Français
age
Press
the
▲▼◄►
c
Configure your TV
Picture Mode Standard
Choose a picture mode
that best suits your
viewing enviroment.
Select your information in all of the categories
below.
TV Setup Complete!
Your TV is now ready to use
OK
Auto Program
Antenna Both
Digital Cable System STD
Analog Cable System STD
Select current connected
antenna.
To get channels, set the options below select
Scan.
Scan
Auto Program
Auto Program is channels for you...
Air 21
6%
Stop
DTV Air0
Air
DTV Cable
Cable
0
0
0
Clock
-- : -- --
You can adjust your time to set DST, Time Zone and
clock mode
Set current date and time
Clock Mode Auto
Date
-- / -- / ----
Time
-- : -- --
DST Off
Time Zone Eastern
Local Set
Warning! TV might not function if local set is not correctly configured.
When Local set is changed, TV will turn off automatically to apply it.
US
Countries List
USA
Standalone
Hospitality Option Menu
appears.
Auto Program
Auto Program is incomplete.
0 channels are memorized.
Change Settings Scan Again
DTV Air0
Air
DTV Cable
Cable
0
0
0
Licence
Manufactured under license from Dolby Laboratories. Dolby and the double-D symbol are trademarks of Dolby
Laboratories.
Manufactured under a license from U.S. Patent No’s: 5,956,674, 5,974,380, 5,978,762, 6,487,535, 6,226,616,
7,212,872, 7,003,467, 7,272,567, 7,668,723, 7,392,195, 7,930,184, 7,333,929 and 7,548,853. DTS, the
Symbol, and DTS and the Symbol together are registered trademarks & DTS Premium Sound is a trademark
of DTS, Inc. ©2012 DTS, Inc. All Rights Reserved.
Manufactured under a license from U.S. Patent No’s: 6,285,767, 8,027,477, 5,319,713, 5,333,201, 5,638,452,
5,771,295, 5,970,152, 5,912,976, 7,200,236, 7,492,907, 8,050,434, 7,720,240, 7,031,474, 7,907,736 and
7,764,802. DTS, the Symbol, and DTS and the Symbol together are registered trademarks & DTS Studio
Sound is a trademark of DTS, Inc. ©2012 DTS, Inc. All Rights Reserved.
The terms HDMI and HDMI High-Defi nition Multimedia Interface, and the HDMI Logo are trademarks or
registered trademarks of HDMI Licensing LLC in the United States and other countries.
DivX Certified® to play DivX® video up to HD 1080p, including premium content.
ABOUT DIVX VIDEO: DivX® is a digital video format created by DivX, LLC, a subsidiary of Rovi Corporation. This is an official DivX Certified®
device that has passed rigorous testing to verify that it plays DivX video. Visit divx.com for more information and software tools to convert your
files into DivX videos.
ABOUT DIVX VIDEO-ON-DEMAND: This DivX Certified® device must be registered in order to play purchased DivX Video-on-Demand (VOD)
movies.
To obtain your registration code, locate the DivX VOD section in your device setup menu. Go to vod.divx.com for more information on how to
complete your registration.
DivX®, DivX Certified® and associated logos are trademarks of Rovi Corporation or its subsidiaries and are used under license.
Covered by one or more of the following U.S. patents: 7,295,673; 7,460,668; 7,515,710; 7,519,274
Open Source License Notice
In the case of using open source software, Open Source Licenses are available on the product menu.
Open Source License Notice is written only English.
[HC673-ZC-QSG]BN68-05850Q-02L02.indd 1 2014-04-16 4:40:56

Pour enregistrer ce produit, veuillez SVP aller à
www.samsung.com/register.
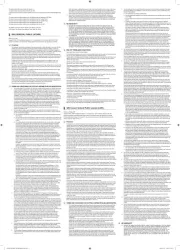
Guide d’installation rapide
Liste des pièces
1
2
Cordon d’alimentation Guide de l’utilisateur
Guide de sécurité
Affi chage du panneau de branchement
3
PILLOW
OUT
4
5
- SIDE -
HDMI IN 1
HDMI IN 2
(DVI)
2
(5V 0.5A)
/CLONING
1
AV IN
AUDIO
VIDEO
HDMI
IN 3
EX-LINK
AUDIO OUT
6
ANT IN
AIR/CABLE
1
8
7
➣ La couleur et la forme du produit peuvent varier en fonction du modèle.
1 HDMI IN 1, 2(DVI), 3
2 USB (5V 0.5A) / CLONING
3 VIDEO / L-AUDIO-R
4 PILLOW OUT
5 EX-LINK
6 AUDIO OUT
7 ANT IN (AIR/CABLE)
8 DATA
En mode Hôtel (interactif ou Hors ligne), les éléments du menu Canal dans Menu OSD, sont désactivés, à
l’exception de la liste des canaux. Si vous devez changer l’attribution des chaînes, utilisez l’option Réglage du
canal dans le menu d’options Hôtel.
Avis
Télécommande du téléviseur
Le dispositif de commande du téléviseur, un petit bouton similaire à une manette de jeu situé dans la partie arrière
droite de ce dernier, permet de commander le téléviseur sans télécommande.
Télécommande du téléviseur
L’image se dessine lorsque
vous vous mettez en face
du téléviseur.
Mise hors tension
Menu Fonction
Capteur pour la télécommande
retour
Utilisation du
Media Play
Utilisation du
Menu
Sélectionnez
une source
Liste des fournisseurs qui offrent les câbles de données compatibles avec le téléviseur
♦ Reportez-vous au code de l’étiquette sur
les câbles de données.
Notez l’extrémité
marquée.
Vérifiez le code sur
l’étiquette
Notez l’extrémité
marquée.
Vendor Cable code
Samsung OCC
Enseo Guest-Tek
BN39-00865B
NXTV BN39-01011B
nStreams BN39-01110A
MTI BN39-01011C
Mode hôtel - prêt à l’emploi
La fonction Mode hôtel - prêt à l’emploi effectue automatiquement la confi guration du mode Hôtel, le réglage du
pays, le réglage de l’horloge et du mode d’image lorsque le téléviseur est allumé pour la première fois. Elle s’exécute
automatiquement aussi lorsque le téléviseur est allumé pour la première fois suite à une réinitialisation de service.
♦ Affi chage du mode Hôtel - prêt à l’emploi
- Option mise en surbrillance initialement :Interactif
- Si vous sélectionnez le bouton Hors ligne seulement, le mode Hôtel hors ligne est réglé par défaut et l’option « Mode hors
ligne est fixé » s’affiche à l’écran pendant 3 secondes.
- Le téléviseur entre en mode RF automatiquement après l’affichage du message OSD Standalone mode is set » (mode
Hôtel hors ligne est fixé) pendant 3 secondes.
- Le menu de configuration interactif s’affiche lorsque vous sélectionnez le mode Interactif. Appuyez sur la touche de mise
sous tension pour quitter le menu interactif.
- Si vous sélectionnez le mode Prêt à l’emploi - Hors ligne, l’option « Sélectionner la langue du menu s’affiche à l’écran.
♦ Réglage local
- Option mise en surbrillance initialement : États-Unis
- Si vous appuyez sur la touche Enter après avoir choisi Modifier, vous pouvez choisir un autre pays.
- Si un autre pays est sélectionné, le téléviseur s’éteint puis se rallume automatiquement.
- Le menu de configuration interactif s’affiche lorsque vous sélectionnez le mode Interactif. Appuyez sur la touche de mise
sous tension pour quitter le menu interactif.
- Si le mauvais pays a été sélectionné, effectuez la réinitialisation du téléviseur une fois dans la section Service du menu
Hôtel.
♦ Affi chage de sélection de la langue des menus
- Si vous sélectionnez «Hors ligne» à partir de l’option «Sélectionner mode téléviseur hôtel », l’option «Sélectionner la langue
du menu» s’affiche.
- Option mise en surbrillance initialement : Français
- Durée de l’affichage : Le délai OSD et l’utilisation de l’écran sont les mêmes que ceux des téléviseurs des clients de
Samsung.
- Si vous appuyez sur la touche Enter, l’option « Sélectionner le pays » s’affiche.
♦ Affi chage du mode image
- Initially highlighted: Standard.
- The TV displays the Picture Mode OSD where you can choose Dynamic or Standard Picture mode.
♦ Affi chage du mode de recherche automatique
- Option mise en surbrillance initialement : Standard.
- La durée d’affichage, qui commence au moment où l’enregistrement automatique se termine et où le tri automatique
débute, est de 30 secondes.
♦ Réglez le mode Horloge, H. d’été et Fuseau hor.
- Option mise en surbrillance initialement : Mode Horloge : Auto, H. d’été : Désactivé, Fuseau hor. : Est
- Si le téléviseur est réglé sur des chaînes numériques et que ces chaînes transmettent des informations relatives à l’heure et
à la date, réglez le Mode horloge à Programm. auto. La date et l’heure seront réglées automatiquement par le téléviseur.
- Si le téléviseur n’est pas réglé sur des chaînes numériques, réglez le Mode horloge sur Manuel; ensuite, réglez
manuellement l’heure et la date sur le téléviseur.
- Activez ou désactivez l’option H. d’été pour appliquer ou non l’heure avancée au téléviseur.
Spécifi cations de l’ensemble de fi xation murale (VESA)
Installation sur un mur ou au plafond
Pour l’installation du support du produit sur un mur, vous devez suivre les instructions du fabricant. Si l’appareil est mal installé, il risque de
glisser ou de tomber et d’être endommagé sérieusement. Il risque aussi de blesser grièvement un enfant ou un adulte.
Installez le support mural sur un mur massif perpendiculaire au plancher. Si vous fi xez le support à un matériau de
construction autre que le placoplâtre, veuillez communiquer avec votre détaillant local. Si vous l’installez au plafond
ou sur un mur incliné, il risque de tomber et de causer des blessures.
➣ Les dimensions standard pour les ensembles de fi xation murale fi gurent dans le tableau ci-dessous.
➣ Les ensembles de fi xation murale de Samsung sont fournis avec un guide d’installation détaillé et toutes les pièces
nécessaires à l’assemblage.
➣ N’utilisez pas de vis non conformes aux spécifi cations VESA relatives aux vis standard.
➣ N’utilisez pas de vis plus longues que les dimensions standard ou non conformes aux spécifi cations VESA en la
matière. Des vis trop longues pourraient endommager l’intérieur du téléviseur.
➣ En ce qui a trait aux supports muraux non conformes aux spécifi cations de la norme VESA relatives aux vis, la longueur
des vis peut différer selon les spécifi cations du support mural.
➣ Ne serrez pas trop les vis; cela pourrait endommager le produit ou provoquer sa chute et causer des blessures.
Samsung décline toute responsabilité dans le cas où de tels accidents se produiraient.
➣ Samsung ne saurait être tenue responsable des dommages au produit ou des blessures occasionnés par l’utilisation
d’un support mural non conforme aux spécifi cations VESA ou non recommandé, ou si le consommateur ne suit pas les
instructions d’installation du produit.
➣ N’installez pas le téléviseur à un angle d’inclinaison de plus de 15 degrés.
➣ Il faut deux personnes pour fi xer le téléviseur sur un mur.
Type de produit
Taille du téléviseur
en pouces
Spécifi cations VESA de l’orifi
ce de passage des vis (A * B)
en millimètres
Vis standard Quantité
LED-TV 28 100 X 100 M4
4
N’installez pas le support mural lorsque le téléviseur est sous tension. Il pourrait survenir des blessures
causées par un choc électrique.
✎ La couleur et la forme du produit peuvent varier en fonction du modèle.
✎ Pour quitter le menu, appuyer sur la commande pendant plus d’une seconde.
✎ Lorsque vous déplacez la télécommande vers l’avant/arrière/gauche/droite pour sélectionner une fonction, assurez-vous de ne pas pousser la télécommande
vers le haut. Si vous poussez vers le haut en premier, vous n’obtiendrez pas le résultat escompté.
Mode veille
Le téléviseur passe en mode veille lorsque vous l’éteignez et continue de consommer une petite quantité d’électricité. Par
mesure de sécurité et pour réduire votre consommation électrique, ne laissez pas votre téléviseur en mode veille durant de
longues périodes (par exemple lorsque vous partez en vacances). Il est conseillé de débrancher le cordon d’alimentation.
Branchement d’un bas-parleur d’oreiller
Vous pouvez brancher un bas-parleur d’oreiller au téléviseur de l’hôpital à l’aide d’un fi l de connexion. Le bas-parleur
fonctionne comme une télécommande et un haut-parleur.
POLLOW OUT
Fil de connexion
Fil de connexion
Panneau arrière du téléviseur
1. Au moyen du fi l de connexion du bas-parleur d’oreiller (fi l fourni séparément), reliez la prise du PILLOW SPEAKER du
téléviseur à celle du bas-parleur sur le mur derrière l’appareil.
Spécifications de la prise du bas-parleur d’oreiller
Prise de sortie: type RCA
Cavaliers d’entrée : fi che stéréo à 3 conducteurs de 1/8 po.
Spécifi cations du signal : extrémité (audio), anneau (données/changement de
canal), douille (commun)
Tip Anneau Anneau
Comment utiliser le bas-parleur d’oreiller
Haut-parleur de type analogique. Le bas-parleur d’oreiller a une touche.
-Mise sous tension: Appuyez sur la touche lorsque le téléviseur est en mode Veille.
-Changement de canal: appuyez sur la touche lorsque le haut-parleur est sous tension.
-Mise hors tension: appuyez sur la touche pendant plus de trois secondes lorsque le haut-parleur est sous tension.
-Un haut-parleur de type analogique fonctionne toujours peu importe la valeur du type de bas-parleur réglé dans le menu
de configuration du mode hôpital.
Haut-parleur de type analogique : le téléviseur est compatible avec le code Samsung, Philips ou Zenith.
-Ce haut-parleur n’est compatible qu’avec un code infrarouge particulier. Vous pouvez changer le code dans le menu de
configuration du mode hôpital.
-L
e téléviseur accorde la préséance à la télécommande Samsung plutôt qu’à la télécommande sans fil du bas-parleur d’oreiller.
-Option: Affichage du menu des canaux
Commande sonore du bas-parleur d’oreiller
Menu de sélection du haut-parleur Haut-parleur du téléviseur Bas-parleur d’oreiller
Haut-parleur du téléviseur Son Son
Haut-parleur externe Aucun son Son
Raccordement du téléviseur au récepteur
[Panneau arrière du téléviseur]
Câble de données
ETH MODEM
1.
Connectez la prise [DATA] du téléviseur à la prise [ETH
MODEM] du récepteur à l’aide du câble de données.
✎ La prise qui porte le nom « ETH MODEM »
et dans laquelle vous branchez le câble de
données pourrait porter un nom différent en
fonction du type de récepteur ou de serveur.
BN68-05850Q-02
Spécifi cations
Facteurs environnementaux
Température de fonctionnement
Niveau d’humidité en fonctionnement
Température d’entreposage
Niveau d’humidité en entreposage
10 °C à 40 °C (50 °F à 104 °F)
10 à 80 %. sans condensation
-20 °C à 45 °C (-4 °F à 113 °F)
5 à 95 %. sans condensation
Nom du modèle
HG28NC673
Résolution d’affi chage
1366 x 768
Taille de l’écran
(diagonale)
28" Catégorie
(28.0" pouces en diagonale)
Son (sortie)
5W x 2
Dimensions (L x P x H)
Boîtier
25.3 x 15.6 x 2.5 pouces
(643.4 x 396.5 x 62.9 (mm))
Poids
8.6 lbs (3.9 kg)
➣ La conception et les spécifi cations peuvent faire l’objet de modifi cations sans préavis.
➣ Cet appareil est un appareil numérique de catégorie B.
AVERTISSEMENT : Cet appareil contient des produits chimiques reconnus par l’État de Californie pour causer le
cancer et une toxicité de la reproduction.
Dimensions
HG28NC673
1
43
2
5
(Unité: pouce)
1 2 3 4 5
HG28NC673 25,3 24 13,7 15,6 2,5
REMARQUE À L’INTENTION DE L’INSTALLATEUR DU SYSTÈME DE CÂBLODISTRIBUTION
La présente remarque vise à rappeler l’article 820-22 du code national de l’électricité (États-Unis) à l’installateur
du système de câblodistribution. Cet article défi nit les principes directeurs relatifs à une mise à la terre correcte et
précise que la mise à la terre du câble doit être raccordée au système de mise à la terre du bâtiment, aussi près que
possible du point d’entrée du câble.
ENTRETIEN ET RÉPARATIONS
Vous ne devez en aucun retirer le panneau arrière du téléviseur. Dans le cas contraire, vous risquez de vous exposer
♦ Scénario UI
Self Diagnosis for TV
Self Diagnosis for HTV
SW Update
Service Pattern
ATV cable AGC Gain
OFF
DTV OpenCable AGC Gain
Default
Default
TV Reset
Si vous
sélectionnez
Modifi er
Si vous sélectionnez
Hors ligne seulement
Si vous sélectionnez
Interactif
Le téléviseur passera au mode RF.
Appuyez sur la touche de
mise hors tension pour sortir
du menu.
Interactif Le menu des
options d’hôtel s’affi che.
Si vous ne changez pas le pays de votre position actuelle
Si vous sélectionnez
Passer
Si vous sélectionnez
Confi guration hors ligne
Sélectionnez la langue
Appuyez sur la touche de mise
hors tension pour sortir du menu.
Sélectionnez un mode Image
Sélectionnez le mode Horloge, H. d’été et votre
Fuseau horaire
Sélectionnez la bande de
chaînes à utiliser pour la
programmation automatique.
Après la recherche
de chaînes.
Si vous choisissez de rétablir les paramètres par défaut du téléviseur,
toutes les valeurs seront ramenées aux valeurs par défaut, et le téléviseur
affi chera le menu prêt à l’emploi pour les hôpitaux. Allez au premier écran
prêt à l’emploi d’hôpital illustré ci-dessous.
Le téléviseur est mis hors
tension et sous tension
automatiquement.
Si vous changez le pays de
votre position actuelle
Local Set
Change Locat Set if Located in North America, Latin America and Europe.
In other regions, Please press SKIP button move to the next step.
Current Localset : US
Change Skip
Local Set
Change Locat Set if Located in North America, Latin America and Europe.
In other regions, Please press SKIP button move to the next step.
Current Localset : US
Change Skip
Easy Set up
Intertactive
(Hotel Menu)
Standalone Setup
(Continue Setup)
Standalone Only
(End Setup)
If you select this, the
setup process will be
completed and go to
hotel menu
c
Select your Language
Select your language to start the on screen setup.
The Language Setting will be applied to Main Menu and not Plug and Play.
Press the ▲▼◄►
buttons to move the
highlight.
Press the enter button to
select.
English
Español
Français
age
Press
the
▲▼◄►
c
Configure your TV
Picture Mode Standard
Choose a picture mode
that best suits your
viewing enviroment.
Select your information in all of the categories
below.
TV Setup Complete!
Your TV is now ready to use
OK
Auto Program
Antenna Both
Digital Cable System STD
Analog Cable System STD
Select current connected
antenna.
To get channels, set the options below select
Scan.
Scan
Auto Program
Auto Program is channels for you...
Air 21
6%
Stop
DTV Air0
Air
DTV Cable
Cable
0
0
0
Clock
-- : -- --
You can adjust your time to set DST, Time Zone and
clock mode
Set current date and time
Clock Mode Auto
Date
-- / -- / ----
Time
-- : -- --
DST Off
Time Zone Eastern
Local Set
Warning! TV might not function if local set is not correctly configured.
When Local set is changed, TV will turn off automatically to apply it.
US
Countries List
USA
Le menu des options
d’hôtel hors ligne s’affi che.
Auto Program
Auto Program is incomplete.
0 channels are memorized.
Change Settings Scan Again
DTV Air0
Air
DTV Cable
Cable
0
0
0
STOP
Veuillez ne pas
retourner cet appareil.
Si vous avez des problèmes avec ce téléviseur
:composez le :
États-Unis : 1-866-894-0524
CANADA : 1-800-726-7864
Pour obtenir de l’assistance en ligne, visitez :
http://www.samsung.com/us/business
à des tensions élevées ou d’autres dangers. Si le téléviseur ne fonctionne pas correctement, débranchez-le et
appelez un centre de service autorisé.
NETTOYAGE ET DÉSINFECTION
Essuyez la partie extérieure du téléviseur à l’aide d’un chiffon non pelucheux.
ATTENTION : Évitez d’utiliser une substance abrasive ou un produit nettoyant pour ne pas endommager la surface du
téléviseur.
PLUIE ET HUMIDITÉ
AVERTISSEMENT: Pour éviter les risques d’incendie et d’électrocution, N’EXPOSEZ PAS ce
téléviseur à la pluie ni à une humidité excessive.
ENVIRONNEMENT À OXYGÈNE
AVERTISSEMENT: Évitez de faire fonctionner le téléviseur dans une tente ou dans une
chambre à oxygène, car cela peut présente un risque d’incendie.
ENDROIT HUMIDE
L’appareil ne droit pas être exposé aux gouttes ou aux éclaboussures et aucun objet
contenant du liquide, comme un vase, ne doit être posé sur l’appareil.
INSTRUCTIONS RELATIVES À L’ENTRETIEN
ATTENTION : Ces instructions sont destinées aux seuls techniciens qualifi és.
Pour réduire le risque d’électrocution, n’effectuez aucune procédure d’entretien autre que celles contenues dans les
instructions d’utilisation à moins que vous ne soyez qualifi é pour le faire.
Pour des applications en 120 V, utilisez uniquement un cordon d’alimentation détachable agrée UL avec une fi che de
confi guration NEMA 5-15P (lames parallèles).
Pour des applications en 240 V, utilisez uniquement un cordon d’alimentation détachable agréé UL avec une fi che de
confi guration NEMA 6-15P (lames tandem).
Mise en garde – Installation sur un mur ou au plafond
L’appareil doit être installé sur un mur ou au plafond selon les instructions du fabricant. L’appareil risque de glisser ou
de tomber et d’être endommagé causant ainsi des blessures graves à un enfant ou un adulte.
Licence
Fabriqué sous licence de Dolby Laboratories. Dolby et le symbole double D sont des marques de commerce
de Dolby Laboratories.
Manufactured under a license from U.S. Patent No’s: 5,956,674, 5,974,380, 5,978,762, 6,487,535, 6,226,616,
7,212,872, 7,003,467, 7,272,567, 7,668,723, 7,392,195, 7,930,184, 7,333,929 and 7,548,853. DTS, the
Symbol, and DTS and the Symbol together are registered trademarks & DTS Premium Sound is a trademark
of DTS, Inc. ©2012 DTS, Inc. All Rights Reserved.
Manufactured under a license from U.S. Patent No’s: 6,285,767, 8,027,477, 5,319,713, 5,333,201, 5,638,452,
5,771,295, 5,970,152, 5,912,976, 7,200,236, 7,492,907, 8,050,434, 7,720,240, 7,031,474, 7,907,736 and
7,764,802. DTS, the Symbol, and DTS and the Symbol together are registered trademarks & DTS Studio
Sound is a trademark of DTS, Inc. ©2012 DTS, Inc. All Rights Reserved.
The terms HDMI and HDMI High-Defi nition Multimedia Interface, and the HDMI Logo are trademarks or
registered trademarks of HDMI Licensing LLC in the United States and other countries.
DivX Certified® to play DivX® video up to HD 1080p, including premium content.
ABOUT DIVX VIDEO: DivX® is a digital video format created by DivX, LLC, a subsidiary of Rovi Corporation. This is an official DivX Certified®
device that has passed rigorous testing to verify that it plays DivX video. Visit divx.com for more information and software tools to convert your
files into DivX videos.
ABOUT DIVX VIDEO-ON-DEMAND: This DivX Certified® device must be registered in order to play purchased DivX Video-on-Demand (VOD)
movies.
To obtain your registration code, locate the DivX VOD section in your device setup menu. Go to vod.divx.com for more information on how to
complete your registration.
DivX®, DivX Certified® and associated logos are trademarks of Rovi Corporation or its subsidiaries and are used under license.
Covered by one or more of the following U.S. patents: 7,295,673; 7,460,668; 7,515,710; 7,519,274
Open Source License Notice
In the case of using open source software, Open Source Licenses are available on the product menu.
Open Source License Notice is written only English.
[HC673-ZC-QSG]BN68-05850Q-02L02.indd 2 2014-04-16 4:40:57
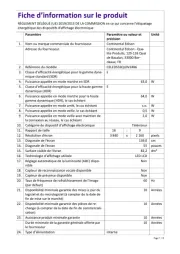
Produktspezifikationen
| Marke: | Samsung |
| Kategorie: | Fernseher |
| Modell: | HG28NC673AF |
| Bildschirmdiagonale: | 28 " |
| Eingebaute Lautsprecher: | Ja |
| WLAN: | Nein |
| Mitgelieferte Kabel: | AC |
| Produktfarbe: | Schwarz |
| RMS-Leistung: | 10 W |
| AC Eingangsspannung: | 110 - 240 V |
| AC Eingangsfrequenz: | 50 Hz |
| Sleep-Timer: | Ja |
| Anzahl USB 2.0 Anschlüsse: | 1 |
| On-Screen-Display (OSD): | Ja |
| Menüsprachen: | ENG, ESP, FRE |
| Verpackungsbreite: | 815 mm |
| Verpackungstiefe: | 108 mm |
| Verpackungshöhe: | 463 mm |
| Paketgewicht: | 4800 g |
| Schnellstartübersicht: | Ja |
| Stromverbrauch (Standardbetrieb): | 30 W |
| Automatische Abschaltung: | Ja |
| Plug & Play: | Ja |
| HD-Typ: | HD |
| Bildschirmform: | Flach |
| Natives Seitenverhältnis: | 16:9 |
| Helligkeit: | 250 cd/m² |
| Reaktionszeit: | 8 ms |
| Kontrastverhältnis: | 1200:1 |
| Bildwinkel, horizontal: | 178 ° |
| Bildwinkel, vertikal: | 178 ° |
| Digitales Signalformatsystem: | ATSC |
| Anzahl HDMI-Anschlüsse: | 3 |
| Anzahl der Lautsprecher: | 2 |
| Stromverbrauch (Standby): | 1 W |
| LED-Anzeigen: | Ja |
| Automatische Kanalsuchlauf: | Ja |
| Bild-in-Bild: | Ja |
| Elektronischer Programmführer (EPG): | Nein |
| Audio (L,R) Out: | 1 |
| Composite Video-Eingang: | 1 |
| PC-Eingang (D-Sub): | Nein |
| Gewicht (ohne Ständer): | 3700 g |
| Breite (ohne Standfuß): | 643.4 mm |
| Tiefe (ohne Standfuß): | 62.9 mm |
| Höhe (ohne Standfuß): | 396.5 mm |
| VESA-Halterung: | Ja |
| 3D: | Nein |
| Internet-TV: | Nein |
| DVI Anschluss: | Nein |
| Anzahl RF Anschlüsse: | 1 |
| Panel-Montage-Schnittstelle: | 100 x 100 mm |
| Ein-/Ausschalter: | Ja |
| Wi-Fi Direct: | Nein |
| Sprachsteuerung: | Nein |
| Eingebaute Audio-Decoder: | Dolby Digital, DTS, Dolby Digital Plus, Dolby Digital Pulse, DTS Premium Sound 5.1, DTS Studio Sound |
| Spiel-Modus: | Ja |
| Bildverarbeitungsverfahren: | Samsung Wide Color Enhancer |
| Nachhaltigkeitszertifikate: | ENERGY STAR |
| BD-Wise: | Nein |
| Auto Lautstärkeregler: | Ja |
| Anzahl OSD-Sprachen: | 3 |
| Display-Auflösung: | 1366 x 768 Pixel |
| Ethernet/LAN: | Nein |
Brauchst du Hilfe?
Wenn Sie Hilfe mit Samsung HG28NC673AF benötigen, stellen Sie unten eine Frage und andere Benutzer werden Ihnen antworten
Bedienungsanleitung Fernseher Samsung
11 Juli 2025
10 Juli 2025
10 Juli 2025
10 Juli 2025

10 Juli 2025
10 Juli 2025
10 Juli 2025
10 Juli 2025

10 Juli 2025
10 Juli 2025
Bedienungsanleitung Fernseher
- TechniSat
- Proscan
- Vox
- Nordmende
- Sharp
- Pioneer
- Vivax
- Sony
- Durabase
- Sencor
- Medion
- Nokia
- Nikkei
- High One
- Ferguson
Neueste Bedienungsanleitung für -Kategorien-
11 Juli 2025

11 Juli 2025
11 Juli 2025
11 Juli 2025

11 Juli 2025
11 Juli 2025
10 Juli 2025

10 Juli 2025
10 Juli 2025