Samsung UA32K4000DR Bedienungsanleitung
Samsung Aircondition UA32K4000DR
Lies die bedienungsanleitung für Samsung UA32K4000DR (4 Seiten) kostenlos online; sie gehört zur Kategorie Aircondition. Dieses Handbuch wurde von 19 Personen als hilfreich bewertet und erhielt im Schnitt 4.2 Sterne aus 6 Bewertungen. Hast du eine Frage zu Samsung UA32K4000DR oder möchtest du andere Nutzer dieses Produkts befragen? Stelle eine Frage
Seite 1/4
Figures and illustrations in this User Manual are provided for reference
only and may differ from actual product appearance. Product design and
Still image warning
yAvoid displaying the same TV channel for long periods.
y
y
process.
y
For personal and non-commercial use only.
¦Getting Started
Accessories
y
yUser Manual
y
y
y
y
y
Input Cables (Sold Separately)
y
y
y
yHDMI
yHDMI-DVI
Turning on the TV
Turn on the TV using the
P
button on the remote control or TV panel.
-
-
-The product colour and shape may vary depending on the model.
-
/
/
Press: Move
Press & Hold: Select
Plug & Play (Initial Setup)
POWER
✎
✎
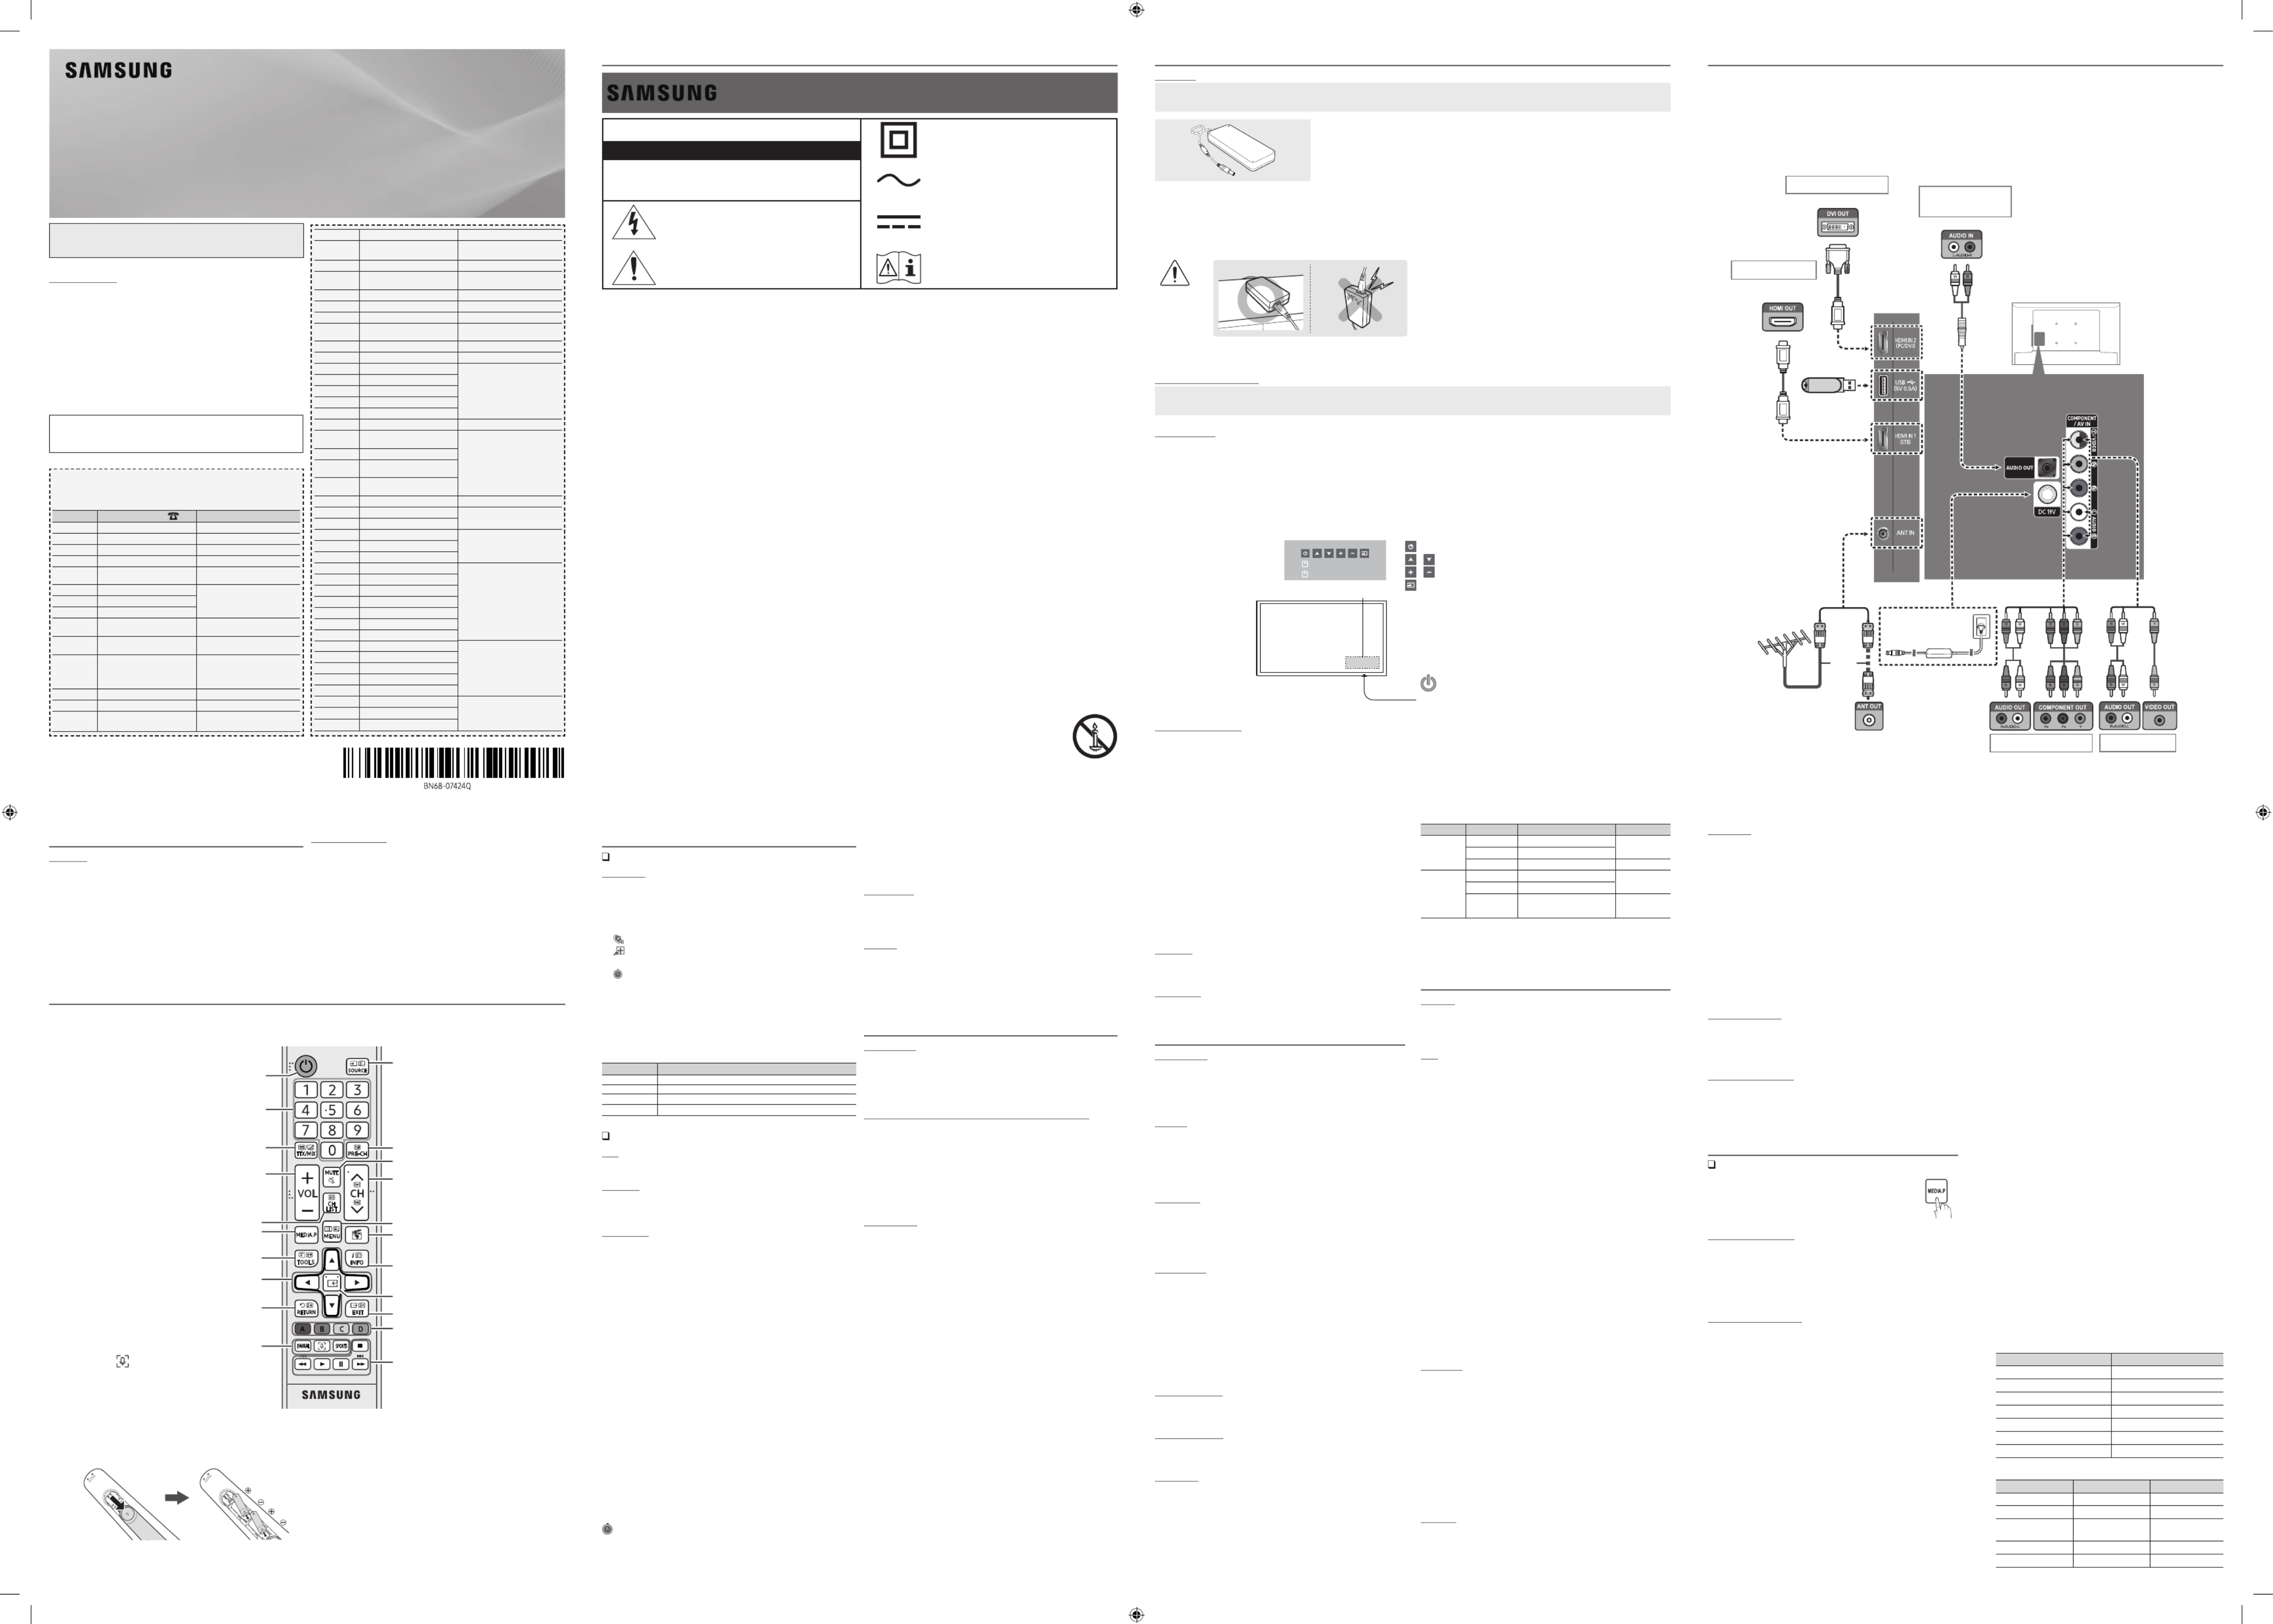
¦Connections
y
an HDMI
y
HDMI mode is
HDMI
an upgrade.
y HDMI
may not display or a connection error may occur.
y
yFor HDMI/DVI HDMI IN 2 (PC/DVI)
port.
y HDMI
yIf an HDMI to DVI HDMI IN 2 (PC/DVI) port,
y HDMI
you to connect the HDMI IN 1 (STB) port.
TV Rear Panel
VHF/UHF
Antenna
or
yThe rear panel may differ
depending on the model.
DVD / Home Theatre
¦Remote Control
✎Power, , Channel VolumeEnter, and
✎
Alternately selects Teletext ONDoubleMix, ,
or OFF.
Returns to the previous channel.
Gives direct access to channels.
Turns the TV on and off.
directions on the TV screen.
E-MANUAL
More TV Feature on or off.
SPORTSSports Modeon or off.
Turns the sound on and off.
Provides an optimal picture and sound for
the popular content in your geographical
area.
Launches the Channel List.
programme or content.
E
(ENTER
item.
Moves the cursor, selects the on-screen menu
TV's menu.
Returns to the previous menu.
sources.
directions on the TV screen.
Media Play.
Adjusts the volume.
Installing batteries (Battery size: AAA)
✎
✎
✎The colour and shape may vary depending on the model.
¦Channel Menu
Seeing Channels
Channel List
Add, delete or set favourite channels and use the programme guide for
All Channels, Added Channels,
Favourite ChannelsProgrammedor ▲/▼
and pressing the ENTER
E
channel.
■All Channels
■Added Channels
■
*
Favourite Channels
■Programmed
✎Channel List.
yGreen (Zoom
y Select
time. The
c
mark appears to the left of the selected channels.
y
T
(ToolsChannel List option menu. (The Options menus
Channel Status Display icons
Icons Operations
c
A channel selected.
*
A channel set as a favourite.
)
A reserved programme.
(
Retuning Channels
Area
Auto Store
Manual Store
✎According to channel source, Manual Store
✎ProgrammeColour SystemSound SystemChannelSearchStore, , , , ,
Channel List Option Menu
t
Channel List menu options. Option menu items
may differ depending on the channel status.
■Add / Delete
✎All Channels menu.
✎
✎The menu only appears for deleted channels.Add
✎Delete a channel from the Added ChannelsFavourite Channelsor menu in
the same manner.
■Add to FavouriteDelete from Favourite /
t
■Timer Viewing
✎
✎Programmed menu.
■Edit Channel Name
name.
■Select All
■Deselect All
■Auto Store
Programmed
(in Channel List
■Change Info
■Cancel Schedules
■Information
■Select AllDeselect All /
channel list.
Channel Mode
Added ChannelsFavourite and
Channels.
✎The Favourite ChannelsAdd to Favourite.
Fine Tune
done automatically during the search and store operation. If the signal is
✎
✎
¦Picture Menu
Mode
t
■Dynamic
■Standard
■Movie
BacklightContrastBrightnessSharpnessColour / / / / / Tint (G/R)
✎In analogue , modes of the PAL system, the TVAVTint (G/R) function is
✎Backlight,
Contrast BrightnessSharpness, and .
✎
to the TV.
✎
Picture Options
■Colour Tone
✎WarmDynamic.
■Size
16:9 mode most
of the time.
16:9
Wide Zoom
Zoom
✎
the left, right and centre of the screen may cause image retention (screen
4:3
Screen Fit
Custom
Auto Wide
Automatically adjusts the picture size to the 16:9 aspect ratio.
■Auto Wide16:9 / Wide ZoomZoom / / 4:3
Auto Wide
✎
the left, right and centre of the screen may cause image retention (screen
NOTE
✎Depending on the input source, the picture size options may vary.
✎
✎
to an input on the TV.
■Digital Clean View
( / / / / Auto Off Low Medium High
Digital Clean View
feature to reduce any static and ghosting that may appear on the screen.
✎
¦Changing the Input Source
Source List
1.
Press the SOURCE
2.
■TV / AV / Component / HDMI1 / HDMI2 / DVI
the Source List
How to use Edit Name
Edit Name lets you associate a device name to an input source. To access
Edit Name, enter menu and select InputEdit Name
connected to the input jacks to make your input source selection easier.
✎ HDMI IN 2 (PC/DVI)
you should set the TV to mode under .PCEdit Name
✎ HDMI IN 2 (PC/DVI)
DVI PC mode under .Edit Name
✎When connecting an AV devices to the HDMI IN 2 (PC/DVI)
DVI mode under .Edit Name
¦Important Safety Instructions
Warning! Important Safety Instructions
(Please read the Safety Instructions before using your TV.)
RISK OF ELECTRIC SHOCK. DO NOT OPEN.
any internal part of this product.
important literature concerning operation and
maintenance.
instructs the user to consult the user manual for
further safety related information.
y
y
y
your local authorities for disposal or recycling information.
If this apparatus does not operate normally - in particular, if there are any unusual sounds or smells coming from it - unplug it immediately and contact an authorised
dealer or service centre.
y
insulation to deteriorate.
y
LED TV
User Manual
4
■HDMI Black Level
screen depth.
✎ HDMI
■Film ModeOffAuto /
✎
■Motion Lighting
adapted motion.
■Analogue Clean View
crosstalk of signals.
Picture Off
Picture Reset
Resets your current picture mode to its default settings.
■Reset Picture Mode
¦Sound Menu
Mode
t
■Standard
■Music
■Movie
■Clear Voice
Equalizer
■Balance
■100Hz 1kHz / / 300Hz / 3kHz / 10kHz
■Reset Equalizer to its default settings.
Auto Volume
Speaker Select
the main speaker and the audio receiver. In this case, set the TV to External
Speaker.
✎When you set Speaker SelectExternal Speaker to
When you set Speaker SelectTV Speaker to
✎When Speaker SelectExternal Speaker is set to , the volume and MUTE
✎
TV Installation Type
HDMI Audio Format
connected to the TV's HDMI port.
Sound Reset
■Reset All
Selecting the Sound Mode
t
When you set to Dual I-Dual II, the current sound mode is displayed on the
screen.
Audio TypeDual I-IIDefault
MonoMono Automatic
change
Stereo Stereo↔Mono
DualDual I↔Dual IIDual I
MonoMono Automatic
change
Stereo Mono↔Stereo
Dual MonoDual I
Dual II Dual I
✎
✎Only activated in stereo sound signal.
✎
¦Setup Menu
Language
✎Press ▲ or ▼
Time
✎ INFO
■Clock SetYear MonthHour Minute, , Day, , .
■Sleep Timer
t
Automatically shuts off the TV after a preset period of time. (, Off 30
min60 min120 min150 min180 min, , , 90 min, and
✎To cancel , select .Sleep TimerOff
■Timer 1 / Timer 2 / Timer 3
On TimerOff Timer /
Activate
Volume
ContentsOn Timer
TV TV / USB or USB
✎Aerial
✎Channel
✎Music Photo /
device.
✎
✎
Repeat Once , Everyday, , , Mon~Fri Mon~Sat Sat~SunManualor
to set at your convenience. If you select , you can set up the day Manual
Game Mode
Game ModeOffOn ( /
Game Mode on.
■Precautions and limitations for Game Mode
✎
device, set .Game Mode to Off
✎If you display the TV menu in , the screen shakes slightly.Game Mode
✎Game ModeTV.
✎Game ModeOn to only after connecting a game console. If you turn
Game Mode
✎If is is set to and Game ModeOnPicture Mode Game ModeSound Mode
is set to Game Mode.
Boot Logo
Eco Solution
yEnergy Saving
yEco Sensor
in the room.
✎If you adjust the , the Off.
is On
✎If is On
yNo Signal Power Off
✎
yAuto Power Off
operation is received for 4 hours.
✎If the option is set to Off
operations are performed on the TV.
Auto Protection Time
(Off, 2 hours, 4 hours, 8 hours, 10 hours
saver is activated to prevent the formation of ghost images on the
screen.
DivX® Video On Demand
Media Play,
the registration is completed.
✎
¦Application Menu
Using the Media Play
Connecting a USB Device
1.
Turn on your TV.
2.
files to the USBjack on the side of the TV.
3.
Media Play.
✎
Using the Media Play Menu
1.
Press the MENU▲or ▼
Applications, then press the ENTERE
2.
Press the ▲or ▼Media Play (USB), then press
the ENTERE
3.
Press the ◄or ►Videos Music, ,
PhotosENTERE
✎
✎
TOOLSInformation.
Need-to-Know List before using Media Play (USB)
y
y
yMedia Play
devices connected in MTP or PTP protocol.
y
y
y
yThe higher the resolution of the image, the longer it takes to display on
the screen.
y
yNot
Supported File Format.” message appears.
y
y
the rights and interests of content providers, preventing illegal
yPTP device is not supported.
y
may malfunction.
y
y
yMedia Play,
yPhotos
y
Videos.
y
y
y
y
language is not displayed properly.
■Videos
1.
Press the ◄or ►Videos, then press the
ENTER
EMedia Play menu.
2.
Press the ◄/►
/▲
/▼
file list.
3.
Press the ENTERE∂
-
-
are not displayed.
- ◄ ► and
-
π
µ
✎
cannot play the game itself.
y
-
.smi
.srt
Micro DVD
.ssa
.ass
-Internal
Format
AVIPicture Format
Alpha
MP4
✎
Country Customer Care Centre Web Site
ALGERIA
U.A.E
QATAR
IRAQ
Contact SAMSUNG WORLD WIDE
- 4 -
Produktspezifikationen
| Marke: | Samsung |
| Kategorie: | Aircondition |
| Modell: | UA32K4000DR |
Brauchst du Hilfe?
Wenn Sie Hilfe mit Samsung UA32K4000DR benötigen, stellen Sie unten eine Frage und andere Benutzer werden Ihnen antworten
Bedienungsanleitung Aircondition Samsung

15 Oktober 2024
14 Oktober 2024
12 Oktober 2024
11 Oktober 2024
11 Oktober 2024
10 Oktober 2024
10 Oktober 2024
9 Oktober 2024
8 Oktober 2024
21 August 2024
Bedienungsanleitung Aircondition
Neueste Bedienungsanleitung für -Kategorien-
16 Oktober 2024
16 Oktober 2024
15 Oktober 2024
14 Oktober 2024
13 Oktober 2024
13 Oktober 2024
13 Oktober 2024
13 Oktober 2024
12 Oktober 2024
12 Oktober 2024