Thermaltake Commander FP Bedienungsanleitung
Thermaltake Nicht kategorisiert Commander FP
Lies die bedienungsanleitung für Thermaltake Commander FP (2 Seiten) kostenlos online; sie gehört zur Kategorie Nicht kategorisiert. Dieses Handbuch wurde von 29 Personen als hilfreich bewertet und erhielt im Schnitt 4.7 Sterne aus 9 Bewertungen. Hast du eine Frage zu Thermaltake Commander FP oder möchtest du andere Nutzer dieses Produkts befragen? Stelle eine Frage
Seite 1/2
© 2015 Thermaltake Technology Co., Ltd. All Rights Reserved. www.thermaltake.com
10 Port Hub for PWM fans
PSU
Commander FP
English
Deutsch
Français
Español
Italiano
Português
● 10 SupportuptoindependentPWMfans
● 3- *Compatiblewithpinfans
● BlueLEDprovidespowerindication
● DirectSATApowerinput**
● Simpleandcleancablemanagement
● Highqualityandsymmetrydesign
● Experiencetheunrivaledairflowandwatercoolingcapabilities
● Easily releasable and reusable beaded cable ties
1. Cleananddrythesurfacebeforeapplication
2. PeeltapefromfastenerattachoneVelcrotapetohubandonetochassis ,
3. Connect the PWM signal connector to hub and 4-pin connector to motherboard
4. Connect the main PWM fan connector to glossy side***
5. Connecttherestoffans tohub
6. ConnectthePSUSATAconnector
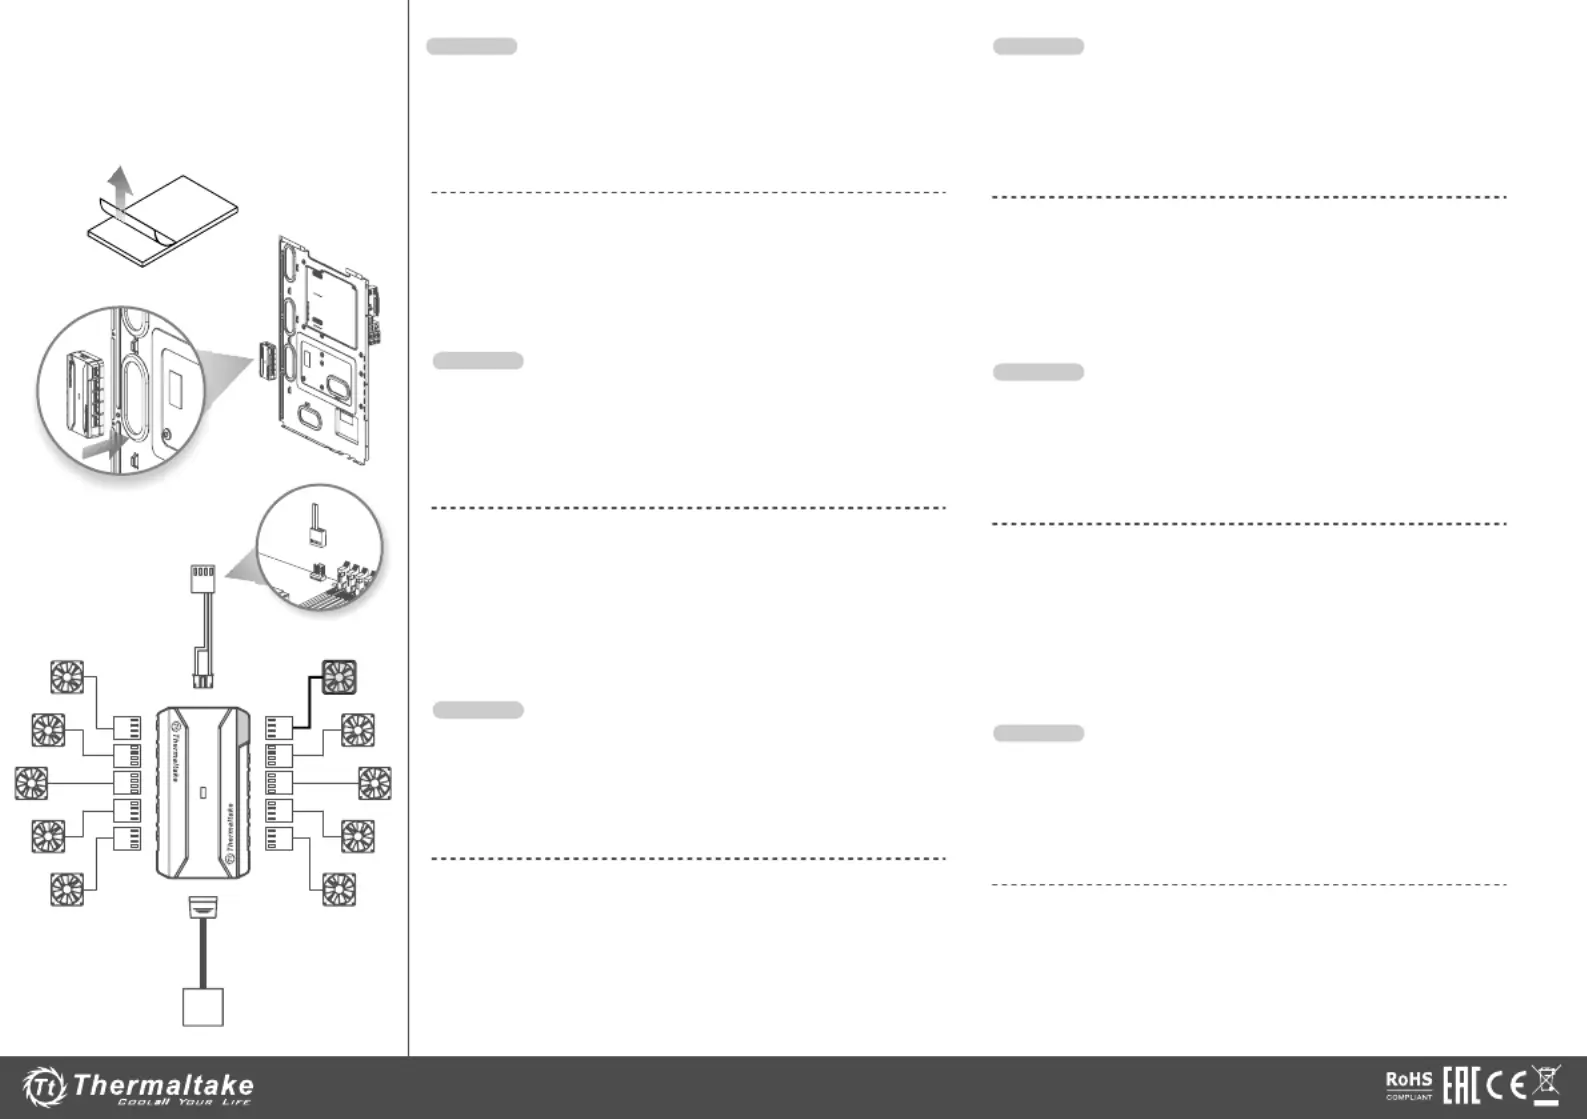
● üüUntersttzt bis zu 10 unabhängige PWM-Lfter
● üKompatibel mit 3-poligen Lftern*
● Blaue LED als Leistungsanzeige
● Direkter SATA-Stromeingang**
● üEinfache und saubere Kabelfhrung
● Hochwertiges und symmetrisches Design
● üErleben Sie den unvergleichliche Luftstrom und die Wasserkhlungsfähigkeiten
● Leicht lösbarer und wiederverwendbarer Kabelbinder
1. Vor der Anwendung, Oberfläche säubern und trocknen
2. Band von Befestigungselement entfernen, ein Klettband auf dem Hub und eins
auf dem Gehäuse anbringen
3. Verbinden Sie den PWM-Signalanschluss mit dem Hub, und den 4-poligen
Stecker mit dem Motherboard
4. Verbinden Sie den Haupt-PWM-Lüfteranschluss an der glänzenden Seite***
5. Schließen Sie den Rest der Lüfter an den Hub an
6. Schließen Sie den Netzteil SATA-Anschluss an
● à 10 éSupporte jusqu'ventilateurs PWM indpendants
● à 3 Compatible avec les ventilateurs broches*
● LED bleue d'indication de puissance
● éEntre d'alimentation directe SATA**
● Gestion simple et propre des câbles
● é éConception de haute qualitet symtrique
● ééDcouvrez des capacits de refroidissement par flux d'air et d'eau incomparables
● éAttaches de câble facilement amovibles et rutilisables
1. Nettoyez et séchez la surface avant l'application.
2. Décollez le film de protection de la bande, fixez une bande velcro sur le hub et une
autre sur le châssis.
3. Branchez le connecteur de signal PWM au hub et le connecteur
4 broches à la carte mère
4. Branchez le connecteur principal des ventilateurs PWM du côté brillant***
5. Branchez le reste des ventilateurs au hub
6. Branchez le connecteur de l'alimentation SATA.
Speed control functionisunavailableforpinfans* 3
Channel port with glossy side powered directlybymotherboard**
*** Only thechannelportwith glossy side support RPM signal detection
Drehzahlregelungsfunktion ist für 3-polige Lüfter nicht verfügbar*
Channel-Port mit glänzender Seite wird direkt vom Motherboard betrieben**
*** Nur der Channel-Port mit glänzender Seite unterstützt RPM-Signalerkennung
La fonction de contrôle de vitesse n'est pas disponible pour les ventilateurs 3 broches*
Le port côté brillant est alimenté directement par la carte mère**
*** Seul le port côté brillant prend en charge la détection du signal de vitesse
● Compatible con hasta 10 ventiladores PWM independientes
● Compatible con ventiladores de 3 patillas*
● óEl LED azul ofrece indicador de alimentacin
● óEntrada de alimentacin Direct SATA**
● óGestin de cable sencillo y limpio
● íDiseño de simetra y alta calidad
● óExperimente el flujo de aire y las funciones de refrigeracin por agua incomparables
● Bidas para cables con remates facilmente liberables y reutilizables
1. Limpie y seque la superficie antes de la aplicación
2. Despegue la cinta del cierre, ponga una cinta de Velcro al concentrador y uno al chasis
3. Conecte el conector de señal PWM al concentrador y el conector de 4 patillas a la placa base
4. Conecte el conector del ventilador PWM principal al lateral brillante***
5. Conecte el resto de ventiladores al concentrador
6. Conecte el conector PSU SATA
● Supporta fino a 10 ventole PWM indipendenti
● Compatibile con ventole a 3 pin*
● Spia di alimentazione blu a LED
● Potenza in ingresso diretta SATA**
● Gestione cavi semplice e pulita
● àDesign estremamente simmetrico e di alta qualit
● à Capacitdi raffreddamento dell’acqua e potenza del flusso d'aria senza precedenti
● Fermacavi bordati facilmente apribili e riutilizzabili
1. Prima dell'utilizzo, pulire e asciugare la superficie
2. Staccare il nastro dal dispositivo di fissaggio e fissare un nastro in
Velcro all'hub e uno al telaio
3. Collegare il connettore per segnali PWM all'hub e il connettore a 4 pin alla scheda madre
4. Collegare il connettore principale delle ventole PWM al lato lucido***
5. Collegare il resto delle ventole all'hub
6. Collegare il connettore PSU SATA
● é 10 Suporta atventoinhas PWM independentes
● íCompatvel com ventoinhas de 3 pinos*
● O LED azul indica a alimentação
● Entrada de alimentação SATA direta**
● Gestão de cabos simples e limpa
● Design de elevada qualidade e simetria
● áExperimente um fluxo de ar e capacidades de refrigeração da gua sem igual
● ááTiras de cabo frisadas, facilmente libertveis e reutilizveis
1. Limpe e seque a superfície antes da aplicação
2. Retire a fita do fixador, coloque uma fita de velcro no encaixe e outra no chassis
3. Ligue o conector do sinal PWM ao encaixe e o conector de 4 pinos à motherboard
4. Ligue o conector da ventoinha PWM principal ao lado lustroso***
5. Ligue as restantes ventoinhas ao encaixe
6. Ligue o conecotr SATA PSU
Función de control de velocidad no disponible para ventiladores de 3 patillas*
Puerto de canal con lateral brillante alimentado directamente por la placa base**
*** Solo el puerto de canal con lateral brillante es compatible con detección de señal RPM
La funzione di controllo della velocità non è disponibile per le ventole a 3 pin*
La porta del canale con il lato lucido è alimentata direttamente dalla scheda madre**
*** Il rilevamento dei segnali RPM è supportato esclusivamente dalla porta del canale
con il lato lucido
Função de controlo de velocidade indisponível para as ventoinhas de 3 pinos*
Porta de canal com lado lustroso alimentado diretamente pela motherboard**
*** Apenas a porta de canal com o lado lustroso suporta a deteção do sinal RPM
Produktspezifikationen
| Marke: | Thermaltake |
| Kategorie: | Nicht kategorisiert |
| Modell: | Commander FP |
| Breite: | 81 mm |
| Tiefe: | 44 mm |
| Gewicht: | 90 g |
| Produktfarbe: | Schwarz |
| Höhe: | 18 mm |
| Warentarifnummer (HS): | 84719000 |
| Gehäusematerial: | Kunststoff |
| Plug & Play: | Ja |
| LED-Anzeigen: | Ja |
| Datenübertragungsrate: | - Mbit/s |
| Anzahl Anschlüsse: | 10 |
| Hub-Schnittstellen: | Molex |
Brauchst du Hilfe?
Wenn Sie Hilfe mit Thermaltake Commander FP benötigen, stellen Sie unten eine Frage und andere Benutzer werden Ihnen antworten
Bedienungsanleitung Nicht kategorisiert Thermaltake

12 März 2026
3 März 2026
26 Februar 2026
6 Dezember 2025
2 Oktober 2025
1 Oktober 2025
1 Oktober 2025
1 Oktober 2025
10 September 2025
25 August 2025
Bedienungsanleitung Nicht kategorisiert
Neueste Bedienungsanleitung für -Kategorien-
3 April 2026
3 April 2026
3 April 2026
3 April 2026
3 April 2026
3 April 2026
3 April 2026
3 April 2026
3 April 2026
3 April 2026