ViewSonic CDE3203 Bedienungsanleitung
ViewSonic Slibemaskine CDE3203
Lies die bedienungsanleitung für ViewSonic CDE3203 (2 Seiten) kostenlos online; sie gehört zur Kategorie Slibemaskine. Dieses Handbuch wurde von 40 Personen als hilfreich bewertet und erhielt im Schnitt 4.0 Sterne aus 5 Bewertungen. Hast du eine Frage zu ViewSonic CDE3203 oder möchtest du andere Nutzer dieses Produkts befragen? Stelle eine Frage
Seite 1/2
ViewSonic® CDE3203
Full HD Professional LED Display
Quick Start Guide
CDE3203_QSG_ENG Rev.1a 12-22-15 Copyright © 2016 ViewSonic Corporation. All right reserved.
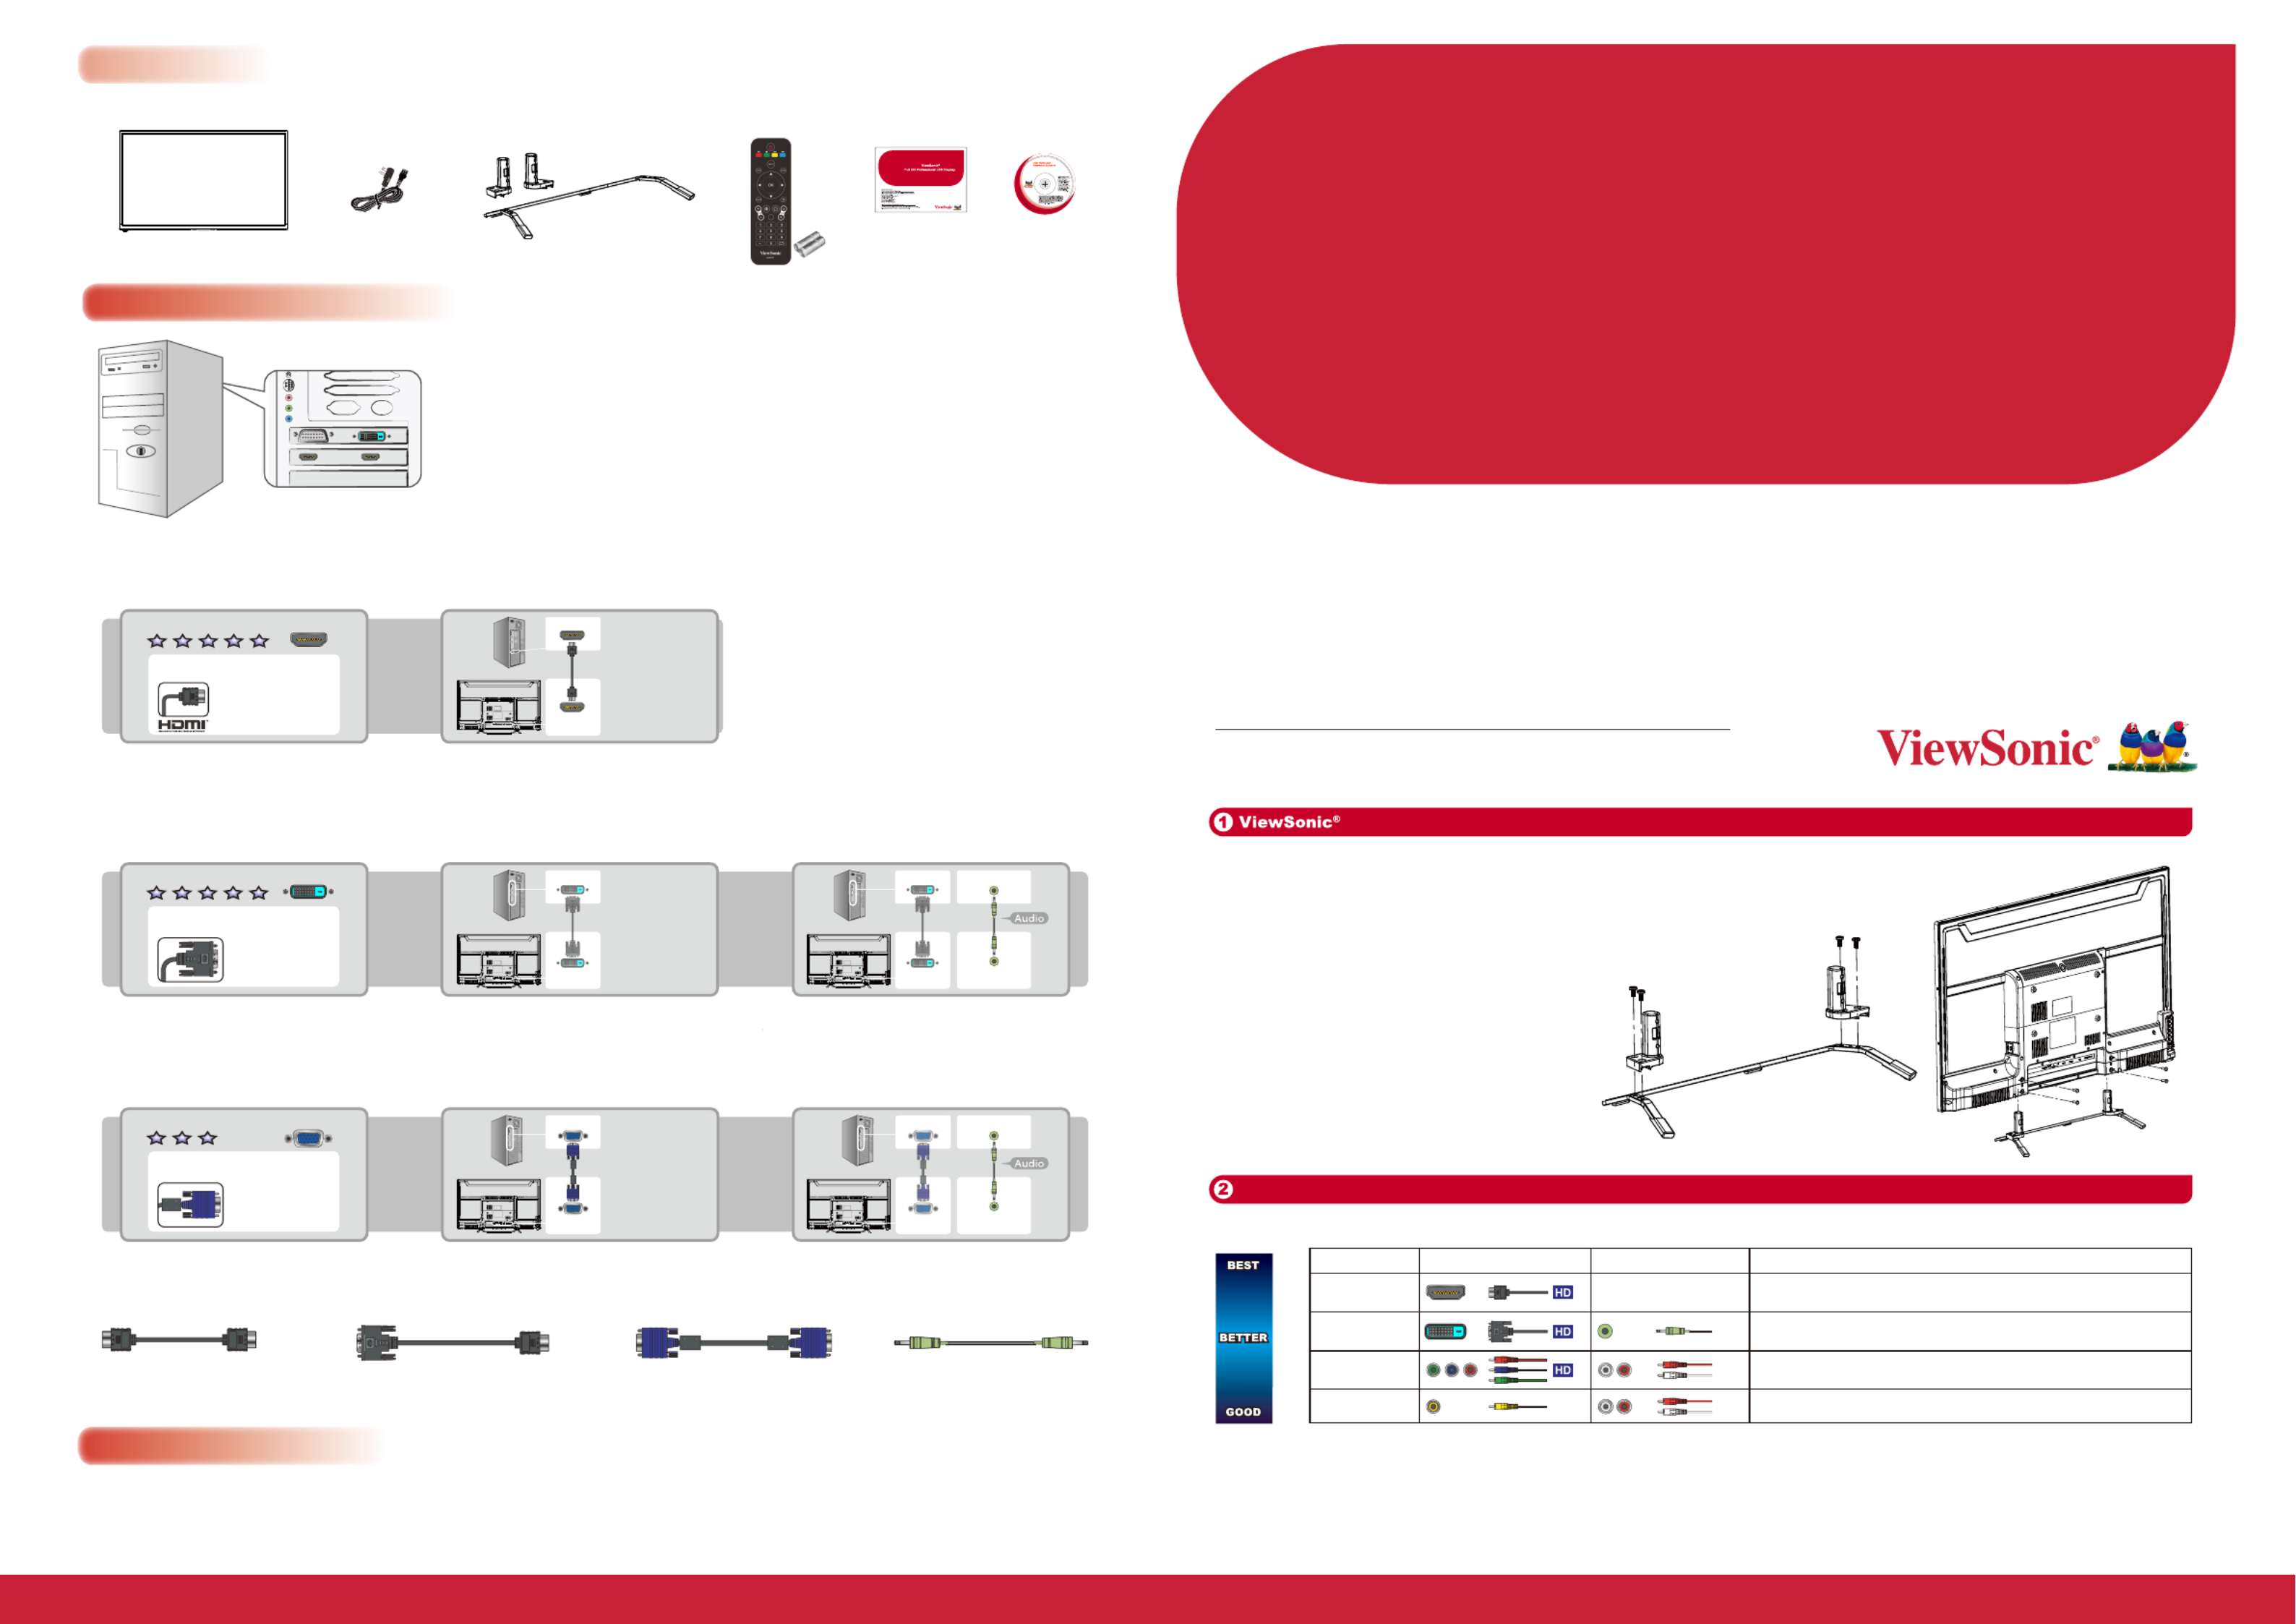
Notes on Connection
Getting start
Video Quality
D-SUB
D-SUB
Required Cable Types for Connection
DVI-to-HDMI HD15
Connect to your Computer
Please find video output port on your PC. You can choose HDMI, DVI or D-SUB.
D-SUB
D-SUB
Video Quality
DVI
DVI
Digital Video Input
DVI
DVI
Step 1: Identify the connector on your PC.
Step 1:Step 2: Identify the connector on your PC.Connect video signal with
appropriate connector cable.
Step 3: Connect audio signal with
appropriate connector cable.
D-SUB
VGA
D-SUB
VGA
Step 2: Connect video signal with
appropriate connector cable.
DVI
DVI
Step 3: Connect audio signal with
appropriate connector cable.
DVI
DVI
Mini-Pin Audio
PC AUDIO OUT
PC AUDIO IN
PC AUDIO OUT
PC AUDIO IN
Main unit Power cable
Plug types by country
Stand
Screw: M4X10 x4, T4X12.5 p1-x4
Screw: M4X10 x4
Screw: T4X12.5 p1-x4
Quick Start Guide
Remote Control with
AAA batteriesx2
Power off your LCD display until you complete all the connections
LCD Display. The Door to High Definition
Connect your LCD display with other external devices
InputVideo ConnectorAudio ConnectorSupported Resolutions
HDMI No need for this input1080p, 1080i, 720p, 480p, 480i, PC timing (Both HD and SD content)
DVI 1080p, 720p, 480p, PC timing (Both HD and SD content)
Component 1080p, 1080i, 720p, 480p 480i (Both HD and SD content)
480i (SD content only)
AV
Connect your PC to your ViewSonic LCD Display
• For the D-Sub connection, you need to apply D-Sub cable and mini 3.5mm audio cable.
• For the DVI connection, you must apply DVI or DVI-to-HDMI cable and additional audio cable.
• Change the PC setting to display on LCD display.
• For detailed information, please refer to your User Manual.
• Please contact ViewSonic Service Team if you had any problem on connection.
• To enjoy an HD experience, please connect an HD source to this LCD display.
• When using a DVI-to-HDMI cable, please make sure to connect the DVI side first.
• Please contact ViewSonic Service team directly, if you have any questions on the Connection.
• Or call our service team: United States 1-800-688-6688 / Canada 1-866-463-4775
For further information, please refer to the User Manual supplied with the LCD display.
Please keep this Quick Start Guide for your future reference.
For Your Convenience
Write down your product serial number. _ _ _ _ _ _ _ _ _ _ _ _ _ _ _ _
If you need any assistance, it will help you.
Please contact ViewSonic service team directly if you have questions on
the use of your LCD display.
Contact ViewSonic Service Team at:
http://www.ViewSonic.com
Or call our service team:
United States 1-800-688-6688
Canada 1-866-463-4775
Please Do Not Return this Product to the Store
UG CD disc
Step 1: Register online at: http://www.ViewSonic.com/support
Step 2: Check your accessory contents in packaging.
Step 3: Install 2 AAA batteries (included in package) in your remote
control.
Step 4: Install your LCD display. If you want to hang the LCD
display on the wall, please refer the User Guide for
detailed instructions.
Enjoy FHD Experience:
Set up your ViewSonic LCD display by using proper connections to
an HD content source such as your HD cable or satellite box.
HDMI
HDMI
HDMI
Step 1: Step 2: Identify the connector on your PC.Connect video signal with
appropriate connector cable.
Video Quality
HDMI
HD Multimedia Interface
HDMI HDMI
HDMI
CDE3203
Quick Start Guide
Produktspezifikationen
| Marke: | ViewSonic |
| Kategorie: | Slibemaskine |
| Modell: | CDE3203 |
| Touchscreen: | Nein |
| Bildschirmdiagonale: | 31.5 Zoll |
| Bildschirmtechnologie: | LCD |
| Anzahl der Farben des Displays: | 16,78 Millionen Farben |
| Eingebaute Lautsprecher: | Ja |
| WLAN: | Nein |
| Breite: | 729.2 mm |
| Tiefe: | 48.5 mm |
| Gewicht: | 5300 g |
| Produktfarbe: | Schwarz |
| Höhe: | 429.7 mm |
| Anzahl eingebauter Lautsprecher: | 2 |
| AC Eingangsspannung: | 100 - 240 V |
| AC Eingangsfrequenz: | 50 - 60 Hz |
| Betriebstemperatur: | 0 - 40 °C |
| Relative Luftfeuchtigkeit in Betrieb: | 15 - 90 % |
| Paketgewicht: | 7200 g |
| Eingebauter Ethernet-Anschluss: | Nein |
| Stromverbrauch (Standardbetrieb): | 41 W |
| Verpackungsgewicht: | 7.2 kg |
| HD-Typ: | Full HD |
| Natives Seitenverhältnis: | 16:9 |
| Helligkeit: | 320 cd/m² |
| Reaktionszeit: | 8 ms |
| Kontrastverhältnis: | 1200:1 |
| Bildwinkel, horizontal: | 178 ° |
| Bildwinkel, vertikal: | 178 ° |
| Anzahl HDMI-Anschlüsse: | 2 |
| Stromverbrauch (Standby): | - W |
| Gewicht (ohne Ständer): | 5300 g |
| VESA-Halterung: | Ja |
| Unterstützte Video-Modi: | 1080p |
| Unterstützte Grafik-Auflösungen: | 1920 x 1080 (HD 1080) |
| DVI Anschluss: | Nein |
| Panel-Montage-Schnittstelle: | 100 x 200 mm |
| Produktdesign: | Digital Beschilderung Flachbildschirm |
| Anzahl der USB-Anschlüsse: | 1 |
| USB-Version: | 2.0 |
| Abmessungen (BxTxH): | 729.2 x 48.5 x 429.7 mm |
| Nachhaltigkeitszertifikate: | ENERGY STAR |
| Verpackungsabmessungen (BxTxH): | 796 x 121 x 504 mm |
| Pixel Abstand: | - mm |
| Aktiver Displaybereich (B x H): | 698.4 x 392.85 mm |
| VGA (D-Sub)-Eingangsanschlüsse: | 1 |
| Lebensdauer des Panels: | 30000 h |
| Computersystem: | Nein |
| Abmessungen, metrisch (B x T x H) mit Standfuß: | 729.2 x 164.3 x 465.7 mm |
| Produktabmessungen: | 729.2 x 48.5 x 429.7 |
| Display-Auflösung: | 1920 x 1080 Pixel |
Brauchst du Hilfe?
Wenn Sie Hilfe mit ViewSonic CDE3203 benötigen, stellen Sie unten eine Frage und andere Benutzer werden Ihnen antworten
Bedienungsanleitung Slibemaskine ViewSonic

27 März 2026
26 März 2026
26 März 2026
25 März 2026
25 März 2026
25 März 2026
25 März 2026
23 März 2026
21 März 2026
20 März 2026
Bedienungsanleitung Slibemaskine
Neueste Bedienungsanleitung für -Kategorien-
3 April 2026
3 April 2026
3 April 2026
3 April 2026
3 April 2026
3 April 2026
3 April 2026
2 April 2026
2 April 2026
1 April 2026