Westinghouse ACC096 Bedienungsanleitung
Westinghouse Nicht kategorisiert ACC096
Lies die bedienungsanleitung für Westinghouse ACC096 (129 Seiten) kostenlos online; sie gehört zur Kategorie Nicht kategorisiert. Dieses Handbuch wurde von 19 Personen als hilfreich bewertet und erhielt im Schnitt 5.0 Sterne aus 9 Bewertungen. Hast du eine Frage zu Westinghouse ACC096 oder möchtest du andere Nutzer dieses Produkts befragen? Stelle eine Frage
Seite 1/129
drain pan
motor
rear view of
refrigerator
KIT CONTENTSINSTRUCTIONS
FRIDGE DESCRIPTION
DESCRIPTION
Cover top cabinet wh GR
Cover top cabinet wh WHT
Ensure refrigerator is empty of all loose items and unplugged
from power source.
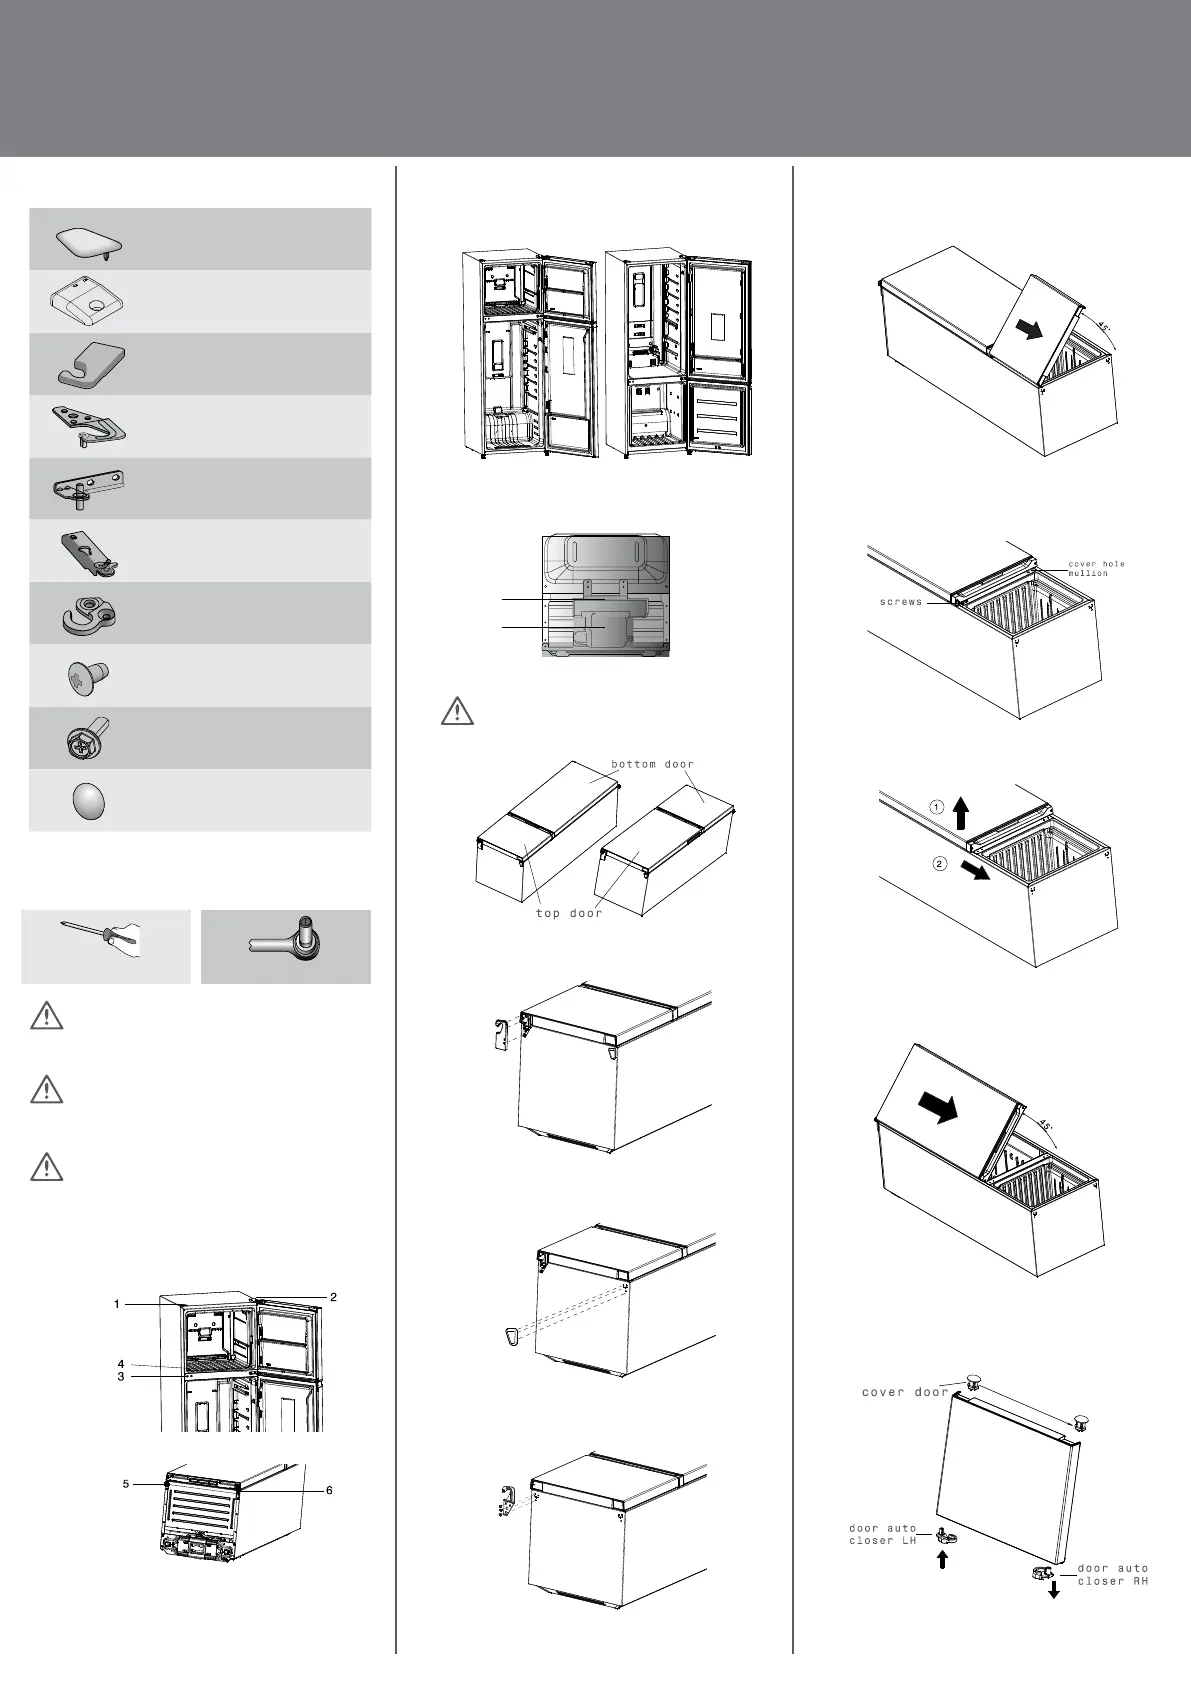
1.Remove top door by opening 45º and gently slide off hinge.
Set door aside to prevent damage.
7.
Unscrew 2 centre hinge screw. Remove the cover hole
mullion with plastic lever. Do not discard screws
(if screws loosen can be use spare in kit content).
8.
Remove RH centre hinge by lifting the door slightly and
sliding hinge out of the door.
9.
Remove bottom door by opening 45º and gently slide off
hinge. Set door aside to prevent damage.
10.
Remove the cover door from top door and assemble it on
the other side. Remove the RH door auto closer and replace
with LH door auto closer (kit content) on the other side.
Repeat the same step with bottom door.
11.
Store power cord next to motor to prevent damage.
Check for water in drain pan and remove any water with
a cloth or sponge if necessary.
2.
Lay the refrigerator on its back.3.
Remove the hinge cover with a soft plastic lever.4.
Remove the LH cap with a soft plastic lever.5.
Unscrew top hinge screws and remove RH top hinge.
Do not discard screws.
6.
1
1
Cover top cabinet right GR
Cover top cabinet right WHT
1
1
Hinge top cover left GR
Hinge top cover left WHT
1
1
Hinge top left1
Hinge centre left1
Hinge bottom base left1
Door auto closer LH2
Screw centre mullion M5x83
Screw centre hinge M5x162
Cover screw mullion WH WHT
NOTE: Keep kit parts separate from other parts as you disassemble
them to avoid mix-ups.This installation manual is applicable to both
top freezer and bottom freezer models.
Phillips head screwdriver 8mm (5/16") hex head socket
TOOLS YOU WILL NEED (not supplied)
WARNING
Electrolux/Westinghouse takes no responsibility for incorrectly
assembled doors leading to injury or malfunction.
2
QTY
INSTALLATION MANUAL
REFRIGERATOR DOOR REVERSAL KIT
Models:ETB3200MG,ETB3400H,ETB3400J,ETB3400K,ETB3440K,ETB3700H,ETB3700J,ETB3700K,ETB3740K,ETM3100L,ETM3100SC,ETM3400L,ETM3440L,ETM3400SC,ETM3400BC,HTB3500AG,RTM3400L,
WTB3100AK,WTB3400AH,WTB3400AK,WTB3400WK,WTB3440WH,WTB3700AH,WTB3700WH,WTB3700WK,WTM3100WL,WTM3100SL,WTM3400WL,EBB3402K,EBB3442K,EBM3402L,EBM3442L,EBB3700H,
EBB3702K,EBB3742K,HBB3200AG,WBB3100WK,WBB3100AK,WBB3400AH,WBB3400HK,WBB3400WK,WBB3400AK,WBB3402BL,WBB3402WL,WBB3700AH,WBB3700HK,WBB3700AK
This installation manual is applicable to both top freezer (top mount) and bottom freezer (bottom mount).
WARNING
Your refrigerator is heavy – you may need assistance.
CAUTION
Refrigerator must stand for 30 minutes prior to connecting to
power supply to ensure system functions correctly.
IMPORTANT
All hinge screws require tightening to a torque setting of 5-10Nm.
Bottom view of right hand hinge cabinet
1 Cover top cabinet WH
2 Hinge top right and hinge
top cover right
3 Cover hole mullion
4 Hinge centre right and
screws
5 Adjustable foot
6 Hinge bottom assembly right
Top view of right hand hinge cabinet
Produktspezifikationen
| Marke: | Westinghouse |
| Kategorie: | Nicht kategorisiert |
| Modell: | ACC096 |
Brauchst du Hilfe?
Wenn Sie Hilfe mit Westinghouse ACC096 benötigen, stellen Sie unten eine Frage und andere Benutzer werden Ihnen antworten
Bedienungsanleitung Nicht kategorisiert Westinghouse

28 März 2026
20 März 2026
1 Februar 2026
31 Januar 2026
30 Januar 2026
30 Januar 2026
30 Januar 2026
29 Januar 2026
28 Januar 2026
26 Januar 2026
Bedienungsanleitung Nicht kategorisiert
Neueste Bedienungsanleitung für -Kategorien-
3 April 2026
3 April 2026
3 April 2026
3 April 2026
3 April 2026
3 April 2026
3 April 2026
3 April 2026
3 April 2026
3 April 2026