Whirlpool OAS KC8V1SW BLG Bedienungsanleitung

Whirlpool Backöfen OAS KC8V1SW BLG

Lies die bedienungsanleitung für Whirlpool OAS KC8V1SW BLG (64 Seiten) kostenlos online; sie gehört zur Kategorie Backöfen. Dieses Handbuch wurde von 3 Personen als hilfreich bewertet und erhielt im Schnitt 4.8 Sterne aus 2 Bewertungen. Hast du eine Frage zu Whirlpool OAS KC8V1SW BLG oder möchtest du andere Nutzer dieses Produkts befragen? Stelle eine Frage

Seite 1/64
EN
Quick guide
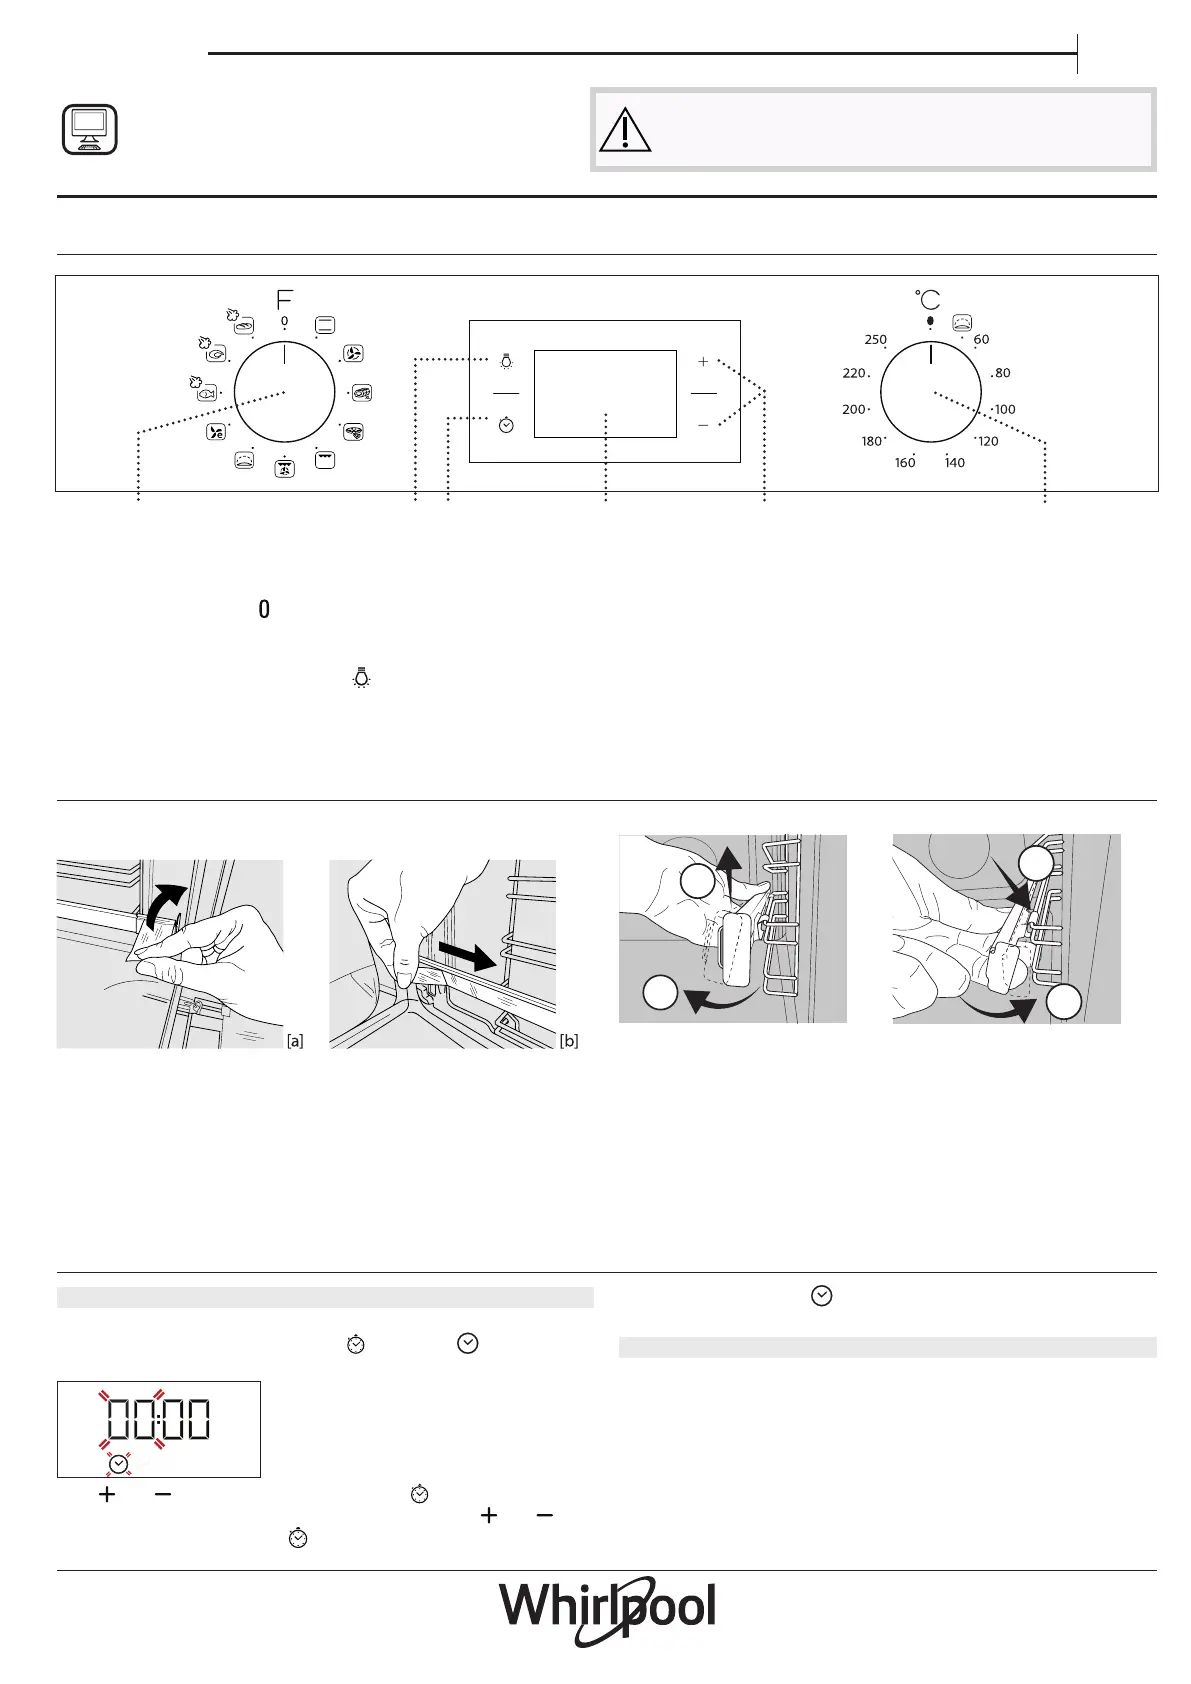
SLIDING RUNNERS AND SHELF GUIDES
Before using the oven remove the protective tape [a] and then
remove the protective foil [b] from the sliding runners.
REMOVING THE SLIDING RUNNERS [c]
Pull the lower part of the sliding runner to uncouple the lower
hooks (1) and pull the the sliding runners upwards, removing
them from the upper hooks (2).
REFITTING THE SLIDING RUNNERS [d]
Hook the upper hooks on the shelf guides (1) then press the
lower part of the sliding runners against the shelf guides, until
the lower hooks are clicking (2).
1
2
1
2
[c] [d]
REMOVING AND REFITTING THE SHELF GUIDES
1. To remove the shelf guides, rmly grip the external part of
the guide, and pull it towards you to extract the support and
the two internal pins from the lodging.
2. To reposition the shelf guides, position them near the cavity
and initially insert the two pins into their lodgings. Next,
position the external part near its lodging, insert the support,
and rmly press towards the wall of the cavity to make sure
the shelf guide is properly secured.
FIRST TIME USE
1. SETTING THE TIME
You will need to set the time when you switch on the
appliance for the rst time: Press until the icon and the
two digits for the hour start ashing on the display.
Use
or to set the hour and press to conrm. The
two digits for the minutes will start ashing. Use or to
set the minutes and press to conrm.
Please note: When the icon is ashing, for example following
lengthy power outages, you will need to reset the time.
2. HEAT THE OVEN
A new oven may release odours that have been left behind
during manufacturing: this is completely normal.
Before starting to cook food, we therefore recommend
heating the oven with it empty in order to remove any
possible odours. Remove any protective cardboard or
transparent lm from the oven and remove any accessories
from inside it.
Heat the oven to 250 °C for about one hour. The oven must be
empty during this time.
CONTROL PANEL DESCRIPTION
1 32 4 5
6
1. SELECTION KNOB
For switching the oven on by selecting
a function. Turn to the position to
switch the oven o.
2. LIGHT
With the oven switched on, press
to turn the oven compartment lamp on
or o.
3. SETTING THE TIME
For accessing the cooking time settings,
delayed start and timer.
For displaying the time when the oven
is o.
4. DISPLAY
5. ADJUSTMENT BUTTONS
For changing the cooking time settings.
6. THERMOSTAT KNOB
Turn to select the temperature you
require when activating manual
functions.
Please note: The knobs are retractable. Press
the knobs in the middle and they pop up.
THANK YOU FOR BUYING A WHIRLPOOL
PRODUCT
In order to receive a more complete
assistance, please register your product on
ww w . whirlpool . eu/register
Before using the appliance carefully read the Safety
Instruction.
FUNCTIONS & DAILY USE
CONVENTIONAL
For cooking any kind of dish on one shelf only.
FORCED AIR
For cooking dierent foods that require the same
cooking temperature on several shelves (maximum three) at
the same time. This function can be used to cook dierent
foods without odours being transferred from one food to
another.
AUTOMATIC CLEANING - PYRO
For cooking large joints of meat (above 2.5kg). We
recommend turning the meat over during cooking to ensure
that both sides brown evenly. We also recommend basting the
joint every so often to prevent it from drying out excessively.
PIZZA
For baking dierent types and sizes of pizza and bread.
It is a good idea to swap the position of the baking trays
halfway through cooking.
GRILL
For grilling steaks, kebabs and sausages, cooking
vegetables au gratin or toasting bread.
When grilling meat, we recommend using a dripping pan
to collect the cooking juices: position the pan on any of the
levels below the wire shelf and add 200 ml of drinking water.
TURBO GRILL
For roasting large joints of meat (legs, roast beef,
chicken). We recommend using a dripping pan to collect the
cooking juices: position the pan on any of the levels below the
wire shelf and add 200 ml of drinking water.
RISING
For helping sweet or savoury dough to rise eectively.
Turn the thermostat knob to the icon to activate this function.
ECO FORCED AIR
For cooking roasts and stued roasting joints on a
single shelf. Food is prevented from drying out excessively by
gentle, intermittent air circulation.
When this ECO function is in use, the light will remain
switched o during cooking but can be switched on again by
pressing
.
FISH
MEAT
BREAD
The functions provide excellent results thanks to
the addition of steam in cooking cycles. Only when the oven
is cold, pour drinking water on the bottom of the oven and
select the specic function for your preparation. The optimal
water quantities and temperatures for each food category are
listed in the relative cooking table. Do not preheat the oven
before inserting food.
1. SELECT A FUNCTION
To select a function, turn the selection knob to the symbol
for the function you require: the display will light up and an
audible signal will sound.
2. ACTIVATE A FUNCTION
MANUAL
To start the function you have selected, turn the thermostat
knob to set the temperature you require.
Please note: During cooking you can change the function by
turning the selection knob or adjust the temperature by turning the
thermostat knob. The function will not start if the thermostat knob
will be on . You can set the cooking time, cooking end time (only
if you set a cooking time) and a timer.
RISING
To start the “Rising” function, turn the thermostat knob to the
relevant symbol; if the oven is set to a dierent temperature,
the function will not start.
Please note: You can set the cooking time, cooking end time (only if
you set a cooking time) and a timer.
Only when the oven is cold, ll
the embossing of the cavity
with the quantity of drinking
water suggested in the relative
cooking table. Place the food
in the oven.
Set and activate the
function: At the end, carefully
open the door and let steam
escape slowly.
Please note: During steam
cooking, do not open the door
and never top up the water.
3. PREHEATING AND RESIDUAL HEAT
Once the function starts, an audible signal and a ashing icon
on the display indicate that the preheating phase has
been activated.
At the end of this phase, an audible signal and the xed icon
on the display will indicate that the oven has reached
the set temperature: at this point, place the food inside and
proceed with cooking.
Please note: Placing the food in the oven before preheating has
nished may have an adverse eect on the nal cooking result.
After cooking and with the function deactivated, the icon
may continue to remain visible on the display even after the
cooling fan has switched o to indicate that there is residual
heat in the compartment.
Please note: It is advisable to air the room after using the appliance
for the rst time.


Produktspezifikationen

Marke: Whirlpool
Kategorie: Backöfen
Modell: OAS KC8V1SW BLG

Brauchst du Hilfe?

Wenn Sie Hilfe mit Whirlpool OAS KC8V1SW BLG benötigen, stellen Sie unten eine Frage und andere Benutzer werden Ihnen antworten