Whirlpool OMR35HR0X Bedienungsanleitung
Lies die bedienungsanleitung für Whirlpool OMR35HR0X (3 Seiten) kostenlos online; sie gehört zur Kategorie Ofen. Dieses Handbuch wurde von 54 Personen als hilfreich bewertet und erhielt im Schnitt 4.1 Sterne aus 3 Bewertungen. Hast du eine Frage zu Whirlpool OMR35HR0X oder möchtest du andere Nutzer dieses Produkts befragen? Stelle eine Frage
Seite 1/3
EN
Quick guide
THANK YOU FOR BUYING A WHIRLPOOL PRODUCT
In order to receive a more complete assistance, please
register your product on www . whirlpool . eu/ register
Before using the appliance carefully read the Safety
Instruction.
FIRST TIME USE
HEAT THE OVEN
A new oven may release odours that have been left behind during
manufacturing: this is completely normal. Therfore, before starting to cook
food, we recommend heating the empty oven in order to remove any
possible odors. Remove any protective cardboard or transparent lm from
the oven and remove any accessories from inside it. Heat the oven to 250°C
for about one hour: The oven must be empty during this time. Follow the
instructions for setting the function correctly.
Please note: We recommend to ventilate the room after using the appliance
for the first time.
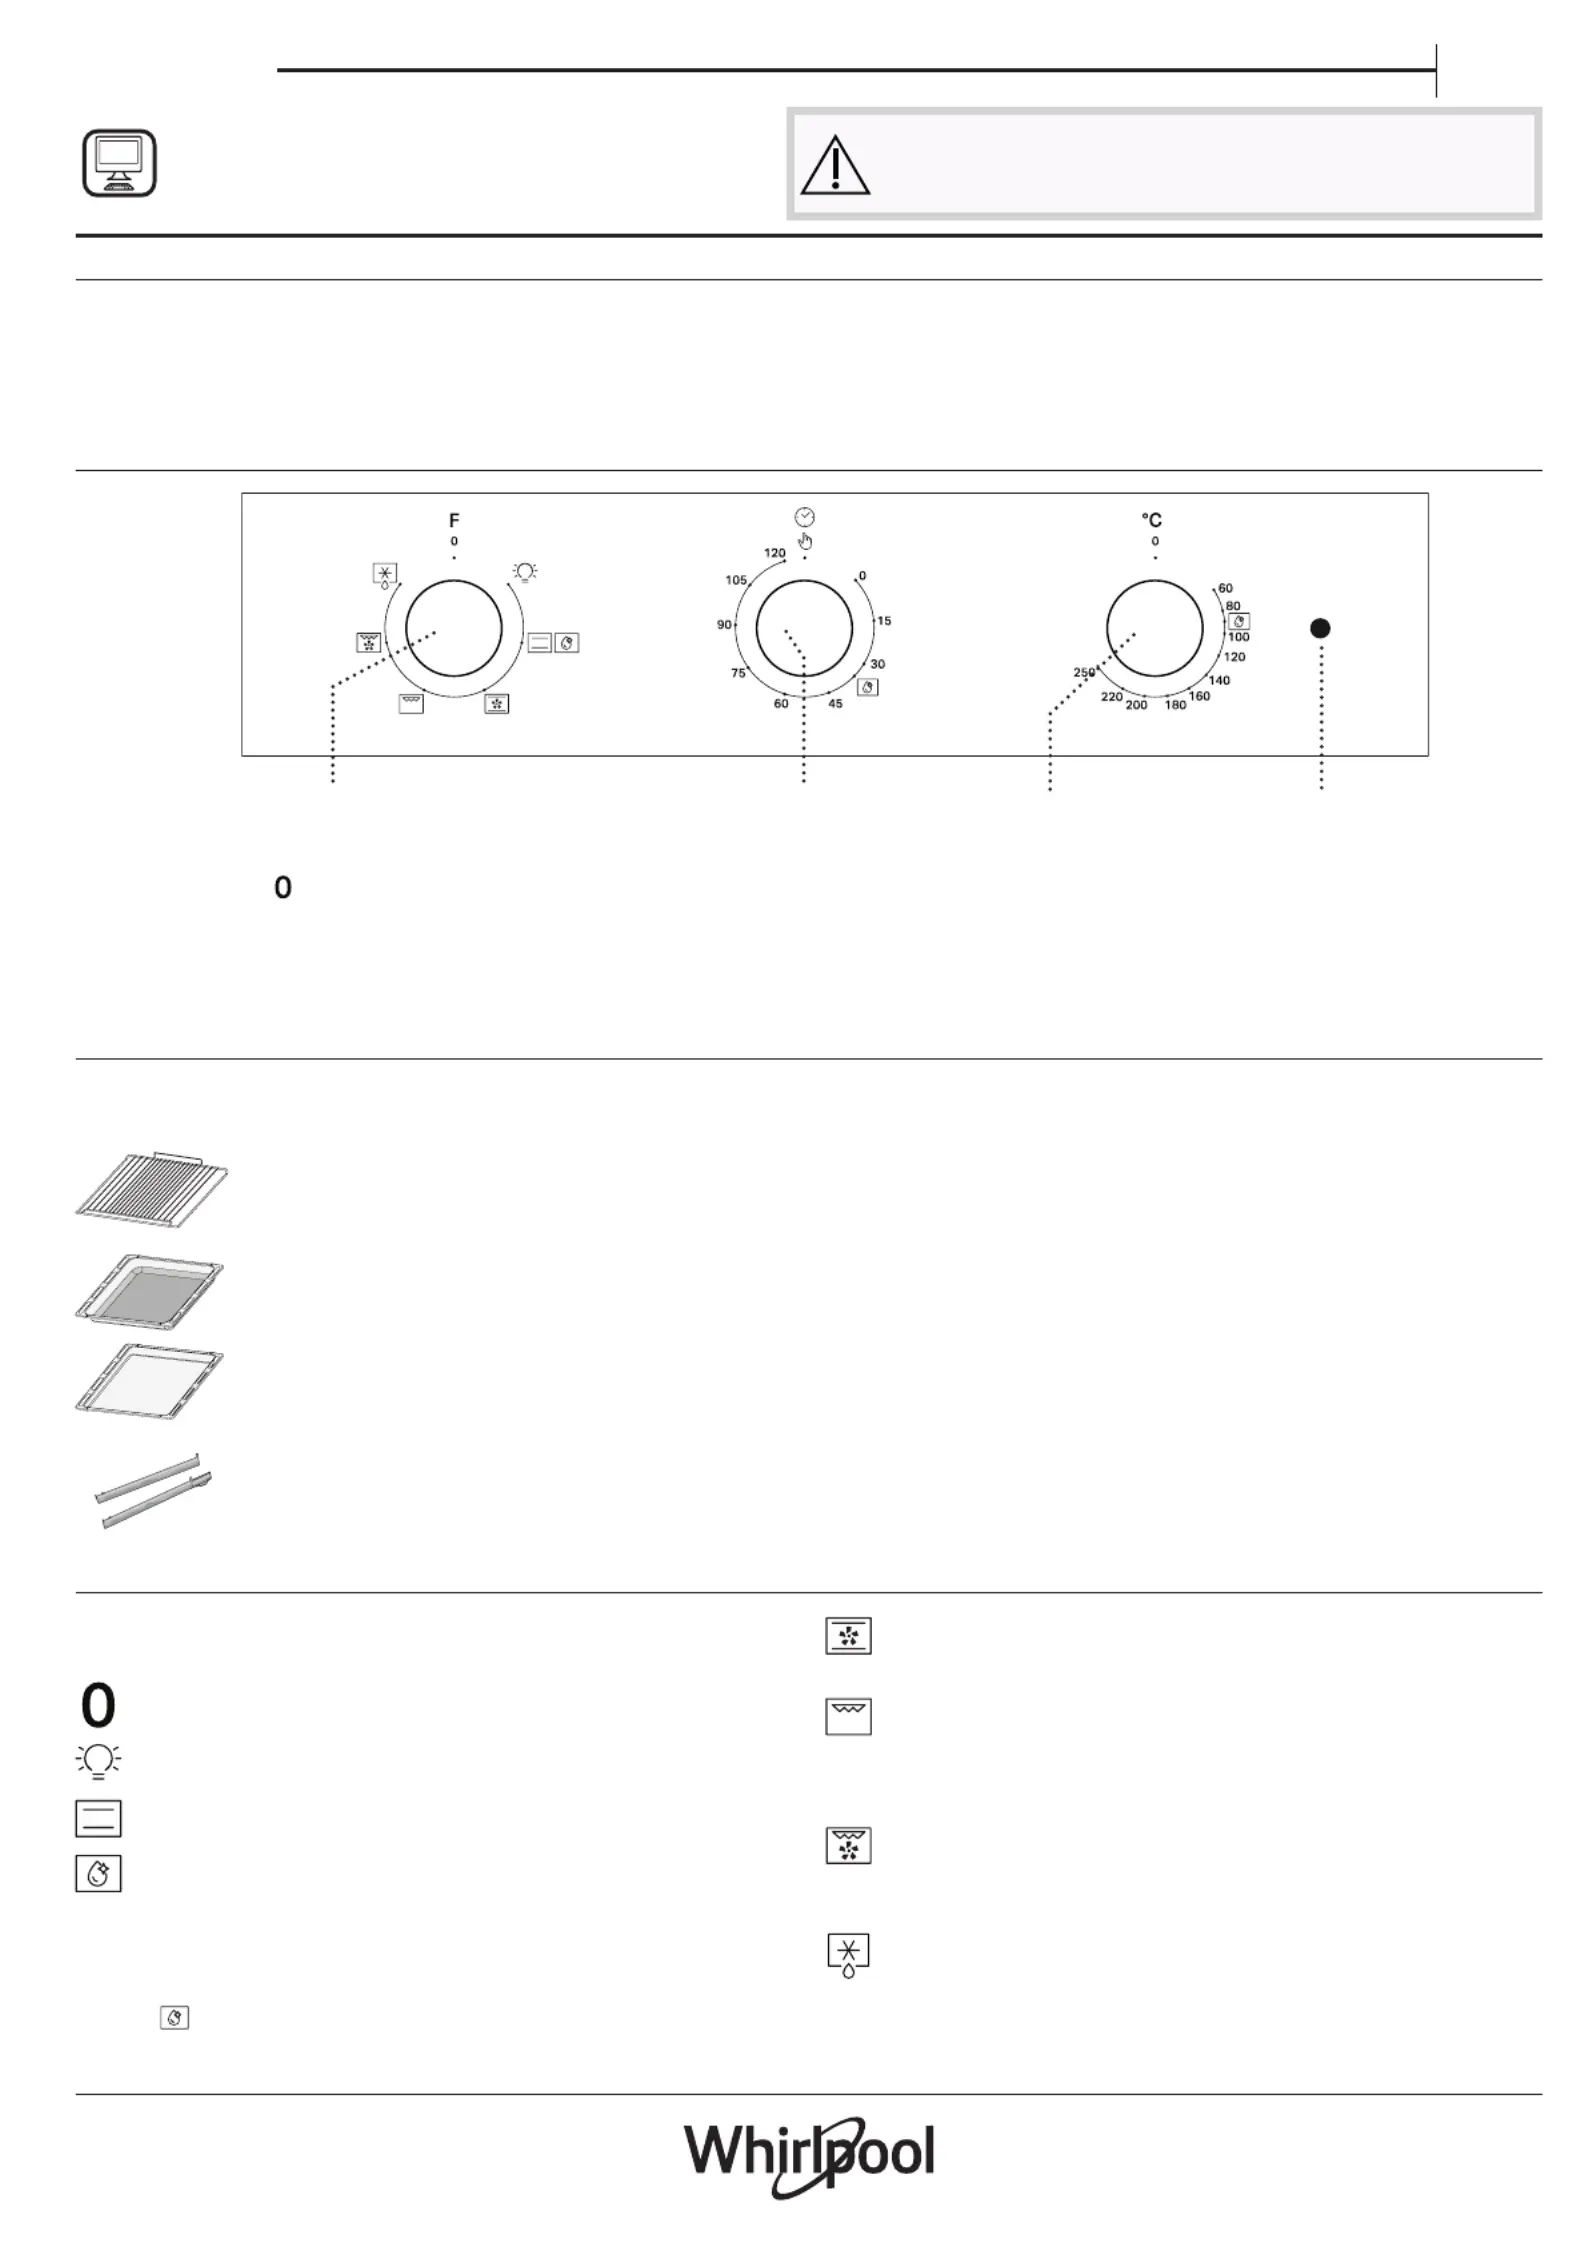
CONTROL PANEL
1
2
3
4
1. SELECTION KNOB
For switching the oven on by selecting a function.
Turn to the position to switch the oven o.
2. TIMER KNOB
Useful as a timer.
3. THERMOSTAT KNOB
Turn to select a desired temperature, activating the selected function.
4. LED THERMOSTAT / PREHEATING
Switches on during the heating process. Switches o once the desired
temperature is reached.
Please note: Placing the food in the oven before preheating has finished
may have an adverse effect on the final cooking result.
Please note: Type of knobs may vary from model type. If the knobs are push
activated, push down on the center of the knob to release it from seating.
ACCESSORIES
The number and type of accessories may vary depending on which model
is purchased. Other accessories that are not supplied can be purchased
separately from the After-sales Service.
WIRE SHELF Use to cook food or as a support for pans,
cake tins and other ovenproof items of cookware.
DRIP TRAY* Use as an oven tray for cooking meat, sh,
vegetables, focaccia, etc. or position underneath the
wire shelf to collect cooking juices.
BAKING TRAY* Use for cooking all bread and pastry
products, but also for roasts, sh en papillotte, etc.
SLIDING RUNNERS* To facilitate inserting or removing
accessories.
Insert the wire shelf onto the level you require by holding it tilted slightly
upwards and resting the raised rear side (pointing upwards) down first.
Then slide it horizontally along the shelf guide as far as possible. The other
accessories, such as the baking tray, are inserted horizontally by sliding them
along the shelf guides.
REMOVING AND REFITTING THE SHELF GUIDES
The shelf guides can be removed to facilitate the oven cleaning: pull them
to remove from their seats.
* Available only on certain models.
FUNCTIONS & DAILY USE
1. SELECT A FUNCTION
To select a function, turn the to the symbol for the function selection knob
you require.
OFF
For switching o the oven.
LIGHT
For switching on the light in the compartment.
CONVENTIONAL
For cooking any kind of dish on one shelf only.
SMART CLEAN
The action of the steam released during this special low-
temperature cleaning cycle allows dirt and food residues to be
removed with ease. To activate the "Smart Clean" cleaning function
pour 100-120ml of drinking water into the bottom of the oven then
turn all the 3 knobs (selection knob, timer knob, thermostat knob)
to icon.
CONVENCTION BAKE
For baking cakes with juicy llings on a single shelf. This function can
also be used for cooking on two shelves.
GRILL
For grilling steaks, kebabs and sausages, cooking vegetables au
gratin or toasting bread. When grilling meat, we recommend using
a tray to collect the cooking juices: Position the tray on any of the
levels below the wire shelf and add 200ml of drinking water.
TURBOGRILL
For roasting large joints of meat. We recommend using a tray to
collect the cooking juices: Position the tray on any of the levels
below the wire shelf and add 200ml of drinking water.
DEFROSTING
For defrosting food more quickly.
Produktspezifikationen
| Marke: | Whirlpool |
| Kategorie: | Ofen |
| Modell: | OMR35HR0X |
| Breite: | 595 mm |
| Tiefe: | 551 mm |
| Gewicht: | 27000 g |
| Produktfarbe: | Black, Stainless steel |
| Steuerung: | Drehregler |
| Höhe: | 595 mm |
| Eingebautes Display: | Ja |
| Verpackungsbreite: | 640 mm |
| Verpackungstiefe: | 650 mm |
| Verpackungshöhe: | 670 mm |
| Paketgewicht: | 28400 g |
| Geräteplatzierung: | Integriert |
| Selbstreinigend: | Ja |
| Grill: | Ja |
| Anschlusswert: | 2750 W |
| LED-Anzeigen: | Ja |
| Türanschlag: | Runter |
| Kindersicherung: | Nein |
| Innenbeleuchtung: | Ja |
| Einbauraum Breite: | 568 mm |
| Einbauraum Tiefe: | 560 mm |
| Ofengröße: | Medium |
| Anzahl der Öfen: | 1 |
| Garraumvolumen Gesamteinheit: | 71 l |
| Leistung Gesamteinheit: | 2750 W |
| Ofentyp: | Elektrischer Ofen |
| Netto-Ofenvolumen: | 71 l |
| Reinigungsart: | Hydrolytisch |
| Anzahl der Gitterroste: | 1 |
| Timer-Typ: | Digital |
| Energieverbrauch (konventionell): | - kWh |
| Energieverbrauch (erzwungene Konvektion): | - kWh |
| Heißluftbetrieb: | Ja |
| Dampfgaren: | Nein |
| Pizzabackfunktion: | Nein |
| Anzahl der Regale: | 2 Regale |
| Einbauraum Höhe: | 585 mm |
| Regelbare Temperatur: | Ja |
| Signalton wenn Vorheizen abgeschlossen: | Nein |
| Anzahl an Kochprogrammen: | 6 |
| Mikrowellenkochen: | Nein |
| Versenkbare Knöpfe: | Nein |
| Anzahl der Regalpositionen: | 2 |
| Rotisserie: | Nein |
| Auftaufunktion des Backofens: | Nein |
| Kühltür: | Nein |
| Brotbackfähigkeit: | Nein |
| Anzahl der Glastür Paneele: | 2 |
| Anzahl der Backbleche: | 1 |
| Gewährleistungsfrist: | 10 Jahr(e) |
| Sicherheitsventil: | Nein |
| Garverfahren im Ofen: | Multitech |
Brauchst du Hilfe?
Wenn Sie Hilfe mit Whirlpool OMR35HR0X benötigen, stellen Sie unten eine Frage und andere Benutzer werden Ihnen antworten
Bedienungsanleitung Ofen Whirlpool

14 Februar 2026
14 Oktober 2024
14 Oktober 2024
14 Oktober 2024
9 Oktober 2024
8 Oktober 2024
8 Oktober 2024
7 Oktober 2024
5 Oktober 2024
4 Oktober 2024
Bedienungsanleitung Ofen
Neueste Bedienungsanleitung für -Kategorien-
7 März 2026
7 März 2026
6 März 2026
3 März 2026
22 Februar 2026
3 Februar 2026
3 Februar 2026
2 Februar 2026
1 Februar 2026
31 Januar 2026