Whirlpool W3F D634 X Bedienungsanleitung
Whirlpool Spülmaschine W3F D634 X
Lies die bedienungsanleitung für Whirlpool W3F D634 X (12 Seiten) kostenlos online; sie gehört zur Kategorie Spülmaschine. Dieses Handbuch wurde von 17 Personen als hilfreich bewertet und erhielt im Schnitt 4.4 Sterne aus 9 Bewertungen. Hast du eine Frage zu Whirlpool W3F D634 X oder möchtest du andere Nutzer dieses Produkts befragen? Stelle eine Frage
Seite 1/12
ENQuick Guide
1
THANK YOU FOR BUYING A WHIRLPOOL PRODUCT.
In order to receive a more complete assistance, please
register your appliance on: www.whirlpool.eu/register
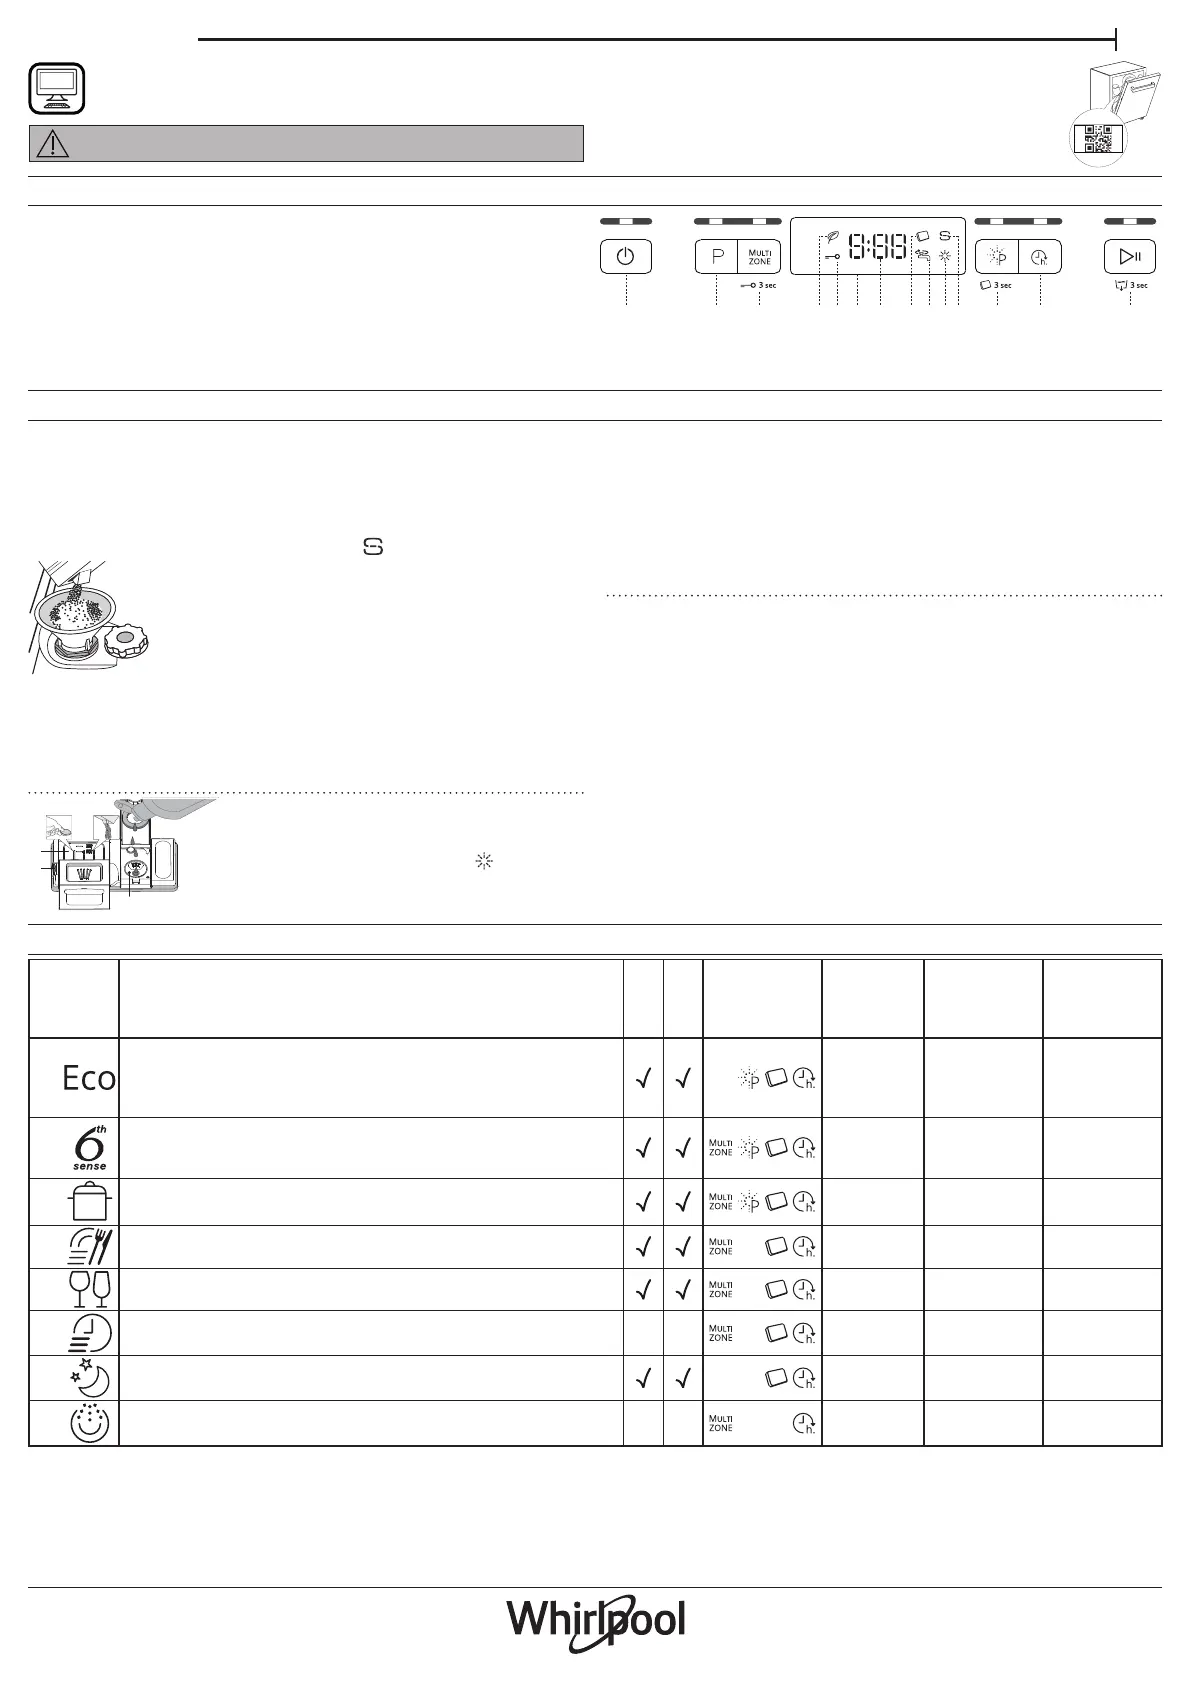
CONTROL PANEL
1. On-O/Reset button with indicator light
2. Program selection button with indicator light
3. Multizone button with indicator light / Key lock
4. Eco program indicator light
5. Key lock indicator light
6. Display
7. Program number and remaining time indicator
8. Tablet (Tab) indicator light
9. Closed water tap indicator light
ProgramPrograms description
Drying
phase
Natu-
ralDry
Available
options
*)
Duration
ofwash
program
(h:min)
**)
Water
consumption
(litres/cycle)
Energy
consumption
(kWh/cycle)
1.
Eco 50°- Program is suitable to clean normally soiled tableware,
that for this use, it is the most ecient programme in terms of its
combined energy and water consumption, and that it is used to
assess compliance with the EU Ecodesign legislation.
3:109.50.85
2.
6
th
Sense® 50°- 60°- For normally soiled dishes with dried food
residues. Senses the level of soiling on the dishes and adjusts the
program accordingly.
1:25 - 3:007.0 - 14.00.90 - 1.40
3.
Intensive 65° - Program recommended for heavily soiled crockery,
especially suitable for pans and saucepans.
2:5014.01.50
4.
Fast Wash&Dry 50° - Normally soiled crockery. Everyday cycle, that
ensures optimal cleaning and drying performance in shorter time.
1:25 11.51.10
5.
Crystals 45° - Program for delicate items, which are more sensitive
to high temperatures, for example glasses and cups.
1:4011.51.20
6.
Rapid 30’ 50° - Program to be used for half load of lightly-soiled
dishes with no dried food residues. Without drying.
--
0:309.00.50
7.
Silent 50° - Suitable for night-time operation of the appliance.
With the lowest noise.
3:3015.01.15
8.
Pre-Wash - Use to refresh crockery planned to be washed later.
No detergent to be used with this program.
--
0:124.50.01
PROGRAMS TABLE
Before using the appliance carefully read the Safety Instruction.
PLEASE SCAN THE QR CODE ON YOUR
APPLIANCE IN ORDER TO HAVE MORE
DETAILED INFORMATION
3
1
2
8
13
1454679101112
ECO program data is measured under laboratory conditions according to European Standard EN 60436:2020.
Note for Test Laboratories: For information on comparative EN testing conditions, please send an email to the following address: [email protected]
Pre-treatment of the dishes is not needed before any of the programs.
*) Not all options can be used simultaneously.
**) Values given for programs other than the program Eco are indicative only. The actual time may vary depending on many factors such as temperature and
pressure of the incoming water, room temperature, amount of detergent, quantity and type of load, load balancing, additional selected options and sensor cali-
bration. The sensor calibration can increase program duration up to 20 min.
10. Rinse Aid rell indica-
tor light
11. Salt rell indicator
light
12. Power Clean® button
with indicator light /
Tablet (Tab)
13. Delay button with indicator light
14. Start/Pause button with indicator light / Drain out
FIRST TIME USE
FILLING THE SALT RESERVOIR
The use of salt prevents the formation of LIMESCALE on the dishes and on
the machine’s functional components.
• It is mandatory that the salt reservoir never be empty.
• It is important to set the water hardness.
The salt reservoir is located in the lower part of the dishwasher and must be
lled when the SALT REFILL indicator light in the control panel is lit.
1. Remove the lower rack and unscrew the reservoir cap
(anticlockwise).
2. Position the funnel (see gure) and ll the salt reservoir
right up to its edge (approximately 1 kg); it is not unu-
sual for a little water to leak out.
3. Only the rst time you do this: ll the salt reservoir
with water.
4. Remove the funnel and wipe any salt residue away from the opening.
Make sure the cap is screwed on tightly, so that no detergent can get into
the container during the wash program (this could damage the water
softener beyond repair).
Whenever you need to add salt, it is mandatory to complete the proce-
dure before the beginning of the washing cycle to avoid corrosion.
FILLING THE RINSE AID DISPENSER
Rinse aid makes dish DRYING easier. The rinse
aid dispenser A should be lled when the
RINSE AID REFILL indicator light in the
control panel is lit. NEVER pour the rinse aid
directly into the appliance tub.
A
C
D
FILLING THE DETERGENT DISPENSER
To open the detergent dispenser use the opening device C. Introduce the
detergent into the dry dispenser D only. Place the amount of detergent for
pre-washing directly inside the tub.
If all-in-one detergents are used, we recommend using the TABLET button,
because it adjusts the program so that the best washing and drying results
are always achieved.
Usage of detergent not designed for dishwashers may cause malfunc-
tion or damage to the appliance.
WATER SOFTENING SYSTEM
Water softener automatically reduces water hardness, consequently pre-
venting scale buildup on heater, contributing also to better cleaning e-
ciency. This system regenerates itself with salt, therefore it is required
to rell salt container when empty.
Frequency of regeneration depends on water hardness level setting - regen-
eration takes place once per 6 Eco cycles with water hardness level set to 3.
Regeneration process starts in nal rinse and nishes in drying phase, be-
fore cycle ends.
• Single regeneration consumes: ~3.5L of water;
• Takes up to 5 additional minutes for the cycle;
• Consumes below 0.005kWh of energy.
Produktspezifikationen
| Marke: | Whirlpool |
| Kategorie: | Spülmaschine |
| Modell: | W3F D634 X |
Brauchst du Hilfe?
Wenn Sie Hilfe mit Whirlpool W3F D634 X benötigen, stellen Sie unten eine Frage und andere Benutzer werden Ihnen antworten
Bedienungsanleitung Spülmaschine Whirlpool

17 Januar 2026
11 Januar 2026
5 Januar 2026
5 Januar 2026
5 Januar 2026
4 Januar 2026
4 Januar 2026
29 Dezember 2026
23 November 2025
13 November 2025
Bedienungsanleitung Spülmaschine
Neueste Bedienungsanleitung für -Kategorien-
21 Januar 2026
21 Januar 2026
21 Januar 2026
21 Januar 2026
21 Januar 2026
21 Januar 2026
21 Januar 2026
21 Januar 2026
20 Januar 2026
20 Januar 2026