Akasa Internal AK-ICR-07U3 Bedienungsanleitung
Akasa Speicherleser Internal AK-ICR-07U3
Lies die bedienungsanleitung für Akasa Internal AK-ICR-07U3 (1 Seiten) kostenlos online; sie gehört zur Kategorie Speicherleser. Dieses Handbuch wurde von 16 Personen als hilfreich bewertet und erhielt im Schnitt 4.3 Sterne aus 9 Bewertungen. Hast du eine Frage zu Akasa Internal AK-ICR-07U3 oder möchtest du andere Nutzer dieses Produkts befragen? Stelle eine Frage
Seite 1/1
STEP 4
Installation
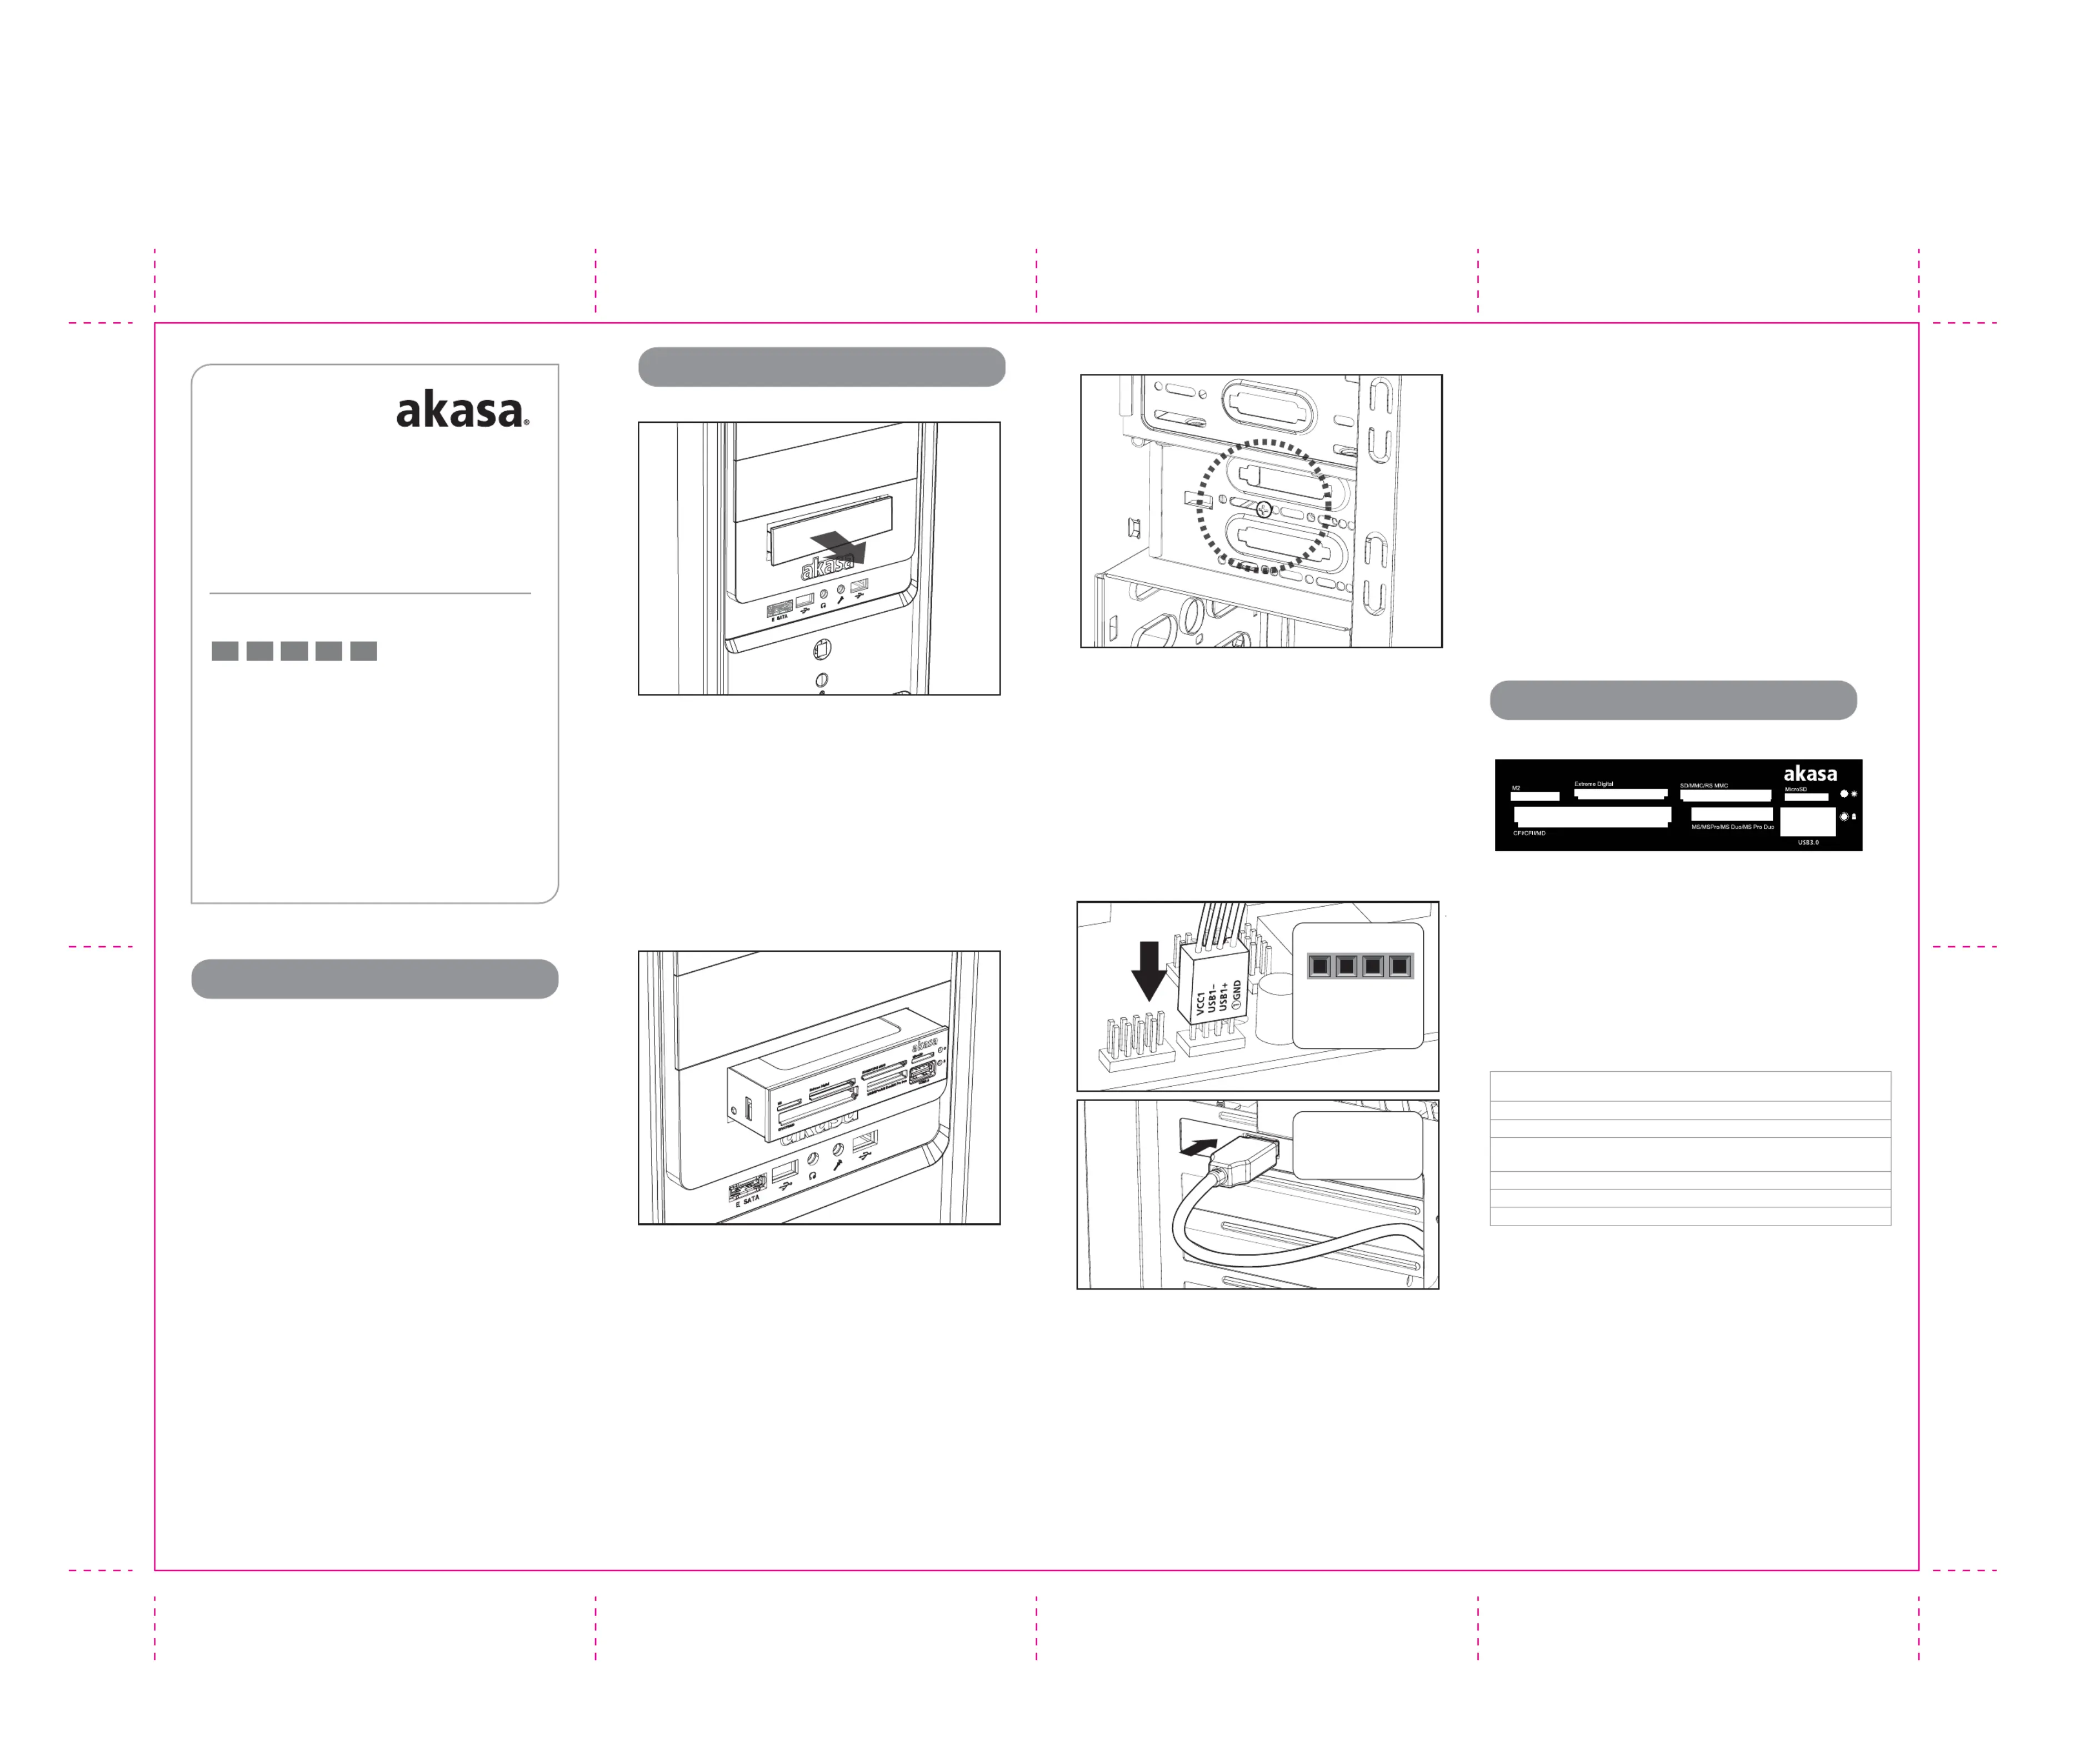
GB
Switch off the system power and open the case side panel. Remove the
cover of an empty 3.5’’ external drive bay.
FR
Eteignez l’alimentation du système et ouvrez le panneau latéral du
boîtier. Retirez le couvercle d’une baie de lecteur externe 3,5 pouces vide.
D
Schalten Sie das System aus und öffnen Sie das Seitenabdeckung des
Gehäuses. Entfernen Sie die Abdeckung eines freien, externen 3.5"
Laufwerkschachtes.
ES
Apague la alimentación del sistema y abra el panel lateral de la carcasa.
Quite la tapa de una bahía de unidad externa vacía de 3,5".
PT
Desligue o sistema e abra o painel lateral do gabinete. Remova a tampa
de uma baia externa de 3.5” vazia.
Pre - installation
GB
WARNING
Electrostatic discharge (ESD) can damage system components.
Use an ESD controlled workstation. If such a workstation is not
available, wear an antistatic wrist strap or touch an earthed
surface before handling any PC components.
FR
ATTENTION
Une décharge électrostatique (ESD) peut endommager les composants
du système. Utilisez une station de travail protégée contre l’ESD. Si
vous ne disposez pas d’une telle station de travail, portez un bracelet
antistatique ou touchez une surface connectée à la masse avant de
manipuler les composants du PC.
D
WARNUNG
Die Systemkomponenten können durch elektrostatische Entladung
beschädigt werden. Benutzen Sie einen for ESD schützenden
Arbeitsplatz. Sollte ein solcher Arbeitspaltz nicht verfügbar sein,
tragen Sie ein antistatisches Armband or berühren Sie eine geerdete
Oberfläche vor dem hantieren mit PC Komponenten.
ES
ADVERTENCIA
La descarga electrostática (ESD) puede dañar componentes en el
sistema. Use una estación de trabajo controlada ESD. Si no tiene
disponible dicho lugar de trabajo, colóquese una muñequera
antiestática o toque la superficie conectada a tierra antes de tocar
componentes en el PC.
PT
Cuidado
A descarga eletrostática (ESD) pode danificar os componentes do
sistema.
Se uma bancada técnica não estiver disponível, use uma pulseira anti-
estática ou toque em uma superfície aterrada antes de manusear
qualquer componente.
STEP 1
A3_297 mm x 420mm 模照紙單色印刷
2011/03
AK-ICR-07U3
AKASA Company notices
The information contained in this document is subject to
change without notice.
All rights reserved. Reproduction, adaptation, or translation of
this material is prohibited without prior written permission of
AKASA, except as allowed under copyright laws. The only
warranties for AKASA products and services are set forth in
the express warranty statements accompanying such products
and services. Nothing herein should be construed as
constituting an additional warranty. AKASA shall not be liable
for technical or editorial errors or omissions contained herein.
User manual
Operation
GB
Insert the card reader into the drive bay until it is in line with front panel
of the chassis.
FR
Insérez le lecteur de carte dans la baie du lecteur jusqu’à ce qu’il soit
aligné avec le panneau avant du châssis.
D
Führen Sie nun den Kartenleser in den Laufwerksschacht ein, bis die
Vorderkante des Kartenleser mit dem vorderen Gehäuseabdeckung
übereinstimmt.
ES
Inserte el lector de tarjetas en la bahía de la unidad hasta que esté en
línea con el panel frontal del chasis.
PT
Insira o leitor de cartões na baia e alinhe-o com o painel frontal do
gabinete.
STEP 2
D
Schließen Sie das interne USB-Kabel an den USB-Anschluss auf dem Motherboard,
Schließen Sie dann das USB 3.0-Kabel an einen freien USB-Anschluss des PCs an.
Schließen Sie das Gehäuseseitenteil.
Hinweis: 1. Wenn der USB Stecker nicht sichtbar ist, sehen Sie im
Mainboard-Handbuch nach.
2. Die maximale Datenübertragungsgeschwindigkeit erreichen Sie nur
mit einem USB 3.0-Port.
ES
Conecte el cable USB interno al cabezal USB de la placa base, luego conecte el
cable USB 3.0 en cualquier puerto USB disponible de su PC. Cierre el panel lateral
de la carcasa.
Nota: 1. Si el cabezal USB no aparece, consulte el manual de la placa base.
2. Para alcanzar la velocidad de transferencia de datos máxima necesita un
equipo con puerto USB 3.0.
PT
Conecte o cabo USB interno na entrada USB da placa-mãe, em seguida conecte o
cabo USB 3.0 numa porta USB disponível em seu PC. Feche a lateral do micro.
Nota: 1. Caso não tenha uma saída USB na placa-mãe, consulte o manual
da placa-mãe.
2. Para atingir a taxa máxima de transferência, é necessário que seu
sistema tenha USB 3.0.
GB
Connect the internal USB cable to the motherboard USB header, then connect USB
3.0 cable into any available USB port of your PC. Close the case side panel.
Note: 1. If the USB header is not apparent consult the motherboard manual.
2. To achieve maximum data transfer speed a system with USB 3.0 port
is required.
FR
Branchez le câble USB interne à l'embase USB de la carte mère, puis connectez le
câble USB 3.0 à un port USB libre de votre PC. Fermez le panneau latéral du boîtier.
Remarque : 1. Si vous ne trouvez pas le connecteur USB, consultez le manuel de la
carte mère.
2. Pour atteindre la vitesse de transfert maximum, un système équipé
d’un port USB 3.0 est nécessaire.
GB
Secure the card reader with the screws provided or the
case 3.5" mounting system.
FR
Fixez le lecteur de carte avec les vis fournies ou avec le système de
montage 3,5 pouces du boîtier.
D
Sichern Sie den Kartenleser mit Hilfe der im Lieferumfang enthaltenen
Schrauben oder dem 3.5" Befestigungssystem des Gehäuses.
ES
Fije el lector de tarjetas con los tornillos suministrados o con el sistema de
montaje de 3,5".
PT
Fixe o leitor de cartões usando os parafusos fornecidos ou o sistema de
montagem do gabinete.
STEP 3
GBFR
PT
DES
GB
Insert the card into corresponding port in the direction matching the port
shape.
FR
Insérez la carte dans le port correspondant dans la direction conforme à la
forme du port.
D
Führen Sie die Karte in den entsprechenden Steckplatz in der Richtung
ein, die mit der Form des Steckplatzes übereinstimmt.
ES
Inserte la tarjeta en el puerto correspondiente en la posición que coincida
con la forma del puerto.
PT
Insira o cartão na porta correspondente, na direção indicada.
SUPPORTED MEMORY CARDS
1
2
3
4
5
6
Compact Flash (CF I, CF II, Ultra, Extreme, I-Pro, Ultimate, MD)
Memory Stick (MS Pro, MS Pro Duo, Magic Gate, Extreme, Ultra)
Secure Digital (, Ultra, Extreme, Elite Pro, High Speed, MMC, MMC Mobile)SDXC, SDHC, SD
• 64GByte for SDXC • 32GByte for SDHC
Extreme Digital (X card, Type H, Type M)
M2 (Memory Stick Micro M2)
microSD (Micro SDHC, High Capacity)
internal
cardreader
USB
VCC1D-1D+1GND
▲
USB 3.0
cable
USB 4-pin
header
Produktspezifikationen
| Marke: | Akasa |
| Kategorie: | Speicherleser |
| Modell: | Internal AK-ICR-07U3 |
Brauchst du Hilfe?
Wenn Sie Hilfe mit Akasa Internal AK-ICR-07U3 benötigen, stellen Sie unten eine Frage und andere Benutzer werden Ihnen antworten
Bedienungsanleitung Speicherleser Akasa

16 Januar 2026
30 Dezember 2026
29 Dezember 2026
23 Dezember 2025
22 Dezember 2025
22 Dezember 2025
22 Dezember 2025
22 Dezember 2025
18 Dezember 2025
13 September 2025
Bedienungsanleitung Speicherleser
Neueste Bedienungsanleitung für -Kategorien-
17 Dezember 2025
12 Oktober 2025
9 Oktober 2025
1 Oktober 2025
29 September 2025
29 September 2025
27 September 2025
26 September 2025
25 September 2025
25 September 2025