ALM mmMidi MKII Bedienungsanleitung
ALM Nicht kategorisiert mmMidi MKII
Lies die bedienungsanleitung für ALM mmMidi MKII (112 Seiten) kostenlos online; sie gehört zur Kategorie Nicht kategorisiert. Dieses Handbuch wurde von 10 Personen als hilfreich bewertet und erhielt im Schnitt 4.1 Sterne aus 6 Bewertungen. Hast du eine Frage zu ALM mmMidi MKII oder möchtest du andere Nutzer dieses Produkts befragen? Stelle eine Frage
Seite 1/112
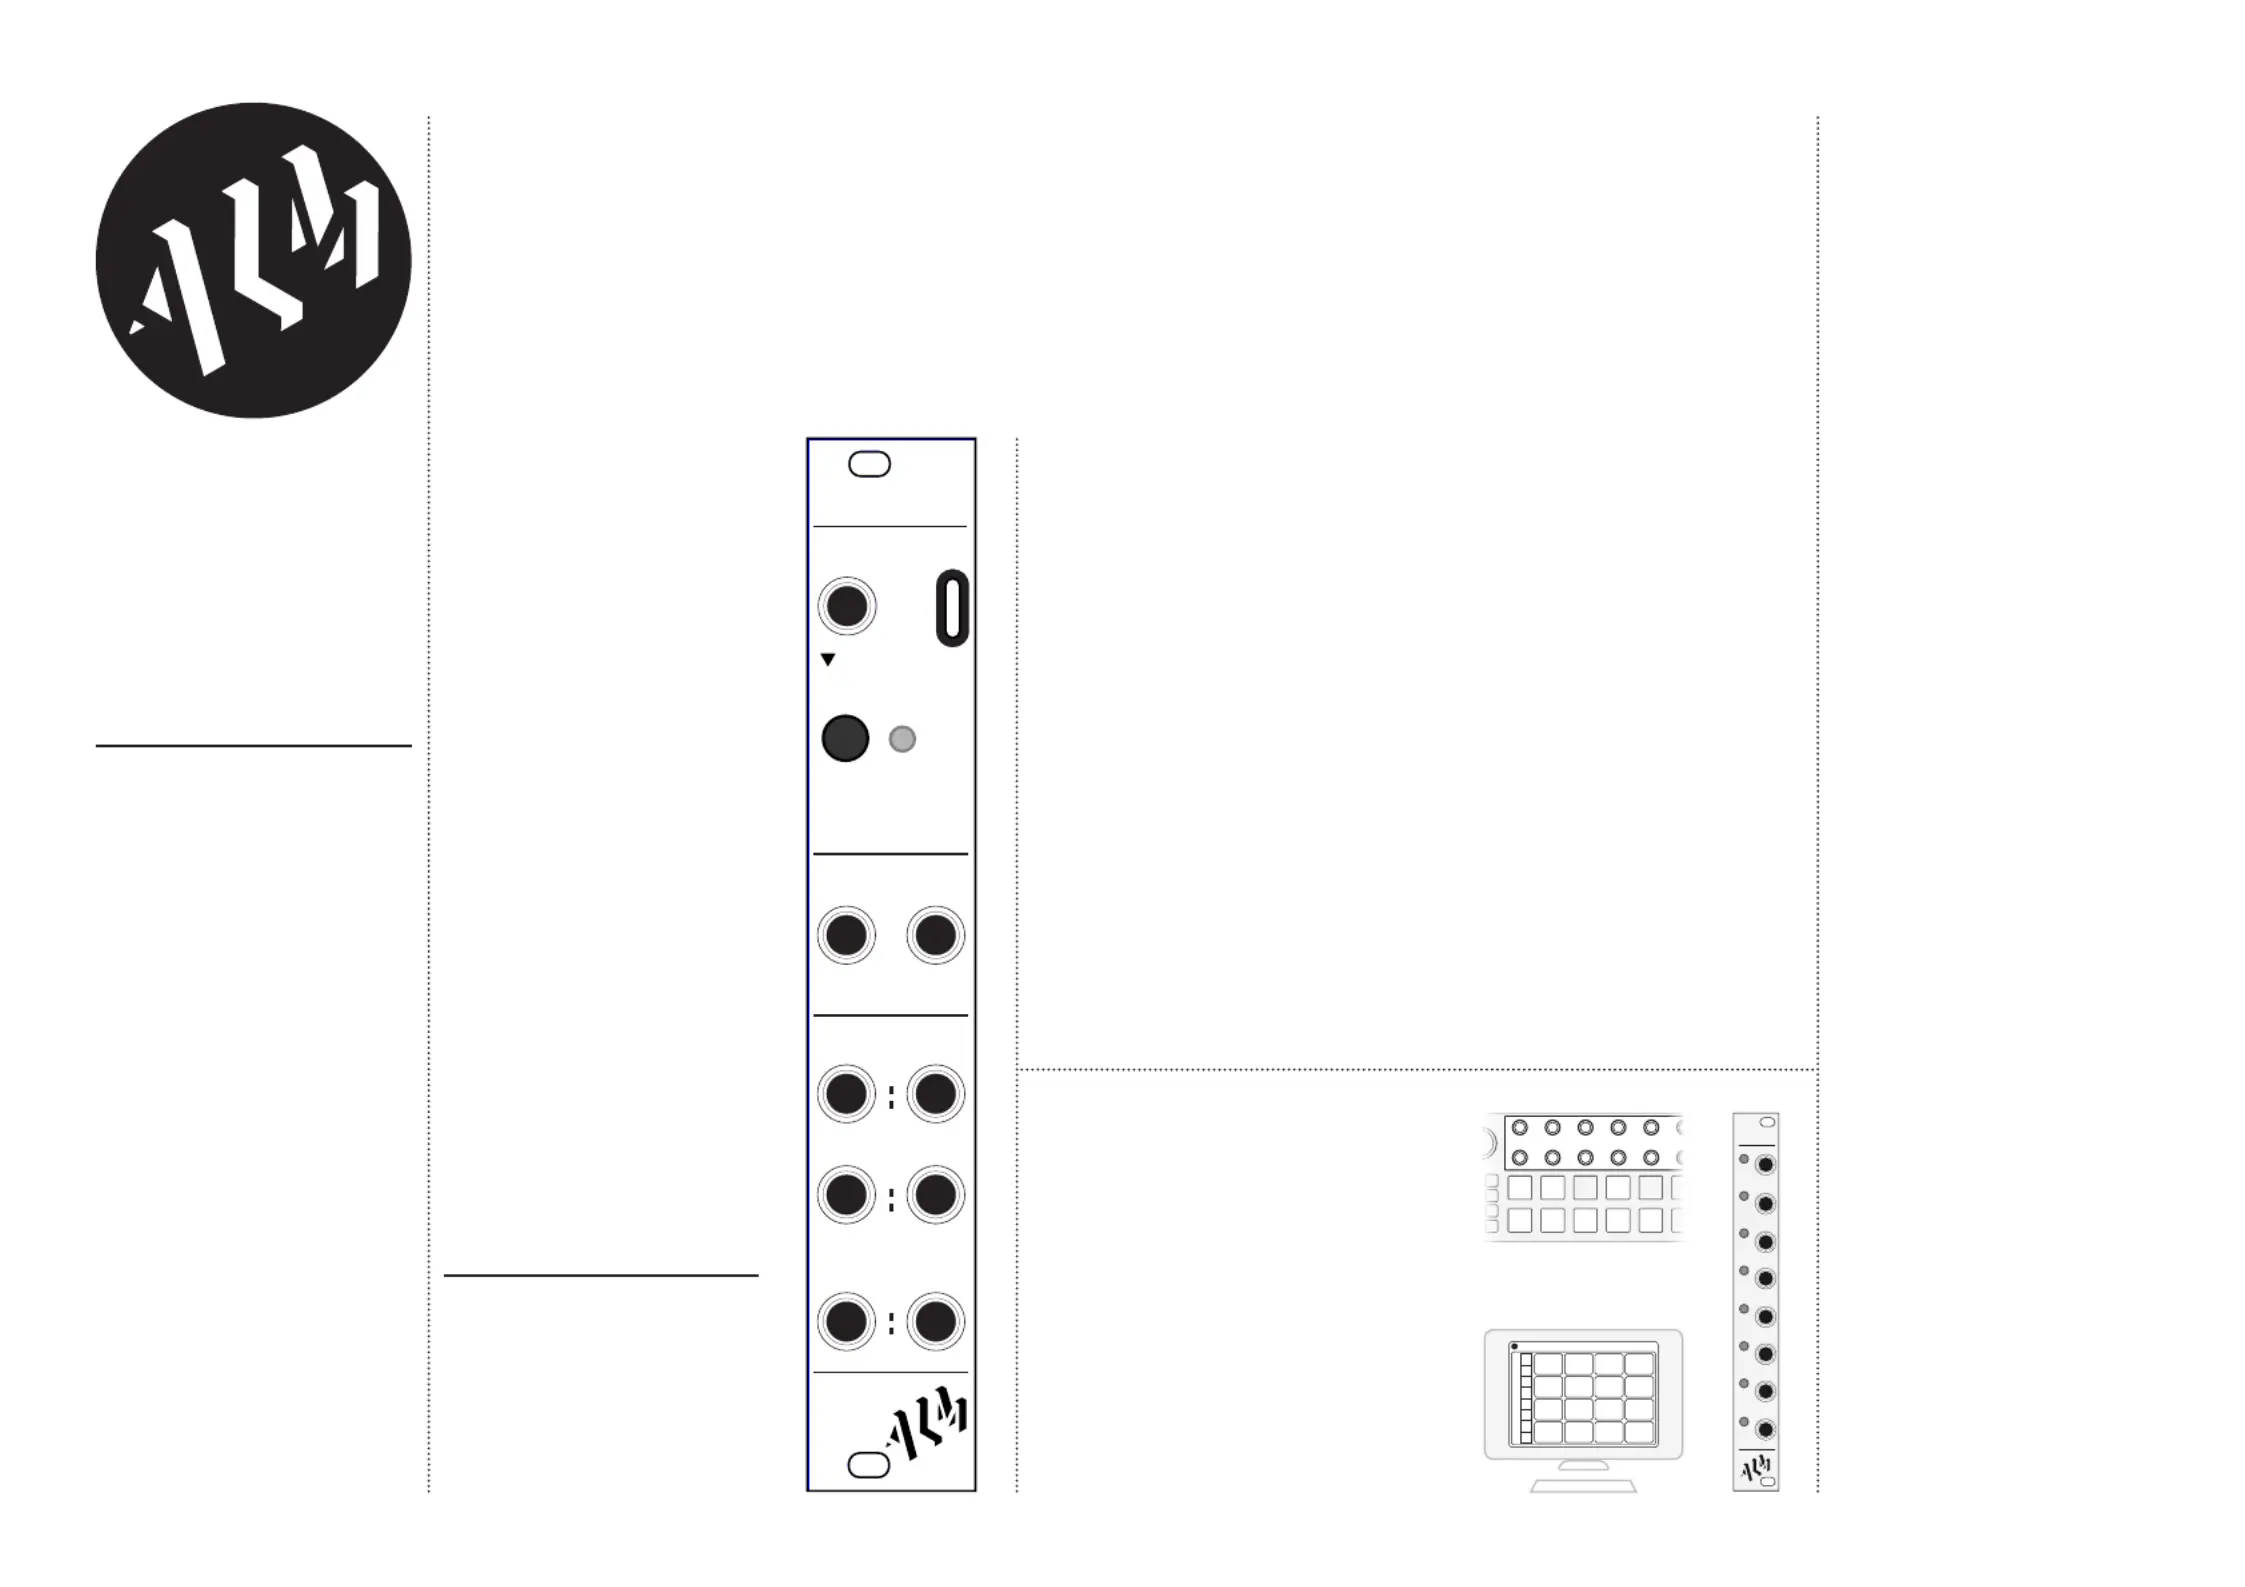
MIDI INPUTS
Use included TRS to DIN
adaptor cable (Type B) OR
USB-C cable to connect
mmMidi to your MIDI controller.
LEARN BUTTON
Used for MIDI channel setup
(see box right).
Quick double press to reset all
outputs. Long press (3+secs) to
transpose outputs by -2 octaves
(persistent across reboots).
ACTIVITY LED
Highlights when MIDI activity is
received.
CLOCK OUTPUT
If a MIDI clock is present, the
x24 output will produce a 24
PPQN clock and the Run output
will go high.
OUTPUTS
Voltage outputs for
channels 1 and 2.
V/Oct & Velocity range: 0-8V
Gate level: 5V
The mmMidi is a simple & compact MIDI interface for your Eurorack synthesiser. It translates 2 independent channels of MIDI note, velocity
and gate information to corresponding control voltage signals via either a classic MIDI DIN type connection or as a driver-less USB MIDI
device. The mmMidi also converts MIDI Clock to analog x24 clock and run outputs (i.e DIN Sync). The optional mmT expander provides a third
MIDI channel of 8 key mapped gate outputs.
Requiring minimal configuration and a pain free set up, the mmMidi makes it easy to sync Pams clock to your DAW, control multiple synth
voices, and trigger drum or sample modules with the optional mmT expander. The new USB-C connection makes it easy to drive your modular
not just from your computer but also via your tablet, phone or any USB MIDI Host.
MIDI CHANNEL SETUP
NOTE: From the factory, mmMidi is configured to channels 1,2 and 3.
1. Hold the ‘Learn’ button until activity light starts flashing (for approx 1 sec).
You can cancel setup anytime by pressing ‘Learn’ again.
2. Connect mmMidi to your MIDI controller/DAW.
3. Set the controller to the MIDI channel that you want to be output by the
first set of voltage outputs on the mmMidi.
4. Send a MIDI note from the controller to mmMidi. The activity light on
mmMidi will flash faster to indicate it has ‘learnt’ channel one.
5. Set the controller to the MIDI channel that you want to be output by the
second set of voltage outputs on the mmMidi and send another note. The LED
on mmMidi will flash even faster to indicate it has ‘learnt’ channel two.
6. Set the controller to a third MIDI channel (for optional expander - even if
it’s not present) and send another note. The LED on mmMidi will stop flashing
and the module is now ready to use with the configured MIDI channels. Setup
is remembered across power cycles.
OPTIONAL EXPANDER - mmT
The ‘mmT’ is an optional 3HP expander
which connects directly to the ‘expand’
socket on the rear of the mmMidi using
the supplied cable.
It maps the third configured MIDI
channel key presses to corresponding
trigger/gate outputs as shown on the
mmT front panel.
It’s useful for controlling drum modules,
particularly the ALM Squid Salmple.
https://busycircuits.com/alm023 (USB Version)
TECHNICAL SPECIFICATIONS
Power: +12V 30ma / -12V 0ma
Size: 4HP
Depth: 38mm
Resolution: 12Bit 0-8V range
ALM023-II /mmMidi
Limited Warranty
From the date of manufacture this
device is guaranteed for a period of 2
years against any manufacturing or
material defects. Any such defects
will be repaired or replaced at the
discretion of ALM. This does not
apply to;
•Physical damage arising for mis
treating (i,e dropping, submerging
etc).
•Damage caused by incorrect power
connections.
•Overexposure to heat or direct
sunlight.
•Damage caused by inappropriate or
misuse.
•Use of incorrect or non official
firmware
No responsibility is implied or
accepted for harm to person or
apparatus caused through operation
of this product. By using this product
you agree to these terms.
Support
Need help? Email your questions to
help@busycircuits.com
For the latest news, additional info,
downloads and firmware updates
please visit the ALM website at
http://busycircuits.com. Also follow
@busycircuits on YouTube and
Instagram.
Module Installation
With your modular synth
powered connect the 10 pin off
end of the supplied standard
eurorack power connector cable
to the 10 pin power connector on
the rear of the module.
The red stripe on the cable
should be orientated to match
the text ‘RED’ marked on the rear
of the module near the power
connector (this is -12V). Connect
the 16 pin end of the cable to
your eurorack bus board (Refer
to your bus board documenta-
tion for the correct orientation).
You are now safe to power up
your modular synth. If the mod-
ule fails to power up check you
have the power cable correctly
orientated and have carefully
read this manual.
All ALM modules feature reverse
power protection.
Firmware Updates
Firmware can be installed over USB
with an official firmware file found at
busycircuits.com.
1. Power off mmMidi/your case.
2. Power on mmMidi/case while
holding down mmMidi’s Learn button.
Activity LED will turn on and stay lit.
3. Connect mmMidi to computer over
USB. It will appear as a disk named
‘mmMidi’.
4. Drag and drop the firmware file
onto the disk.
When update completes mmMidi will
reboot and be ready to use.
ALM023 manual version: 0.5
C
C
#
#
#
D
D
E
F
F
G
mmT
C#
C
D#
DE
F#
FG
CC#DD#
EFF#
DAW
G
Controller
or
DAW
V/Oct
Velocity
Gates
12
Learn
Clock
Activity
Run
MIDI In
x24
mmMidi
Supported MIDI CCs
CC68 - Toggle Legato on
CC74 - Velocity Override
(CC74 enabled by
setting Program Change to 1)
CC120/CC123 - Output reset
mmMidi
Produktspezifikationen
| Marke: | ALM |
| Kategorie: | Nicht kategorisiert |
| Modell: | mmMidi MKII |
Brauchst du Hilfe?
Wenn Sie Hilfe mit ALM mmMidi MKII benötigen, stellen Sie unten eine Frage und andere Benutzer werden Ihnen antworten
Bedienungsanleitung Nicht kategorisiert ALM

28 Januar 2026
28 Januar 2026
5 September 2025
29 August 2024
29 August 2024
29 August 2024
23 August 2024
23 August 2024
21 August 2024
17 August 2024
Bedienungsanleitung Nicht kategorisiert
Neueste Bedienungsanleitung für -Kategorien-
3 April 2026
3 April 2026
3 April 2026
3 April 2026
3 April 2026
3 April 2026
3 April 2026
3 April 2026
3 April 2026
3 April 2026