Atlona AT-OME-EX-KIT Bedienungsanleitung
Atlona WLAN-Repeater AT-OME-EX-KIT
Lies die bedienungsanleitung für Atlona AT-OME-EX-KIT (16 Seiten) kostenlos online; sie gehört zur Kategorie WLAN-Repeater. Dieses Handbuch wurde von 70 Personen als hilfreich bewertet und erhielt im Schnitt 4.1 Sterne aus 3 Bewertungen. Hast du eine Frage zu Atlona AT-OME-EX-KIT oder möchtest du andere Nutzer dieses Produkts befragen? Stelle eine Frage
Seite 1/16
1
Installation Guide
AT-OME-EX-KIT
Omega
™
4K/UHD
HDMI Over HDBaseT TX/RX with USB, Control, and PoE
AT-OME-EX-KIT
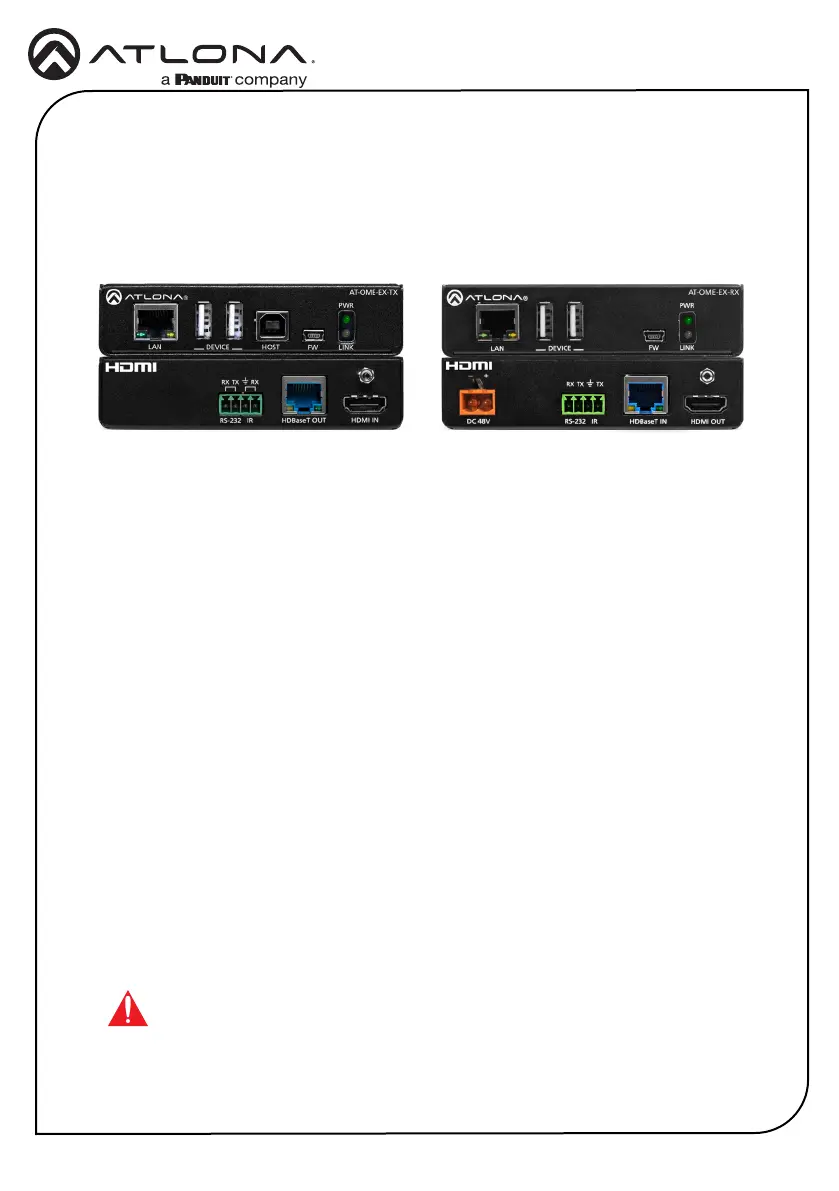
The Atlona AT-OME-EX-KIT is an HDBaseT extender for video up to 4K/60 4:2:0, plus
embedded audio, control, Ethernet, and USB 2.0 over distances up to 330 feet (100 meters).
Part of the Omega
™
Series of integration products for modern AV communications and
collaboration, the OME-EX-KIT is HDCP 2.2 compliant and extends IR, RS-232, and IP control
signals. The integrated USB extension is ideal for software video conferencing and the use of
touch or interactive displays. The OME-EX-TX transmitter includes a USB host port for a PC,
plus two peripheral devices such as a speakerphone, microphone, or keyboard and mouse. The
OME-EX-RX receiver provides two USB 2.0 interfaces for devices such as a camera or display.
The transmitter and receiver are available separately, for use with other Omega Series integration
products.*
* Both the AT-OME-EX-TX and AT-OME-EX-RX are not compatible with the AT-UHD-HDVS-300
system for extending USB.
IMPORTANT: Visit http://www.atlona.com/product/AT-OME-EX-KIT for the
latest rmware updates and User Manual.
1 x AT-OME-EX-TX
1 x AT-OME-EX-RX
2 x Captive screw connectors, 4-pin
1 x AT-IR-CS-TX
4 x Mounting plates
8 x Mounting screws
1 x 48 V DC power supply
1 x Installation Guide
Package Contents
Produktspezifikationen
| Marke: | Atlona |
| Kategorie: | WLAN-Repeater |
| Modell: | AT-OME-EX-KIT |
| Upgradefähige Firmware: | Ja |
| Produktfarbe: | Schwarz |
| AC Eingangsspannung: | 100 - 240 V |
| AC Eingangsfrequenz: | 50 - 60 Hz |
| Anzahl USB 2.0 Anschlüsse: | 4 |
| Betriebstemperatur: | 0 - 50 °C |
| Relative Luftfeuchtigkeit in Betrieb: | 20 - 90 % |
| Zertifizierung: | CE, RoHS, FCC |
| Stromverbrauch (Standardbetrieb): | 32.35 W |
| Anzahl Ethernet-LAN-Anschlüsse (RJ-45): | 4 |
| Warentarifnummer (HS): | 85176990 |
| Typ: | Netzwerksender & -empfänger |
| LED-Anzeigen: | Link, Power |
| Temperaturbereich bei Lagerung: | -20 - 60 °C |
| Ausgangsstrom: | 0.83 A |
| Ausgangsspannung: | 48 V |
| Nachhaltigkeitszertifikate: | RoHS |
| Maximal mögliche Übertragungsstrecke: | 100 m |
| unterstütze Kabeltypen: | Cat5e, Cat6, Cat6a, Cat7, HDMI |
| Datenübertragungsrate: | 120 Mbit/s |
| Empfängergewicht: | 870 g |
| Gewicht Transmitter: | 406 g |
| Breite des Empfängers: | 109 mm |
| Tiefe des Empfängers: | 127 mm |
| Höhe des Empfängers: | 26 mm |
| Breite des Senders: | 109 mm |
| Tiefe des Senders: | 127 mm |
| Höhe des Senders: | 26 mm |
| Anzahl RJ-45-Anschlüsse (Sender): | 2 |
| Anzahl RJ-45-Anschlüsse (Empfänger): | 2 |
Brauchst du Hilfe?
Wenn Sie Hilfe mit Atlona AT-OME-EX-KIT benötigen, stellen Sie unten eine Frage und andere Benutzer werden Ihnen antworten
Bedienungsanleitung WLAN-Repeater Atlona

22 August 2024
22 August 2024
1 Mai 2024
10 Januar 2024
24 September 2023
Bedienungsanleitung WLAN-Repeater
Neueste Bedienungsanleitung für -Kategorien-
17 März 2026
14 März 2026
13 März 2026
12 März 2026
11 März 2026
9 Februar 2026
6 Februar 2026
5 Februar 2026
4 Februar 2026
4 Februar 2026