AXESS 99-5838CH Bedienungsanleitung
AXESS Nicht kategorisiert 99-5838CH
Lies die bedienungsanleitung für AXESS 99-5838CH (40 Seiten) kostenlos online; sie gehört zur Kategorie Nicht kategorisiert. Dieses Handbuch wurde von 31 Personen als hilfreich bewertet und erhielt im Schnitt 4.4 Sterne aus 7 Bewertungen. Hast du eine Frage zu AXESS 99-5838CH oder möchtest du andere Nutzer dieses Produkts befragen? Stelle eine Frage
Seite 1/40
The World’s best kits.
®
MetraOnline.com © COPYRIGHT 2022 METRA ELECTRONICS CORPORATION REV. 12/9/22 INST99-5838CH
INSTALLATION INSTRUCTIONS
99-5838CH
Patent # 10,579,232
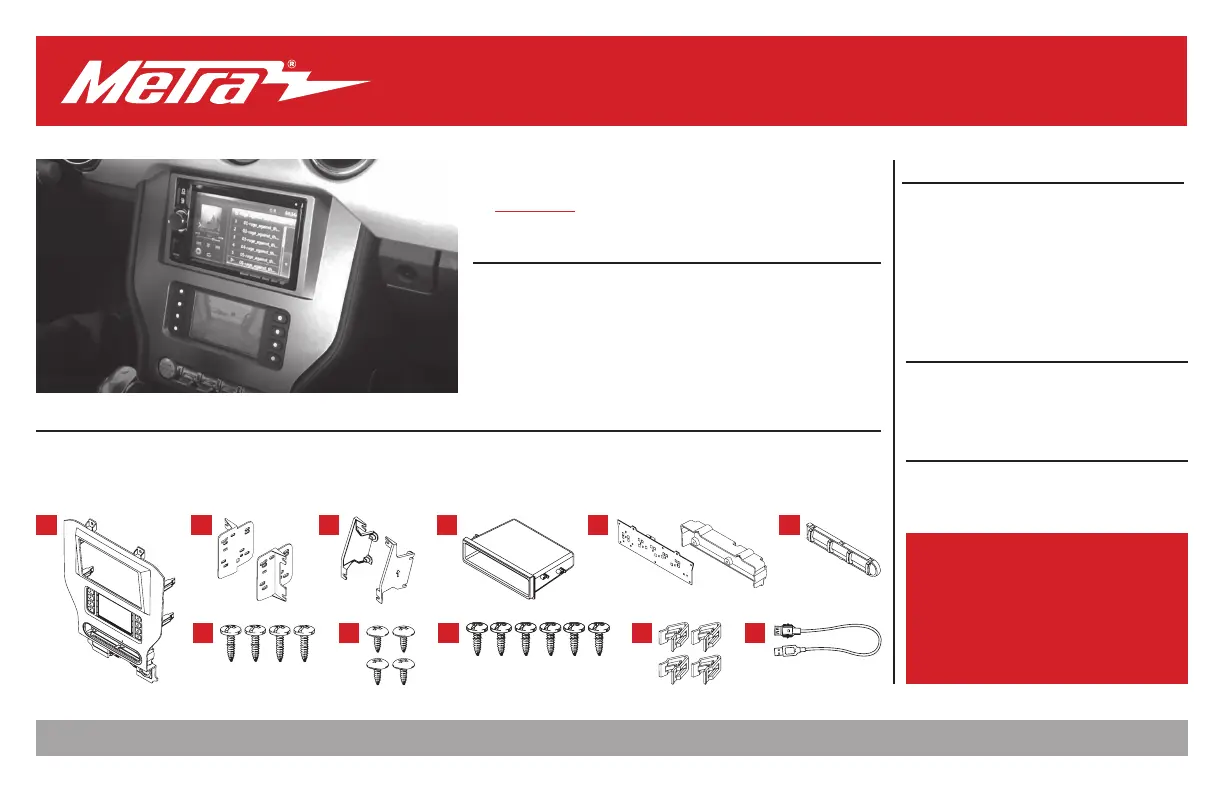
KIT FEATURES
• ISO DIN radio provision with pocket
• ISO DDIN radio provision
• Touchscreen display for climate and personalization features
• Painted charcoal
KIT COMPONENTS
• A) Radio trim panel with touchscreen display • B) Radio brackets • C) SYNC module brackets • D) Pocket • E) Engine start/stop circuit board and cover
• F) Engine start/stop trim • G) #8 x 3/4" Phillips pan-head screws (4) • H) #8 x 3/8" Phillips truss-head screws (4) • I) #4 x 1/2" Phillips pan-head screws (6)
• J) Panel clips (4)
• K) USB cable • Not shown: HVAC interface and wiring harness, Antenna adapter
TOOLS REQUIRED
• Panel removal tool • Phillips screwdriver
• 9/32" socket wrench • Cutting tool
• Torx T-10 screwdriver • Pick tool
TABLE OF CONTENTS
Dash Disassembly ..............................................2-4
Kit Preparation ....................................................5-7
Kit Assembly
–ISO DIN radio provision with pocket ..................8
–ISO DDIN radio provision .....................................8
Axxess Interface installation ............................9-18
Final Assembly ......................................................13
WIRING & ANTENNA CONNECTIONS
Wiring Harness: Axxess interface built
into touchscreen
Antenna Adapter: Included with kit
Ford Mustang (with 4.2" screen) 2015-2022
ABCF
G
DE
HIJK
Visit MetraOnline.com for more detailed information about the product and up-to-date
vehicle specific applications
ATTENTION: With the key out of the ignition,
disconnect the negative battery terminal
before installing this product. Ensure that all
installation connections, especially the air
bag indicator lights, are plugged in before
reconnecting the battery or cycling the ignition
to test this product.
NOTE: Refer also to the instructions included
with the aftermarket radio.
Please visit metraonline.com or axxessinterfaces.com for more harness and interface options.
Produktspezifikationen
| Marke: | AXESS |
| Kategorie: | Nicht kategorisiert |
| Modell: | 99-5838CH |
Brauchst du Hilfe?
Wenn Sie Hilfe mit AXESS 99-5838CH benötigen, stellen Sie unten eine Frage und andere Benutzer werden Ihnen antworten
Bedienungsanleitung Nicht kategorisiert AXESS

31 Juli 2025
31 Juli 2025
14 Juli 2025
14 Juli 2025
14 Juli 2025
14 Juli 2025
14 Juli 2025
14 Juli 2025
14 Juli 2025
14 Juli 2025
Bedienungsanleitung Nicht kategorisiert
Neueste Bedienungsanleitung für -Kategorien-
3 April 2026
3 April 2026
3 April 2026
3 April 2026
3 April 2026
3 April 2026
3 April 2026
3 April 2026
3 April 2026
3 April 2026