AXESS AXAC-MZ1 Bedienungsanleitung
AXESS Nicht kategorisiert AXAC-MZ1
Lies die bedienungsanleitung für AXESS AXAC-MZ1 (16 Seiten) kostenlos online; sie gehört zur Kategorie Nicht kategorisiert. Dieses Handbuch wurde von 44 Personen als hilfreich bewertet und erhielt im Schnitt 4.0 Sterne aus 6 Bewertungen. Hast du eine Frage zu AXESS AXAC-MZ1 oder möchtest du andere Nutzer dieses Produkts befragen? Stelle eine Frage
Seite 1/16
CAUTION!
All accessories, switches, climate
controls panels, and especially air bag indicator
lights must be connected before cycling the
ignition. Also, do not remove the factory radio
with the key in the on position, or while the
vehicle is running.
AXAC-MZ1
INSTALLATION INSTRUCTIONS
AxxessInterfaces.com © COPYRIGHT 2023 METRA ELECTRONICS CORPORATION REV. 1/31/23 INSTAXAC-MZ1
INTERFACE FEATURES
TOOLS REQUIRED
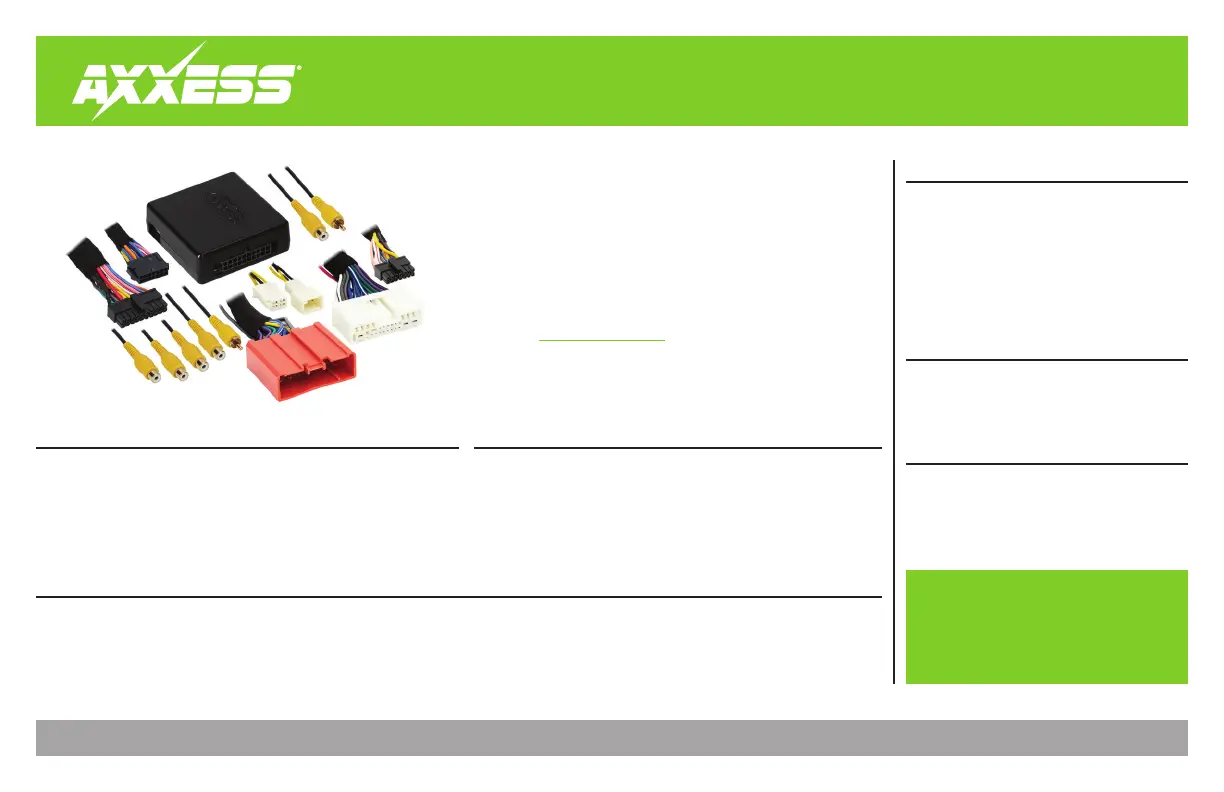
INTERFACE COMPONENTS
REQUIRED ITEMS
TABLE OF CONTENTS
Introduction............................................................2
Configuration .....................................................2-4
Connections ............................................................5
Installation .............................................................6
Programming .........................................................6
• (4) Camera inputs
•
Turn signal trigger generated via CAN bus communication of the vehicle
• (4) Programmable camera control wires
• Micro-B USB updatable
• Crimping tool and connectors, or solder gun,
solder, and heat shrink
• Tape • Wire cutter • Zip ties
• AXAC-MZ1 interface
• AXAC-MZ1 interface harness
• AXAC-MZ1 vehicle harness (qty. 2)
• 24-pin T-harness
• 4-pin T-harness (cam harness)
Update Cable: AXUSB-MCBL (sold separately)
Axxess Updater Program
†
With full color LCD screen
Mazda† Camera Interface With Pre-Wired Harness
2007-2015
APPLICATIONS
Mazda
CX-5 2013-2015
CX-9 2013-2015
CX-9 (with NAV) 2007-2012
Note: Only compatible with NTSC cameras.
Visit AxxessInterfaces.com for more detailed information
about the product and up-to-date vehicle specific applications
Produktspezifikationen
| Marke: | AXESS |
| Kategorie: | Nicht kategorisiert |
| Modell: | AXAC-MZ1 |
Brauchst du Hilfe?
Wenn Sie Hilfe mit AXESS AXAC-MZ1 benötigen, stellen Sie unten eine Frage und andere Benutzer werden Ihnen antworten
Bedienungsanleitung Nicht kategorisiert AXESS

31 Juli 2025
31 Juli 2025
14 Juli 2025
14 Juli 2025
14 Juli 2025
14 Juli 2025
14 Juli 2025
14 Juli 2025
14 Juli 2025
14 Juli 2025
Bedienungsanleitung Nicht kategorisiert
Neueste Bedienungsanleitung für -Kategorien-
3 April 2026
3 April 2026
3 April 2026
3 April 2026
3 April 2026
3 April 2026
3 April 2026
3 April 2026
3 April 2026
3 April 2026