AXESS AXPIO-REN1 Bedienungsanleitung
AXESS Nicht kategorisiert AXPIO-REN1
Lies die bedienungsanleitung für AXESS AXPIO-REN1 (12 Seiten) kostenlos online; sie gehört zur Kategorie Nicht kategorisiert. Dieses Handbuch wurde von 31 Personen als hilfreich bewertet und erhielt im Schnitt 4.5 Sterne aus 8 Bewertungen. Hast du eine Frage zu AXESS AXPIO-REN1 oder möchtest du andere Nutzer dieses Produkts befragen? Stelle eine Frage
Seite 1/12
AXPIO-REN1
INSTALLATION INSTRUCTIONS
AxxessInterfaces.com © COPYRIGHT 2023 METRA ELECTRONICS CORPORATION REV. 7/28/23 INSTAXPIO-REN1
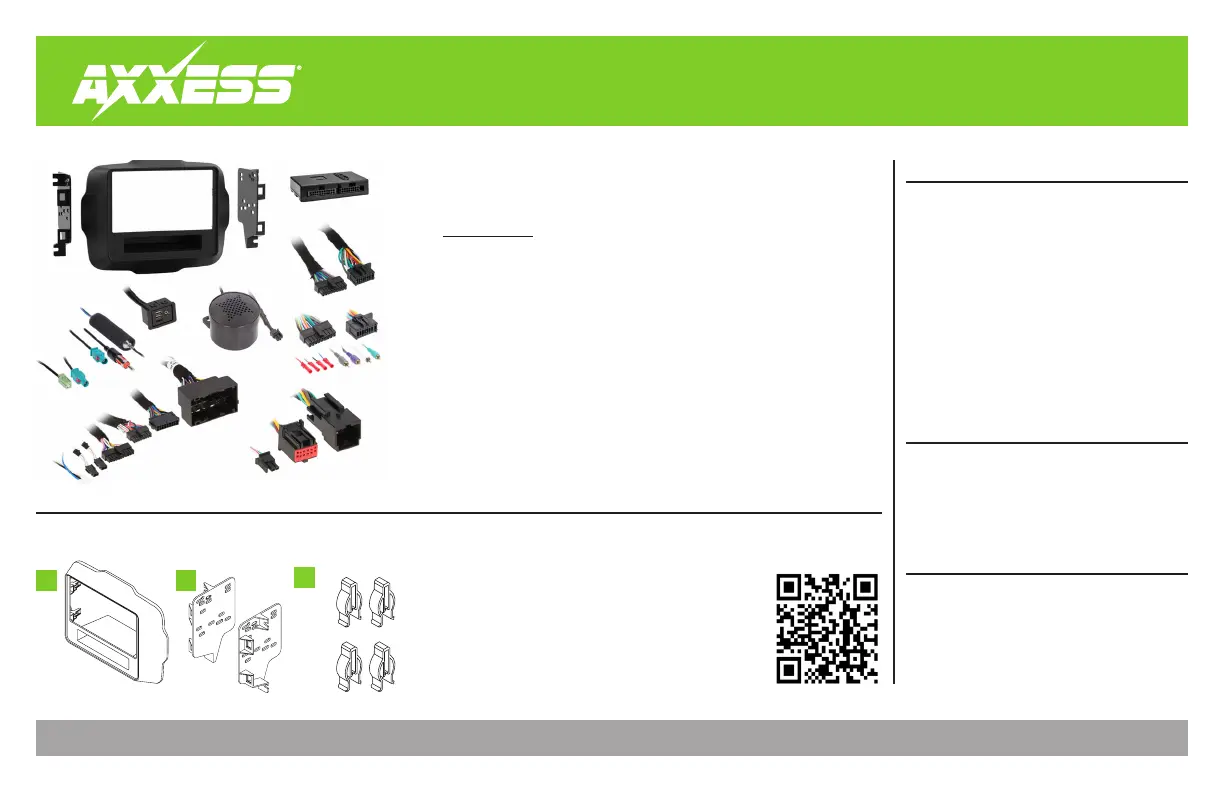
KIT COMPONENTS
• A) Radio trim panel • B) Radio brackets • C) Panel clips (4)
Not shown: LD-CH5-PIO, LD-CHRYHAZ2T,
Radio interface, AXUSB-RAM1, PR04AVIC-PIO or PR04-PIORCA Harness,
External Speaker
TABLE OF CONTENTS
Dash Disassembly ..................................................2
Kit Assembly ..........................................................3
Axxess Interface Installation ............................4-7
Interface Installation ........................................4
Dash Assembly ..................................................5
Radio Operation ............................................5-7
Odometer Type .................................................7
Jeep Renegade 2015-2020
AB
C
WIRING & ANTENNA CONNECTIONS
Wiring Harness: Included with Kit
Antenna Adapter: Included with Kit
GPS Antenna Adapter: Included with Kit
Visit AxxessInterfaces.com for up-to-date
vehicle specific applications.
Product Info
IMPORTANT: TPMS will only display on the instrument cluster, not on the Pioneer
®
.
Visit MetraOnline.com for more detailed information about the product and up-to-date
vehicle specific applications
Designed for Pioneer® DMHW4600NEX/W4660NEX or DMH-WC5700NEX receivers
Note: This kit will function in both Single-Zone and Dual-Zone vehicles:
• All HVAC functions will be retained.
• Single-Zone vehicles will only get status feedback of the HVAC functions,
while Dual-Zone vehicles can also be controlled through the radio screen.
• Compass is only retained on vehicles equipped with the UConnect 3 (5” touchscreen).
• Allows for the retention and adjustment of the factory personalization menu
through the Pioneer
®
radio.
(Features continued on next page
)
TOOLS & INSTALLATION ACCESSORIES REQUIRED
• Panel removal tool • Phillips screwdriver
• Torx screwdrivers • Tape
• Wire cutter • Zip-ties
• Crimping tool and connectors, or solder gun,
solder, and heat shrink
Produktspezifikationen
| Marke: | AXESS |
| Kategorie: | Nicht kategorisiert |
| Modell: | AXPIO-REN1 |
Brauchst du Hilfe?
Wenn Sie Hilfe mit AXESS AXPIO-REN1 benötigen, stellen Sie unten eine Frage und andere Benutzer werden Ihnen antworten
Bedienungsanleitung Nicht kategorisiert AXESS

31 Juli 2025
31 Juli 2025
14 Juli 2025
14 Juli 2025
14 Juli 2025
14 Juli 2025
14 Juli 2025
14 Juli 2025
14 Juli 2025
14 Juli 2025
Bedienungsanleitung Nicht kategorisiert
Neueste Bedienungsanleitung für -Kategorien-
3 April 2026
3 April 2026
3 April 2026
3 April 2026
3 April 2026
3 April 2026
3 April 2026
3 April 2026
3 April 2026
3 April 2026