AXESS AXSWC-TL Bedienungsanleitung
AXESS Nicht kategorisiert AXSWC-TL
Lies die bedienungsanleitung für AXESS AXSWC-TL (9 Seiten) kostenlos online; sie gehört zur Kategorie Nicht kategorisiert. Dieses Handbuch wurde von 40 Personen als hilfreich bewertet und erhielt im Schnitt 4.8 Sterne aus 9 Bewertungen. Hast du eine Frage zu AXESS AXSWC-TL oder möchtest du andere Nutzer dieses Produkts befragen? Stelle eine Frage
Seite 1/9
CAUTION!
All accessories, switches, climate
controls panels, and especially air bag indicator
lights must be connected before cycling the
ignition. Also, do not remove the factory radio
with the key in the on position, or while the
vehicle is running.
AXSWC-TL
INSTALLATION INSTRUCTIONS
AxxessInterfaces.com © COPYRIGHT 2020 METRA ELECTRONICS CORPORATION REV. 1/24/20 INSTAXSWC-TL
INTERFACE FEATURES
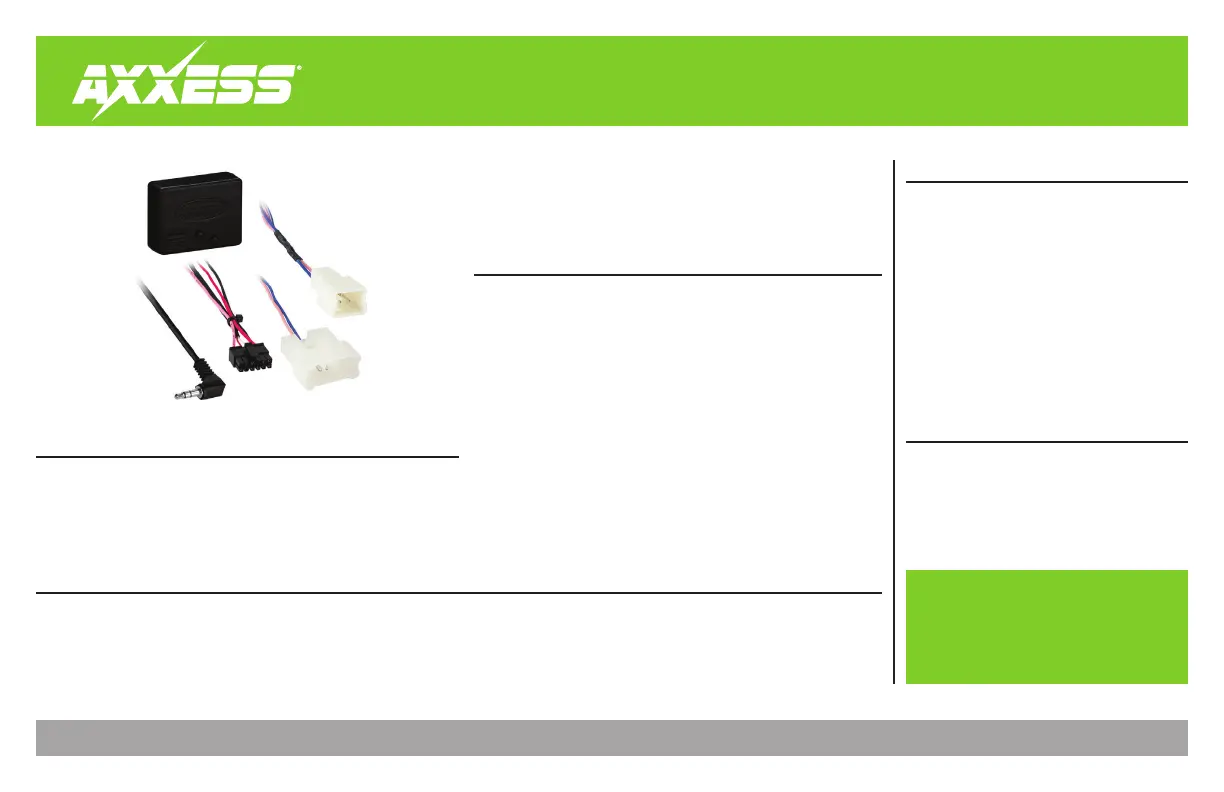
INTERFACE COMPONENTS
TOOLS REQUIRED
• Cutting tool • Crimping tool • Tape
• Connectors (example: butt-connectors, bell
caps, etc.)
TABLE OF CONTENTS
Connections to be made
–Into the vehicle .................................................2
–To the radio .......................................................2
Programming .........................................................3
Radio legend ..........................................................3
Troubleshooting .....................................................3
Extra Features ........................................................4
Resetting the AXSWC-TL ........................................4
Axxess Steering Wheel Control interface
Toyota/Lexus Select vehicles1999-2009
APPLICATIONS
• One Interface does it all - No additional interfaces needed
• Automatically programs the audio buttons on the steering wheel
• Auto detects what radio it’s connected to
• Works with most major radio brands
• Micro-B USB updatable
• All connections are made behind the radio
• Non-volatile memory retains settings even if the battery is
disconnected or the interface is removed from the vehicle
TOYOTA
Avalon 2003-2004
Prius 2001-2003
Sienna 1999-2003
LEXUS
GS300 / GS430 2001-2005
LX470 2001-2002
SC430 2002-2009
• AXSWC-TL interface
• AXSWC-TL harness
• Female 3.5mm connector with Brown and Brown/White wires
Produktspezifikationen
| Marke: | AXESS |
| Kategorie: | Nicht kategorisiert |
| Modell: | AXSWC-TL |
Brauchst du Hilfe?
Wenn Sie Hilfe mit AXESS AXSWC-TL benötigen, stellen Sie unten eine Frage und andere Benutzer werden Ihnen antworten
Bedienungsanleitung Nicht kategorisiert AXESS

31 Juli 2025
31 Juli 2025
14 Juli 2025
14 Juli 2025
14 Juli 2025
14 Juli 2025
14 Juli 2025
14 Juli 2025
14 Juli 2025
14 Juli 2025
Bedienungsanleitung Nicht kategorisiert
Neueste Bedienungsanleitung für -Kategorien-
3 April 2026
3 April 2026
3 April 2026
3 April 2026
3 April 2026
3 April 2026
3 April 2026
3 April 2026
3 April 2026
3 April 2026