Bosch GA50DC Professional Bedienungsanleitung
Bosch Nicht kategorisiert GA50DC Professional
Lies die bedienungsanleitung für Bosch GA50DC Professional (1 Seiten) kostenlos online; sie gehört zur Kategorie Nicht kategorisiert. Dieses Handbuch wurde von 8 Personen als hilfreich bewertet und erhielt im Schnitt 4.6 Sterne aus 7 Bewertungen. Hast du eine Frage zu Bosch GA50DC Professional oder möchtest du andere Nutzer dieses Produkts befragen? Stelle eine Frage
Seite 1/1
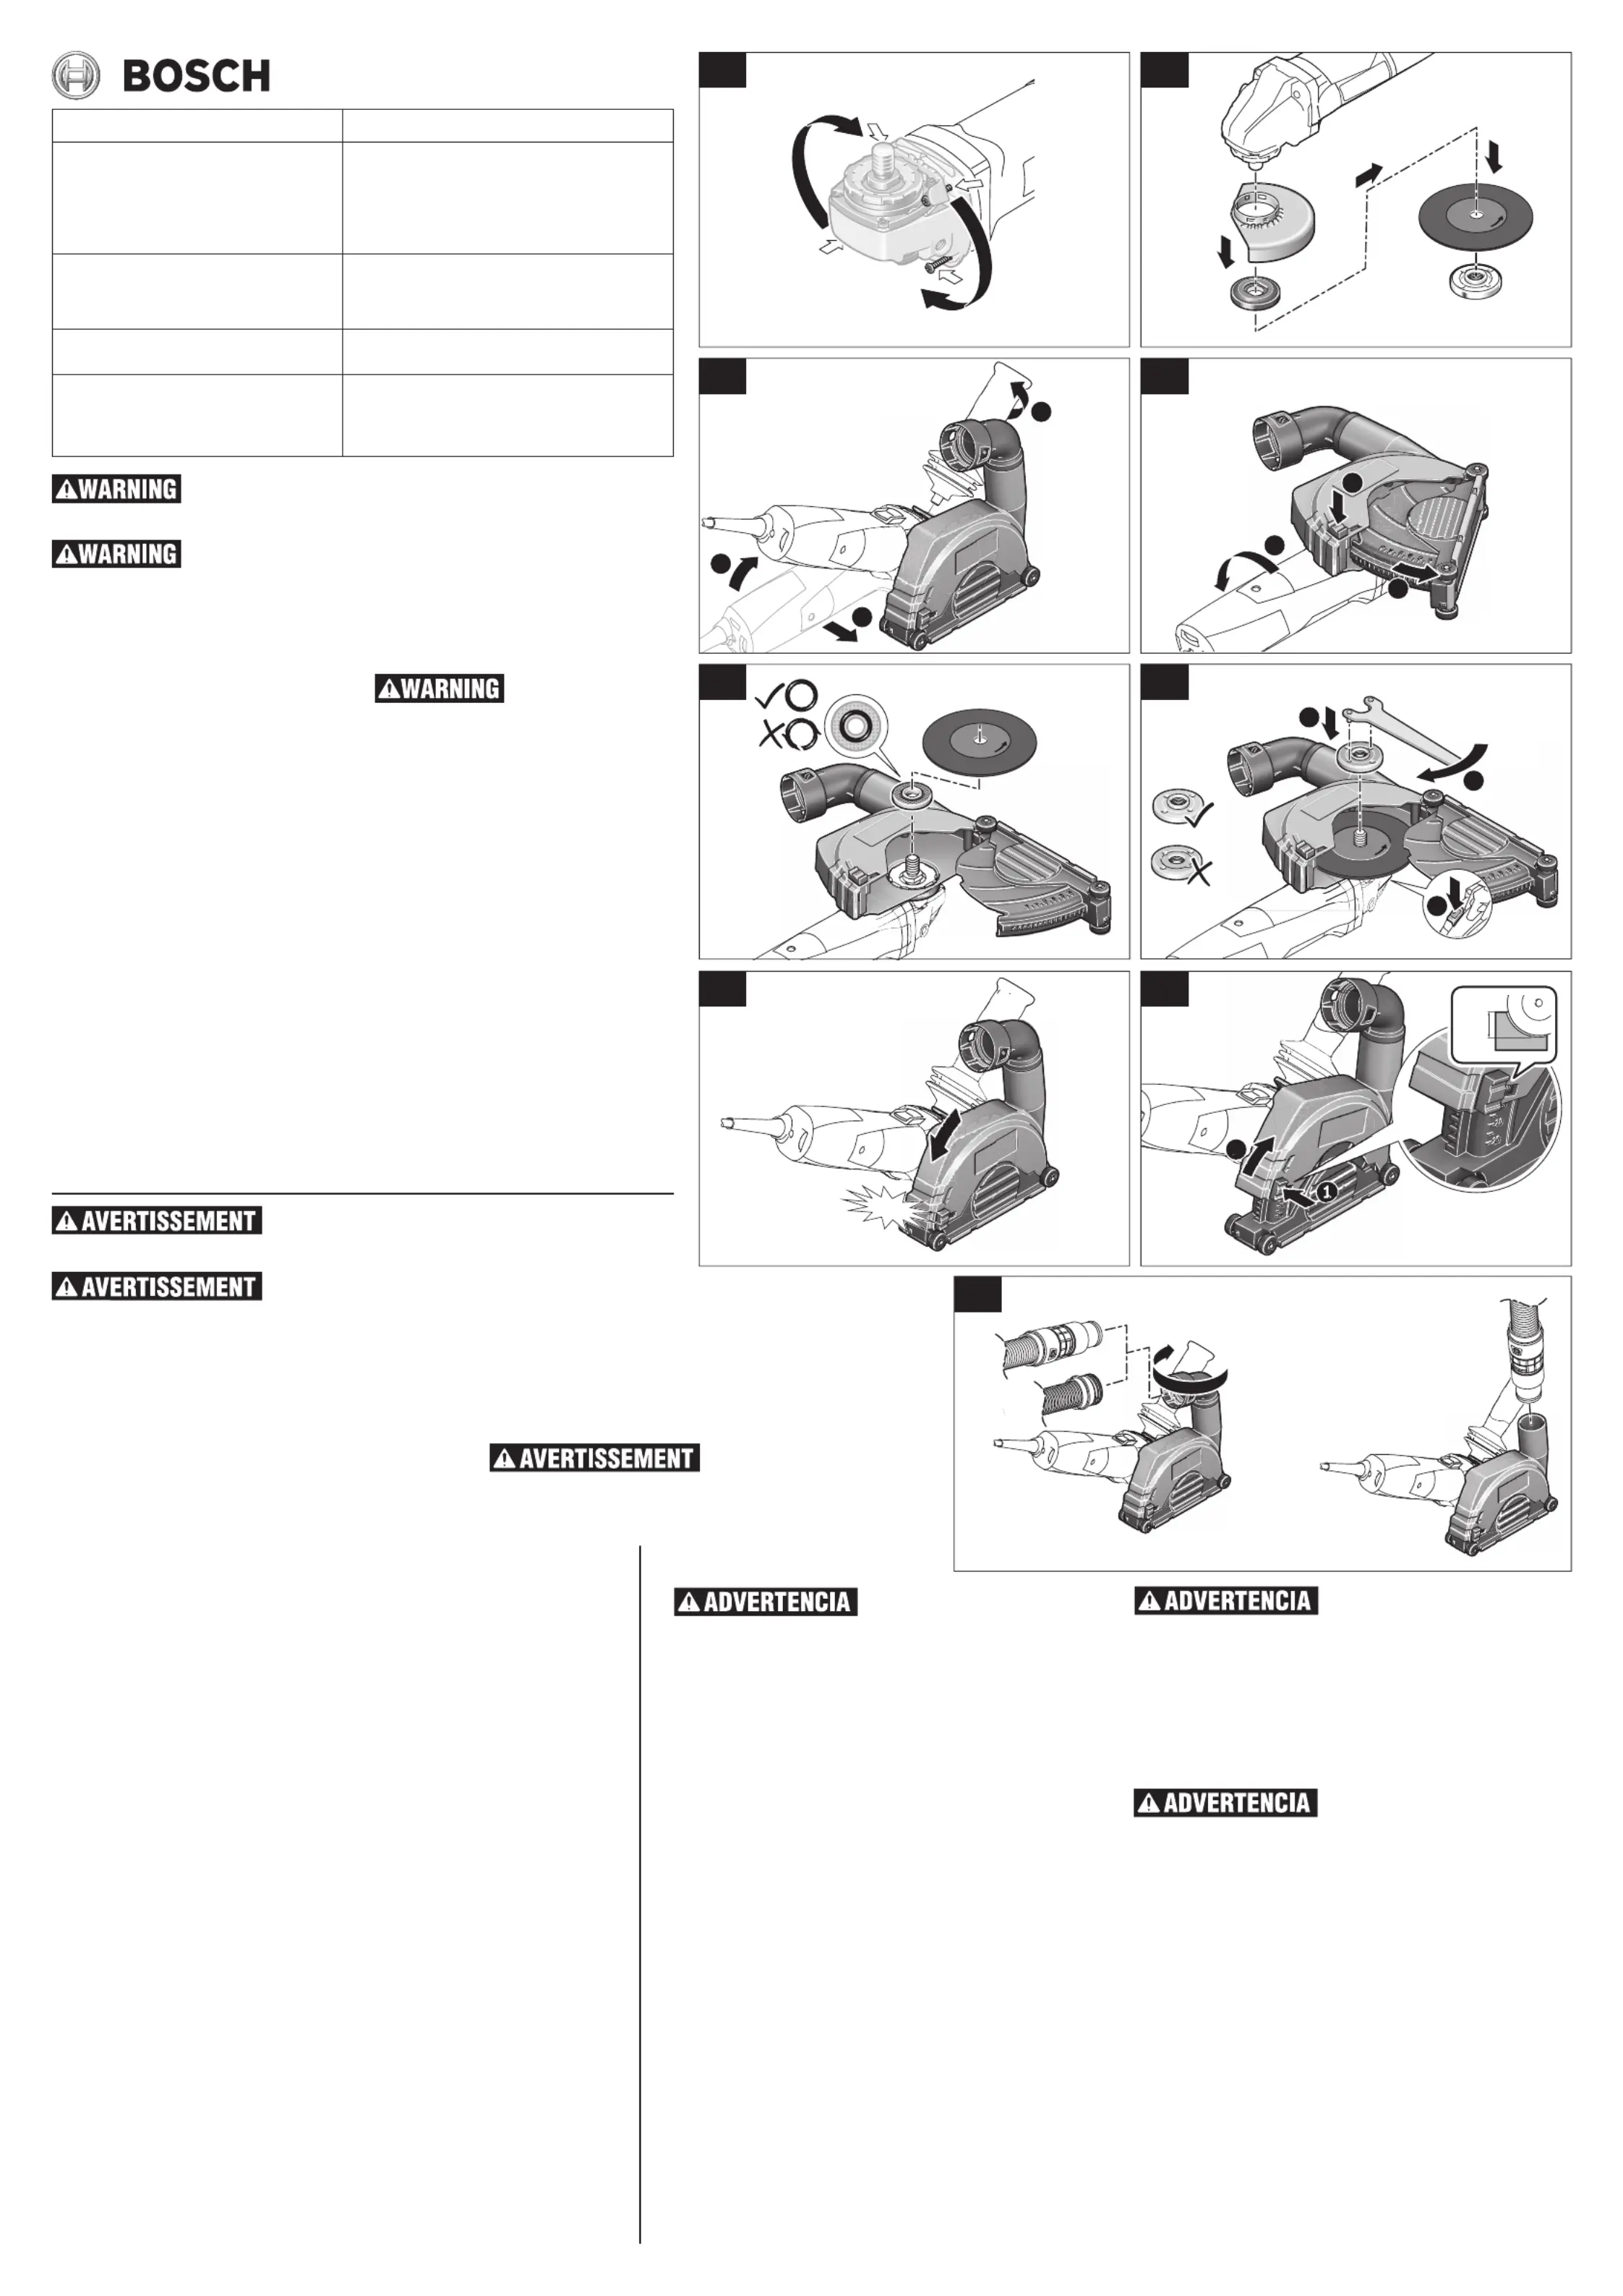
DUST COLLECTION GUARD INSTALLATION
•Disconnecttoolfrompowersource.Remove
Guard:Depressreleasebutton,rotateguard
untilarrowonguardlinesupwitharrowon
spindleneck,andremoveguardfromspindle
neck.Removesidehandle(Fig.B).
•Positiongrinderandguardinthesamefashion
asinFig.C,startingthegrinderinposition.➊
Alignthearrowonthegrinderwiththeclosest,
visibledetentontheguard.Turntheguard5
degreestowardyou,untilthehandlebracketis
restingonthegrinder,centeredoverthethread-
edholethatreceivesthathandle.Reinstallthe
accessoryhandleintothisholetosecurethe
cutoffguard(Fig.C).
•Turnthegrinderonitsside.Depressredbut➊-
tonandholdwhilepullingthebottomhalfof➋
theguardcompletelyfreeofthetophalfof➌
theguard(Fig.D).
•Alignbackingflangeonspindle,followedby
thecuttingwheel.Makesurethatthebacking
flangeisproperlyseatedandthatthecutting
wheelissituatedinthecorrectcuttingdirection
(Fig.E).
•Oncethebackingflangeandcuttingwheelare
correctlyplaced,installtheclampingflange.
Handtightensothattheflangeissnugagainst
thewheel.Then,depressthespindlelock➋
andholditwhiletighteningtheclampingflange
withaBoschSpannerwrench(Fig.F).
•Closethecuttingguardbydepressingthered
buttonandslidingtheupperguardintothebot-
tomguarduntiltheguardiscompletelyclosed
(Fig.G).
•Oncetheguardhasbeencompletelyshutyoumay
nowselectthedepthofcutyouwishtomake.All
measurementsareinmillimeters(Fig.H).
•Attachthevacuumhosetoeitherthe360de-
greeswivelattachmentordirectlytotheguard
itself.Thiswillvarybyapplication(Fig.I).
Model/Modèle/Modelo
GA50DC
Description
Description
Descripción
ConcreteCutOffDustCollectionGuard
Dispositifdeprotectiondusystèmededépous-
siéragepourlacoupedebéton
Protectorderecoleccióndepolvoproducidoalcor-
tarconcreto
WheelType
Typedemeule
Tipoderueda
Type41/1AMasonryCutting
Outildecoupedemaçonneriedetype41/1A
Cortedemamposteríatipo41/1A
DiametersAccepted/Diamètresacceptés/
Diámetrosaceptados
5”(127mm)
WorksonGrindersModels
Compatibleaveclesmodèlesdemeuleuses
Funcionaenlosmodelosdeamoladora
1800,1801,1803EVS,1810PS,1810PSD,1811PS,
1811PSD,1821,1821D,AG40-11PD,AG40-11P,
AG40-85,AG40-85PD,AG40-85P,AG50-10,
AG50-11VS,AG50-11VSPD,AG50-125PD
Read the tool manual and these instructions for the use of this accessory with
your tool.
USE ONLY TYPE 41/1A MASONRY CUTTING WHEELS
Wheel guard must be attached when using type 41/1A cutting wheels. Use
only with type 41/1A cutting wheels. Always keep guard between you and
your work while cutting. Wear eye, dust and ear protection. Always use side handle.
1600A001KR02/15
1-877-BOSCH99 (1-877-267-2499)
www.boschtools.com
TOOL PREPARATION (Fig. A)
Disconnectplugfrompowersource.Completely
unscrewthefourscrewsandrotatethetoolhead
carefullytothenewpositionwithoutremoving
itfromthehousing.Forpaddleswitchtools,
switchshouldface“down”towardsworksur-
face.Forslideswitchtools,slideshouldface
“up”towardsuser,sothetoolcanbeusedfor
longmasonrycuttingapplications.Screwinand
tightenthefourscrewsagain.
Return tool head to origi-
nal position when return-
ing to grinding, sanding, brushing or metal cut-
ting applications.
INSTALLATION DU DISPOSITIF DE PROTECTION
DU SYSTÈME DE DÉPOUSSIÉRAGE
•Débranchezvotreoutildesasource
d’alimentationélectrique.Retraitdudis-
positifdeprotection:Appuyezsurle
boutonderelâchement,faitestournerle
dispositifdeprotectionjusqu’àcequela
flèchesurledispositifdeprotectionsoit
alignéesurlaflècheducoldel’arbre,puis
retirezledispositifdeprotectionducolde
l’arbre.Retirezlapoignéelatérale(Fig.B).
•Positionnezlameuleuseetledispositifde
protectiondelamêmemanièrequesurle
Fig.C,encommençantaveclameuleuse
danslaposition.Alignezlaflèchesurla➊
meuleusesurlecranvisibleleplusproche
dudispositifdeprotection.Faitestourner
ledispositifdeprotectionde5degrés
versvous,jusqu’àcequelesupportde
lapoignéereposesurlameuleuse,centré
surletroufiletéquireçoitcettepoignée.
Réinstallezlapoignéeaccessoiredansce
trouafindesécuriserledispositifdepro-
tectiondumécanismededépoussiérage
pourlacoupedebéton(Fig.C).
•Tournezlameuleusepourqu’ellerepose
sursoncôté.Appuyezsurlebouton➊
rougeettenez-leenfoncétoutentirant➋
surlamoitiéinférieuredudispositifde
protectionpourladétachercomplète➌-
mentdelamoitiésupérieuredudispositif
deprotection(Fig.D).
•Alignezlaflasquedesupportsurl’arbre,
puisfaitesdemêmepourlameule.Veillez
àcequelaflasquedesupportreposecor-
rectementàl’endroitprévuàceteffetet
quelameulesoitsituéedanslesensde
coupecorrect(Fig.E).
•Aprèsquelaflasquedesupportetla
meuleaurontétéplacéesauxendroits
appropriés,installezlabridedefixation.
Serrezàlamaindetellesortequelabride
reposenaturellementcontrelameule.
Puisappuyezsurlemécanismedever-
rouillagedel’arbreettenez-ledans➋
cettepositionpendantquevousserrezla
bridedefixationavecuneclétricoisede
Bosch(Fig.F).
•Fermezledispositifdeprotectiondel’outil
decoupeenappuyantsurleboutonrouge
etenfaisantglisserlapartiesupérieuredu
dispositifdeprotectiondansledispositif
deprotectiondubasjusqu’àcequeledis-
positifdeprotectionsoitcomplètement
fermé(Fig.G).
•Aprèsavoirfermécomplètementledis-
positifdeprotection,vouspouvezsélec-
tionnerlaprofondeurdelacoupeque
vousdésirezréaliser.Touteslesmesures
sontenmillimètres(Fig.H).
•Attachezletuyaudel’aspirateurà
l’élémentpivotantsur360degrésou
directementaudispositifdeprotection
lui-même.Toutdépendradesbesoinsde
l’application(Fig.I).
Lisez le mode d’emploi et ces instructions pour apprendre à uti-
liser cet accessoire avec votre outil.
UTILISEZ SEULEMENT DES MEULES À COUPER LA MAÇONNERIE DE TYPE 41/1A
Le dispositif de protection de la meule doit être attaché en cas
d’utilisation de meules de coupe de type 41/1A. Utilisez seulement
avec des meules de type 41/1A. Veillez à ce que le dispositif de protection de la meule soit toujours
placé entre votre ouvrage et vous pendant les opérations de coupe. Portez des verres protecteurs, des
bouche-oreilles et un masque contre les poussières. Utilisez toujours une poignée latérale.
PRÉPARATION DE L’OUTIL (Fig. A)
Débranchezlafichedelaprisedecourant.Dévissezcomplètement
lesquatrevisetfaitestournerlatêtedel’outilenprenanttoutes
lesprécautionsnécessairesjusquedanslanouvellepositionsans
lefairesortirdesonboîtier.Pourlesoutilsayantuncontacteurà
palette,lecontacteurdoitêtreorientéverslebas,endirectiondela
surfacedetravail.Pourlesoutilsayantuninterrupteurcoulissant,
l’interrupteurdoitêtreorientéversl’utilisateurdefaçonquel’outil
puisseêtreutilisédanslecadred’applicationsdecoupedemaçon-
neriedelonguedurée.Vissezetserrezlesquatrevisànouveau.
Remettez la tête de l’outil dans
la position originale lorsque
vous souhaitez l’utiliser à nouveau pour des applications de meu-
lage, de ponçage, de brossage ou de coupe de métal.
INSTALACIÓN DEL PROTECTOR DE RECOLECCIÓN DE POLVO
•Desconectelaherramientadelafuentede
alimentación.Retireelprotector:Presioneel
botóndeliberación,roteelprotectorhasta
quelaflechaubicadaenelmismosealinee
conlaflechaubicadaenelcuellodelhusillo
yretireelprotectordelcuellodelhusillo.Re-
tireelmangolateral(Fig.B).
•Posicionelaamoladorayelprotectordela
mismamaneraqueenelFig.C,ubicandola
amoladoraenlaposición1.Alineelaflecha
ubicadaenlaamoladoraconelreténvisible
máscercanodelprotector.Gireelprotector
5gradoshaciausted,hastaqueelsoporte
delmangoestédescansandosobrelaamo-
ladora,centradosobreelagujeroroscado
querecibeesemango.Reinstaleelmango
accesorioenesteagujeroparasujetarfirme-
menteelprotectordecorte(Fig.C).
•Volteelaamoladorasobreunodesuslados
➊➋.Presioneelbotónrojoymanténgalo
presionadomientrasjalalamitadinferiordel
protectorhastaqueseliberecompleta➌-
mentedelamitadsuperiordelprotector(Fig.
D).
•Alineelapestañadesoportesobreelhusillo,
seguidoporlaruedadecorte.Asegúrese
dequelapestañadesoporteestéasentada
adecuadamenteyquelaruedadecorteesté
situadaenelsentidodecortecorrecto(Fig.
E).
•Unavezquelapestañadesoporteylarueda
decorteesténcolocadascorrectamente,in-
stalelapestañadefijación.Aprieteamanola
pestañademaneraquequedeperfectamente
ajustadacontralarueda.Luego,presioneel
cierredelhusillo➋ymanténgalopresionado
mientrasaprietalapestañadesujecióncon
unallavedeganchoBosch(Fig.F).
•Cierreelprotectordecortepresionandoel
botónrojoydeslizandoelprotectorsuperior
haciaelinteriordelprotectorinferior,hasta
queelprotectorestécompletamentecerrado
(Fig.G).
•Unavezquesehayacerradocompletamente
elprotector,ustedpodráseleccionarlapro-
fundidaddecortealaquedeseecortar.To-
daslasmedicionessonenmilímetros(Fig.
H).
•Acoplelamangueradeaspiraciónyasea
aladitamentogiratoriode360gradosodi-
rectamentealpropioprotector.Estovariará
poraplicación(Fig.I).
Lea el manual de la herramienta y es-
tas instrucciones para el uso de este
accesorio con su herramienta.
UTILICE ÚNICAMENTE RUEDAS PARA CORTAR MAMPOSTERÍA TIPO
41/1A
El protector de la rueda debe estar in-
stalado cuando se utilicen ruedas de
corte tipo 41/1A. Utilice únicamente ruedas de corte tipo 41/1A. Man-
tenga siempre el protector entre usted y la pieza de trabajo mientras
esté cortando. Use protección de los ojos, antipolvo y de los oídos.
Usar siempre el mango lateral.
PREPARACIÓN DE LA HERRAMIENTA (Fig. A)
Desconecteelenchufedelafuentedealimentación.Desenrosquecom-
pletamenteloscuatrotornillosyrotecuidadosamentelacabezadela
herramientahastalaposiciónnuevasinretirarladelacarcasa.Enel
casodeherramientasconinterruptordepaleta,elinterruptordeberá
estarorientadohacia“abajo”,hacialasuperficiedetrabajo.Enelcaso
deherramientaconinterruptordeslizante,elinterruptordeberáestar
orientadohacia“arriba”,haciaelusuario,paraquelaherramientase
puedautilizarparaaplicacionesprolongadasdecortedemampostería.
Enrosqueyaprietedenuevoloscuatrotornillos.
Devuelva la cabeza de la herramienta
a la posición original cuando regrese a
aplicaciones de amolado, lijado, cepillado o corte de metales.
2
1
3
1
2
3
2
1
3
click!
2
360°
10
mm
Fig. A
Fig. C
Fig. E
Fig. G
Fig. B
Fig. D
Fig. F
Fig. H
Fig. I
Produktspezifikationen
| Marke: | Bosch |
| Kategorie: | Nicht kategorisiert |
| Modell: | GA50DC Professional |
Brauchst du Hilfe?
Wenn Sie Hilfe mit Bosch GA50DC Professional benötigen, stellen Sie unten eine Frage und andere Benutzer werden Ihnen antworten
Bedienungsanleitung Nicht kategorisiert Bosch

28 März 2026
16 März 2026
16 März 2026
8 März 2026
8 März 2026
4 März 2026
28 Februar 2026
26 Februar 2026
17 Februar 2026
16 Februar 2026
Bedienungsanleitung Nicht kategorisiert
Neueste Bedienungsanleitung für -Kategorien-
3 April 2026
3 April 2026
3 April 2026
3 April 2026
3 April 2026
3 April 2026
3 April 2026
3 April 2026
3 April 2026
3 April 2026