Bresser OMNI-2 Bedienungsanleitung
Lies die bedienungsanleitung für Bresser OMNI-2 (2 Seiten) kostenlos online; sie gehört zur Kategorie Fernglas. Dieses Handbuch wurde von 48 Personen als hilfreich bewertet und erhielt im Schnitt 4.1 Sterne aus 2 Bewertungen. Hast du eine Frage zu Bresser OMNI-2 oder möchtest du andere Nutzer dieses Produkts befragen? Stelle eine Frage
Seite 1/2
OMNI 2 red dot sights are designed for the ”two eyes open” method which greatly enhances
situational awareness and target acquisition. Thanks to the optical design the red dot
follows the movement of the user’s eye while remaining xed on target, eliminating any need
for centering.
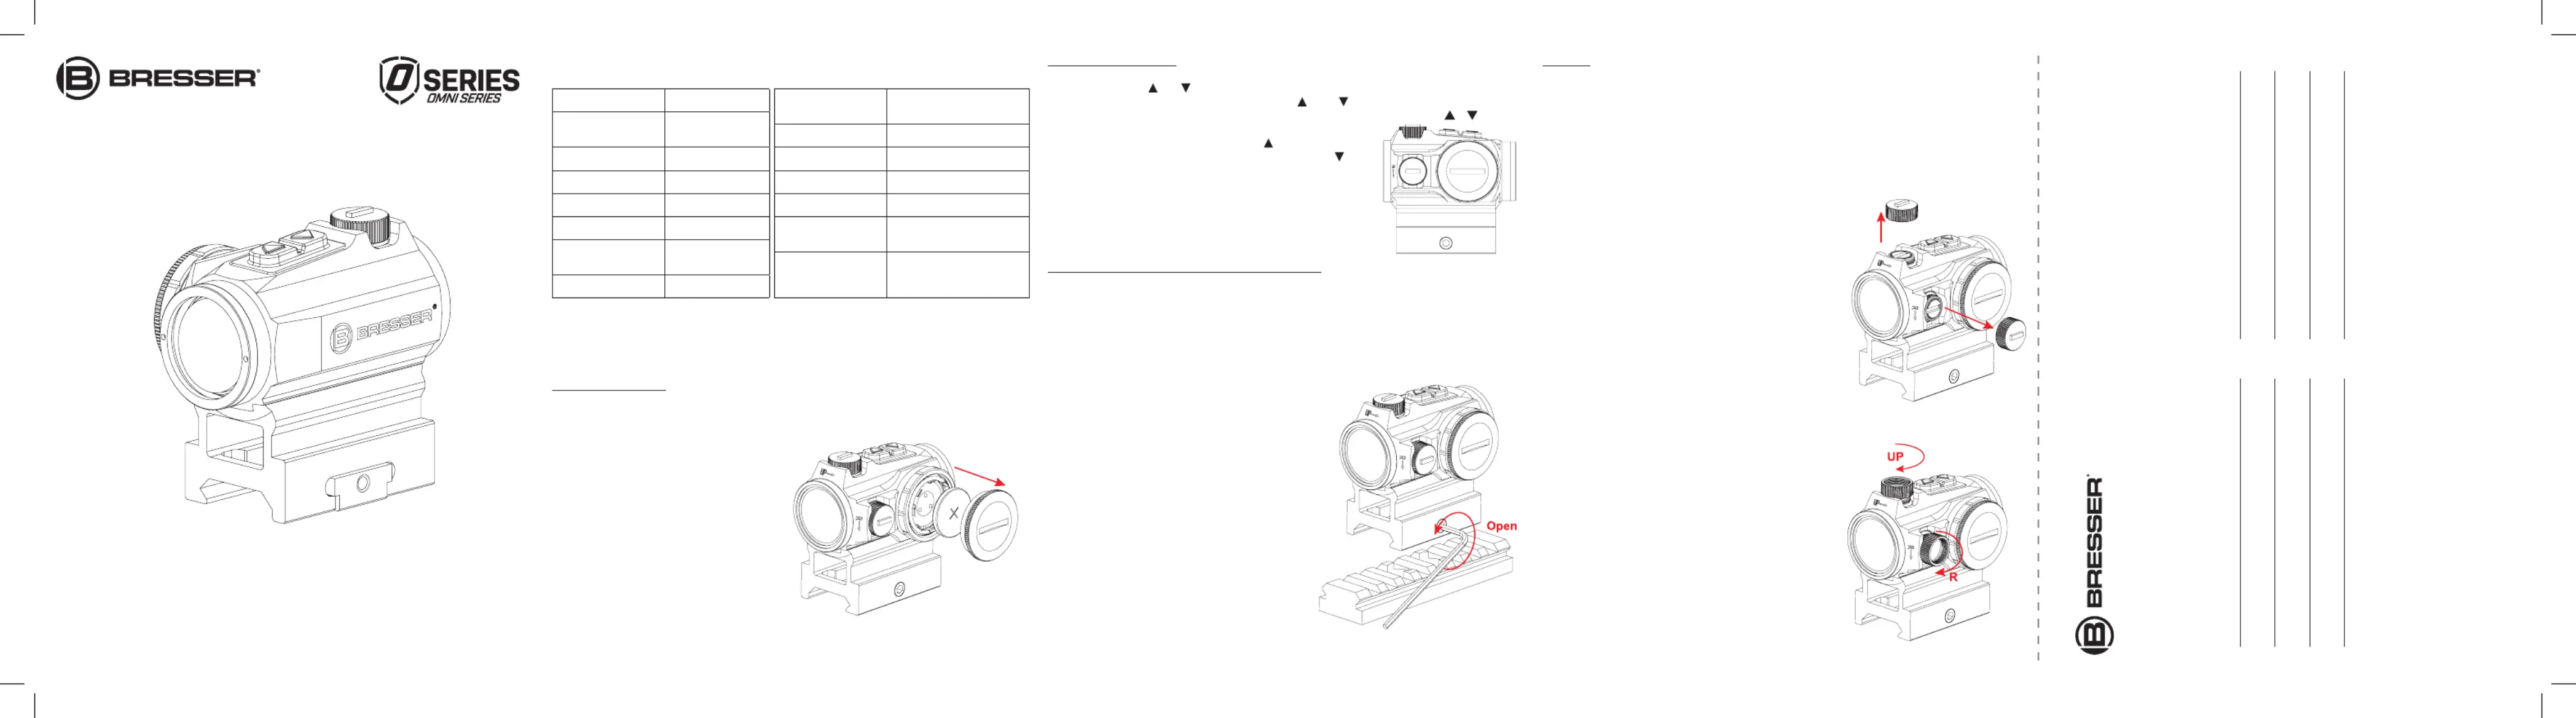
INSTALLING BATTERY
CAUTION:BEFORE YOU BEGIN, ENSURE THAT THE FIREARM IS CLEAR. REMOVE MAGAZINE,
LOCK ACTION OPEN AND VISUALLY INSPECT TO ENSURE THAT THE CHAMBER IS CLEAR.
1. Remove Battery cap, use a coin if needed.
2. Insert Battery with the positive end
toward Battery cap as can be seen in .Fig 1
CAUTION: CHECK THAT THE O-RING IS
IN GOOD CONDITION AND IN POSITION
TO ENSURE THAT THERE WILL BE NO
WATER LEAKAGE INTO THE BATTERY
COMPARTMENT.
3. Replace the cap by pushing down and
screwing on clockwise to tighten
4. Verify that the red dot is visible.
OMNI-2
WATERPROOF RED DOT SIGHT INSTRUCTIONS
CAUTION: BEFORE YOU BEGIN, ENSURE THAT THE FIREARM IS CLEAR. REMOVE MAGAZINE,
LOCK ACTION OPEN AND VISUALLY INSPECT TO ENSURE THAT THE CHAMBER IS CLEAR.
PRODUCT SPECIFICATIONSILLUMINATION CONTROL
On/O buttons and illumination control is located on the top of the sight. See .Fig 2
1. Press either the () or () button turn the sight on.
2. To turn the sight o press and hold both the () and ()
button for 1 second.
3. Once the dot is illuminated, you can increase the apparent
brightness by pressing and releasing the () button; or
decrease the brightness by pressing and releasing the ()
button.
4. When the sight on, the shutdown will automatically turn o
after 3 hours.
5. If red dot sights is shut down due to abnormal power
failure, it will remain in the stall before shutdown when power
is turned on again.
MOUNT ONTO A PICATINNY OR WEAVER-STYLE RAIL
Your OMNI-2 features a durable base design that is factory ready to mount on a Picatinny or
standard Weaver rail system. To get started, refer to the following steps:
CAUTION:BEFORE YOU BEGIN, ENSURE THAT THE FIREARM IS CLEAR. REMOVE MAGAZINE,
LOCK ACTION OPEN AND VISUALLY INSPECT TO ENSURE THAT THE CHAMBER IS CLEAR.
1. Loosen the screw using an allen wrench, and clamp the locking bar around the Picatinny
rail
2. With the shaft positioned in a groove on the
Picatinny/weaver rail, push the sight with mount
forward and tighten the shaft using the tool.
WARNING: TO AVOID POSSIBLE RECOIL INJURY,
BE SURE TO LEAVE ENOUGH SPACE BETWEEN
THE RED-DOT SIGHT EYEPIECE AND YOUR EYES.
CHECK TO SEE THAT YOU ARE ABLE TO SEE
THE FULL FIELD OF VIEW AND RED DOT WHEN
IN A SHOOTING POSITION.
3. Tighten the shaft until a light resistance is
encountered. Proceed with another 1/4 to 1/2
turn until fully tightened.
To get the best performance from your red dot,
it must be mounted properly. If you are not
familiar with mounting a red dot, it is strongly
recommended that you seek the assistance of a
qualied professional.
ZEROING
The sight is delivered with the red dot in a centered position. Normally this means that only
small adjustments are necessary, providing that the weapon rail (Picatinny/Weaver rail) is
properly aligned.
CAUTION: DO NOT CONTINUE TO ADJUST WINDAGE AND ELEVATION MECHANISMS IF YOU
ENCOUNTER RESISTANCE.
1. Turn the switch until the red dot has a suitable intensity to contrast against the target.
2. To access the Elevation adjustment screw and the
Windage adjustment screw, remove the Adjustment cap.
See .Fig 3
3. The Adjustment Cap can be used to turn the
Adjustment screws. Place the knobs on the Adjustment
cap into the recesses on the Adjustment screws.
4.Fig 4 Windage adjustments (See .)
a. To move the point of impact to the right, turn Windage
adjustment screw counter clockwise
b. To move the point of impact to the left, turn Windage
adjustment screw clockwise.
5. Elevation adjustments (See .)Fig 5
a. To move the point of impact up, turn Elevation
adjustment screw counter clockwise.
b. To move the point of impact down, turn Elevation
adjustment screw clockwise.
6. Conrm zeroing by ring at least three shots at a
zeroing target. Check points of impact to conrm accuracy
and repeat above procedure if required.
7. After initial ring, ensure that the sight with mount is
securely installed on the weapon.
CAUTION: NEVER CLEAN THE LENSES WITH FINGERS.
USE LENS PAPER/CLOTH. IF LENS PAPER/CLOTH IS NOT
AVAILABLE:
To clear away debris (sand, grass etc.): blow away the
dirt or rinse with clear water.
To clean lenses: mist up the lenses or rinse with clear
water and clean them with a soft piece of cloth.
Model23-20100
DescriptionWaterproof Red
Dot Sight
Magnication1x
Length2.4”
Width1.6”
Height2.5”
Optical Height1.4”
Weight0.3lbs
Power SupplyCR2032 3V
Lithium Battery
Brightness1 - 10 Day; 1 - 3 NV
Windage36 MOA
Elevation36 MOA
Click Value1 MOA
Waterproof
(Depth/Time)
1m / 30min
Continue on back
Cut and mail in
Register your product.
Learn about the full range of service your warranty provides.
Registering online is quick and easy!
https://explorescientificusa.com/product-registration
For products that do not include a serial number, use the product item number followed by the date of purchase
expressed in a six-digit format. For example, a purchase date of January 1, 2018, would be entered as 010118.
Model numbers:Serial numbers:
Fig. 1
Fig. 2
Fig. 3
Fig. 4
Fig. 5
Produktspezifikationen
| Marke: | Bresser |
| Kategorie: | Fernglas |
| Modell: | OMNI-2 |
Brauchst du Hilfe?
Wenn Sie Hilfe mit Bresser OMNI-2 benötigen, stellen Sie unten eine Frage und andere Benutzer werden Ihnen antworten
Bedienungsanleitung Fernglas Bresser

17 März 2026
10 März 2026
31 Januar 2026
17 Juli 2025
16 Juli 2025
16 Juli 2025
16 Juli 2025
16 Juli 2025
16 Juli 2025
5 Juli 2025
Bedienungsanleitung Fernglas
Neueste Bedienungsanleitung für -Kategorien-
2 April 2026
28 März 2026
28 März 2026
25 März 2026
24 März 2026
23 März 2026
23 März 2026
22 März 2026
22 März 2026
22 März 2026