Caroma Husk Spray Bedienungsanleitung
Caroma Wasserhahn Husk Spray
Lies die bedienungsanleitung für Caroma Husk Spray (21 Seiten) kostenlos online; sie gehört zur Kategorie Wasserhahn. Dieses Handbuch wurde von 45 Personen als hilfreich bewertet und erhielt im Schnitt 4.0 Sterne aus 9 Bewertungen. Hast du eine Frage zu Caroma Husk Spray oder möchtest du andere Nutzer dieses Produkts befragen? Stelle eine Frage
Seite 1/21
IS1333A(05/14)
R
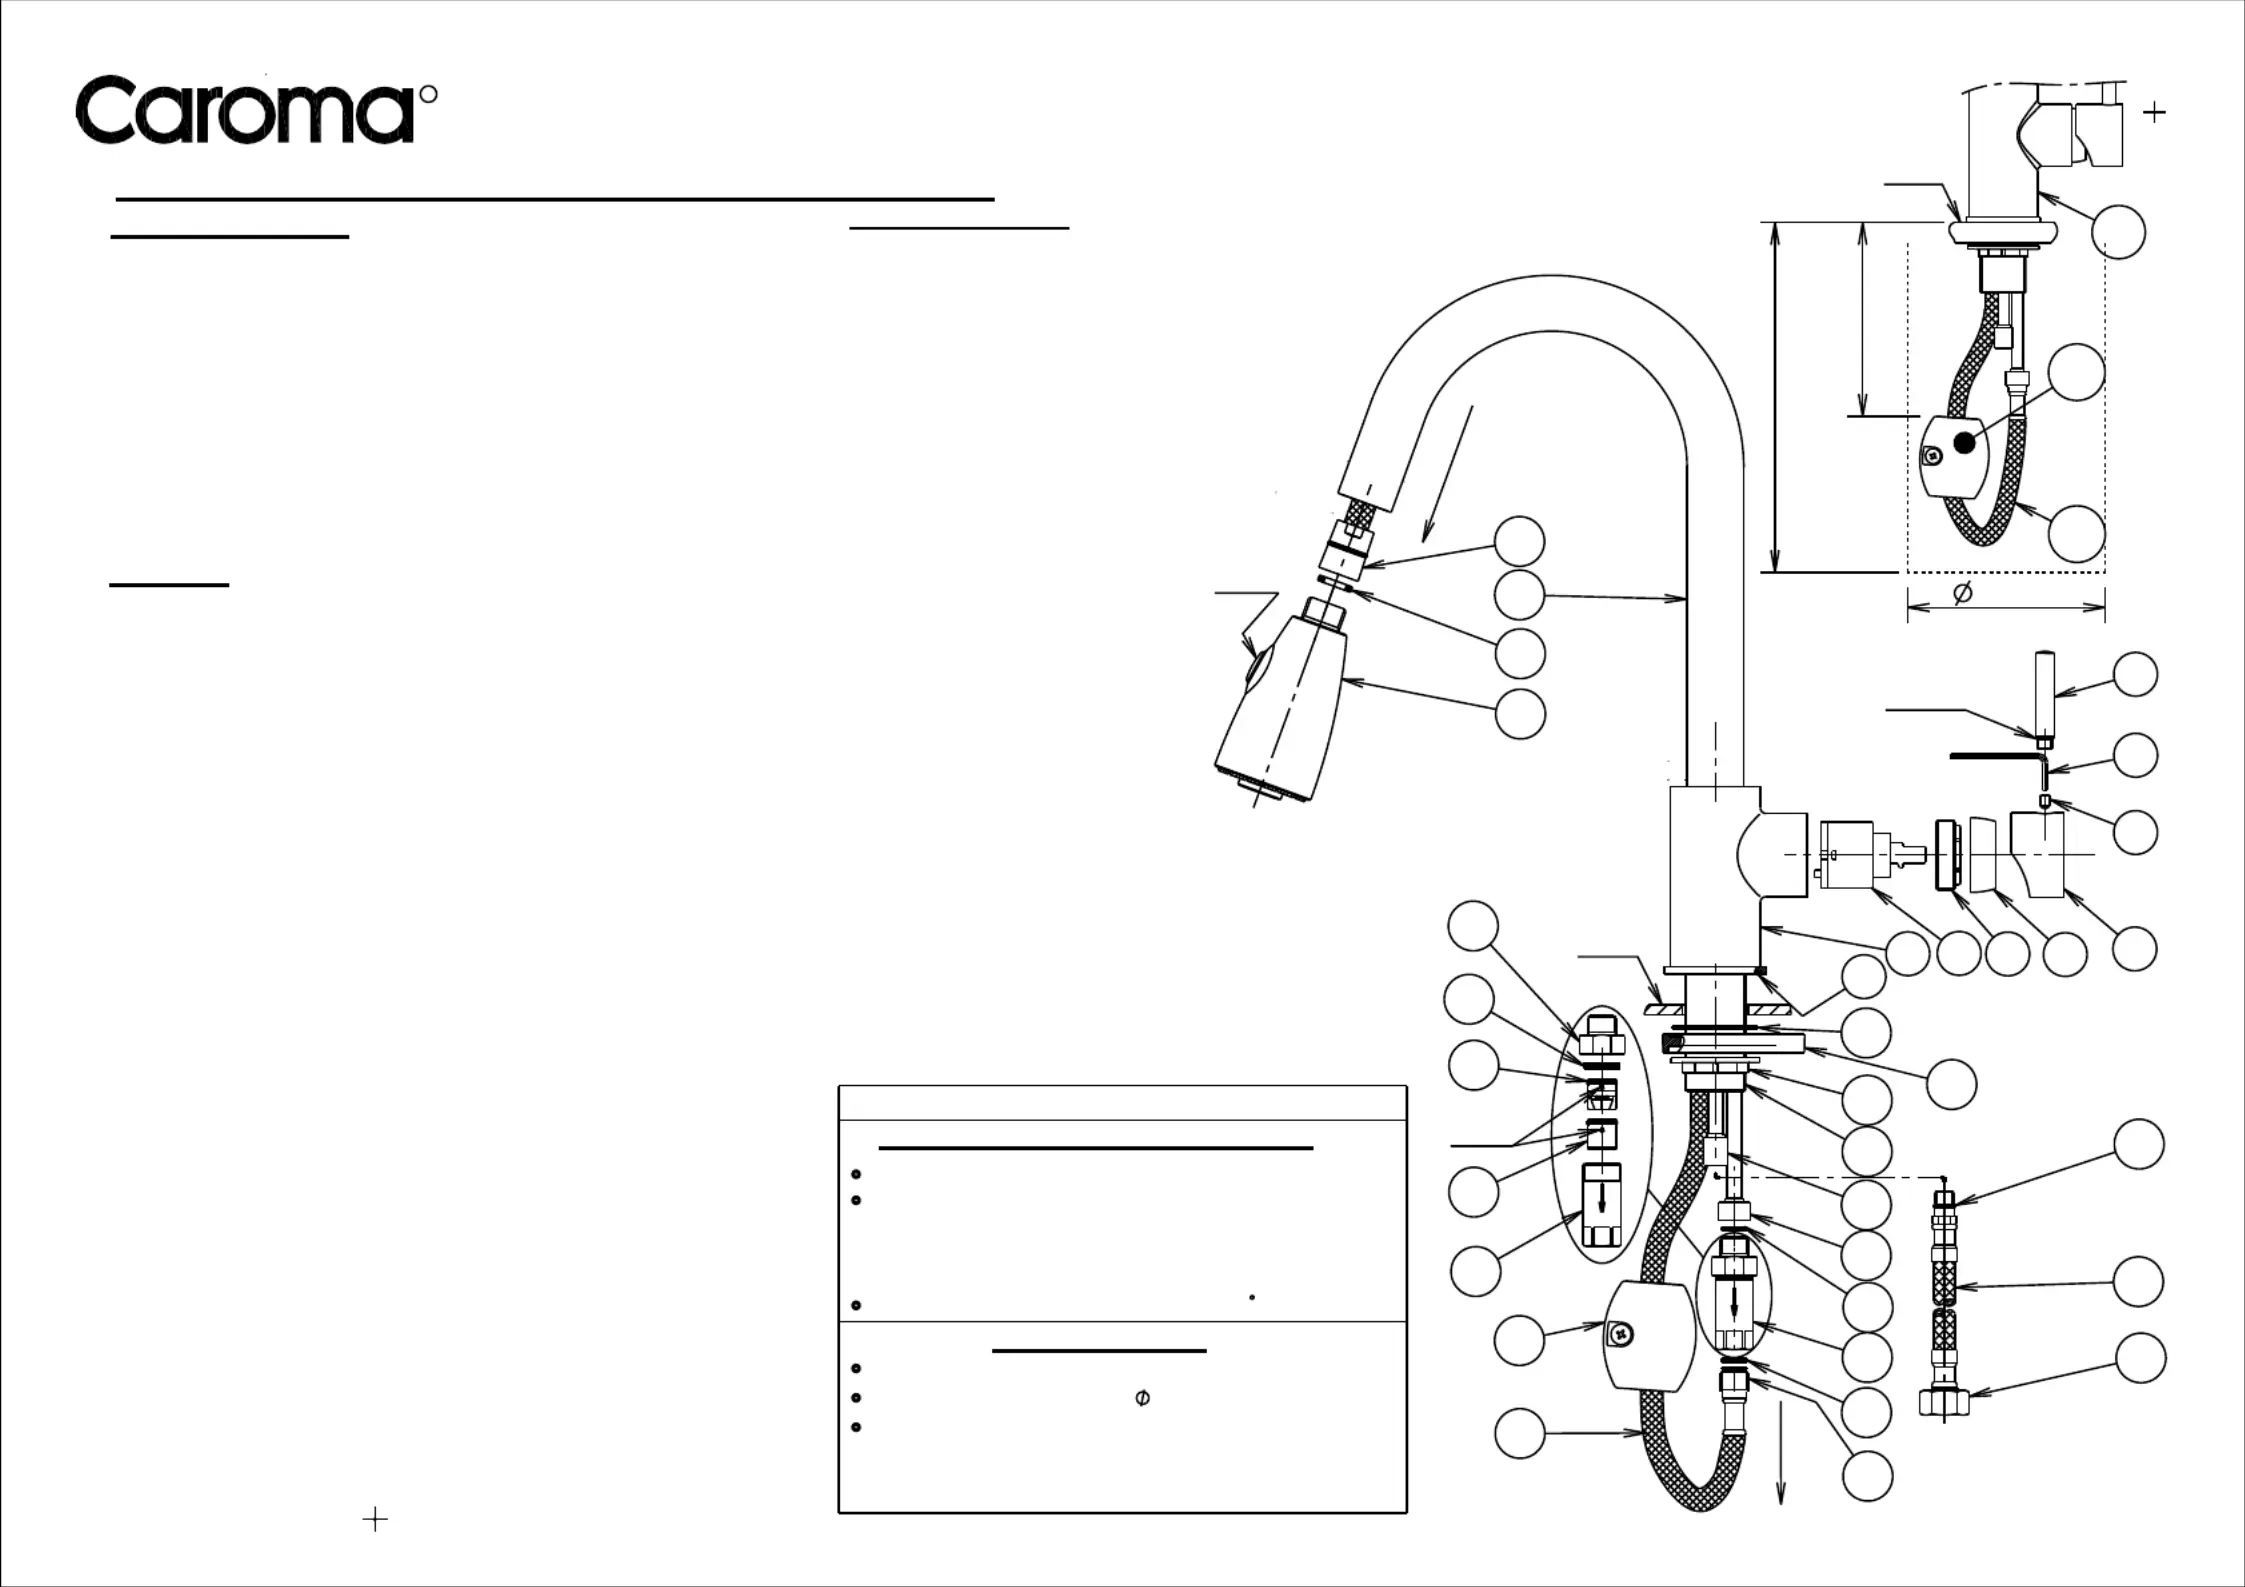
Installation (Fig.1 & 2)
Important Information
Not suitable for gravity feed systems.
*
*
Isolating stop taps must be fitted to the hot & cold water
supply connections. (Part No. 842018C - Mini cistern 1/4T)
*
All pipework must be thoroughly flushed prior to installation,
as foreign materials may block the flow regulating device
and reduce the flow of water. Note: Aerator insert housing
must be retightened to prevent removal by hand.
*
Mixer is fitted with a flow regulated check valve (25).
Note: warranty is void if check valve (26) & flow regulated
check valve (25) are not installed as shown.
*
The swivel outlet tube (31) must not be rotated by more than
one turn in either direction to avoid damaging the hose (23).
1)
Check that spray head (29) together with washer (30) is
assembled into conical nut (32) of hose (23). From fixing pack fit
'O'ring (9) into base of mixer body (8) as shown in Fig. 1.
2)
Insert the free end (19) of hose (23) & then the threaded tube (13)
of mixer (8) through the hole in the deck. Pull the spray head (29)
together with hose (23) from the outlet tube (31) until the free end
(19) is just above the inlet fittings (14). Fit washer (10), spacer (11)
(for thin decks only) followed by nut (12) onto the threaded tube (13)
of mixer (8). Screw on the nut (12), position mixer (8) with handle (4)
on the RH side as shown then tighten fixing nut (12) using a suitable
tool until mixer assembly is secured firmly to the deck.
3)
Flexible Tail Mixer Connections: Apply suitable lubricant to
'O'rings (20). Fit flexible tail (21) (with red indication) into inlet
fitting (14) marked with ' red ring'. Hand tighten the tail, ensuring
the 'O'rings (20) have fully entered the sealing bore to provide a
watertight joint. Fit other flexible tail (with blue indication) into
remaining fitting in a similar manner.
4)
Ensure washer (18) is fitted into outlet of adaptor (17) then
screw free end (19) of hose (23) into adaptor & tighten using a
suitable spanner, taking care that hose is not twisted when
tightened. With hose (23) unobstructed & hanging freely in its
retracted position in the cabinet (Fig.2), fit hose weight (24) onto
hose (23) and position it so that the hose (23) can extend
sufficiently when spray head (29) is pulled from the swivel tube
(31) (Fig.2). Tighten hose weight screws using a suitable
screwdriver.
5)
Flexible Tail Inlet Connections: Connect the flexible tails (21) to
the hot and cold isolating stop taps, hand tighten the connecting
nut (22) until rubber washer contacts the sealing face of the
connection end, then tighten firmly using a suitable spanner to
provide a watertight joint.
Important: Flexible tails must not be kinked, twisted or in tension
when installed. (Minimum Bend Radius:- 50mm) Do not install
flexible tails where subject to ultra violet light.
Note: If water does not flow from spray head (29), make sure that
check valves (25 & 26) are installed correctly with arrows pointing
in the direction of flow.
PLUMBERS INSTALLATION INSTRUCTIONS
HUSK - RETRACTABLE DUAL SPRAY SINK MIXER
WATER EFFICIENT TAPWARE
Hot and cold water inlet pressures should be equal.
Static inlet pressure range : 150-1000 kPa
IMPORTANT
Pressure & Temperature Requirements.
Deck Requirements
Maximum hot water temperature : 80C.
Tap body hole (in deck) : 34-36mm
New Regulation:- 500 kPa maximum static
pressure at any outlet within a building.
(Ref. AS/NZS 3500.1-2003, Clause 3.3.4)
Deck thickness :60mm maximum
Minimum clearance requirement (Fig 2),
underneath the deck to allow the Pull-out
hose and weight to move freely.
1
4
7
8
6
5
Fig.1
Flow
Direction
10
12
Flow
Direction
2
3
Button
'O'Ring
9
Arrow
11
+Discard for
thick decks
+
14
15
16
17
18
19
20
Mixer
Connection
End
21
22
Inlet
Connection
End
23
24
17
25
26
27
28
29
30
31
32
Deck
13
600mm
250mm
300mm
Fig.2
MINIMUM CLEARANCE IN CABINET
MINIMUM CLEARANCE
RECOMMENDED
8
Deck
24
23
Replacing Cartridge
Turn off hot and cold water supplies at isolating stop taps.
Ensure inside face of mixer body (8) is clean.
Check that seal is in position in base of new
cartridge (7). Fit new cartridge (7) into mixer
body, taking care that two lugs on base of
cartridge (7) fit into mating holes
in mixer body (8).
Turn on isolating stop taps and check operation.
1)
2)
3)
4)
5)
6)
Carefully unscrew handle lever (1). Using 2.5mm
allen key (2) loosen screw (3) and remove
handle (4). Unscrew cap (5) taking
care not to damage the decorative
finish. Unscrew retaining nut (6)
and remove the old cartridge (7).
Screw on nut (6).
Important:- Nut (6) should be
tightened to a torque of 10 Nm.
Replace cap (5) tightening by hand.
Fit handle (4) taking care that it is
pushed fully down, tighten screw (3)
using the 2.5mm allen key (2).
Screw handle lever (1) into handle
(4) and tighten firmly by hand, taking
care not to damage decorative finish.
Produktspezifikationen
| Marke: | Caroma |
| Kategorie: | Wasserhahn |
| Modell: | Husk Spray |
Brauchst du Hilfe?
Wenn Sie Hilfe mit Caroma Husk Spray benötigen, stellen Sie unten eine Frage und andere Benutzer werden Ihnen antworten
Bedienungsanleitung Wasserhahn Caroma

4 September 2025
Bedienungsanleitung Wasserhahn
Neueste Bedienungsanleitung für -Kategorien-
3 April 2026
3 April 2026
3 April 2026
3 April 2026
3 April 2026
2 April 2026
2 April 2026
2 April 2026
2 April 2026
2 April 2026