Chieftec UNC-209SR-B Bedienungsanleitung
Chieftec
Nicht kategorisiert
UNC-209SR-B
Lies die bedienungsanleitung für Chieftec UNC-209SR-B (4 Seiten) kostenlos online; sie gehört zur Kategorie Nicht kategorisiert. Dieses Handbuch wurde von 5 Personen als hilfreich bewertet und erhielt im Schnitt 4.8 Sterne aus 3 Bewertungen. Hast du eine Frage zu Chieftec UNC-209SR-B oder möchtest du andere Nutzer dieses Produkts befragen? Stelle eine Frage
Seite 1/4

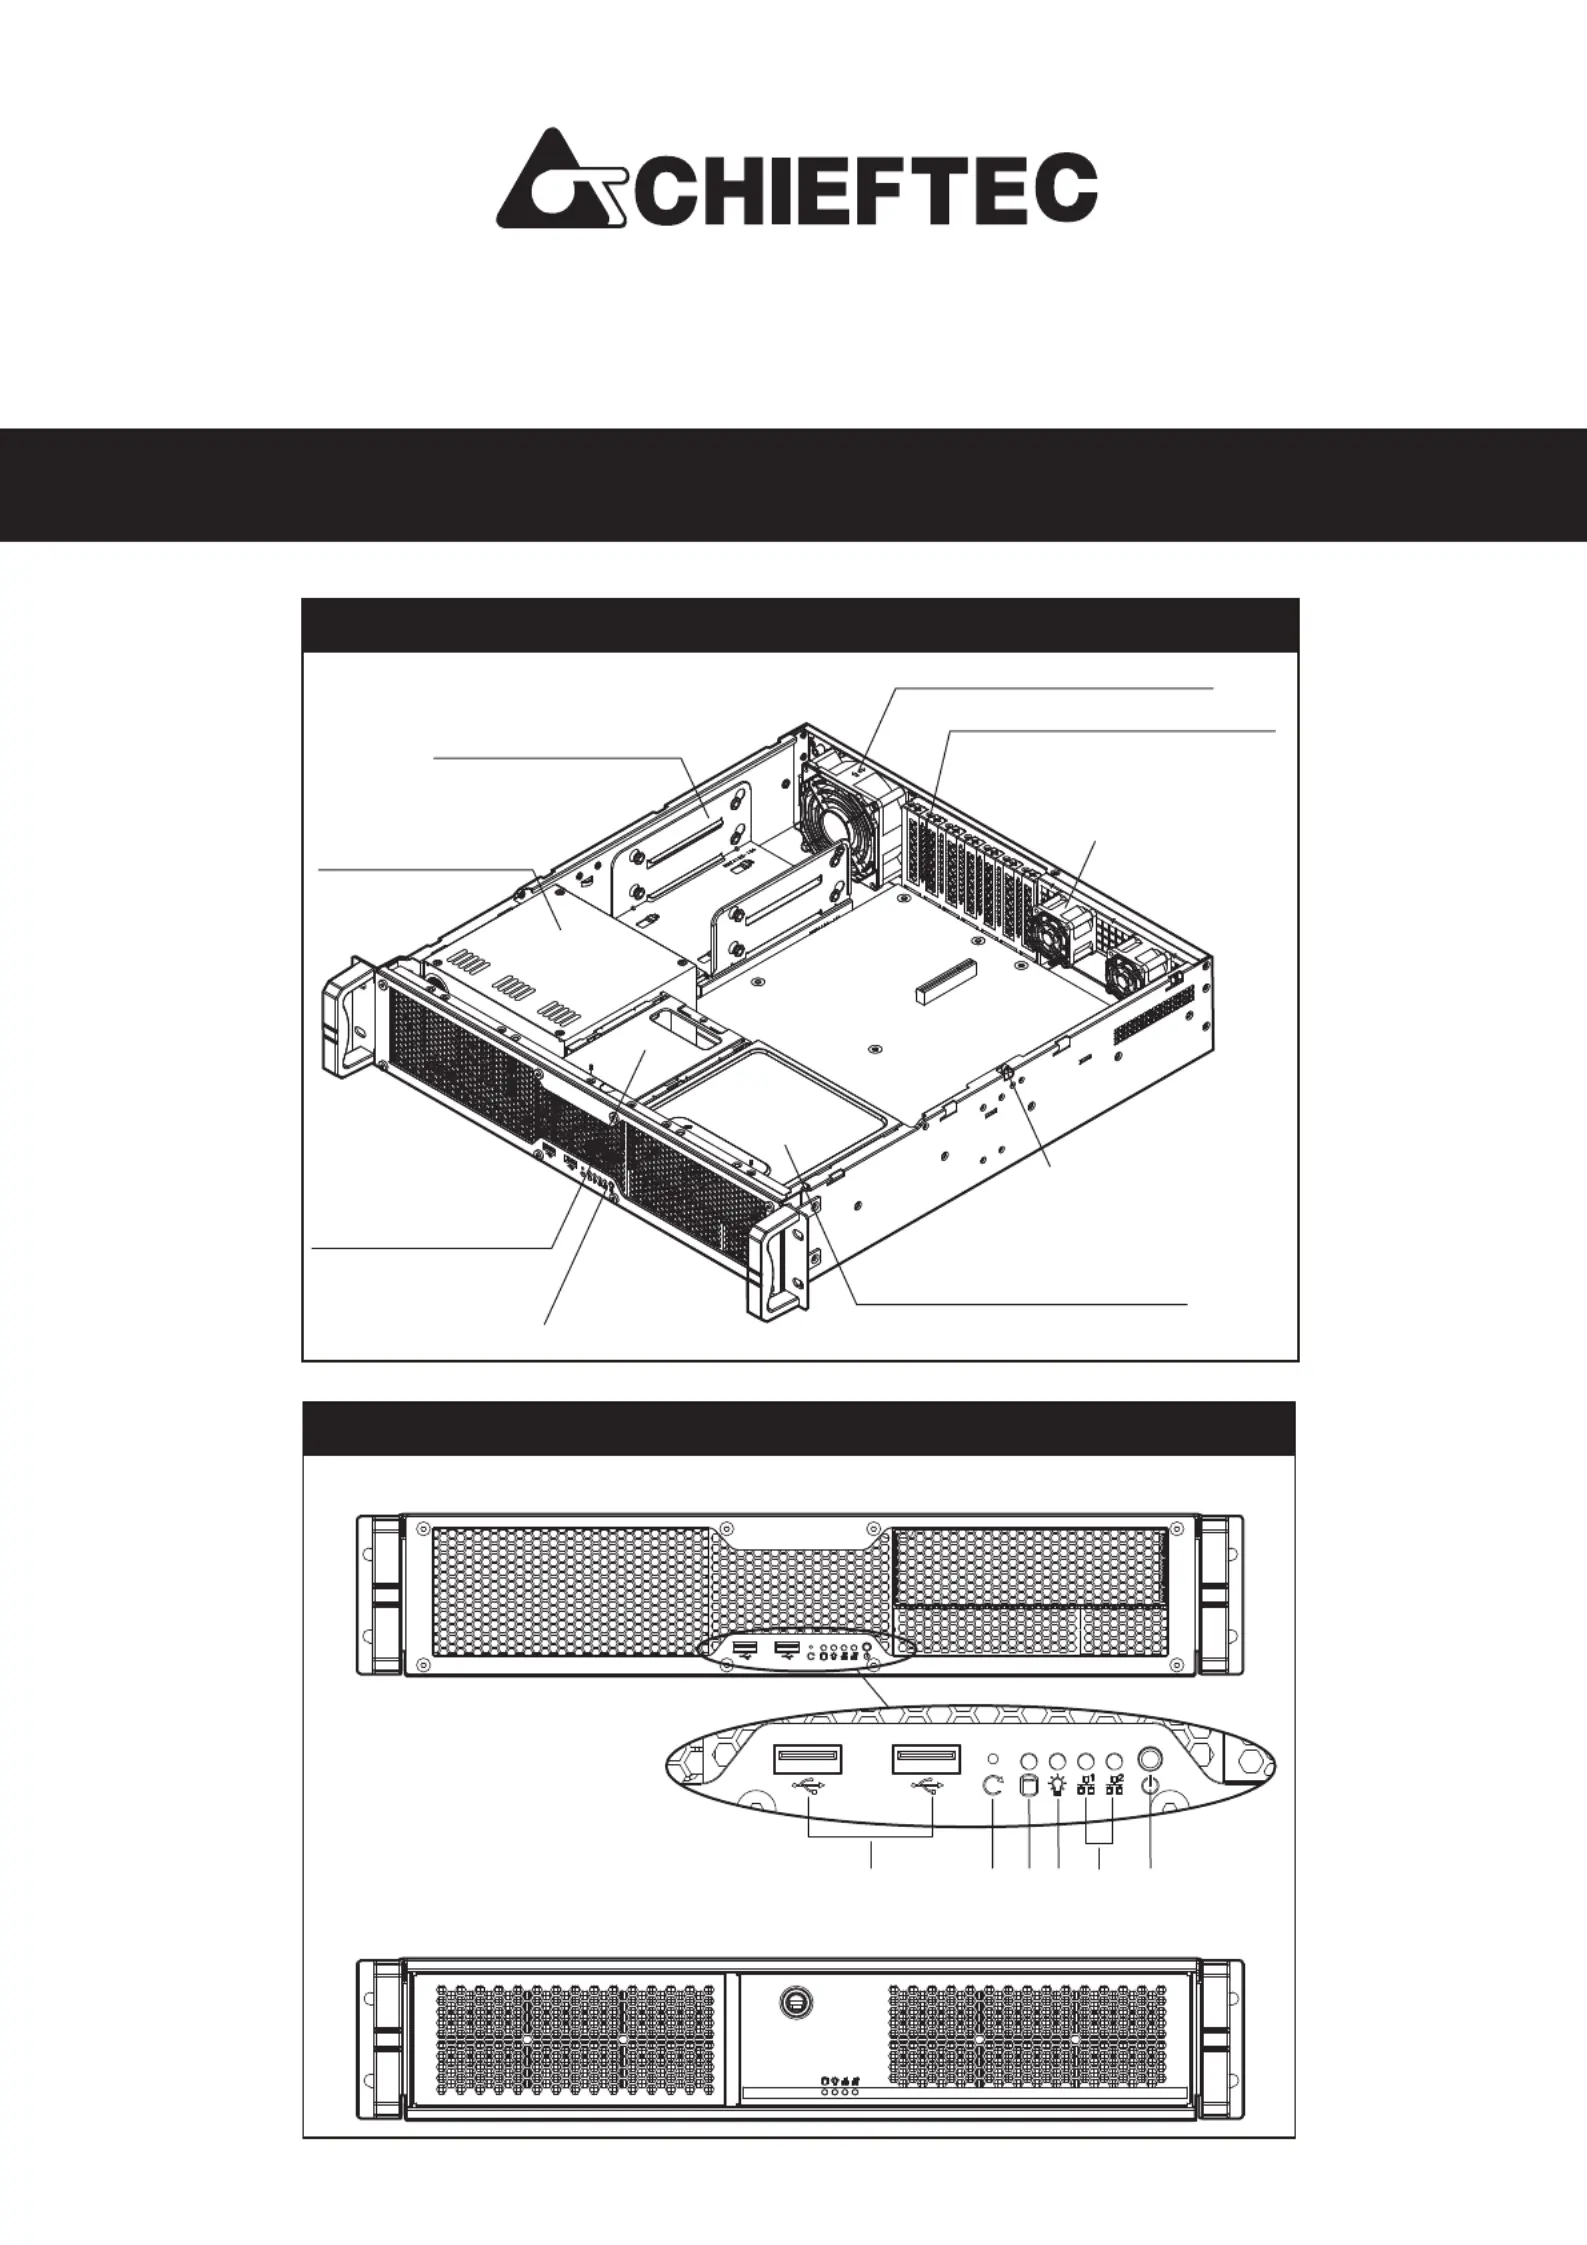
Front Panel Controls and Indicators
Major Components
IN THIS YOU CAN TRUST
- 01 -
A. Power Switch
B. LAN1, LAN2 Activity LED
C. Power on LED
D. HDD Activity LED
E. System Reset LED
F. USB 2.0 port x 2
ABCDEF
UNC-209SR-B QUICK INSTALLATION GUIDE
Without front door
With front door
Rear Fan: 1x 80mm t 32mm(Option)
Front Controls and Indicators
Single PS/2 PSU
Internal 3.5” HDD x 2
Internal 2.5” SSD x 2
7x Low Profile PCI slots
(or 3x Full Height PCI slots
with optional bracket)
Rear Fan:
2x 40mm t 28mm
(Option)
Intrusion Switch (Option)
1x5.25” ODD+1x3.5” HDD
(or 3.5” FDD) Drive Bay
ATX M/B
(12”x 9.6”)

Rear Window Configuration
Top Cover Opening
Maintaining Front Door Filter
Installing Internal 3.5” HDD
Release three screws on left,
right and rear sides of the
top cover, and pull back
to open it
- 02 -
1
2
1
2
3
2
1. Unlock the front door and take out the filters to clean
2. Insert two filters on both left and right sides of the
front door with four anchoring points
7x Low Profile PCI slots
3x Full Height PCI slots
with optional braceket
Rear Fan
Standard I/O Opening
(depend on M/B specification)
This unit must be operated
with the chassis TOP COVER
installed to ensure proper cooling
1. Slide two internal 3.5” HDDs into the bay
2. Use eight quakeproof screws to fix 3.5”
HDDs on both left and right sides of the bay
3. Slide the internal 3.5” HDD assembly
on the chassis and use a screw to
fix it with the chassis

Installing Internal 2.5” SSD
Installing 5.25”/3.5” Drive Bay(with 3.5” HDD or FDD)
Installing PS/2 power supply
1
1
2
2
3
3
4
5
5
Installing 5.25” ODD
Installing 3.5” HDD
Installing 5.25”/3.5” Drive Bay
Installing FDD
1. Release two screws on top of the drive bay to take it out from the chassis
2. Release one screw at the right side of the drive bay
3. Take out the upper front cover
4. Slide the 5.25” ODD into the drive bay assembly
5. Use eight screws to fix on both left and right sides of the drive bay
Slide 3.5” HDD into drive bay ,
and use four quakeproof
screws to fix it at the
bottom of the drive bay
1. Remove the lower front cover of the drive bay
2. Slide FDD into drive bay
3. Use four screws to fix it on both left and
right sides of the drive bay
1. Slide the 5.25”/3.5” drive bay into the chassis
2. Use two screws to fix it on the chassis
- 03 -
1
1
2
2
2
3
1. Use two screws to fix bracket on the PSU
2. Slide the PSU assembly into the chassis,
and use two screws to fix it on the
left side of the chassis
1. Slide two internal 2.5” SSD into the bay
2. Use eight quakeproof screws to fix two
SSD on both left and right sides of
the bay
3. Slide the internal 2.5” SSD
assembly into the
chassis and use
one screw to
fix it on the
chassis
Produktspezifikationen
Marke: | Chieftec |
Kategorie: | Nicht kategorisiert |
Modell: | UNC-209SR-B |
Brauchst du Hilfe?
Wenn Sie Hilfe mit Chieftec UNC-209SR-B benötigen, stellen Sie unten eine Frage und andere Benutzer werden Ihnen antworten
Bedienungsanleitung Nicht kategorisiert Chieftec
16 Juli 2025
Bedienungsanleitung Nicht kategorisiert
- MarQuant
- Scala
- Konftel
- Anker
- Sparmax
- Russound
- LG
- Berkel
- Prestigio
- Hämmerli
- IBEAM
- Eminent
- RADEMACHER
- Titanwolf
- Dash
Neueste Bedienungsanleitung für -Kategorien-
19 Juli 2025
19 Juli 2025
19 Juli 2025
19 Juli 2025
19 Juli 2025
19 Juli 2025
19 Juli 2025
19 Juli 2025
19 Juli 2025