DeLOCK 95281 Bedienungsanleitung
DeLOCK
Nicht kategorisiert
95281
Lies die bedienungsanleitung für DeLOCK 95281 (4 Seiten) kostenlos online; sie gehört zur Kategorie Nicht kategorisiert. Dieses Handbuch wurde von 4 Personen als hilfreich bewertet und erhielt im Schnitt 5.0 Sterne aus 2.5 Bewertungen. Hast du eine Frage zu DeLOCK 95281 oder möchtest du andere Nutzer dieses Produkts befragen? Stelle eine Frage
Seite 1/4

Declaration of conformity
Products with a CE symbol fulll the EMC directive (2014/30/EU) and
RoHS directive (2011/65/EU+2015/863+2017/2102), which were released by the
EU-comission.
The declaration of conformity can be downloaded here:
https://www.delock.de/produkte/G_95281/merkmale.html
WEEE-notice
The WEEE (Waste Electrical and Electronic Equipment)-directive, which became
eective as European law on February 13th 2003, resulted in an all out change
in the disposal of disused electro devices. The primarily purpose of this directive
is the avoidance of electrical waste (WEEE) and at the same time the support of
recycling and other forms of recycling in order to reduce waste. The WEEE-logo
on the device and the package indicates that the device should not be disposed
in the normal household garbage. You are responsible for taking the disused
electrical and electronical devices to a respective collecting point. A separated
collection and reasonable recycling of your electrical waste helps handling the
natural resources more economical. Furthermore recycling of electrical waste is
a contribution to keep the environment and thus also the health of men. Further
information about disposal of electrical and electronical waste, recycling and
the collection points are available in local organizations, waste management
enterprises, in specialized trade and the producer of the device.
Cet appareil et
ses accessoires
se recyclent
Points de collecte sur www.quefairedemesdechets.fr
EU Import: Tragant Handels- und Beteiligungs GmbH
Beeskowdamm 13/15, 14167 Berlin, Germany
Support Delock
If you have further questions, please contact our customer support
support@delock.de
You can nd current product information on our homepage: www.delock.com
Final clause
Information and data contained in this manual are subject to change without notice
in advance. Errors and misprints excepted.
Copyright
No part of this user's manual may be reproduced, or transmitted for any purpose,
regardless in which way or by which means, electronically or mechanically, without
explicit written approval of Delock.
Edition: 11/2024
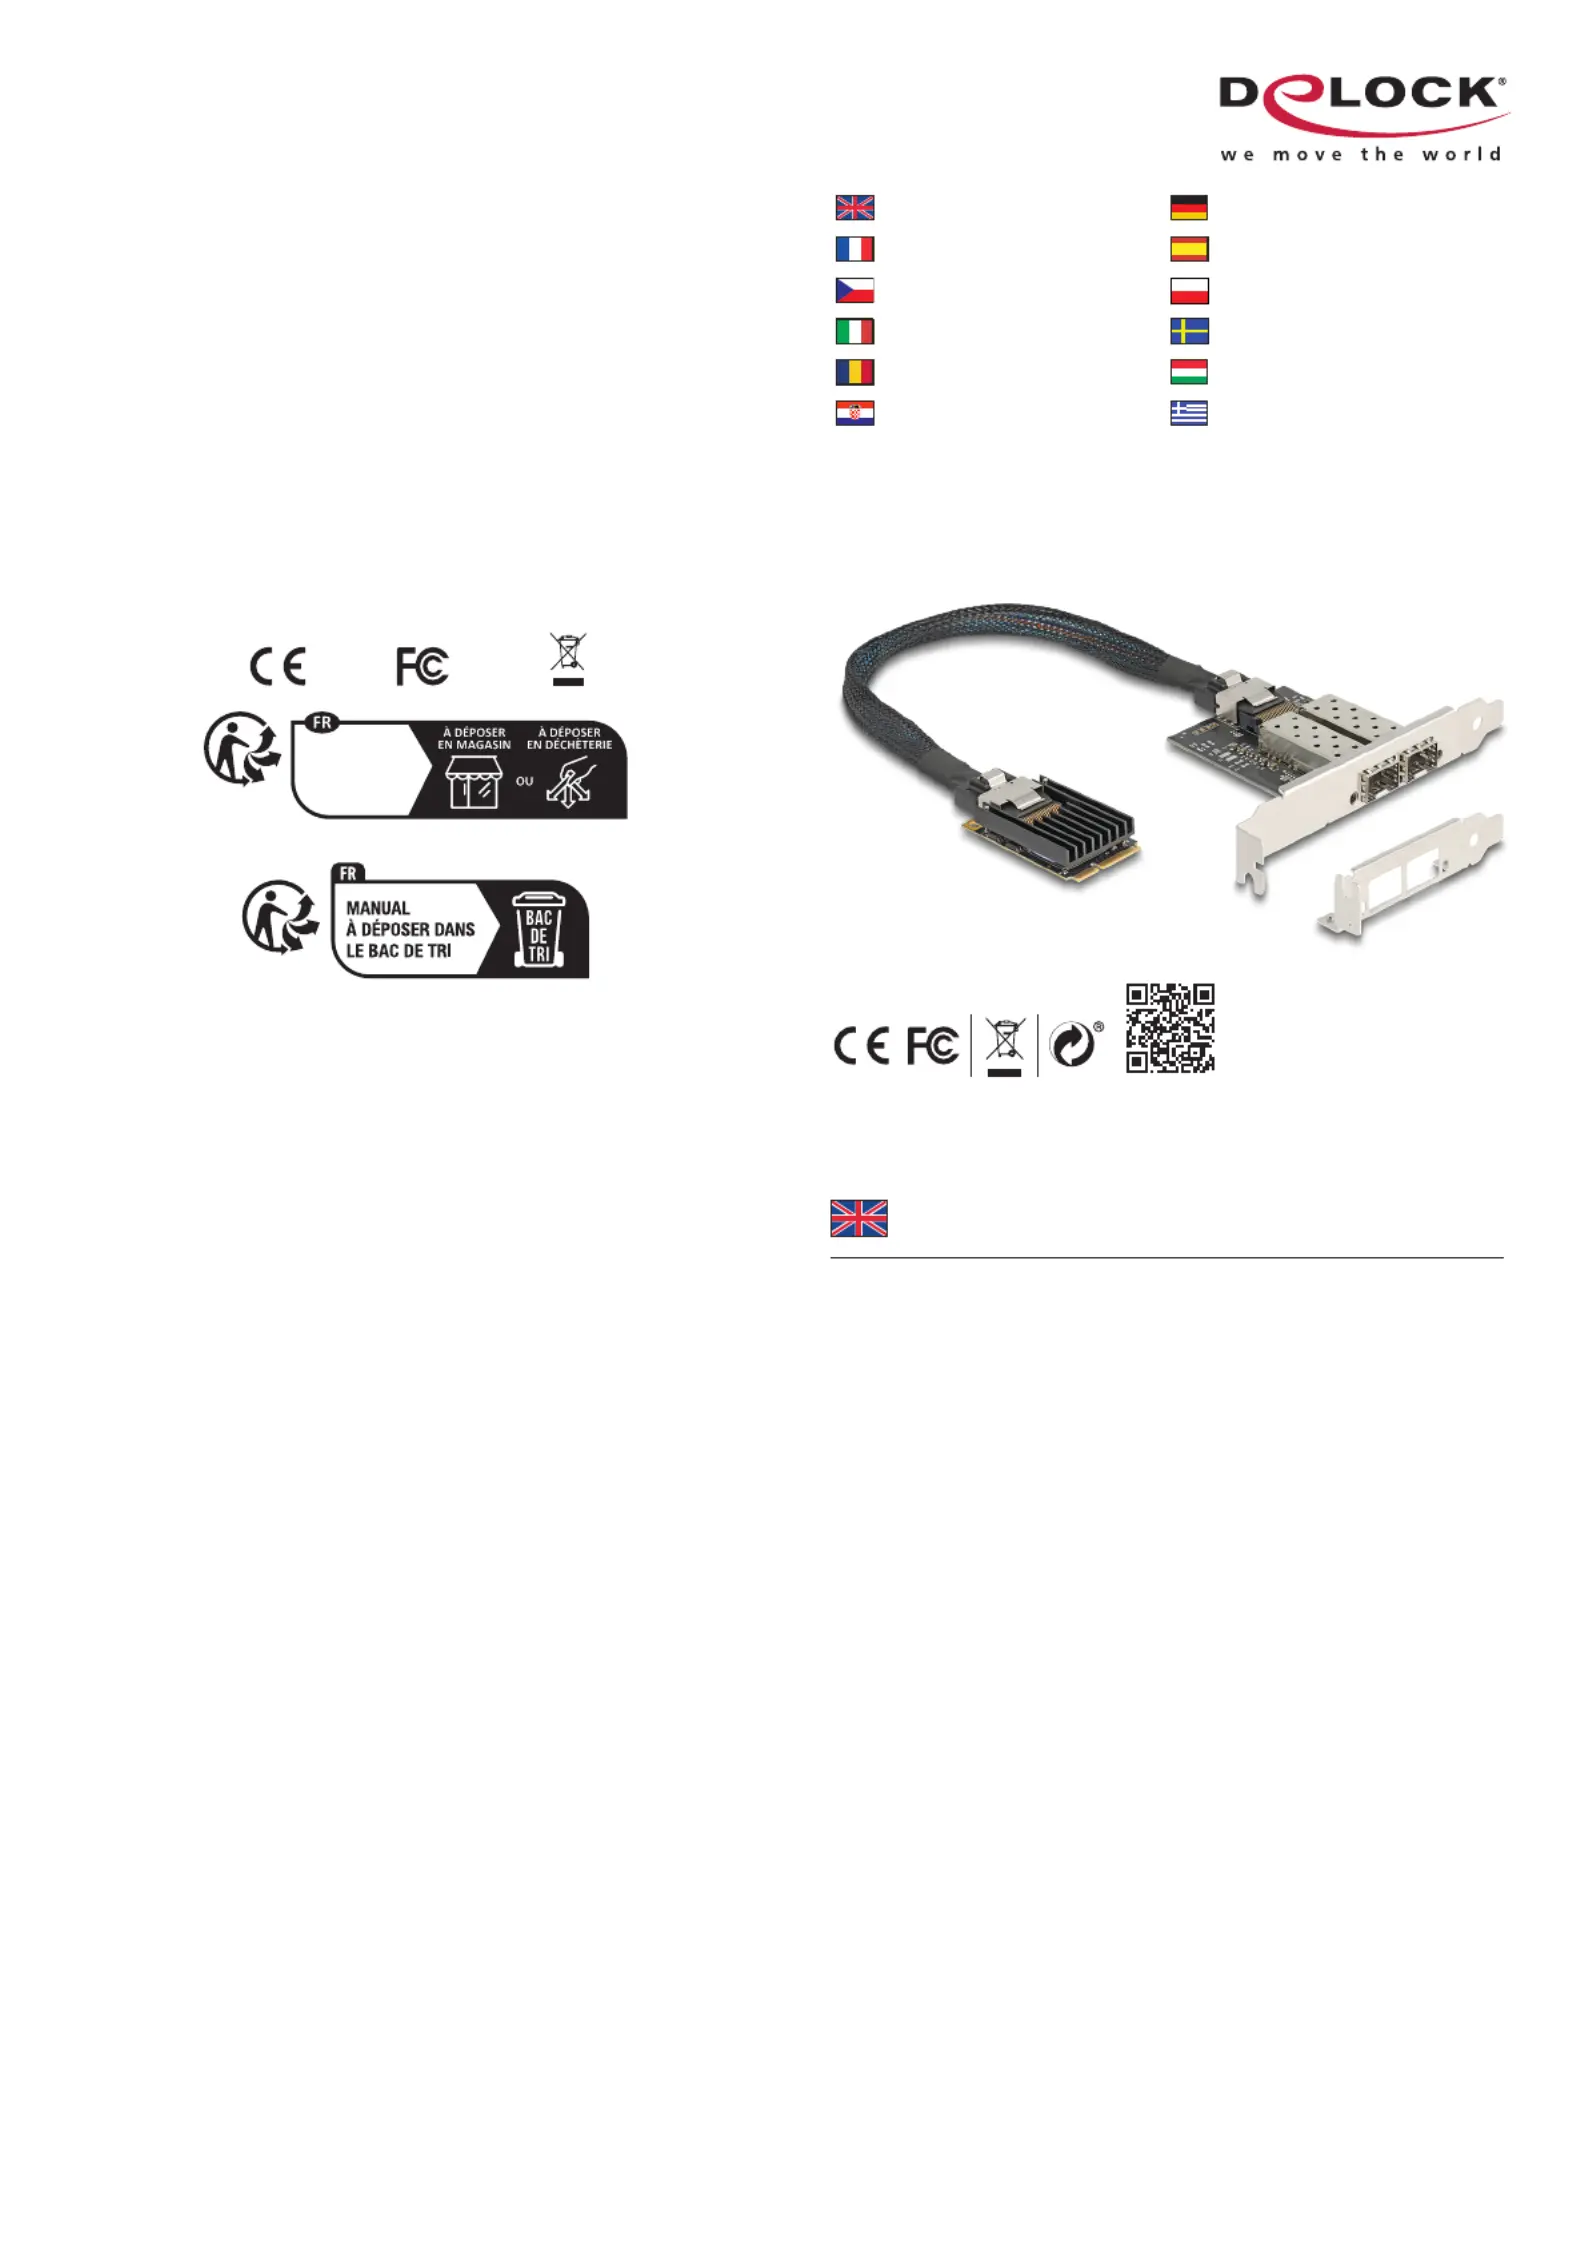
Gigabit LAN Mini PCIe Card
2 x Gigabit LAN SFP
User manual
Mode d’emploi
Uživatelská příručka
Manuale utente
Manual de utilizare
Korisnički priručnik
Bedienungsanleitung
Manual del usuario
Instrukcja obsługi
Bruksanvisning
Használati utasítás
Εγχειρίδιο χρήστη
Product-No: 95281
User manual no: 95281-a
www.delock.com
English
Description
This Mini PCIe module by Delock expands a system by two Gigabit LAN
interfaces, which can be lead out via the slot bracket.
The SFP slots accept optional Gigabit SFP modules by Delock to connect a PC
via a ber optic cable to the network.
Technical details
• Connectors:
internal: 1 x Mini PCIe male
external: 2 x SFP slot for 1 Gbps SFP module
• Chipset: Intel i350
• Form factor: Mini PCIe full size
• Interface: PCI Express revision 2.1
• Data transfer rate:
Gigabit Ethernet up to 1000 Mbps
PCI Express p1-x1 up to 4 Gbps
• Supports IEEE 802.3z
• Supports IEEE 802.1Q Virtual LAN (VLAN)
• Supports 9k Jumbo Frames
• LED indicator for link and activity
• Cable length with connectors: ca. 30 cm

System requirements
• Windows 10/10-64/11
• Motherboard with a free Mini PCIe slot with a PCIe interface
• PC with one free slot
Package content
• Mini PCIe module
• Connecting cable
• Slot bracket
• Low prole bracket
• User manual
Safety instructions
• Protect the product against moisture
• Avoid static electricity when installing the card
Hardware Installation
1.
Turn o your PC and unplug the power cord.
2.
Open the housing.
3.
Connect the connecting cables to the module and to the bracket.
4.
Insert the module into a free Mini PCIe slot and screw the module.
(dierent motherboards may have dierent xing options)
5.
Remove the slot holder from the available slot.
6.
Insert the slot bracket straight and carefully into the free slot.
7.
Use a screw to attach it to the housing.
8.
Reattach the housing and connect the power cord to the AC adapter.
Driver Installation
1.
When the installation of the device is nished, the driver will be automatically
installed after you restart the computer.
2.
You can now start to use the device.
Conguration système requise
• Windows 10/10-64/11
• Carte mère avec un port libre Mini PCIe avec interface PCIe
• PC avec un slot libre
Contenu de l’emballage
• Module Mini PCIe
• Câbles de connexion
• Panneau arrière
• Low prole slot arrière
• Mode d’emploi
Instructions de sécurité
• Protéger le produit contre l’humidité
• Éviter l’électricité statique lors de l’installation de la carte
Installation matérielle
1.
Eteignez votre PC et débranchez le cordon d'alimentation.
2.
Ouvrez le boîtier.
3.
Connectez les câbles de connexion au module et au crochet.
4.
Insérez le module dans une fente Mini PCIe libre et vissez le module.
(diérentes cartes mères peuvent avoir des options de xation diérentes)
5.
Déposez le support du slot disponible.
6.
Insérez le support de fente droit et en faisant attention dans la fente
disponible.
7.
Utilisez une vis pour le xer au boîtier.
8.
Remontez le boîtier et branchez le cordon d'alimentation et l'adaptateur AC.
Installation du pilote
1.
Lorsque l'installation du périphérique est terminée, le pilote est installé
automatiquement après redémarrage de l'ordinateur.
2.
Vous pouvez à présent commencer à utiliser le périphérique.
English
Deutsch
Français
Español
Systemvoraussetzungen
• Windows 10/10-64/11
• Mainboard mit einem freien Mini PCIe Steckplatz mit PCIe Schnittstelle
• PC mit einem freien Slot
Packungsinhalt
• Mini PCIe Modul
• Verbindungskabel
• Slotblech
• Low Prole Blende
• Bedienungsanleitung
Sicherheitshinweise
• Produkt vor Feuchtigkeit schützen
• Vermeiden Sie statische Auadung beim Einbau der Karte
Hardwareinstallation
1.
Schalten Sie Ihren PC aus, ziehen Sie das Netzkabel.
2.
Önen Sie das Gehäuse.
3.
Verbinden Sie die Kabel mit dem Modul und dem Slotblech.
4.
Stecken Sie das Modul in den freien Mini PCIe Slot und schrauben Sie
das Modul fest. (unterschiedliche Mainboards haben evtl. eine andere
Befestigungsmöglichkeit)
5.
Entfernen Sie das Slotblech vom gewünschten freien Slot.
6.
Stecken Sie das Slotblech gerade und vorsichtig in den freien Slot.
7.
Befestigen Sie dieses mit einer Schraube am Gehäuse.
8.
Schließen Sie das Gehäuse wieder und verbinden Sie das Netzkabel mit dem
Netzteil.
Treiberinstallation
1.
Nach dem Einbau des Gerätes wird nach dem Neustart der Treiber
automatisch installiert.
2.
Sie können nun das Gerät verwenden.
Requisitos del sistema
• Windows 10/10-64/11
• Placa base con un puerto Mini PCIe disponible con interfaz PCIe
• PC con una ranura libre
Contenido del paquete
• Módulo Mini PCIe
• cable de conexión
• Abrazadera posterior
• Low prole soporte posterior
• Manual del usuario
Instrucciones de seguridad
• Proteja el producto contra el polvo
• Evite la electricidad estática cuando instale la tarjeta
Hardware Instalación
1.
Apague su equipo y desconecte el cable de alimentación.
2.
Abra la carcasa.
3.
Enchufe los cables de conexión al módulo y al soporte.
4.
Inserte el modelo en una ranura Mini PCIe disponible y atorníllelo.
(cada placa base puede tener diferentes opciones de jación)
5.
Extraiga la tapa de la ranura de una ranura disponible.
6.
Inserte el soporte para ranura sin torcerlo y con cuidado en la ranura
disponible.
7.
Asegúrelo a la carcasa mediante un tornillo.
8.
Vuelva a colocar la carcasa y conecte el adaptador de CA del cable de
alimentación.
Instalación del controlador
1.
Cuando la instalación del dispositivo haya terminado, el controlador se
instalará automáticamente después de reiniciar el equipo.
2.
Ahora p2-ya puede utilizar el dispositivo.

České
Polsku
Italiano
Svenska
Systémové požadavky
• Windows 10/10-64/11
• Základní deska s volným Mini PCIe portem s PCIe rozhraním
• PC s volným slotem
Obsah balení
• Mini PCIe modul
• Připojovací kabel
• Zadní záslepka (Rear bracket)
• Záslepka do slotu
• Uživatelská příručka
Bezpečnostní pokyny
• Chraňte produkt před vlhkostí
• Při instalaci karty se vyvarujte působení statické elektřiny
Instalace hardware
1.
Vypněte PC a odpojte přívodní šňůru napájení.
2.
Otevřte kryt PC.
3.
Připojte propojovací kabel k modulu a k záslepce slotu.
4.
Zasuňte modul do volného Mini PCIe slotu a přišroubujte.
(různé desky mohou mít různá uchycení modulů)
5.
Odstraňte záslepku z volného slotu.
6.
Do volného slotu nyní opatrně vložte dodávanou zaslepku s LAN výstupem.
7.
Připevněte jej šroubky ke skříni.
8.
Nasaďte zpět kryt a připojte napájecí šňůru.
Instalace ovladače
1.
Po dokončení instalace hardwaru se driver nainstaluje automaticky. Poté
restartujte počítač.
2.
Zařízení můžete začít používat.
Requisiti di sistema
• Windows 10/10-64/11
• Scheda principale con uno slot Mini PCIe disponibile con un'interfaccia PCIe
• PC con uno slot disponibile
Contenuto della confezione
• Modulo Mini PCIe
• Cavi di collegamento
• Staa slot
• Staa a basso prolo
• Manuale utente
Istruzioni per la sicurezza
• Proteggere il prodotto dall'umidità
• Evitare l'elettricità statica durante l'installazione della scheda
Installazione dell'hardware
1.
Spegnere il PC e scollegare il cavo di alimentazione.
2.
Aprire l'alloggiamento.
3.
Collegare i cavi di collegamento al modulo e alla staa.
4.
Inserire il modulo in uno slot Mini PCIe disponibile e avvitare il modulo.
(Diverse schede principali potrebbero avere dierenti opzioni di ssaggio)
5.
Rimuovere il supporto dallo slot disponibile.
6.
Inserire la staa dello slot in linea retta e con attenzione nello slot disponibile.
7.
Utilizzare una vite per ssarla all'alloggiamento.
8.
Reinserire l'alloggiamento e collegare il cavo di alimentazione all'adattatore
CA.
Installazione del driver
1.
Al termine dell'installazione del dispositivo, il driver viene automaticamente
installato al riavvio del computer.
2.
Ora è possibile iniziare a utilizzare il dispositivo.
Wymagania systemowe
• Windows 10/10-64/11
• Płyta główna z jednym wolnym portem Mini PCIe z interfejsem PCIe
• Komputer PC z jednym wolnym gniazdem
Zawartość opakowania
• Moduł Mini PCIe
• Kabel połączeniowy
• Śledż
• Low Prole śledz
• Instrukcja obsługi
Instrukcje bezpieczeństwa
• Produkt należy zabezpieczyć przed wilgocią
• Podczas instalacji karty należy się zabezpieczyć przed elektrycznością statyczną
Instalacja sprzętu
1.
Wyłącz komputer i odłącz kabel zasilania.
2.
Otwórz obudowę.
3.
Podłącz kable połączeniowe do modułu i do wspornika.
4.
Włóż moduł do wolnego złącza Mini PCIe i przykręć go.
(odmienne płyty główne mają różne opcje mocowania)
5.
Zdejmij zaślepkę z wolnego gniazda.
6.
Wsuń wspornik równo i ostrożnie do wolnego gniazda.
7.
Zamocuj śrubą do obudowy.
8.
Zamknij z powrotem obudowę i podłącz kabel do zasilacza.
Instalacja sterownika
1.
Po zainstalowaniu urządzenia, sterownik zainstaluje się automatycznie po
restarcie komputera.
2.
Teraz można już korzystać z urządzenia.
Systemkrav
• Windows 10/10-64/11
• Moderkort med en ledig Mini PCIe-plats med ett PCIe-gränssnitt
• PC med en ledig plats
Paketets innehåll
• Mini PCIe modul
• Anslutningskablar
• Bakre konsol
• Fäste med låg prol
• Bruksanvisning
Säkerhetsinstruktioner
• Skydda produkten mot fukt
• Undvik statisk elektricitet när du installerar kortet
Hårdvaruinstallation
1.
Stäng av datorn och koppla ifrån strömsladden.
2.
Öppna höljet.
3.
Anslut anslutningskablarna till modulen och kortplatsen.
4.
Anslut modulen till en ledig Mini PCIe-plats och skruva fast modulen.
(olika moderkort har olika xeringsalternativ)
5.
Ta bort platshållaren från den lediga platsen.
6.
Sätt in kortplatsen rakt och försiktigt i den lediga platsen.
7.
Använd en skruv för att fästa den till höljet.
8.
Sätt tillbaka höljet och anslut strömsladden till eluttaget.
Installation av drivrutiner
1.
När installationen an enheten är klar kommer drivrutinen att automatiskt
installeras när du startar om datorn.
2.
Du kan nu börja använda enheten.
Produktspezifikationen
Marke: | DeLOCK |
Kategorie: | Nicht kategorisiert |
Modell: | 95281 |
Brauchst du Hilfe?
Wenn Sie Hilfe mit DeLOCK 95281 benötigen, stellen Sie unten eine Frage und andere Benutzer werden Ihnen antworten
Bedienungsanleitung Nicht kategorisiert DeLOCK
25 Juli 2025
25 Juli 2025
25 Juli 2025
25 Juli 2025
25 Juli 2025
25 Juli 2025
25 Juli 2025
25 Juli 2025
25 Juli 2025
25 Juli 2025
Bedienungsanleitung Nicht kategorisiert
- PurAthletics
- Native Instruments
- Dynacord
- Siku
- Weller
- Wetelux
- Pit Boss
- Heatit
- Urbanista
- Audioline
- Graupner
- Clean Air Optima
- Hegel
- IMC Toys
- WestBend
Neueste Bedienungsanleitung für -Kategorien-
25 Juli 2025
25 Juli 2025
25 Juli 2025
25 Juli 2025
25 Juli 2025
25 Juli 2025
25 Juli 2025
25 Juli 2025
25 Juli 2025
25 Juli 2025