Elation EPV Image VSC Bedienungsanleitung
Elation Beleuchtung EPV Image VSC
Lies die bedienungsanleitung für Elation EPV Image VSC (60 Seiten) kostenlos online; sie gehört zur Kategorie Beleuchtung. Dieses Handbuch wurde von 4 Personen als hilfreich bewertet und erhielt im Schnitt 4.0 Sterne aus 8 Bewertungen. Hast du eine Frage zu Elation EPV Image VSC oder möchtest du andere Nutzer dieses Produkts befragen? Stelle eine Frage
Seite 1/60
!!!!!!!!!!!!!!!!!!!!!!!!!!!!!!!!!!!!!!!!!!!!!!!!!!!!!!!!!!!!!!!!!!!!!!!!!!
Image VSC Quick Start Manual
Image VSC Quick Start Manual
Image VSC Quick Start Manual
Image VSC Quick Start ManualImage VSC Quick Start Manual!
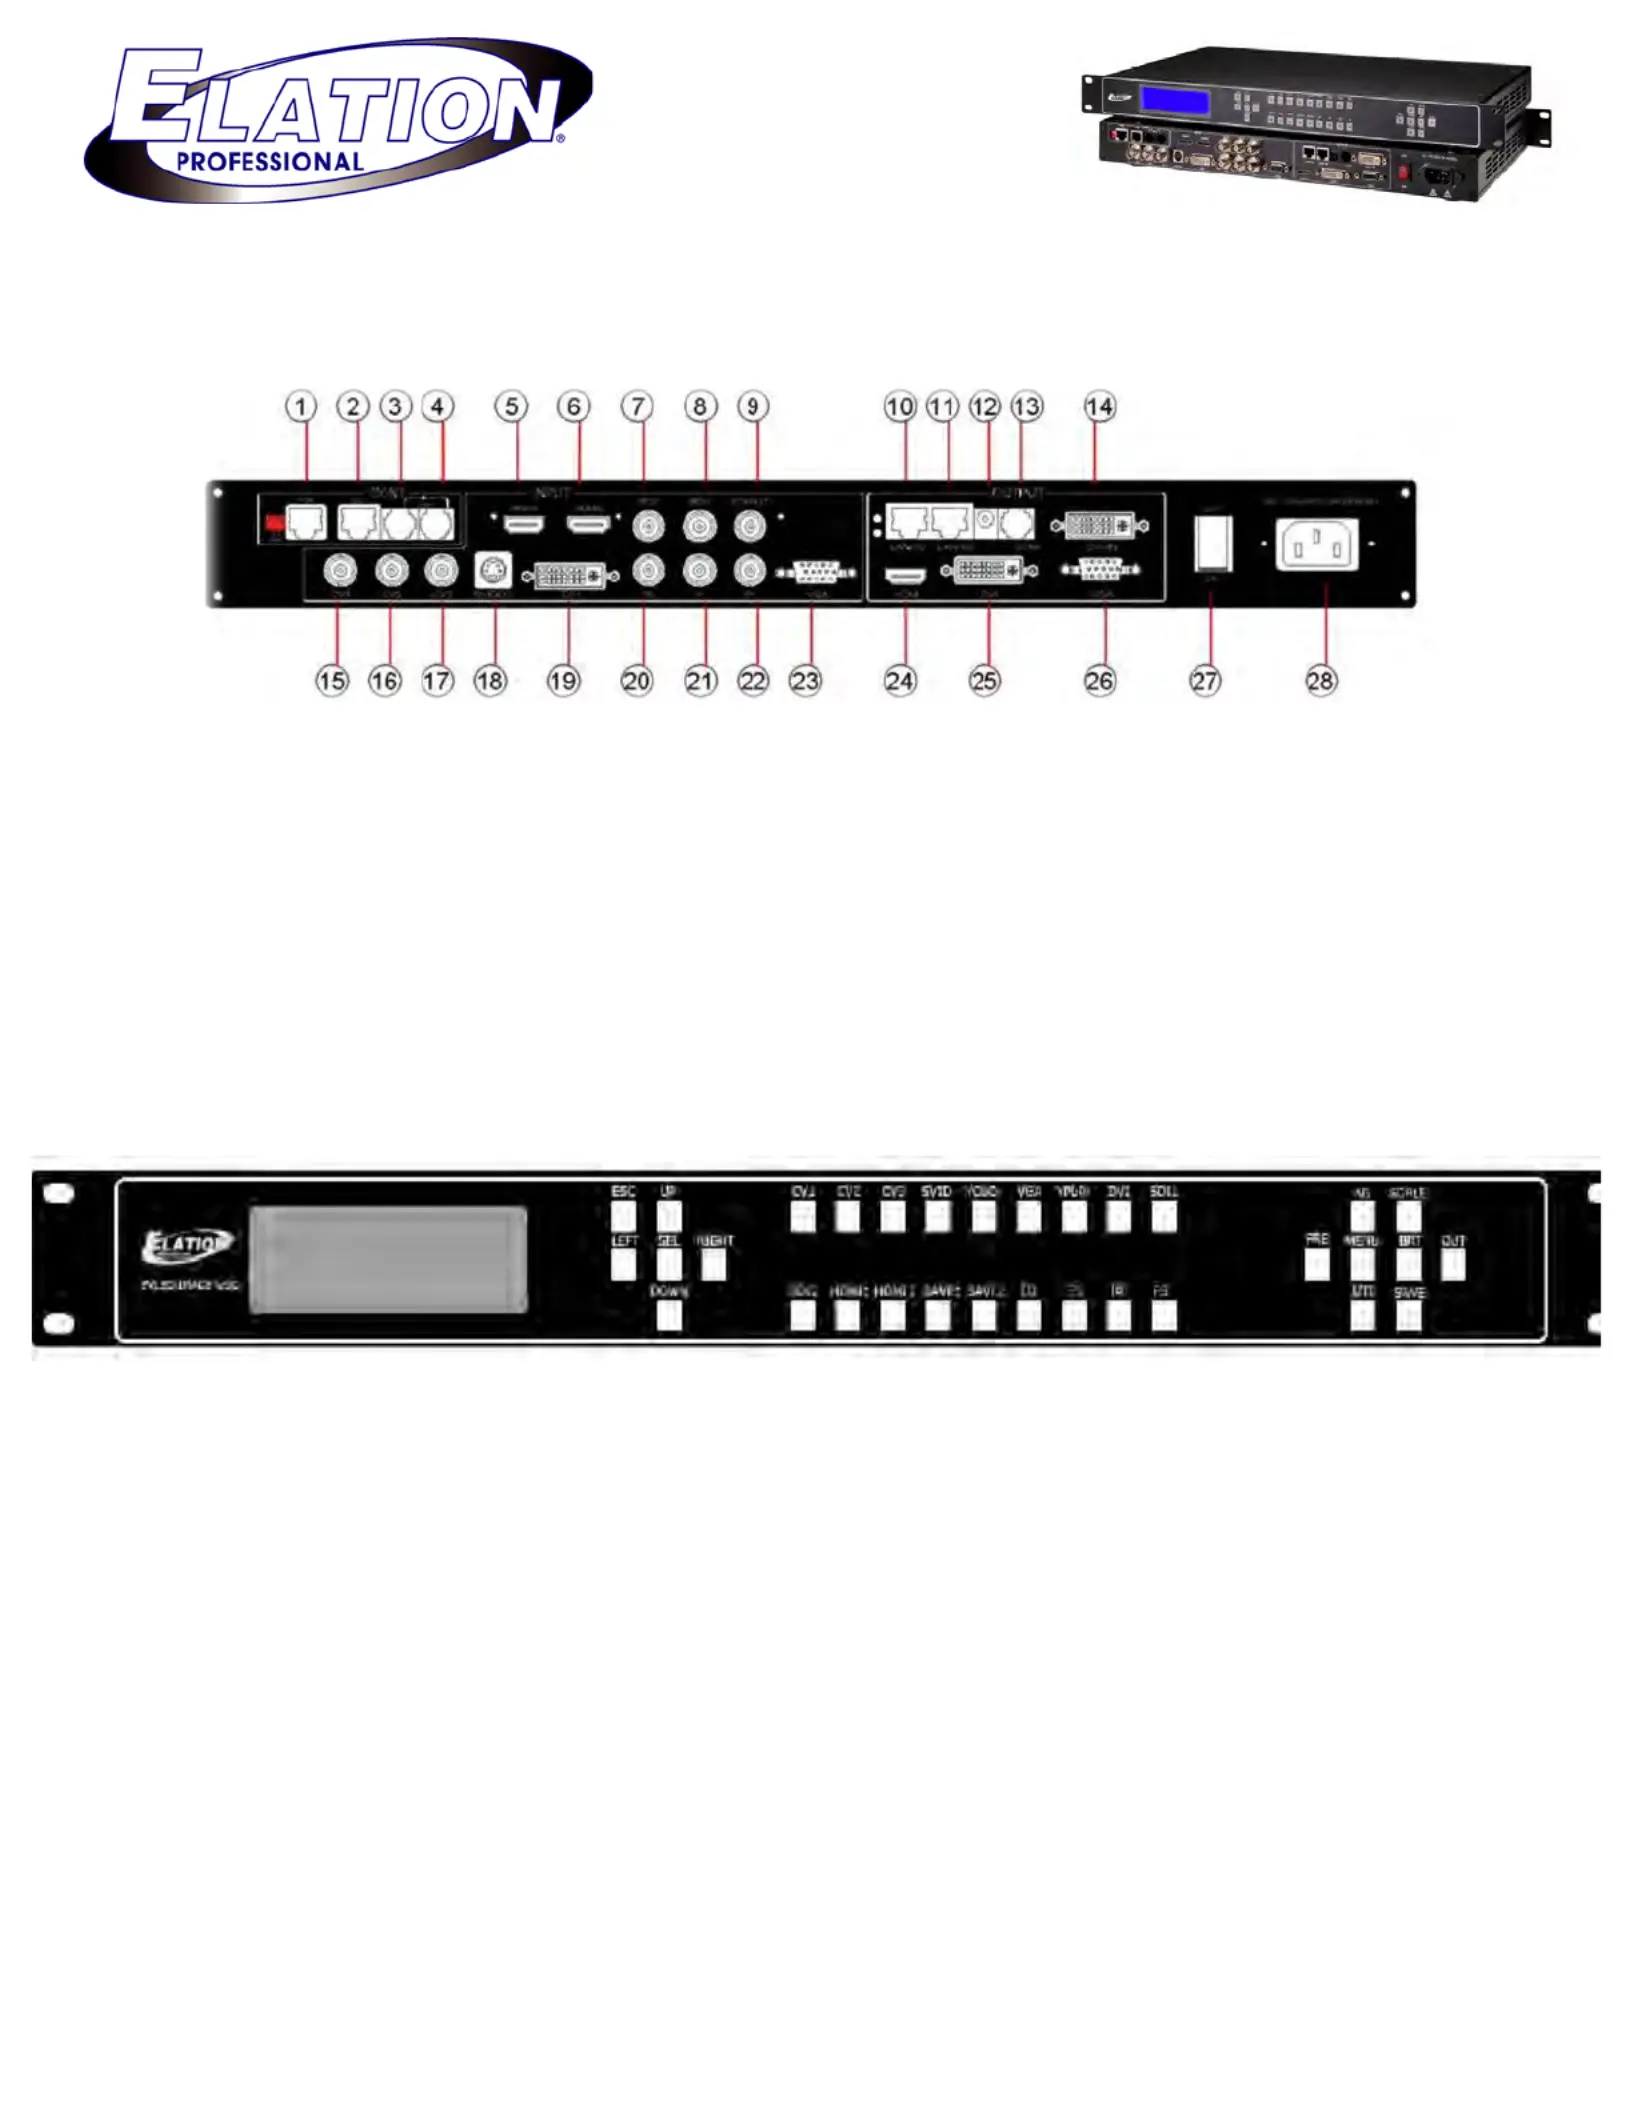
Cable Connections
Cable Connections
Cable Connections
Cable ConnectionsCable Connections:
:
:
::
!!!!!!!!!!!!!!!!!!!!!!!!!!!!!!!
1
1
1
11
st
st
st
stst
. With a DVI
. With a DVI
. With a DVI
. With a DVI. With a DVIingle or Dual Link cable m
ingle or Dual Link cable m
ingle or Dual Link cable m
ingle or Dual Link cable mingle or Dual Link cable m.
.
.
. .
-
-
-
--D S
D S
D S
D SD Sake a connection between port 25 and 14
ake a connection between port 25 and 14
ake a connection between port 25 and 14
ake a connection between port 25 and 14ake a connection between port 25 and 14
2
2
2
22
nd
nd
nd
ndnd
. With the proper CAT5 cable make a connection between port 10
. With the proper CAT5 cable make a connection between port 10
. With the proper CAT5 cable make a connection between port 10
. With the proper CAT5 cable make a connection between port 10 . With the proper CAT5 cable make a connection between port 10 and the first video tile or
and the first video tile or
and the first video tile or
and the first video tile orand the first video tile orvideo splitter.
video splitter.
video splitter.
video splitter. video splitter.
or RJ45 to EtherCon
or RJ45 to EtherCon
or RJ45 to EtherCon
or RJ45 to EtherConor RJ45 to EtherCon
Elation CAT5 cables are RJ45 to 9pin
Elation CAT5 cables are RJ45 to 9pin
Elation CAT5 cables are RJ45 to 9pin
Elation CAT5 cables are RJ45 to 9pin Elation CAT5 cables are RJ45 to 9pin .
.
.
..
3
3
3
33
rd
rd
rd
rdrd
. To access the mapping software make a connection between port 13 and
. To access the mapping software make a connection between port 13 and
. To access the mapping software make a connection between port 13 and
. To access the mapping software make a connection between port 13 and . To access the mapping software make a connection between port 13 and open USB port
open USB port
open USB port
open USB port open USB port
an
an
an
anan
on
on
on
on on
your computer. (Remember we recommend strongly your computer runs on WindowsXP)
your computer. (Remember we recommend strongly your computer runs on WindowsXP)
your computer. (Remember we recommend strongly your computer runs on WindowsXP)
your computer. (Remember we recommend strongly your computer runs on WindowsXP)your computer. (Remember we recommend strongly your computer runs on WindowsXP)
4
4
4
44
th
th
th
thth
. Finally to make the input connection
. Finally to make the input connection
. Finally to make the input connection
. Finally to make the input connection. Finally to make the input connectionidenti
identi
identi
identiidentiselect from ports 5 thru 23
select from ports 5 thru 23
select from ports 5 thru 23
select from ports 5 thru 23 select from ports 5 thru 23
,
,
,
,,
fy
fy
fy
fy fy your input signal then
your input signal then
your input signal then
your input signal thenyour input signal then
the correct connection that corresponds to your
the correct connection that corresponds to your
the correct connection that corresponds to your
the correct connection that corresponds to your the correct connection that corresponds to your video signal.
video signal.
video signal.
video signal.video signal.
Quick Setting:
Quick Setting:
Quick Setting:
Quick Setting:Quick Setting:
1
1
1
11
st
st
st
stst
. Sele
. Sele
. Sele
. Sele. Sele input video signal by pressing the button that corresponds
input video signal by pressing the button that corresponds
input video signal by pressing the button that corresponds
input video signal by pressing the button that corresponds input video signal by pressing the button that corresponds
ct the desired
ct the desired
ct the desired
ct the desiredct the desiredto the connection made in
to the connection made in
to the connection made in
to the connection made into the connection made in
ports 5 thru 23. CV1,CV2,CV3(Composite Video) ,SVID (S
ports 5 thru 23. CV1,CV2,CV3(Composite Video) ,SVID (S
ports 5 thru 23. CV1,CV2,CV3(Composite Video) ,SVID (S
ports 5 thru 23. CV1,CV2,CV3(Composite Video) ,SVID (S ports 5 thru 23. CV1,CV2,CV3(Composite Video) ,SVID (S YCbCr
YCbCr
YCbCr
YCbCr YCbCr
-
-
-
--Video) ,
Video) ,
Video) ,
Video) ,Video) ,(Digital Component Video)
(Digital Component Video)
(Digital Component Video)
(Digital Component Video)(Digital Component Video)
VGA (
VGA (
VGA (
VGA ( VGA (YPbPr (Analog Component Video)
YPbPr (Analog Component Video)
YPbPr (Analog Component Video)
YPbPr (Analog Component Video) YPbPr (Analog Component Video)
Computer Video
Computer Video
Computer Video
Computer VideoComputer Video),
),
),
),),DVI (Digital Visual Interface)
DVI (Digital Visual Interface)
DVI (Digital Visual Interface)
DVI (Digital Visual Interface)DVI (Digital Visual Interface)
,
,
,
, , Interface)
Interface)
Interface)
Interface)Interface)
SDI (Serial Digital Interface)
SDI (Serial Digital Interface)
SDI (Serial Digital Interface)
SDI (Serial Digital Interface)SDI (Serial Digital Interface)HDMI (High Definition Multimedia
HDMI (High Definition Multimedia
HDMI (High Definition Multimedia
HDMI (High Definition Multimedia HDMI (High Definition Multimedia .
.
.
..
2
2
2
22
nd
nd
nd
ndnd
. You can select the desired video resolution via two methods. (A) By pressing the OUT button and selecting
. You can select the desired video resolution via two methods. (A) By pressing the OUT button and selecting
. You can select the desired video resolution via two methods. (A) By pressing the OUT button and selecting
. You can select the desired video resolution via two methods. (A) By pressing the OUT button and selecting . You can select the desired video resolution via two methods. (A) By pressing the OUT button and selecting
one of the predefined sizes, for example (1024x768 60hz). (B) By pressing the S
one of the predefined sizes, for example (1024x768 60hz). (B) By pressing the S
one of the predefined sizes, for example (1024x768 60hz). (B) By pressing the S
one of the predefined sizes, for example (1024x768 60hz). (B) By pressing the S one of the predefined sizes, for example (1024x768 60hz). (B) By pressing the SCALE button, this menu will
CALE button, this menu will
CALE button, this menu will
CALE button, this menu will CALE button, this menu will
allow you to define both
allow you to define both
allow you to define both
allow you to define both allow you to define both horizontal as well as
horizontal as well as
horizontal as well as
horizontal as well as horizontal as well as
the
the
the
the the the
the
the
the the vertical size by adjusting the pixel count of each one.
vertical size by adjusting the pixel count of each one.
vertical size by adjusting the pixel count of each one.
vertical size by adjusting the pixel count of each one. vertical size by adjusting the pixel count of each one.
This menu will also allow you
This menu will also allow you
This menu will also allow you
This menu will also allow you This menu will also allow you ideo image by adjusting the horizontal position
ideo image by adjusting the horizontal position
ideo image by adjusting the horizontal position
ideo image by adjusting the horizontal positionideo image by adjusting the horizontal position
to define the position of the v
to define the position of the v
to define the position of the v
to define the position of the vto define the position of the v
as well as the vertical position. Keep in mind that you can adjust the increments of the pixel count by 1,10,100
as well as the vertical position. Keep in mind that you can adjust the increments of the pixel count by 1,10,100
as well as the vertical position. Keep in mind that you can adjust the increments of the pixel count by 1,10,100
as well as the vertical position. Keep in mind that you can adjust the increments of the pixel count by 1,10,100 as well as the vertical position. Keep in mind that you can adjust the increments of the pixel count by 1,10,100
for faster adjustments.
for faster adjustments.
for faster adjustments.
for faster adjustments. for faster adjustments.
3
3
3
3 3
rd
rd
rd
rdrd
. Finally you can adjust the
. Finally you can adjust the
. Finally you can adjust the
. Finally you can adjust the . Finally you can adjust the Contrast and Brightness for better picture color by selecting the BRT button.
Contrast and Brightness for better picture color by selecting the BRT button.
Contrast and Brightness for better picture color by selecting the BRT button.
Contrast and Brightness for better picture color by selecting the BRT button.Contrast and Brightness for better picture color by selecting the BRT button.
For further assistance please call Elation Support at 866 245 6726 or email us at [email protected]
Produktspezifikationen
| Marke: | Elation |
| Kategorie: | Beleuchtung |
| Modell: | EPV Image VSC |
Brauchst du Hilfe?
Wenn Sie Hilfe mit Elation EPV Image VSC benötigen, stellen Sie unten eine Frage und andere Benutzer werden Ihnen antworten
Bedienungsanleitung Beleuchtung Elation

29 März 2026
29 März 2026
15 März 2026
1 März 2026
28 Februar 2026
21 Februar 2026
20 Februar 2026
19 Februar 2026
18 Februar 2026
18 Februar 2026
Bedienungsanleitung Beleuchtung
Neueste Bedienungsanleitung für -Kategorien-
3 April 2026
3 April 2026
3 April 2026
3 April 2026
3 April 2026
3 April 2026
3 April 2026
3 April 2026
3 April 2026
3 April 2026