Equip 650201 Bedienungsanleitung
Lies die bedienungsanleitung für Equip 650201 (2 Seiten) kostenlos online; sie gehört zur Kategorie Unterstützung für Flachbildschirme. Dieses Handbuch wurde von 26 Personen als hilfreich bewertet und erhielt im Schnitt 4.1 Sterne aus 5 Bewertungen. Hast du eine Frage zu Equip 650201 oder möchtest du andere Nutzer dieses Produkts befragen? Stelle eine Frage
Seite 1/2
LCD TV WALL MOUNT BRACKET
TILTING
Universal | 650201
Features
lSupports 58 ~ 94cm (23” ~ 37”) Flat Panel Display
lDistance from TV to Wall: 46mm
lFlexible Adjustment with 0º ~ -10º Tilt
lVESA Mount Standards: Maximum 400 x 200mm
lHole Pattern: Maximum 420mm Wide and 230mm High
lUniversal Mounting Pattern
lBubble Level Integrated
lLoad Capacity: Maximum 75kg (165lbs)
WARNING!
Make sure that any listed parts are not missing or defective. Improper installation would result in personal
injury or damage to equipment. If you have any questions about installation, please visit
http://www.equip-info.netfor more assistance.
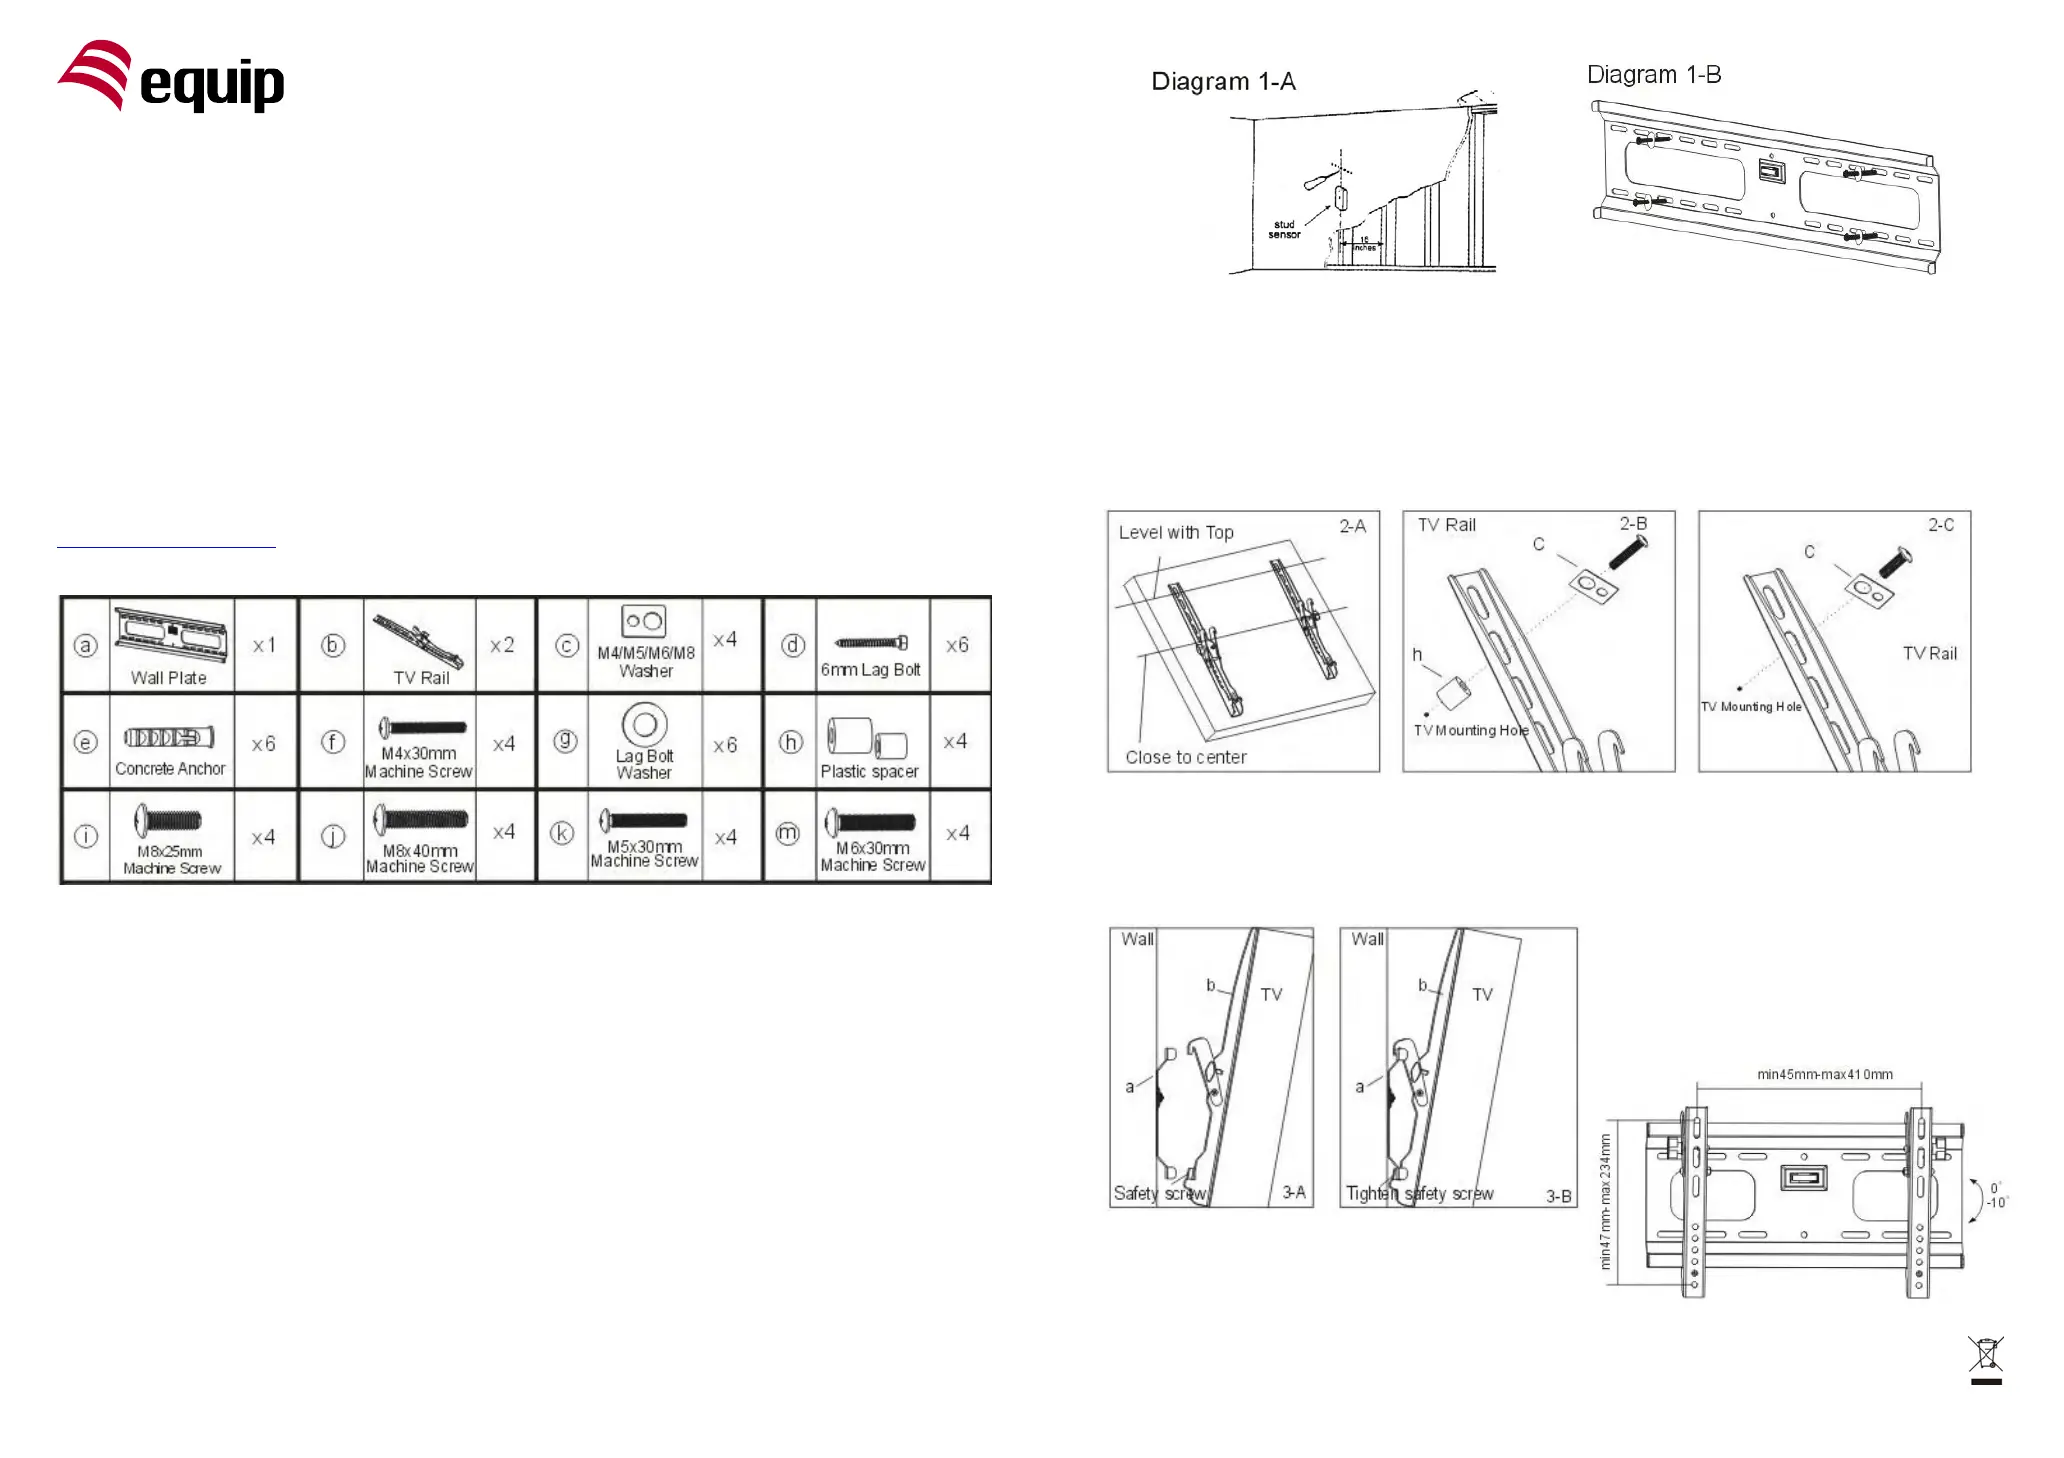
Hardware Kit
Note:Any of the hardware in kit will be required. Other joint parts are forbidden.
INSTALLATION
Mount Wall Plate on the Wall - The product is designed for mounting on solid brick, concrete or hard wood
batten/studs wall, but plasterboard or paneled wall is not allowed.
(a) Solid Brick, Concrete Block Wall- Use the wall plate○
a
as a template to mark 6 holes location on the
wall, three in the top row slots and three more in the bottom row. Make sure these holes are level and there
is at least 200mm between any two holes. Drill these holes with a 10mm masonry bit to at least 60mm in
depth. Insert a concrete anchor○
e
into each of these holes. Attach the wall plate to the wall using 6 lag
bolts○
d
and 6 lag bolt washers○
g
.
(b) Hard Wood Batten/Stud Wall- The wall plate○
a
must be mounted to two wood studs. Use a high
quality stud sensor to locate three adjacent studs. It is a good idea to verify where the studs are located
with an awl or thin nail shown in diagram 1-A. Drill a 3mm deep hole at the desired height in each stud using
a 4mm drill bit. Use the wall plate○
a
as a template to mark the location of the second hole in each stud.
Pre-drill these holes using the 4mm drill bit as well. Attach the wall plate to the wall using the 4 lag bolts○
d
and 4 lag bolt washers○
g
. Make sure the wall plate is oriented so the flat surface in the center of the plate in
against the wall shown in diagram 1-B.Note: Do not use any concrete ancher when you mount the bracket
onto hard wood wall.
Mount the TV Rails on the Back of Your Display and Install - Make sure the two TV rails○
b
are
mounted at an equal distance from the top of the TV and as close to the center as possible as shown in
diagram 2-A. Knobs should face the outside of the television. Plastic spacers○
h
are provided to be used
with M4, M5, M6 and M8 mount screws on TV with curved or recessed back panel as shown in diagram 2-B.
If you mount the TV rails to a television with flat back, you will not need a plastic spacer as shown in diagram
2-C. Make sure these screws are right! Some TVs have shallow threaded inserts; so we have provided 4
extra washers if the provided screws are too long.
Hang the TV on the Wall Plate and Adjust -First hook the TV rails over the top of the wall plate○
a
in
diagram 3-A. Then tighten the safety screws on the bottom of TV rails○
b
in diagram 3-B. You can adjust
your TV down to 10 degrees at maximum: first loosen one knob, second loosen the other knob and then
adjust the TV whichever degree you want. Finally tighten the two knobs.
Produktspezifikationen
| Marke: | Equip |
| Kategorie: | Unterstützung für Flachbildschirme |
| Modell: | 650201 |
| Breite: | 450 mm |
| Gewicht: | 2000 g |
| Produktfarbe: | Schwarz |
| Höhe: | 270 mm |
| Befestigungstyp: | Wand |
| Höchstgewichtskapazität: | 75 kg |
| Paketgewicht: | 2500 g |
| Zertifizierung: | RoHS |
| Gehäusematerial: | Stahl |
| Neigungswinkelbereich: | -10 - 0 ° |
| Projektionsflächenkapazität: | 23 - 37 " |
| Verpackungsabmessungen (BxTxH): | 496 x 226 x 60 mm |
| Minimale VESA-Halterung: | 400 x 200 mm |
| Maximale VESA-Halterung: | 400 x 200 mm |
Brauchst du Hilfe?
Wenn Sie Hilfe mit Equip 650201 benötigen, stellen Sie unten eine Frage und andere Benutzer werden Ihnen antworten
Bedienungsanleitung Unterstützung für Flachbildschirme Equip

25 August 2024
25 August 2024
25 August 2024
25 August 2024
Bedienungsanleitung Unterstützung für Flachbildschirme
Neueste Bedienungsanleitung für -Kategorien-
16 Oktober 2024
15 Oktober 2024
4 Oktober 2024
2 Oktober 2024
2 Oktober 2024
2 Oktober 2024
1 Oktober 2024
1 Oktober 2024
1 Oktober 2024
1 Oktober 2024