Extron FOXBOX Tx DVI Plus MM Bedienungsanleitung
Extron WLAN-Repeater FOXBOX Tx DVI Plus MM
Lies die bedienungsanleitung für Extron FOXBOX Tx DVI Plus MM (2 Seiten) kostenlos online; sie gehört zur Kategorie WLAN-Repeater. Dieses Handbuch wurde von 39 Personen als hilfreich bewertet und erhielt im Schnitt 4.0 Sterne aus 2 Bewertungen. Hast du eine Frage zu Extron FOXBOX Tx DVI Plus MM oder möchtest du andere Nutzer dieses Produkts befragen? Stelle eine Frage
Seite 1/2
This card provides quick start instructions for an experienced installer to set up and
operate an Extron® FOXBOX DVI Plus transmitter and receiver.
NOTES:•OnlytheFOXBOXRxDVIPlusreceivercanacceptinputfroma
FOXBOX Tx DVI Plus transmitter.
•TheFOXBOXRxDVIPlusreceivercanacceptinputsfromanyFOX
500 or FOXBOX transmitter, including VGA models.
Installation
Step 1 — Mounting
Turn off or disconnect all equipment power sources and mount the transmitter and receiver as required.
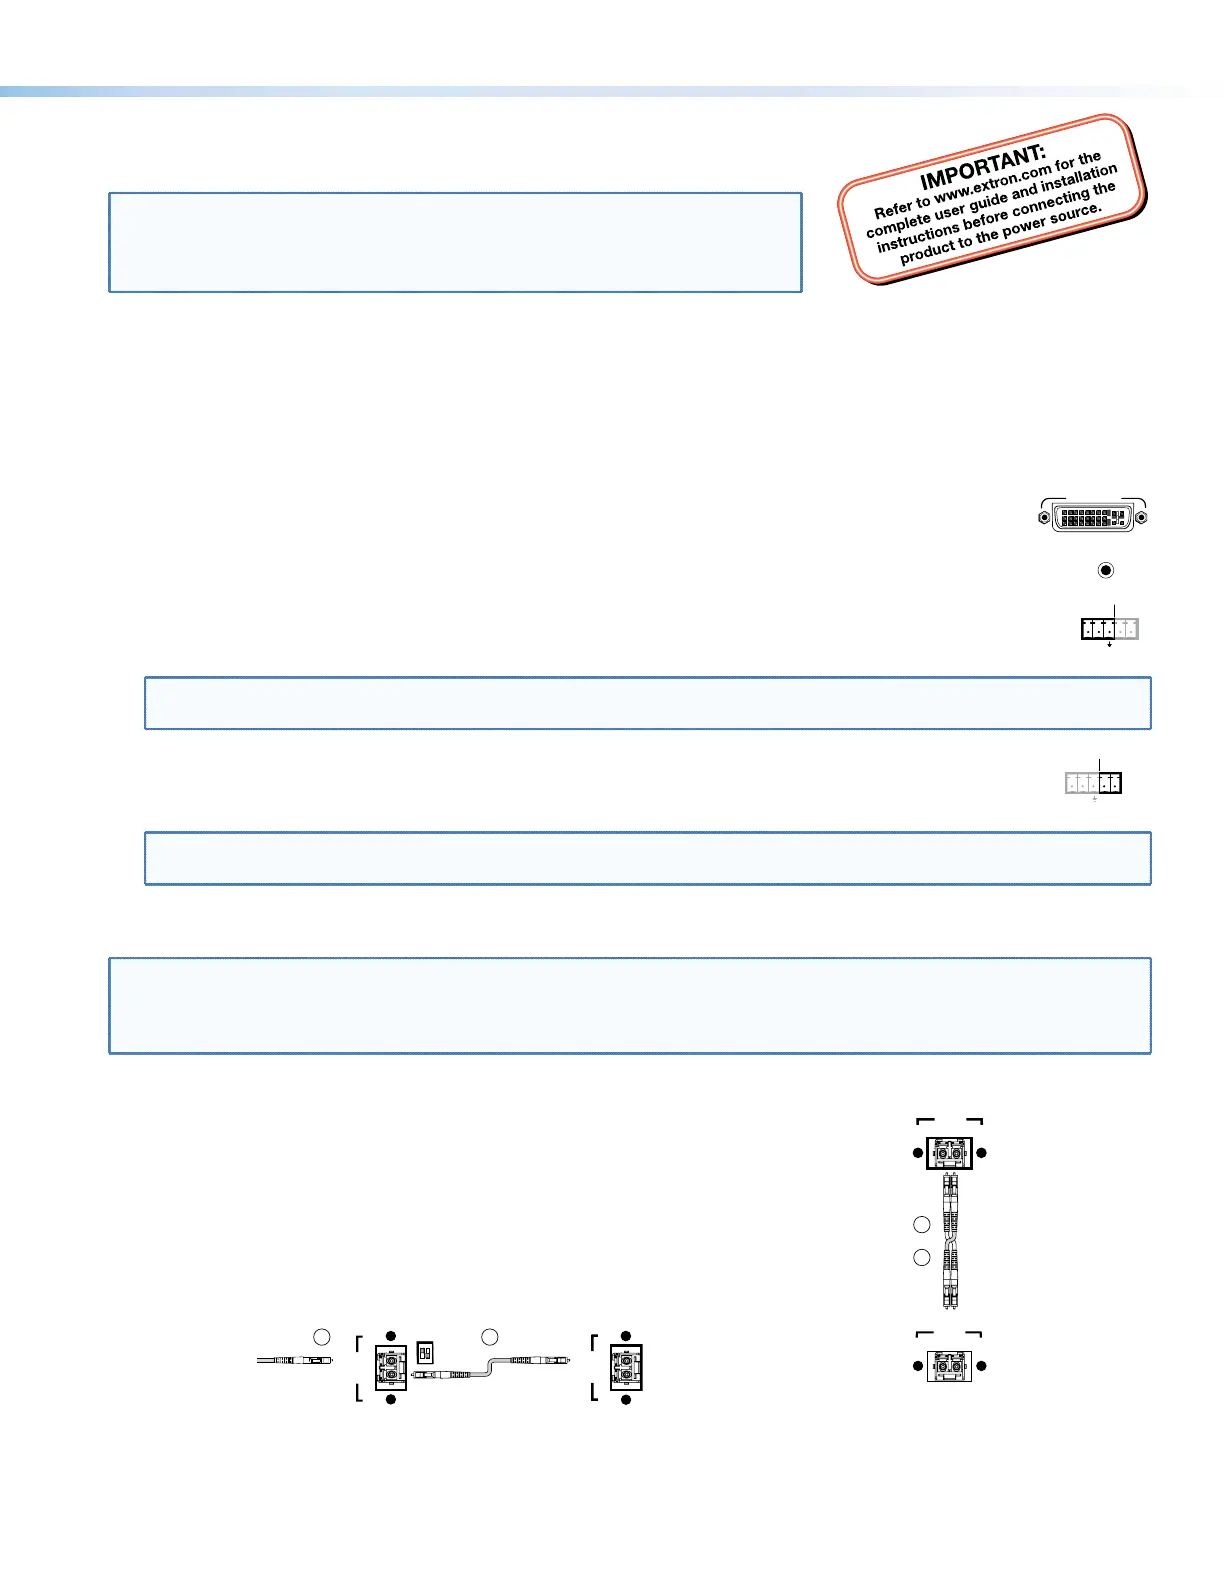
Step 2 — Input and Output Connections
a. ConnectaDVIvideosourcetothetotheInputconnectoronthetransmitterandtheaDVIDisplaytothe
DVI-D INPUT
Ouput connectors on the receiver.
b. Connect unbalanced stereo or mono audio input and an audio output device to the 3.5 mm mini jack audio
AUDIO
ports on both units.
c. IfyouwanttheFOXBOXunitstopassserialdataorcontrolsignals,suchasforserialcontrolofaprojector,
ALARM
Tx Rx1 2
RS-232
OVER FIBER
connectthemasterdevicetothetransmitterandtheslavedeviceusingtherstthreepolesoftheRS-232
OverFiber/Alarm5-polecaptivescrewconnectorsonbothunits.
NOTE:ForRS-232responses(fromthereceivertothetransmitter),youmustinstallthecableinstep3b and leave
the receiver in normal configuration.
d. Forremotemonitoringofthestatusoftheopticallinks,connectalocallyconstructedorobtaineddeviceto
RS-232
OVER FIBER
ALARM
Tx Rx1 2
thetwoAlarmpolesoftheunits’RS-232OverFiber/Alarm5-polecaptivescrewconnectors.Thetwopoles
are shorted together when no light is detected.
NOTES:TheAlarmportonthetransmitterreportsthestatusoftheRxlightlink.
The Alarm port on the receiver reports the status of the Tx light link.
Step 3 — Throughput Connections
NOTE:Youcanconnectthetransmitterandoneormorereceiversinoneofthreeways:
•Oneway(transmittertoreceiver)only,performstep3a.
•Twoway(transmittertoreceiverandreturn),performsteps 3a and 3b.
•Oneway(transmittertoreceiver)withdaisychain(receivertoreceiver),performsteps3a and 3c.
a. ConnectabercablebetweentheTxportonthetransmitterandtheRxporton
the receiver.
OPTICAL
TxRx
LINK
LINK
OPTICAL
TxRx
LINK
LINK
and
Transmitter
Receiver
3a
3b
b. Ifyouwantthereceivertosendreturnserialdata(suchasresponsesfroma
controlleddevice)tothetransmitter,connectabercablebetweentheTxport
onthereceiverandtheRxportonthetransmitter.
c. Ifyouwantareceivertodaisychaintheopticalsignaltoanotherreceiver(upto
10receiversinadaisychain):
zConnecttheTxportonthereceivertotheRxportonanotherreceiver.
zSettheModeDIPswitch1uponrstreceiver.
OPTICAL
TxRx
LINK
LINK
From Transmitter or
Daisy Chaining Receiver
MODE
12
Receiver
Receiver
3a3c
OPTICAL
LINK
LINK
TxRx
1
FOXBOXDVIPlus•SetupGuide
Produktspezifikationen
| Marke: | Extron |
| Kategorie: | WLAN-Repeater |
| Modell: | FOXBOX Tx DVI Plus MM |
| Breite: | 109 mm |
| Tiefe: | 152 mm |
| Gewicht: | 300 g |
| Produktfarbe: | Grau |
| Höhe: | 25 mm |
| AC Eingangsspannung: | 100-240 V |
| AC Eingangsfrequenz: | 50-60 Hz |
| Betriebstemperatur: | 0 - 50 °C |
| Relative Luftfeuchtigkeit in Betrieb: | 10 - 90 % |
| Verpackungsbreite: | 313 mm |
| Verpackungstiefe: | 222 mm |
| Verpackungshöhe: | 64 mm |
| Paketgewicht: | 1040 g |
| Zertifizierung: | CE, c-UL, FDA 1, UL, C-tick, FCC A, ICES, VCCI |
| Stromverbrauch (Standardbetrieb): | 12 W |
| Typ: | Netzwerksender |
| Gehäusematerial: | Metall |
| LED-Anzeigen: | Ja |
| Temperaturbereich bei Lagerung: | -40 - 70 °C |
| Luftfeuchtigkeit bei Lagerung: | 10 - 90 % |
| Ausgangsstrom: | 1 A |
| Ausgangsspannung: | 12 V |
| Maximal mögliche Übertragungsstrecke: | 30000 m |
| Datenübertragungsrate: | 4950 Mbit/s |
| Optischer Kabelverbinder: | LC |
Brauchst du Hilfe?
Wenn Sie Hilfe mit Extron FOXBOX Tx DVI Plus MM benötigen, stellen Sie unten eine Frage und andere Benutzer werden Ihnen antworten
Bedienungsanleitung WLAN-Repeater Extron

6 September 2024
6 September 2024
5 September 2024
5 September 2024
5 September 2024
Bedienungsanleitung WLAN-Repeater
Neueste Bedienungsanleitung für -Kategorien-
17 März 2026
14 März 2026
13 März 2026
12 März 2026
11 März 2026
9 Februar 2026
6 Februar 2026
5 Februar 2026
4 Februar 2026
4 Februar 2026