Extron ZipClip 400 Bedienungsanleitung
Extron Nicht kategorisiert ZipClip 400
Lies die bedienungsanleitung für Extron ZipClip 400 (2 Seiten) kostenlos online; sie gehört zur Kategorie Nicht kategorisiert. Dieses Handbuch wurde von 47 Personen als hilfreich bewertet und erhielt im Schnitt 4.6 Sterne aus 2 Bewertungen. Hast du eine Frage zu Extron ZipClip 400 oder möchtest du andere Nutzer dieses Produkts befragen? Stelle eine Frage
Seite 1/2
1
IMPORTANT:
I
I
I
IM
M
M
MP
P
P
PO
O
O
ORT
RT
RT
RTA
A
A
AN
N
N
NT:
T:
T:
T:
Go to www.extron.com for the
complete user guide, installation
instructions, and specifications.
ZipClip400/ZipCaddy400 • Installation Guide
w
w
w
w
w
w
w
w
w
w
e
e
e
e
e
e
e
e
e
e
ZipClip 400ZipCad 400dy
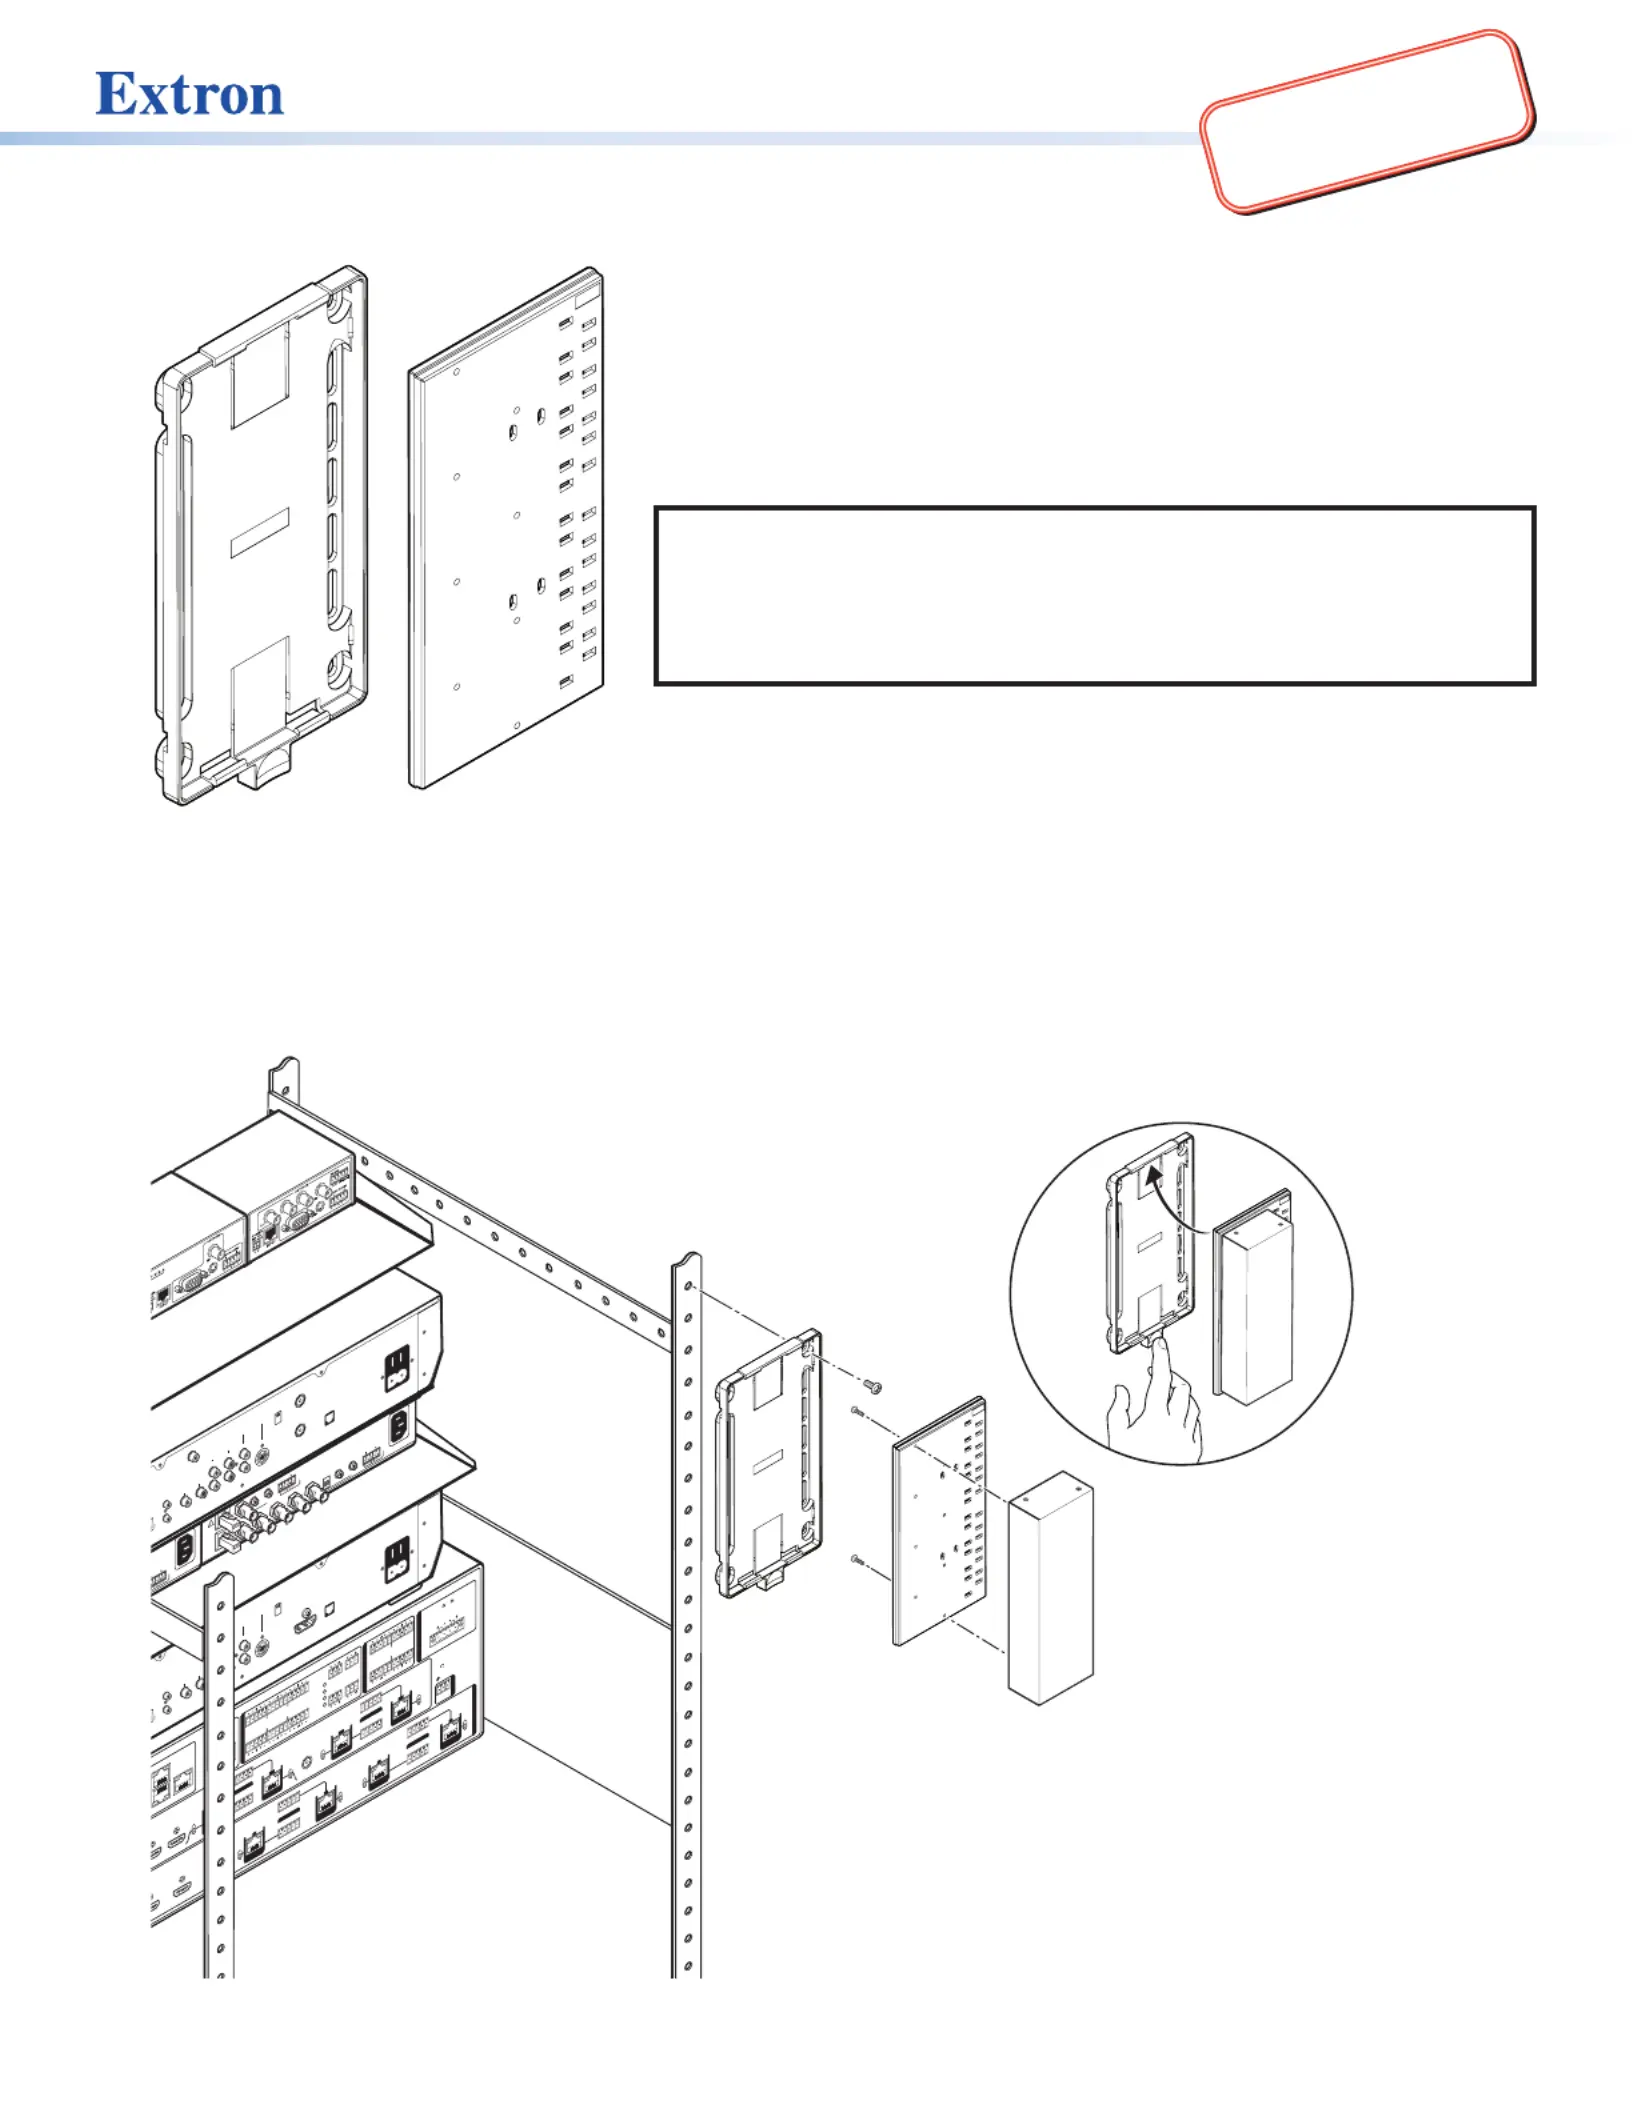
Figure 1. Front and Side View of the
ZipClip 400/ZipCaddy 400
The ZipClip400/ZipCaddy400 mounting kit is a plastic mounting kit allowing
1/2, 1/4, and 1/8 rack width, 3 inches (76 mm) or select 6 inches (152 mm) deep
Extron enclosures and select small form factor PCs to be securely and easily
mounted to various surfaces, such as under a table, on a rack rail system (side or
back), or in a lectern.
The ZipCaddy400 has two sides with a step groove to allow the edges to snap
into the ZipClip400. The ZipCaddy400 disengages with a press of the lever tab
on the ZipClip400.
NOTES:
• A 1/2 rack product takes up the entire ZipCaddy400 plate. Multiple 1/4
and 1/8 products fit onto the ZipCaddy400 side-by-side.
• Included cable ties are used to secure cables to the ZipCaddy400 (see
figure5 on page2).
Included Parts:
• (1) ZipClip400
• (1) ZipCaddy400
• (4) Cable tie wraps
• (4) Product mounting #4-40 screws
• (4) ZipClip mounting #12 wood screws
• Installation guide
Installing Device Onto a Rack
1
LR
5A6A
XTP
RS-2
32 IR
TxRxTxRx
G
Tx
RxG
RESET
XTP
DTP
XTP
DTP
+48V
MIC/LINE
113
24
2
3
4
LAN 2
LAN 1
LAN 3
DTP
HDBT
578
4
CLASS 2 WIRING
8/
OVER TP
REMOTE
SIG
LINK
IN
SI
G
L
IN
K
IN
AUDIO INPUTS
AUDIO OUTPUTS
AMP OUTPUT
INPUTS
RS-232 IR
TxRxTxRx
G
RS-232 IR
T
xRxT
xRx
G
XTP
DTP
XTP
DTP
910
OVER TP
S
I
G
LIN
K
IN
SIG LINK
IN
RS-232 IR
TxRxTxRxG
1
LR
1
LR
3
LR
3
LR
5
LR
2
LR
4
LR
2
LR
4
LR
6
LR
S
I
G
LI
NK
OUT
6B6
RS-
232 IR
xRxTxRx
XTP
S/PDIF
OUT
DTPHDBT
G
RS-232 IR
xRxT
xRx
G
OVER TP
XTP
DTP
HDBT
SIG LINK
OUT
SIG LINK
OUT
78
RS-232 IR
TxRxTxRx
XTP
DTP
HDBT
G
RS-232 IR
TxRxTxRx
G
OVER TP
CONTROL S
IN
OUTO)
VIDEOS VIDEO
TEL LINE
HDMIAC IN
AC OUT
A
AUDIO 3
OUT
LR
B O
RGB INP
AUDIO
VDEO
HV
A
AUDIO
LRB
A
LRB
ISOGC SYNC
50/60 Hz
B
50/60 Hz
CONTROL S
IN
OUT(MONO)
LR
AUDIOVIDEOS VIDEOCH 3
CH 4
VHF/UHF
VHF(SAT)/UHF
IN
OUT
TEL LINE
AC IN
AC OUT
A
RF REMOTE
AUDIO 3
OUT
LR
e
e
e
e
e
e
e
e
e
e
w
w
w
w
w
w
w
w
w
w
e
e
e
e
e
e
e
e
e
e
w
w
w
w
w
w
w
w
w
w
Back of Rack
ZipClip 400
ZipCaddy 400
1
2
3
1/2-rack product
shown
Figure 2. Installation onto the Back of a Rack.
1. Install the ZipClip400 to the rack (see figure2,
1
). Rack screws are
not provided.
2. Secure the rack product, products, or small PC to the ZipCaddy400
with the provided #4-40 product mounting screws (
2
).
3. To install, insert the ZipCaddy400 onto the ZipClip 400 and click
into place (
3
).
To remove, press down on the ZipClip400 tab.
Produktspezifikationen
| Marke: | Extron |
| Kategorie: | Nicht kategorisiert |
| Modell: | ZipClip 400 |
Brauchst du Hilfe?
Wenn Sie Hilfe mit Extron ZipClip 400 benötigen, stellen Sie unten eine Frage und andere Benutzer werden Ihnen antworten
Bedienungsanleitung Nicht kategorisiert Extron

25 März 2026
28 Februar 2026
3 Februar 2026
2 Februar 2026
2 Februar 2026
25 November 2025
24 November 2025
11 November 2025
11 November 2025
7 Oktober 2025
Bedienungsanleitung Nicht kategorisiert
Neueste Bedienungsanleitung für -Kategorien-
3 April 2026
3 April 2026
3 April 2026
3 April 2026
3 April 2026
3 April 2026
3 April 2026
3 April 2026
3 April 2026
3 April 2026