Forte Lighting 2748-05 Bedienungsanleitung
Forte Lighting Beleuchtung 2748-05
Lies die bedienungsanleitung für Forte Lighting 2748-05 (1 Seiten) kostenlos online; sie gehört zur Kategorie Beleuchtung. Dieses Handbuch wurde von 12 Personen als hilfreich bewertet und erhielt im Schnitt 4.4 Sterne aus 5 Bewertungen. Hast du eine Frage zu Forte Lighting 2748-05 oder möchtest du andere Nutzer dieses Produkts befragen? Stelle eine Frage
Seite 1/1
F
G
A
E
D
C
B
INSTALLATION
INSTALLATION
INSTALLATION
INSTALLATION INSTALLATION INSTRUCTIONS
INSTRUCTIONS
INSTRUCTIONS
INSTRUCTIONS INSTRUCTIONS
For Model 2748-05
For Model 2748-05
For Model 2748-05
For Model 2748-05 For Model 2748-05
READ AND SAVE THESE INSTRUCTIONS
READ AND SAVE THESE INSTRUCTIONS
READ AND SAVE THESE INSTRUCTIONS
READ AND SAVE THESE INSTRUCTIONSREAD AND SAVE THESE INSTRUCTIONS
These instructions are provided for your safety. It is essential to read them carefully and completely before installing the light
fixture. We strongly suggest that all direct-wired fixtures be installed by a qualified, licensed electrician.
ASSEMBLING T
ASSEMBLING T
ASSEMBLING T
ASSEMBLING TASSEMBLING THE FIXT
HE FIXT
HE FIXT
HE FIXTHE FIXTURE
URE
URE
URE URE
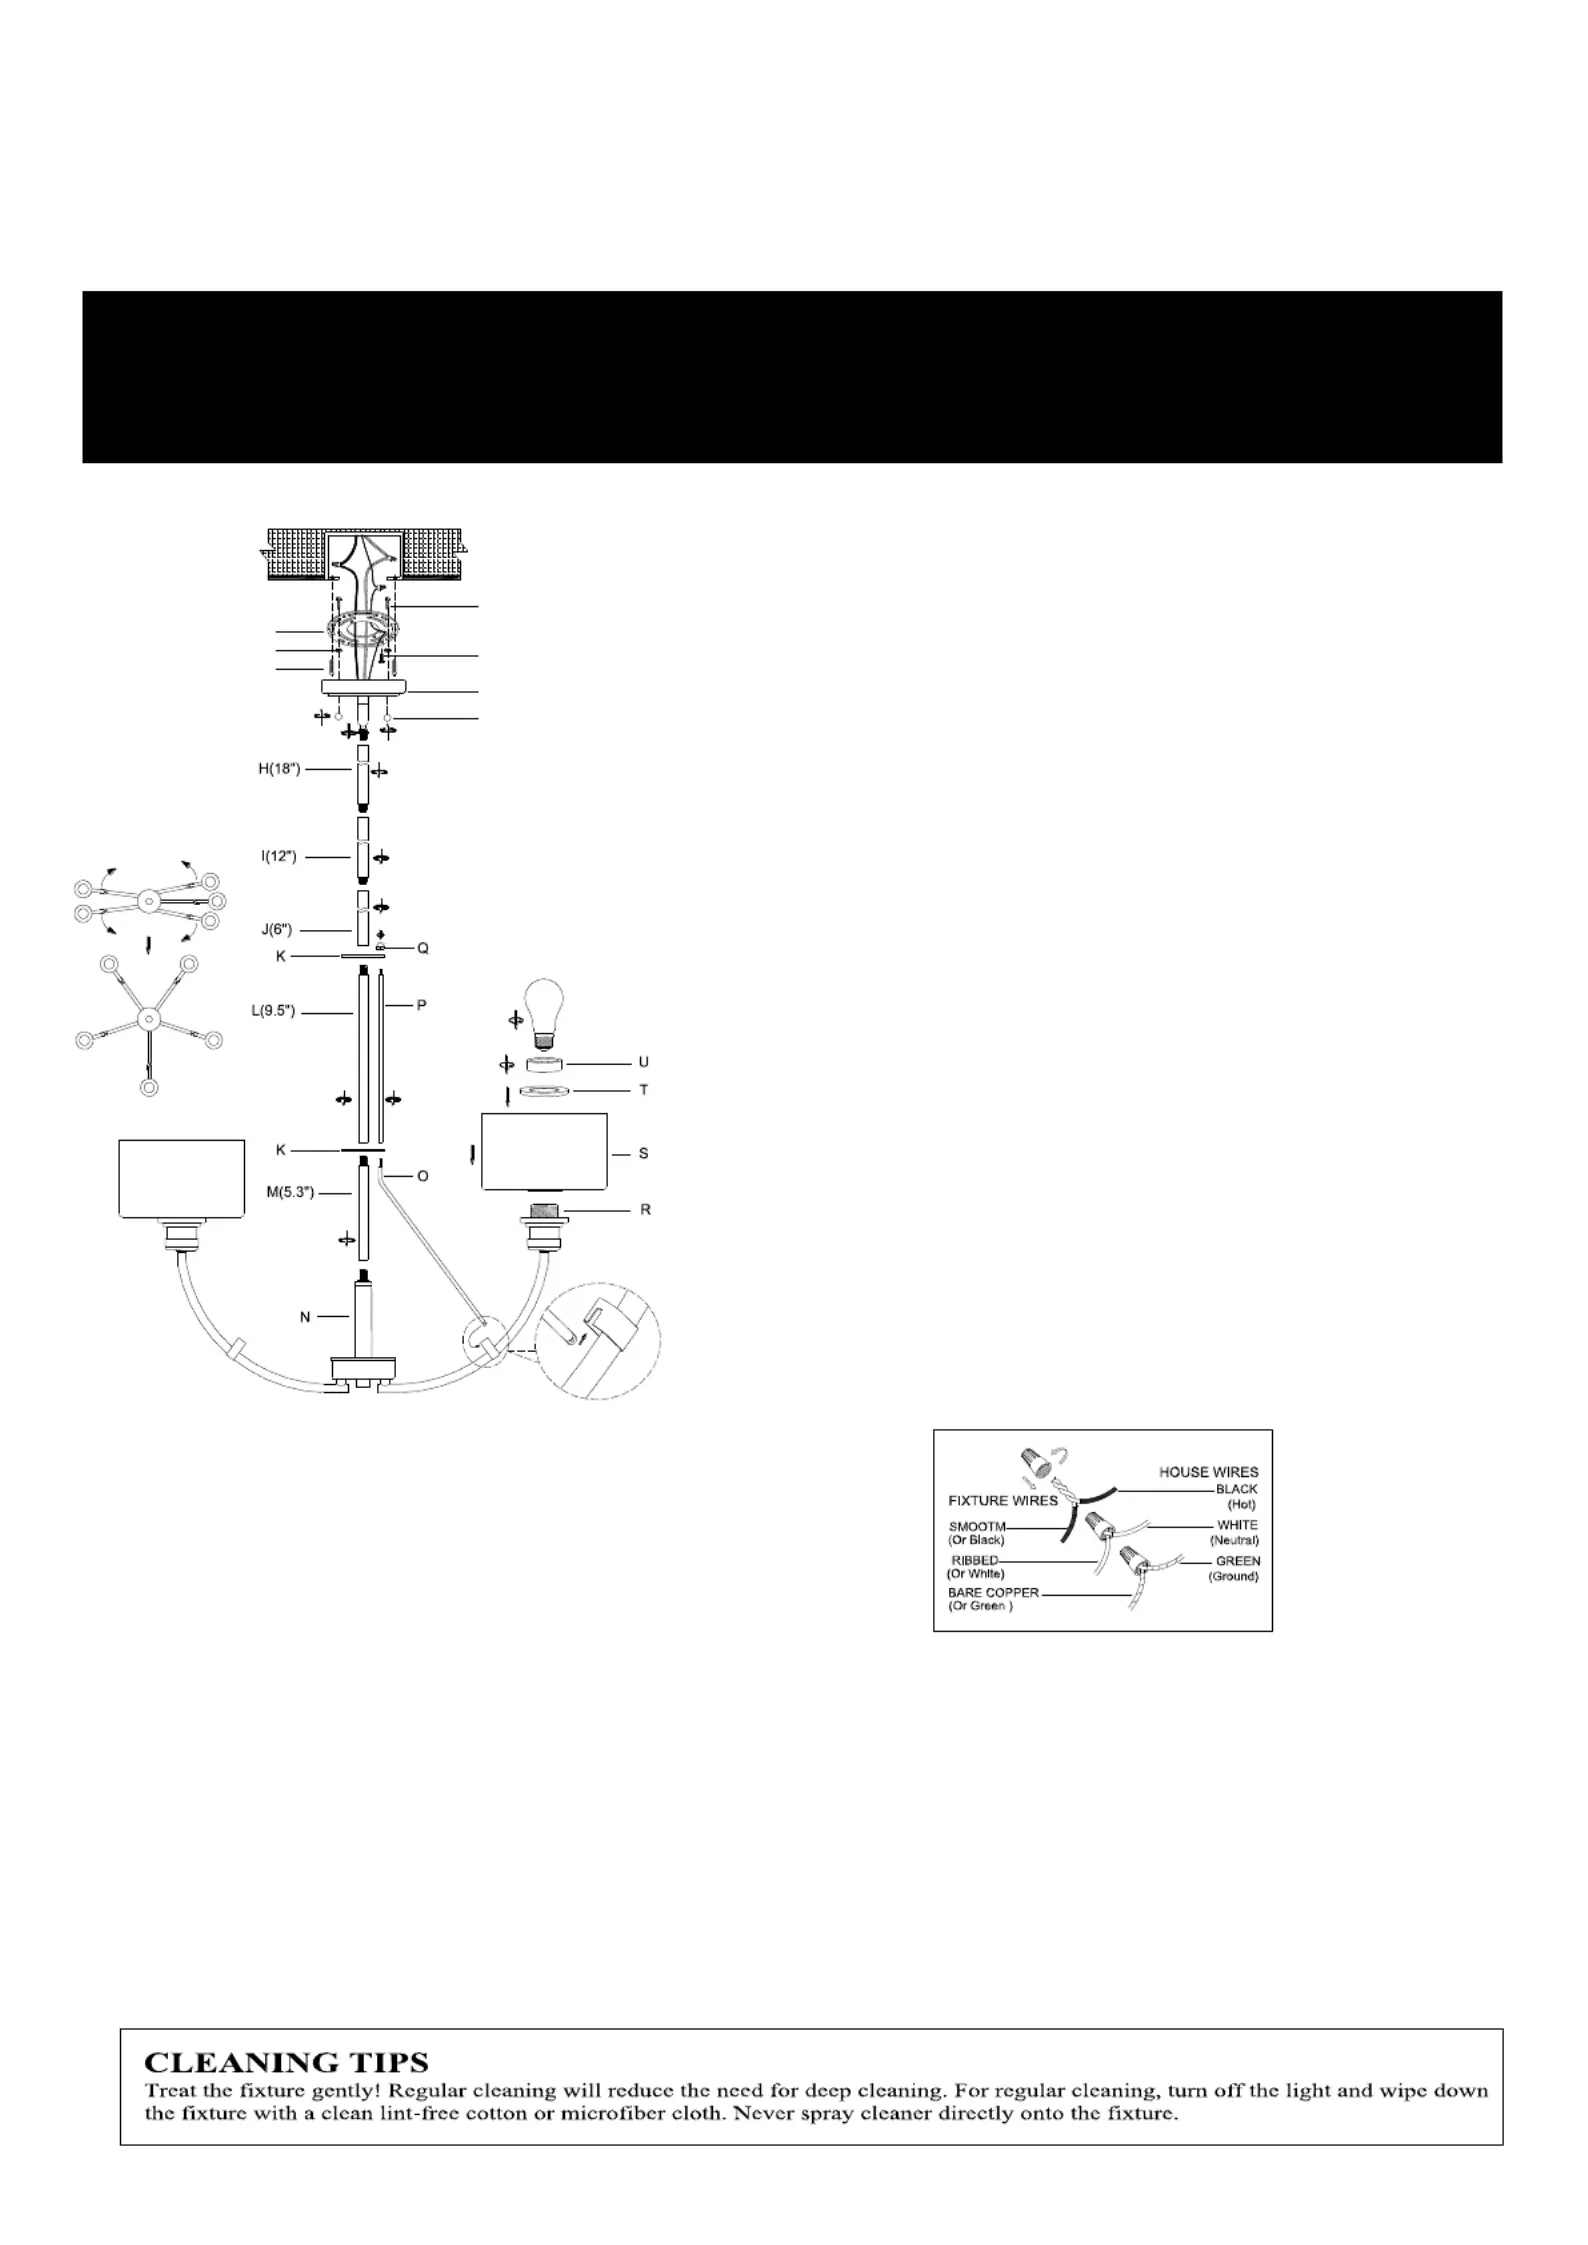
Rotate the top and bottom arms of the fixture so they are equally
spaced around the fixture. Note: if the fixture does not hang straight,
it is normally due to the unequal arm space.
Screw and tighten the rod (M) into the bolt on the column (N).
Place the round plate (K) on top of the rod (M). Screw the rod (L)
onto rod (M). Draw one end of the wire (O) into the U groove on
the lamp arm and insert the other end with elbow into the hole on
the plate (K). Screw the metal wire (P) to connect with the wire (O).
Place the upper metal piece (K) onto the long rod (L) and the metal
wire (P). Lock the wire (P) and plate (K) with nut (Q). Screw and
tighten the 6”” rod (rod (J) onto the 9.5L). The rod (H) and (I) can
use one or both according to the height of the ceiling.
CONNECTING T
CONNECTING T
CONNECTING T
CONNECTING TCONNECTING THE WIR
HE WIR
HE WIR
HE WIRHE WIRES
ES
ES
ES ES
Attach the fixture’s wire to the power supply wires at the junction
boxConnect the black wire to the black wire (or smooth), the .
white wire to the white (or ribbed) t ground wire to the ground he
wire (green or copper). Twist the end of the wire pairs together
and twist on a wire connector. Make sure all twists are in the same
direction. If there is no ground wire (green or copper) from the
junction box, locate the ground screw (E) on the mounting plate (B)
and wrap the fixtures ground wire around the green ground screw ’
(E). Use a screwdriver to secure the ground screw (E) onto the
mounting bracket. Tuck all wires neatly into the junction box.
PREPARING FOR
PREPARING FOR
PREPARING FOR
PREPARING FOR PREPARING FOR INSTA
INSTA
INSTA
INSTAINSTALLATION
LLATION
LLATION
LLATIONLLATIONS
S
S
S S
Remove all contents from the carton. See the important notes
above. Shut off the power at the circuit breaker and completely
remove the old fixture from the ceiling, including the old
mounting strap.
The mounting plate (B) contains several pairs of threaded holes.
Find holes that match the spacing of the holes on the junction box
and your fixtures canopy (F). ’
Two mounting screws (A) should be attached to the mounting
plate (B). You may need to tighten the nuts that hold these screws
in place. Pull the house wires through the center of the mounting
plate (B). Place the mounting plate (B) over the junction box to
align with the holes on the fixtures canopy (F). Secure the ’
mounting plate (B) to the junction box by securely tightening the
mounting screws (D).
FINISHING T
FINISHING T
FINISHING T
FINISHING TFINISHING THE INST
HE INST
HE INST
HE INSTHE INSTALLATION
ALLATION
ALLATION
ALLATIONALLATIONS
S
S
S S
Place the canopy (F) to the ceiling and secure the canopy nuts (G)
to the mounting plate (B) in place. Secure the glass (S) and the
metal washer (T) onto the socket by screwing socket ring (U) until
it is tightened. Adjust the glass to level. Install light bulb(s) (not
included) accordance with the fixtures specifications. Do not ’
exceed the recommended maximum wattage.
Your installation is now complete. Turn on the power and test the
fixture.
WARNING! SHUT POWER OFF AT FUSE OR CIRCUIT BREAKER
BEFORE INSTALLATION
AVERTISSEMENT! COUPER LE COURANT AU NIVEAU DES FUSIBLES OU DU DISJONCTEUR.
Produktspezifikationen
| Marke: | Forte Lighting |
| Kategorie: | Beleuchtung |
| Modell: | 2748-05 |
Brauchst du Hilfe?
Wenn Sie Hilfe mit Forte Lighting 2748-05 benötigen, stellen Sie unten eine Frage und andere Benutzer werden Ihnen antworten
Bedienungsanleitung Beleuchtung Forte Lighting

18 Februar 2026
17 Februar 2026
10 Februar 2026
8 Februar 2026
7 Februar 2026
7 Februar 2026
6 Februar 2026
6 Februar 2026
6 Februar 2026
2 Februar 2026
Bedienungsanleitung Beleuchtung
Neueste Bedienungsanleitung für -Kategorien-
1 April 2026
1 April 2026
1 April 2026
1 April 2026
1 April 2026
1 April 2026
1 April 2026
1 April 2026
1 April 2026
1 April 2026