GE A1456W Bedienungsanleitung
GE Digitalkameras A1456W
Lies die bedienungsanleitung für GE A1456W (2 Seiten) kostenlos online; sie gehört zur Kategorie Digitalkameras. Dieses Handbuch wurde von 29 Personen als hilfreich bewertet und erhielt im Schnitt 4.4 Sterne aus 7 Bewertungen. Hast du eine Frage zu GE A1456W oder möchtest du andere Nutzer dieses Produkts befragen? Stelle eine Frage
Seite 1/2
2
Insérer la batterie
1. Ouvrez le compartiment de la batterie .
2. Insérez le batteries dans le créneau de la batterie en suivant la direction de la
polarité.
3. Fermez le compartiment de la batterie.
4
Prendre une photo
1. Maintenir fermement l'appareil photo.
2. Composer votre image depuis l'écran LCD.
3. Appuyer a moitié sur le bouton de l'obturateur pour faire la mise au point sur
le sujet au centre de l'image, puis appuyer a fond sur le bouton de l'obturateur
pour prendre la photo.
5
Utilisation du bouton Mode
La caméra possède un bouton Mode pratique qui permet de changer facilement
entre les diérents modes.
Appuyez sur le bouton Gauche/Droite pour choisir le mode,appuyez sur pour
conrmer.
Mode autoMode ASCN
Mode manuelMode paysage
PanoramaMode lm
Mode PortraitStabilisation
6
Utilisation des touches du menu
L’appareil photo dispose de touches de menu appropriées vous permettant de
procéder plus rapidement aux réglages de prise de vue et de l'appareil photo.
Appuyez sur la touche gauche/droite pour trouver le type de menu désiré puis sur les
touches bas et respectivement pour le sélectionner et le valider.
Réglage photoInstallation générale
Réglage lmTransmission
Réglage LectureFichier/logiciel
7
Acher votre image
1. Appuyez le bouton Lecture.
2. Utiliser les boutons gauche/droite pour passer d'une photo à une autre.
3
Régler la date, l’heure et la langue
1. Appuyer sur Marche/arrêt pour mettre l'appareil sous tension. Le menu Langue
apparaît, utiliser les boutons gauche/droite, haut/bas pour sélectionner la
langue, puis appuyer sur pour conrmer votre choix.
2. Utiliser à nouveau les boutons gauche/droite, haut/bas pour régler la date et
l'heure, appuyer ensuite sur pour conrmer.
1
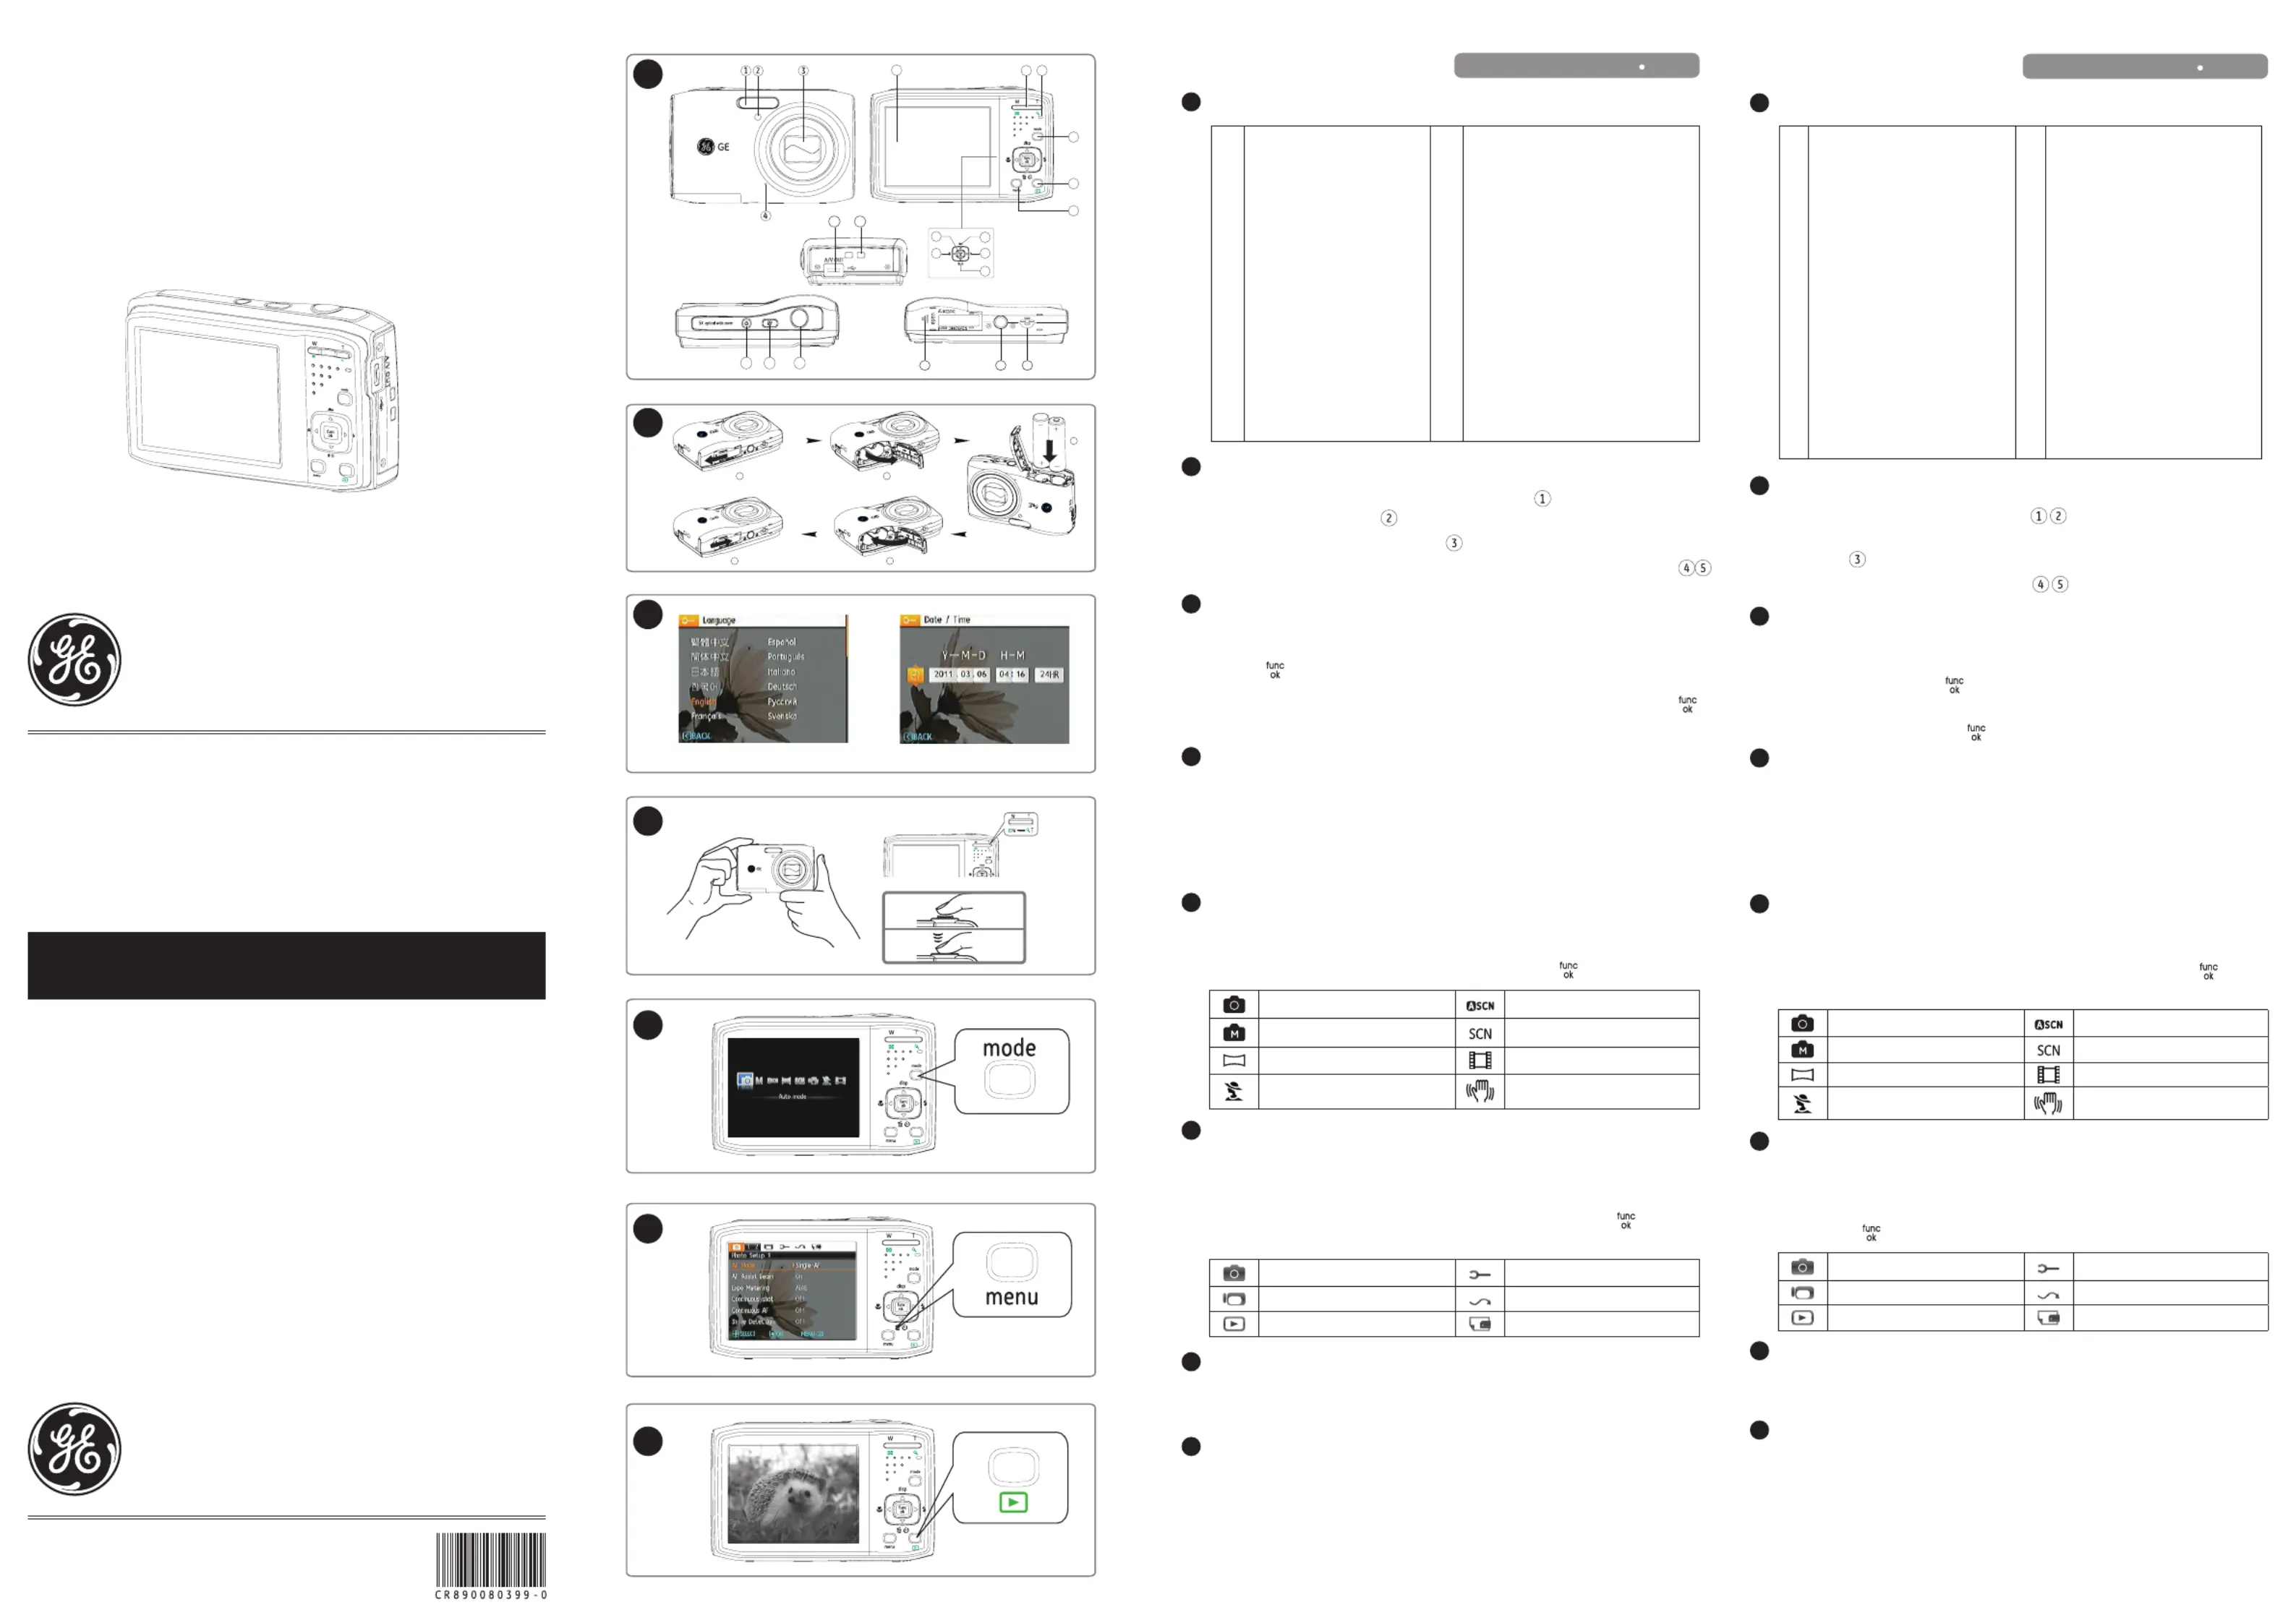
Vues de l’appareil photo
Guide de Mise en route
Français
1Flash13Touche Supprimer / Retardateur / Bas
2Assistant AF / Indicateur de compteur14Touche de prise de vue rapprochée/
Gauche
3Objectif15Fonction/Bouton OK
4Micro16Port USB / AV
5Ecran LCD17Bracelet
6Bouton de zoom18Bouton d’alimentation
7Indicateur d'état19Bouton d’enregistrement
8Bouton de sélection du mode20Déclencheur
9Bouton Lecture21Fente pour carte mémoire / Compartiment
de batterie
10Bouton Menu22Douille pour trépied
11Bouton Haut/Bas23Haut-parleur
12Bouton Mode Flash / Droite
GE Digital Camera
A Series : A1456W
© 2011 General Imaging Company
© 2011 General Imaging Company
http://www.ge.com/digitalcameras
1
Camera Views
2
Inserting the battery
1. Slide open the battery cover in the direction shown then lift the cover the
direction shown in gure .
2. Insert the battery as shown in gure
.
3. Close the battery cover and slide it to the right to lock it as shown in gures
.
1. At initial startup, press power to turn on the camera and the language menu
will appear.Use the Up/Down/Left/Right button to select a language, then
press to conrm the language.
2. Use the Up/Down/Left/Right button again to set the date and time, and press
to conrm.
3
Setting the Date/Time/Language
4
Taking a picture
1. Hold the camera securely.
2. Press the Zoom wheel on either the Tele or Wide position of the camera to zoom
in or out of your subject while taking pictures.
3. Press the shutter button halfway to focus on the subject then press the button
fully to take a picture.
5
Using the Mode Button
The camera provides a convenient mode button that allows you to switch easily
between dierent modes.
Press the Left/Right button to choose the mode, then press to conrm.
Auto modeASCN mode
Manual modeScene mode
Panorama modeMovie mode
Portrait ModeStabilization mode
Quick Start Guide English
7
Viewing your picture
1. Press the Playback button to switch to Playback mode.
2. Use the Left/Right button to browse through your photos.
6
Using the menu button
The camera has a quick and easy menu button to allow you to adjust the shooting
options and camera settings.
Press the Left/Right button to switch between menu types, then press the Down
button to select the page with the function you want to adjust. Press to
conrm.
Photo setting menuBasic setting menu
Recording setting menu Link setting menu
Playback setting menuFile and software setting menu
1Flash Lamp13
Delete button/Self-timer button/ Down
button
2AF Assist/Timer Indicator14Close-up shooting button/Left button
3Lens15Function/OK Button
4Microphone16USB/AV Port
5LCD Screen17Wrist Strap
6Zoom Button18Power Button
7
Status Indicator
19Recording button
8Mode Selection Button20Shutter Button
9Playback Button21Card Slot/Battery Compartment
10Menu Button22Tripod Socket
11Disp/Up Button23Speaker
12Flash Mode/Right Button
8
User Manual
To view the user manual, please connect the camera to your computer. A window
will launch with instructions for retrieving the manual and other software for the
camera. Note: You need to have internet service to retrieve these les. If you do not
have internet service, please contact the customer service department (located
on the warranty card) to obtain a free copy. Troubleshooting: If the window doesn’
t automatically launch, check to see if Antivirus or Security software is blocking the
application. Otherwise, contact customer service department.
8
Manuel d’utilisation
Pour plus d’informations concernant le mode d’emploi, veuillez connecter l’appareil
à un ordinateur.Une fenêtre s’ouvrira, avec des instructions pour récupérer le
manuel d’utilisation et d’autres logiciels pour votre caméra. Remarque: Vous
devez avoir accès à Internet pour récupérer les chiers. Si vous n’avez pas accès
à Internet, vous pouvez appeler le service client au numéro indiqué sur la carte
de garantie pour obtenir un exemplaire gratuit du manuel.Dépannage: En cas de
problèmes, veuillez vérier si votre logiciel antivirus ou tout autre logiciel pare-feu
bloque l’application. Si ce n’est pas le cas, veuillez contacter le service client.
2
3
4
6
5
7
1
1
2
4
5
3
5
6
7
9
8
10
11
12
13
14
15
16
17
20
1918
212322
Produktspezifikationen
| Marke: | GE |
| Kategorie: | Digitalkameras |
| Modell: | A1456W |
| Bildschirmdiagonale: | 2.7 " |
| Eingebautes Mikrofon: | Ja |
| Bluetooth: | Nein |
| Breite: | 92.4 mm |
| Tiefe: | 30.35 mm |
| Gewicht: | 130 g |
| Mitgelieferte Kabel: | USB |
| Produktfarbe: | Silber |
| Akku-/Batterietyp: | AA |
| Akku-/Batterietechnologie: | Alkali |
| Höhe: | 60.5 mm |
| Energiequelle: | Akku |
| Betriebstemperatur: | 0 - 40 °C |
| Relative Luftfeuchtigkeit in Betrieb: | 0 - 90 % |
| Schnellstartübersicht: | Ja |
| Display: | LCD |
| HD-Typ: | Nicht unterstützt |
| Anzahl unterstützter Akkus/Batterien: | 2 |
| Unterstützte Videoformate: | MOV |
| Unterstützte Bildformate: | JPG |
| Akku-/Batteriespannung: | 1.5 V |
| USB-Version: | 2.0 |
| Megapixel (ca.): | 14.1 MP |
| Digitaler Zoom: | 6 x |
| Maximale Video-Auflösung: | - Pixel |
| Eingebauter Blitz: | Ja |
| Größe des Bildsensors: | 1/2.3 " |
| Kompatible Speicherkarten: | SD, SDHC |
| Max. Speicherkartengröße: | 32 GB |
| Video-Auflösung: | 320 x 240,640 x 480 Pixel |
| Speicherkapazität: | 50 MB |
| Fokus: | TTL |
| Brennweitenbereich: | 5.1 - 25.5 mm |
| Megapixel insgesamt: | 14.4 MP |
| Sensor-Typ: | CCD |
| Kamera-Typ: | Kompaktkamera |
| Maximale Bildauflösung: | 4320 x 3240 Pixel |
| Foto Auflösung(en): | 640 x 480,2048 x 1536,2592 x 1944,3264 x 2448,4320 x 2432,4320 x 2880 |
| Bildstabilisator: | Ja |
| Optischer Zoom: | 5 x |
| ISO-Empfindlichkeit: | 80,100,200,400,800,1600 |
| Belichtungssteuerung: | Programm AE |
| Belichtungskorrektur: | ± 2EV (1/3EV step) |
| Belichtungsmessung: | Centre-weighted, Spot |
| Automatische Belichtungsspeicherung (AE): | Ja |
| Akkulaufzeit (CIPA Standard): | 140 Schüsse |
| Kürzeste Verschlusszeit: | 1/2000 s |
| Längste Verschlusszeit: | 4 s |
| Blitz-Modi: | Flash off, Forced on, Red-eye reduction, Slow synchronization |
| Blitzreichweite (Weitwinkel): | 0.3 - 4.4 m |
| Blitzreichweite (Tele): | 0.5 - 3.4 m |
| PictBridge: | Ja |
| Weißabgleich: | Auto, Cloudy, Daylight, Fluorescent, Incandescent, Manual |
| Bildstile: | Beach, Children, Documents, Fireworks, Museum, Night landscape, Night portrait, Party (indoor), Portrait, Snow, Sports, Sunset |
| Aufnahmemodi: | Auto, Movie, Scene |
| Selbstauslöser Verzögerung: | - s |
| Kamera Wiedergabe: | Movie, Single image, Slide show |
| Handschlaufe: | Ja |
| Temperatur Betriebsumgebung: | 32 - 104 °F |
| Maximale Blendenzahl: | 5.2 |
| Minimum Brennweite (äquivalent 35 mm Kleinbild): | 28 mm |
| Maximum Brennweite (äquivalent 35 mm Kleinbild): | 140 mm |
| Minimale Blendenzahl: | 3.5 |
| Objektivaufbau (Elemente/Gruppen): | 7/7 |
| AF-Objekterkennung: | Gesicht |
| Makro-Fokusbereich (Weitwinkel): | 0.05 - ∞ m |
| Smile-Erkennung: | Ja |
| Manueller Fokusbereich (Weitwinkel): | 0.2 - ∞ m |
| Manueller Fokusbereich (tele): | 1 - ∞ m |
Brauchst du Hilfe?
Wenn Sie Hilfe mit GE A1456W benötigen, stellen Sie unten eine Frage und andere Benutzer werden Ihnen antworten
Bedienungsanleitung Digitalkameras GE

10 Oktober 2024
13 Juli 2024
12 Juli 2024
9 Juli 2024
6 Juli 2024
6 Juli 2024
8 Oktober 2022
8 Oktober 2022
8 Oktober 2022
Bedienungsanleitung Digitalkameras
Neueste Bedienungsanleitung für -Kategorien-
11 Oktober 2024
7 Oktober 2024
14 Juli 2024
14 Juli 2024
14 Juli 2024
14 Juli 2024
13 Juli 2024
13 Juli 2024
13 Juli 2024
12 Juli 2024