Hikvision DS-QAE0120G1R Bedienungsanleitung
Hikvision Lautsprecher DS-QAE0120G1R
Lies die bedienungsanleitung für Hikvision DS-QAE0120G1R (4 Seiten) kostenlos online; sie gehört zur Kategorie Lautsprecher. Dieses Handbuch wurde von 34 Personen als hilfreich bewertet und erhielt im Schnitt 4.9 Sterne aus 4 Bewertungen. Hast du eine Frage zu Hikvision DS-QAE0120G1R oder möchtest du andere Nutzer dieses Produkts befragen? Stelle eine Frage
Seite 1/4
AnalogCabinetSpeaker
QuickStartGuide
UD36270B-A
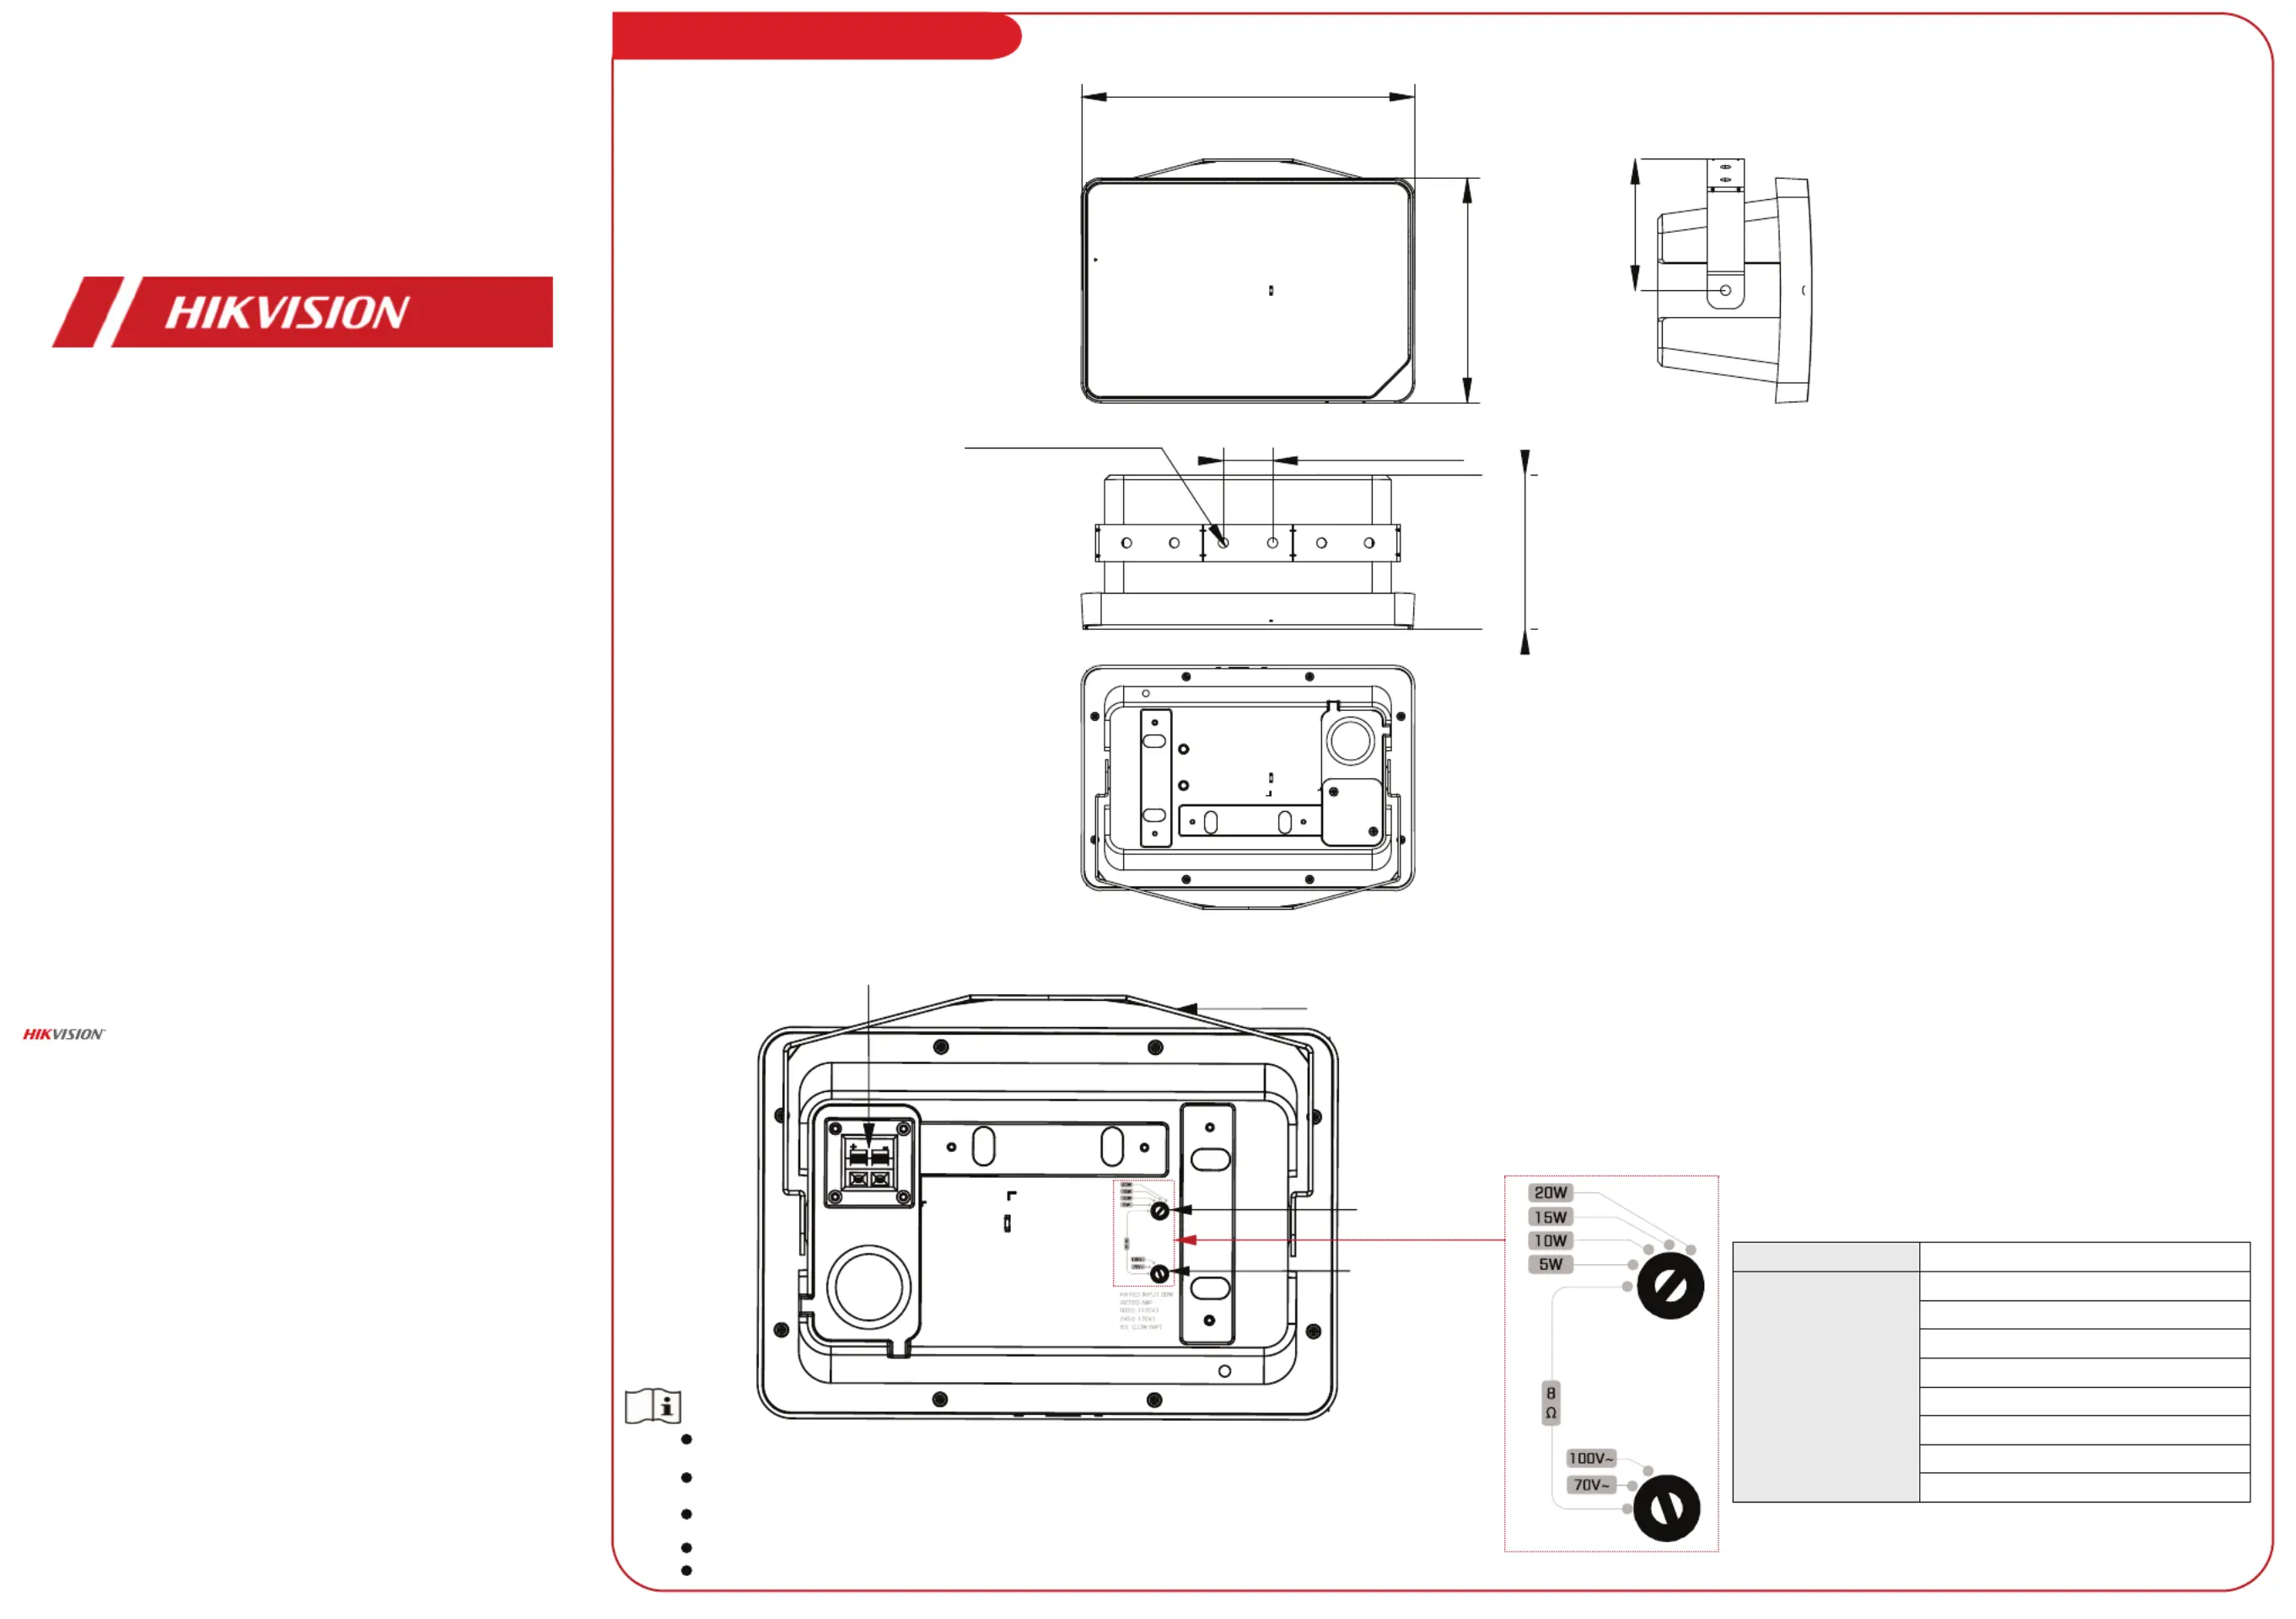
AppearanceandInterface
1
Dimensions
70V:20W/15W/10W/5WcomplieswiththerequirementsofEN54-24:2008standard,itcanactasa
component,specificallyasaloudspeaker,invoicealarmsystemsforfiredetectionandfirealarmsystems.
Whenthe
constantvoltageinputinterfaceis
connectedtothe100Vinput,thepowerknob2cannotbe
adjustedto70V.
Whenthe
constantvoltageinputinterfaceis
connectedtothe70Vinput,thepowerknob2cannotbe
adjustedto100V.
Whenthepowerknob1isadjustedto8Ω,thepowerknob2canonlybeadjustedto8Ω.
Whenthepowerknob2isadjustedto8Ω,thepowerknob1canonlybeadjustedto8Ω.
Rotatethepowerknob1andthepowerknob2tothe
correspondingsilk-screenedvalue.
Note
268.4mm(10.57”)
4-40mm(1.57”)
125.12mm(4.93”)
180.4mm(7.1”)
6-Ø8mm(0.32”)
106.21mm(4.18”)
BottomInterfaces
ConstantVoltageInputInterface
Bracket
PowerKnob1
PowerKnob2
AboutthisDocument
ThisDocumentincludesinstructionsforusingandmanagingtheProduct.Pictures,charts,images
andallotherinformationhereinafterarefordescriptionandexplanationonly.
TheinformationcontainedintheDocumentissubjecttochange,withoutnotice,duetofirmware
updatesorotherreasons.PleasefindthelatestversionoftheDocumentattheHikvisionwebsite
(https://www.hikvision.com).Unlessotherwiseagreed,HangzhouHikvisionDigitalTechnologyCo.,
Ltd.oritsaffiliates(hereinafterreferredtoas"Hikvision")makesnowarranties,expressorimplied.
PleaseusetheDocumentwiththeguidanceandassistanceofprofessionalstrainedinsupporting
theProduct.
AboutthisProduct
Thisproductcanonlyenjoytheafter-salesservicesupportinthecountryorregionwherethe
purchaseismade.
AcknowledgmentofIntellectualPropertyRights
Hikvisionownsthecopyrightsand/orpatentsrelatedtothetechnologyembodiedintheProducts
describedinthisDocument,whichmayincludelicensesobtainedfromthirdparties.
AnypartoftheDocument,includingtext,pictures,graphics,etc.,belongstoHikvision.Nopartofthis
Documentmaybeexcerpted,copied,translated,ormodifiedinwholeorinpartbyanymeans
withoutwrittenpermission.
andotherHikvision’strademarksandlogosarethepropertiesofHikvisioninvarious
jurisdictions.
Othertrademarksandlogosmentionedarethepropertiesoftheirrespectiveowners.
LEGALDISCLAIMER
TOTHEMAXIMUMEXTENTPERMITTEDBYAPPLICABLELAW,THISDOCUMENTANDTHEPRODUCT
DESCRIBED,WITHITSHARDWARE,SOFTWAREANDFIRMWARE,AREPROVIDED"ASIS"AND"WITH
ALLFAULTSANDERRORS".HIKVISIONMAKESNOWARRANTIES,EXPRESSORIMPLIED,INCLUDING
WITHOUTLIMITATION,MERCHANTABILITY,SATISFACTORYQUALITY,ORFITNESSFORAPARTICULAR
PURPOSE.THEUSEOFTHEPRODUCTBYYOUISATYOUROWNRISK.INNOEVENTWILLHIKVISION
BELIABLETOYOUFORANYSPECIAL,CONSEQUENTIAL,INCIDENTAL,ORINDIRECTDAMAGES,
INCLUDING,AMONGOTHERS,DAMAGESFORLOSSOFBUSINESSPROFITS,BUSINESSINTERRUPTION,
ORLOSSOFDATA,CORRUPTIONOFSYSTEMS,ORLOSSOFDOCUMENTATION,WHETHERBASEDON
BREACHOFCONTRACT,TORT(INCLUDINGNEGLIGENCE),PRODUCTLIABILITY,OROTHERWISE,IN
CONNECTIONWITHTHEUSEOFTHEPRODUCT,EVENIFHIKVISIONHASBEENADVISEDOFTHE
POSSIBILITYOFSUCHDAMAGESORLOSS.
YOUACKNOWLEDGETHATTHENATUREOFTHEINTERNETPROVIDESFORINHERENTSECURITYRISKS,
ANDHIKVISIONSHALLNOTTAKEANYRESPONSIBILITIESFORABNORMALOPERATION,PRIVACY
LEAKAGEOROTHERDAMAGESRESULTINGFROMCYBER-ATTACK,HACKERATTACK,VIRUSINFECTION,
OROTHERINTERNETSECURITYRISKS;HOWEVER,HIKVISIONWILLPROVIDETIMELYTECHNICAL
SUPPORTIFREQUIRED.
YOUAGREETOUSETHISPRODUCTINCOMPLIANCEWITHALLAPPLICABLELAWS,ANDYOUARE
SOLELYRESPONSIBLEFORENSURINGTHATYOURUSECONFORMSTOTHEAPPLICABLELAW.
ESPECIALLY,YOUARERESPONSIBLE,FORUSINGTHISPRODUCTINAMANNERTHATDOESNOT
INFRINGEONTHERIGHTSOFTHIRDPARTIES,INCLUDINGWITHOUTLIMITATION,RIGHTSOF
PUBLICITY,INTELLECTUALPROPERTYRIGHTS,ORDATAPROTECTIONANDOTHERPRIVACYRIGHTS.
YOUSHALLNOTUSETHISPRODUCTFORANYPROHIBITEDEND-USES,INCLUDINGTHE
DEVELOPMENTORPRODUCTIONOFWEAPONSOFMASSDESTRUCTION,THEDEVELOPMENTOR
PRODUCTIONOFCHEMICALORBIOLOGICALWEAPONS,ANYACTIVITIESINTHECONTEXTRELATED
TOANYNUCLEAREXPLOSIVEORUNSAFENUCLEARFUEL-CYCLE,ORINSUPPORTOFHUMANRIGHTS
ABUSES.
INTHEEVENTOFANYCONFLICTSBETWEENTHISDOCUMENTANDTHEAPPLICABLELAW,THE
LATTERPREVAILS.
©HangzhouHikvisionDigitalTechnologyCo.,Ltd.Allrightsreserved.
ConstantImpedancePowerKnob1&2:
8Ω
ConstantVoltage
PowerKnob2:
100V,
PowerKnob1:
20W
PowerKnob2:
100V,
PowerKnob1:
15W
PowerKnob2:
100V,
PowerKnob1:
10W
PowerKnob2:
100V,
PowerKnob1:
5W
PowerKnob2:
70V,
PowerKnob1:
20W
PowerKnob2:
70V,
PowerKnob1:
15W
PowerKnob2:
70V,
PowerKnob1:
10W
PowerKnob2:
70V,
PowerKnob1:
5W
Produktspezifikationen
| Marke: | Hikvision |
| Kategorie: | Lautsprecher |
| Modell: | DS-QAE0120G1R |
Brauchst du Hilfe?
Wenn Sie Hilfe mit Hikvision DS-QAE0120G1R benötigen, stellen Sie unten eine Frage und andere Benutzer werden Ihnen antworten
Bedienungsanleitung Lautsprecher Hikvision

2 August 2025
2 August 2025
1 August 2025
Bedienungsanleitung Lautsprecher
Neueste Bedienungsanleitung für -Kategorien-
3 April 2026
3 April 2026
3 April 2026
3 April 2026
2 April 2026
2 April 2026
2 April 2026
2 April 2026
2 April 2026
2 April 2026