Infinity Modulus MCC 1 Bedienungsanleitung
Infinity Lautsprecher Modulus MCC 1
Lies die bedienungsanleitung für Infinity Modulus MCC 1 (1 Seiten) kostenlos online; sie gehört zur Kategorie Lautsprecher. Dieses Handbuch wurde von 23 Personen als hilfreich bewertet und erhielt im Schnitt 4.2 Sterne aus 4 Bewertungen. Hast du eine Frage zu Infinity Modulus MCC 1 oder möchtest du andere Nutzer dieses Produkts befragen? Stelle eine Frage
Seite 1/1
11
2
3
4
5
6
7
8
9
17
00545
15
10
16
GRN
+
GRN/BLK
—
GRN
+
GRN/BLK
—
NETWORK
MODCTRNET
RED+
BLK
—
WOOFER
MODCTRWFR
or
336545-002
WOOFER
MODCTRWFR
or
336545-002
TWEETER
MODSATTWT
or
336417-001
GRN
+
YEL
—
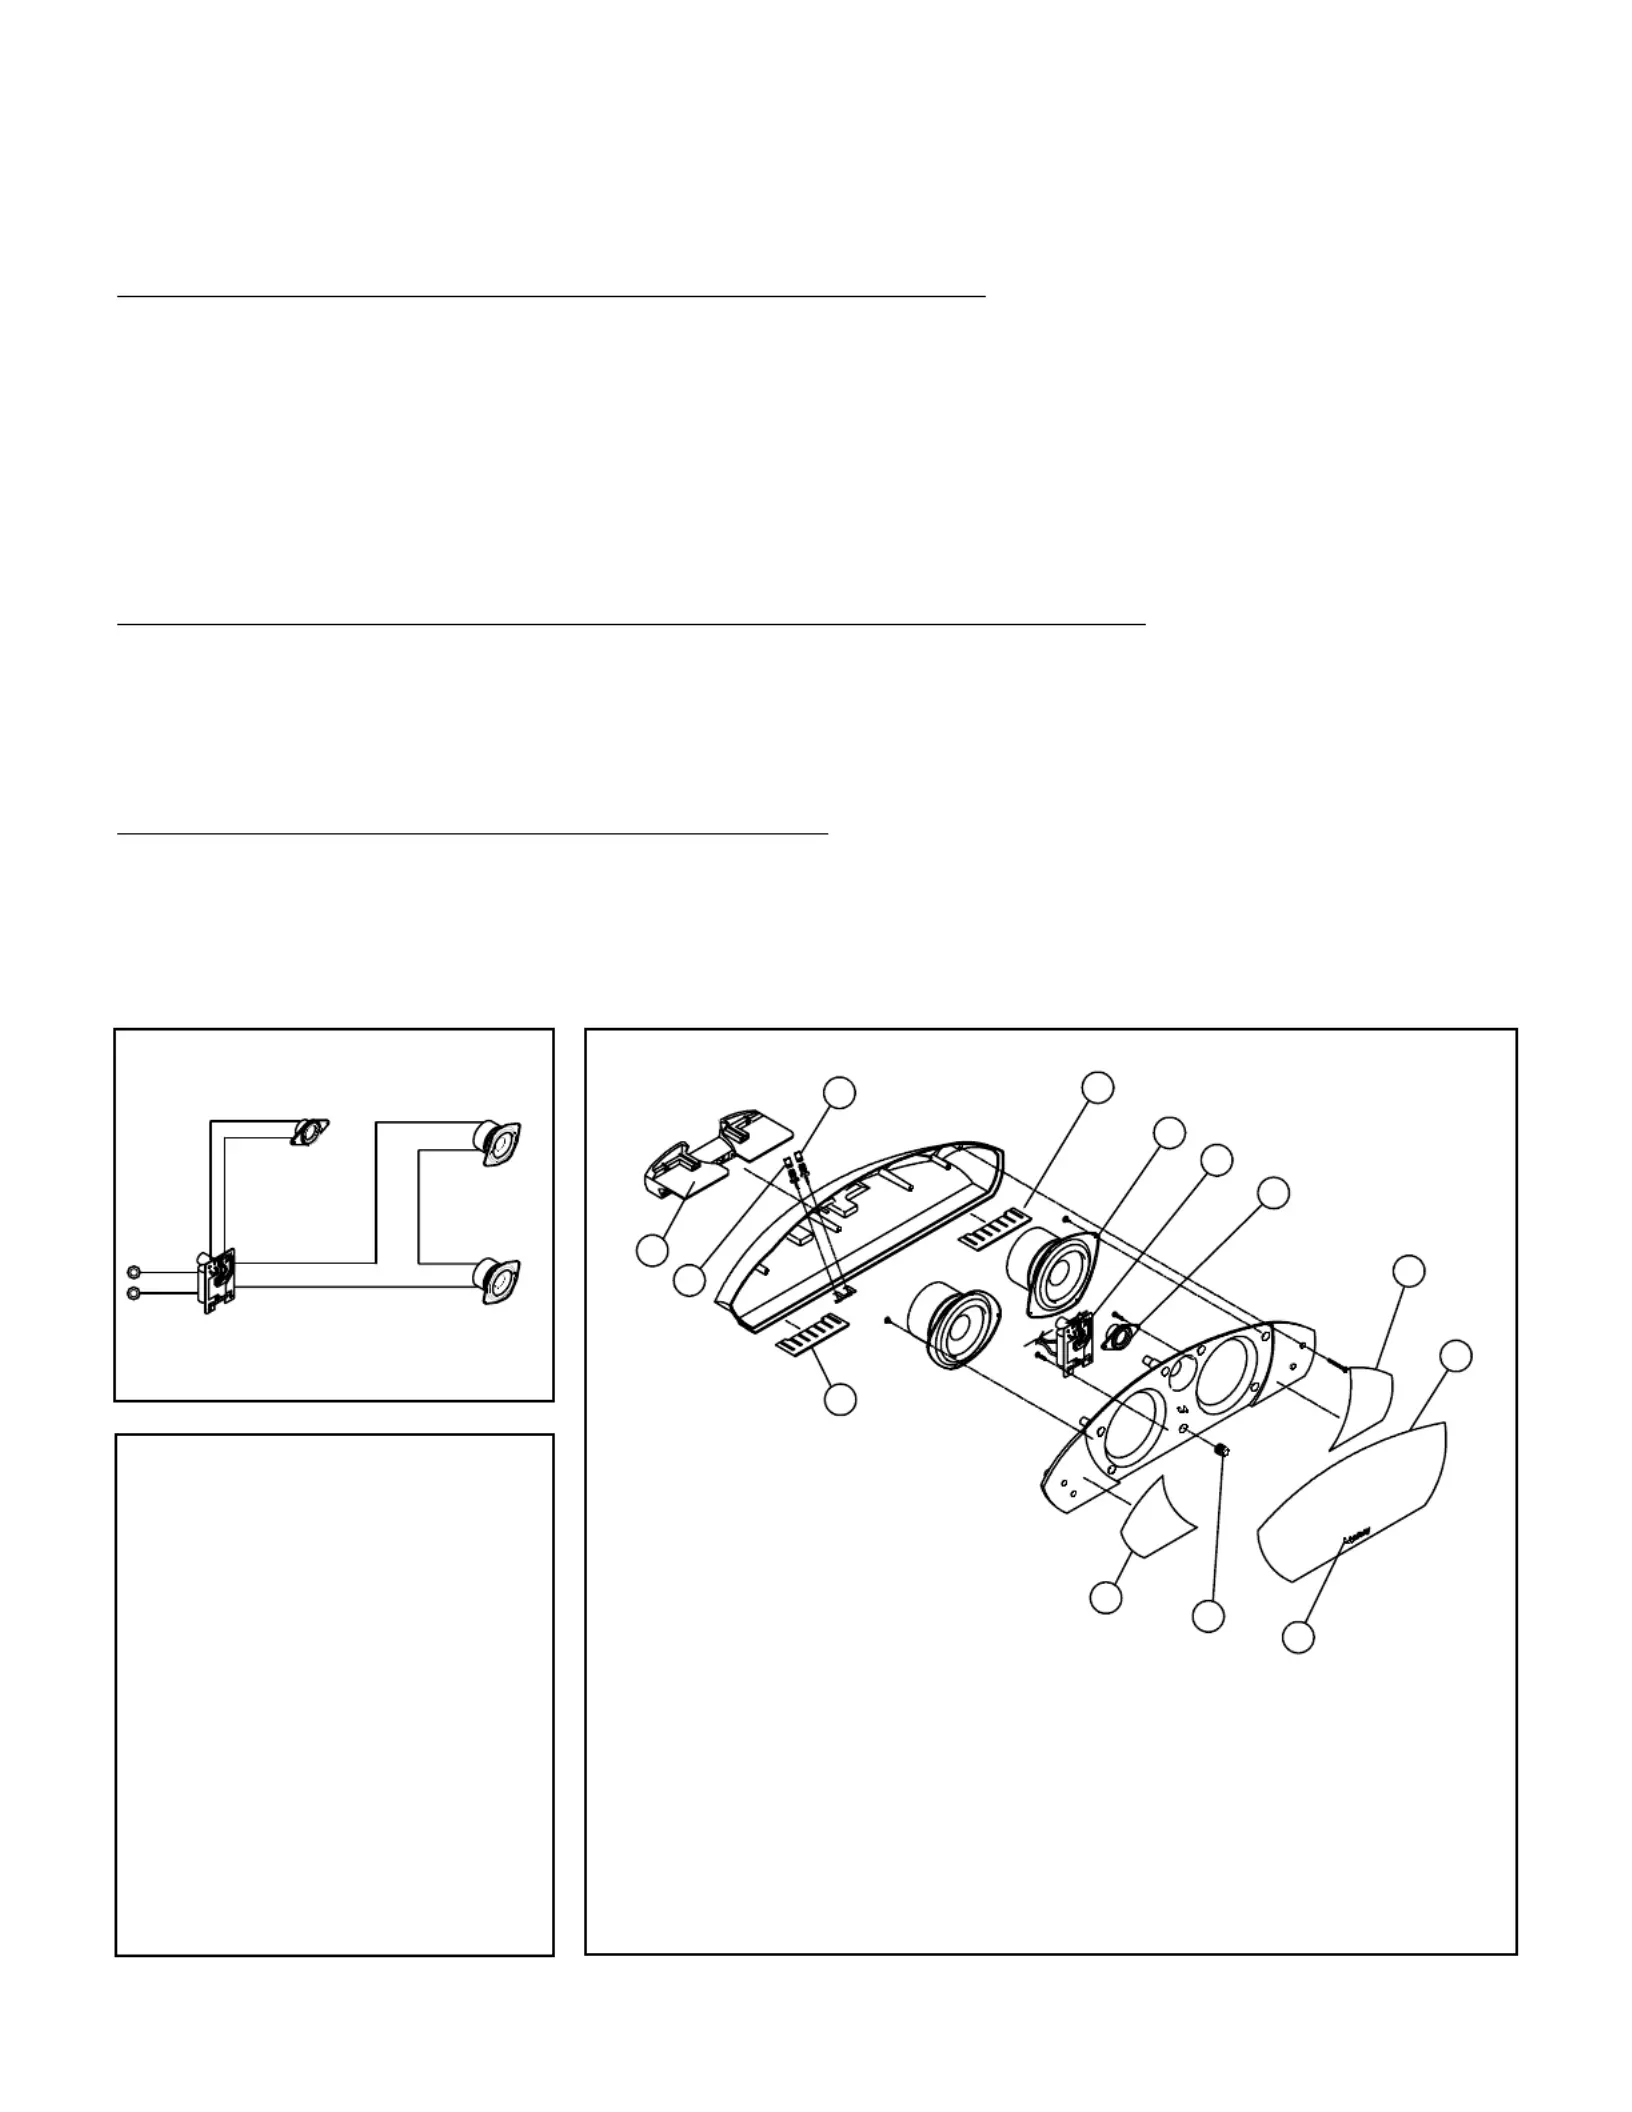
EXPLODED VIEW
WIRING DIAGRAM
MCC-1 Modulus
®
Center
Infinity Loudspeaker Troubleshooting/Repair Tips
Most customers prefer to do simple loudspeaker repairs themselves. By following the steps below, a majority of loudspeakers canbe returned to
their original factory performance with minimum effort. Choose the example that best describes the problem you are experiencing.
Problem 1: No sound or distorted sound from one loudspeaker in a pair (or set)
Connect the dead/distorting loudspeaker to a different amplifier channel (one that had a functioning loudspeaker connected to it). If it functions
normally, the problem is not loudspeaker-related. If the loudspeaker still makes no sound or sounds distorted, a wire may have become loose
or disconnected, the network (also known as a crossover) may be defective, the drivers (woofer, tweeter, etc.) may be defective or, in very rare
cases, all may be defective.
Refer to the wiring diagram and exploded view below. The network is a small circuit board found on the inside of the terminal cup, or mounted to
an inside wall of the enclosure. It sends low-frequency sounds to the woofer, high-frequency sounds to the tweeter and, if applicable, mid-frequency
sounds to the midrange driver. Make sure all wires are secure and connected. Look for components on the network that look burnt, “bulged,”
or abnormal. If everything looks normal, connect the network to the drivers from another matching loudspeaker. MAKE SURE you attach the
correct wires to each driver – mid- and low-frequency sounds can damage the tweeter! If there is still no sound or distorted sound, the network
is defective. If there is clean undistorted sound, the drivers are defective.
Problem 2: No sound or distorted sound from one or more (but not all) drivers in an enclosure
Remove the problem driver(s) from the enclosure and make sure all wires are secure and connected. If they are, proceed with the following test:
Woofer or midrange driver –Connect the driver’s + and – input terminals directly to the loudspeaker wires from your receiver/amplifier and play
some music at a reasonable volume. If the driver now sounds normal (produces a clean, undistorted sound), the network is most likely defective.
Tweeter –Replace the tweeter with a functioning tweeter from another loudspeaker. If the tweeter now functions normally (produces clean,
undistorted sound), the original tweeter is defective. If the replacement tweeter also sounds distorted or produces no sound, the network is
most likely defective.
Problem 3: Loudspeakers distort, rattle or pop at higher volumes
This is usually NOT a loudspeaker problem. Common causes are too much power (playing the loudspeakers too loud and causing themto distort),
an amplifier with not enough power (the amplifier can’t produce the required volume without distorting), excessive equalization(turning the tone
controls too far clockwise, and/or engaging the loudness/bass boost button on your receiver) or some combination of the above. If only one
loudspeaker is exhibiting the problem, and you’re confident that it’s not caused by too little power/too much power/excessive equalization, see
solutions for Problems 1 and 2.
ITEM NO.DESCRIPTIONQTY.PART NO.
1.Complete Center Speaker, Charcoal1MODCTRCHAR
Complete Center Speaker, Platinum1MODCTRPLAT
2.Woofer for Modulus Center2MODCTRWFR or
336545-002
3.Network1MODCTRNET
4.Tweeter1MODSATTWT or
336417-001
5.Right trim panel for Center1MODCTRPLATE-R
6.Grille, complete with cloth, Charcoal1MODCTRGRCHAR
Grille, complete with cloth, Platinum1MODCTRGRPLAT
7.Logo for Modulus Center1MODCTRLOGO
(Charcoal)
ITEM NO.DESCRIPTIONQTY.PART NO.
8.Grille cup, Platinum7MODSATGCUPPLAT
Grille cup, Charcoal7MODSATGCUP or
336880-002
9.Left trim panel for Center1MODCTRPLATE-L
10.Red binding post1MODSATBP-R
11.Black binding post1MODSATBP-B
12.Owner’s Manual1336782-001
13.Survey Card1335868-002
14.Warranty Card1335841-001
15.Rubber pad, Right1MODCTRRPADR
16.Rubber pad, Left1MODCTRRPADL
17.Rubber hook1MODCTRRHOOK
TO SERVICE THE MODULUS MCC-1 CENTER
1.Remove the grille.
2.Remove the (7) exposed rubber grille retainers;this can be
accomplished by carefully pulling them out of their cavities with
long-nosed pliers or similar tool.
3.Remove the (7) Phillips screws that are now exposed.
4.Four additional screws lie underneath the two front trim panels;
these can be carefully removed by applying a blow dryer (high or
maximum) or heat gun to the trim panels.Take care not to direct
the gun directly at the woofer or tweeter;do not burn yourself after
each panel has been heated – gloves are recommended.
See illustration.
If either trim panel is damaged upon removal, order:
part# MODCTRPLATE-L – Left Trim Panel
part# MODCTRPLATE-R – Right Trim Panel
5.Remove the (4) additional Phillips screws that are now exposed.
6.Carefully lift the front baffle, with drivers attached, off the cabinet.
7.Reassembly:Adhesive already in place, if encrusted on the front
baffle, must be removed by scraping it off as it may prevent the
trim panel from sitting flush on the front baffle.New adhesive
must be added to reattach the trim panel.
Produktspezifikationen
| Marke: | Infinity |
| Kategorie: | Lautsprecher |
| Modell: | Modulus MCC 1 |
Brauchst du Hilfe?
Wenn Sie Hilfe mit Infinity Modulus MCC 1 benötigen, stellen Sie unten eine Frage und andere Benutzer werden Ihnen antworten
Bedienungsanleitung Lautsprecher Infinity

9 Februar 2026
4 Februar 2026
29 Januar 2026
20 Januar 2026
19 Januar 2026
16 Januar 2026
16 Januar 2026
15 Januar 2026
15 Januar 2026
15 Januar 2026
Bedienungsanleitung Lautsprecher
Neueste Bedienungsanleitung für -Kategorien-
3 April 2026
3 April 2026
3 April 2026
3 April 2026
2 April 2026
2 April 2026
2 April 2026
2 April 2026
2 April 2026
2 April 2026