Intellinet 561433 Bedienungsanleitung
Intellinet Schalter 561433
Lies die bedienungsanleitung für Intellinet 561433 (2 Seiten) kostenlos online; sie gehört zur Kategorie Schalter. Dieses Handbuch wurde von 47 Personen als hilfreich bewertet und erhielt im Schnitt 4.2 Sterne aus 7 Bewertungen. Hast du eine Frage zu Intellinet 561433 oder möchtest du andere Nutzer dieses Produkts befragen? Stelle eine Frage
Seite 1/2
8-Port Gigabit Ethernet
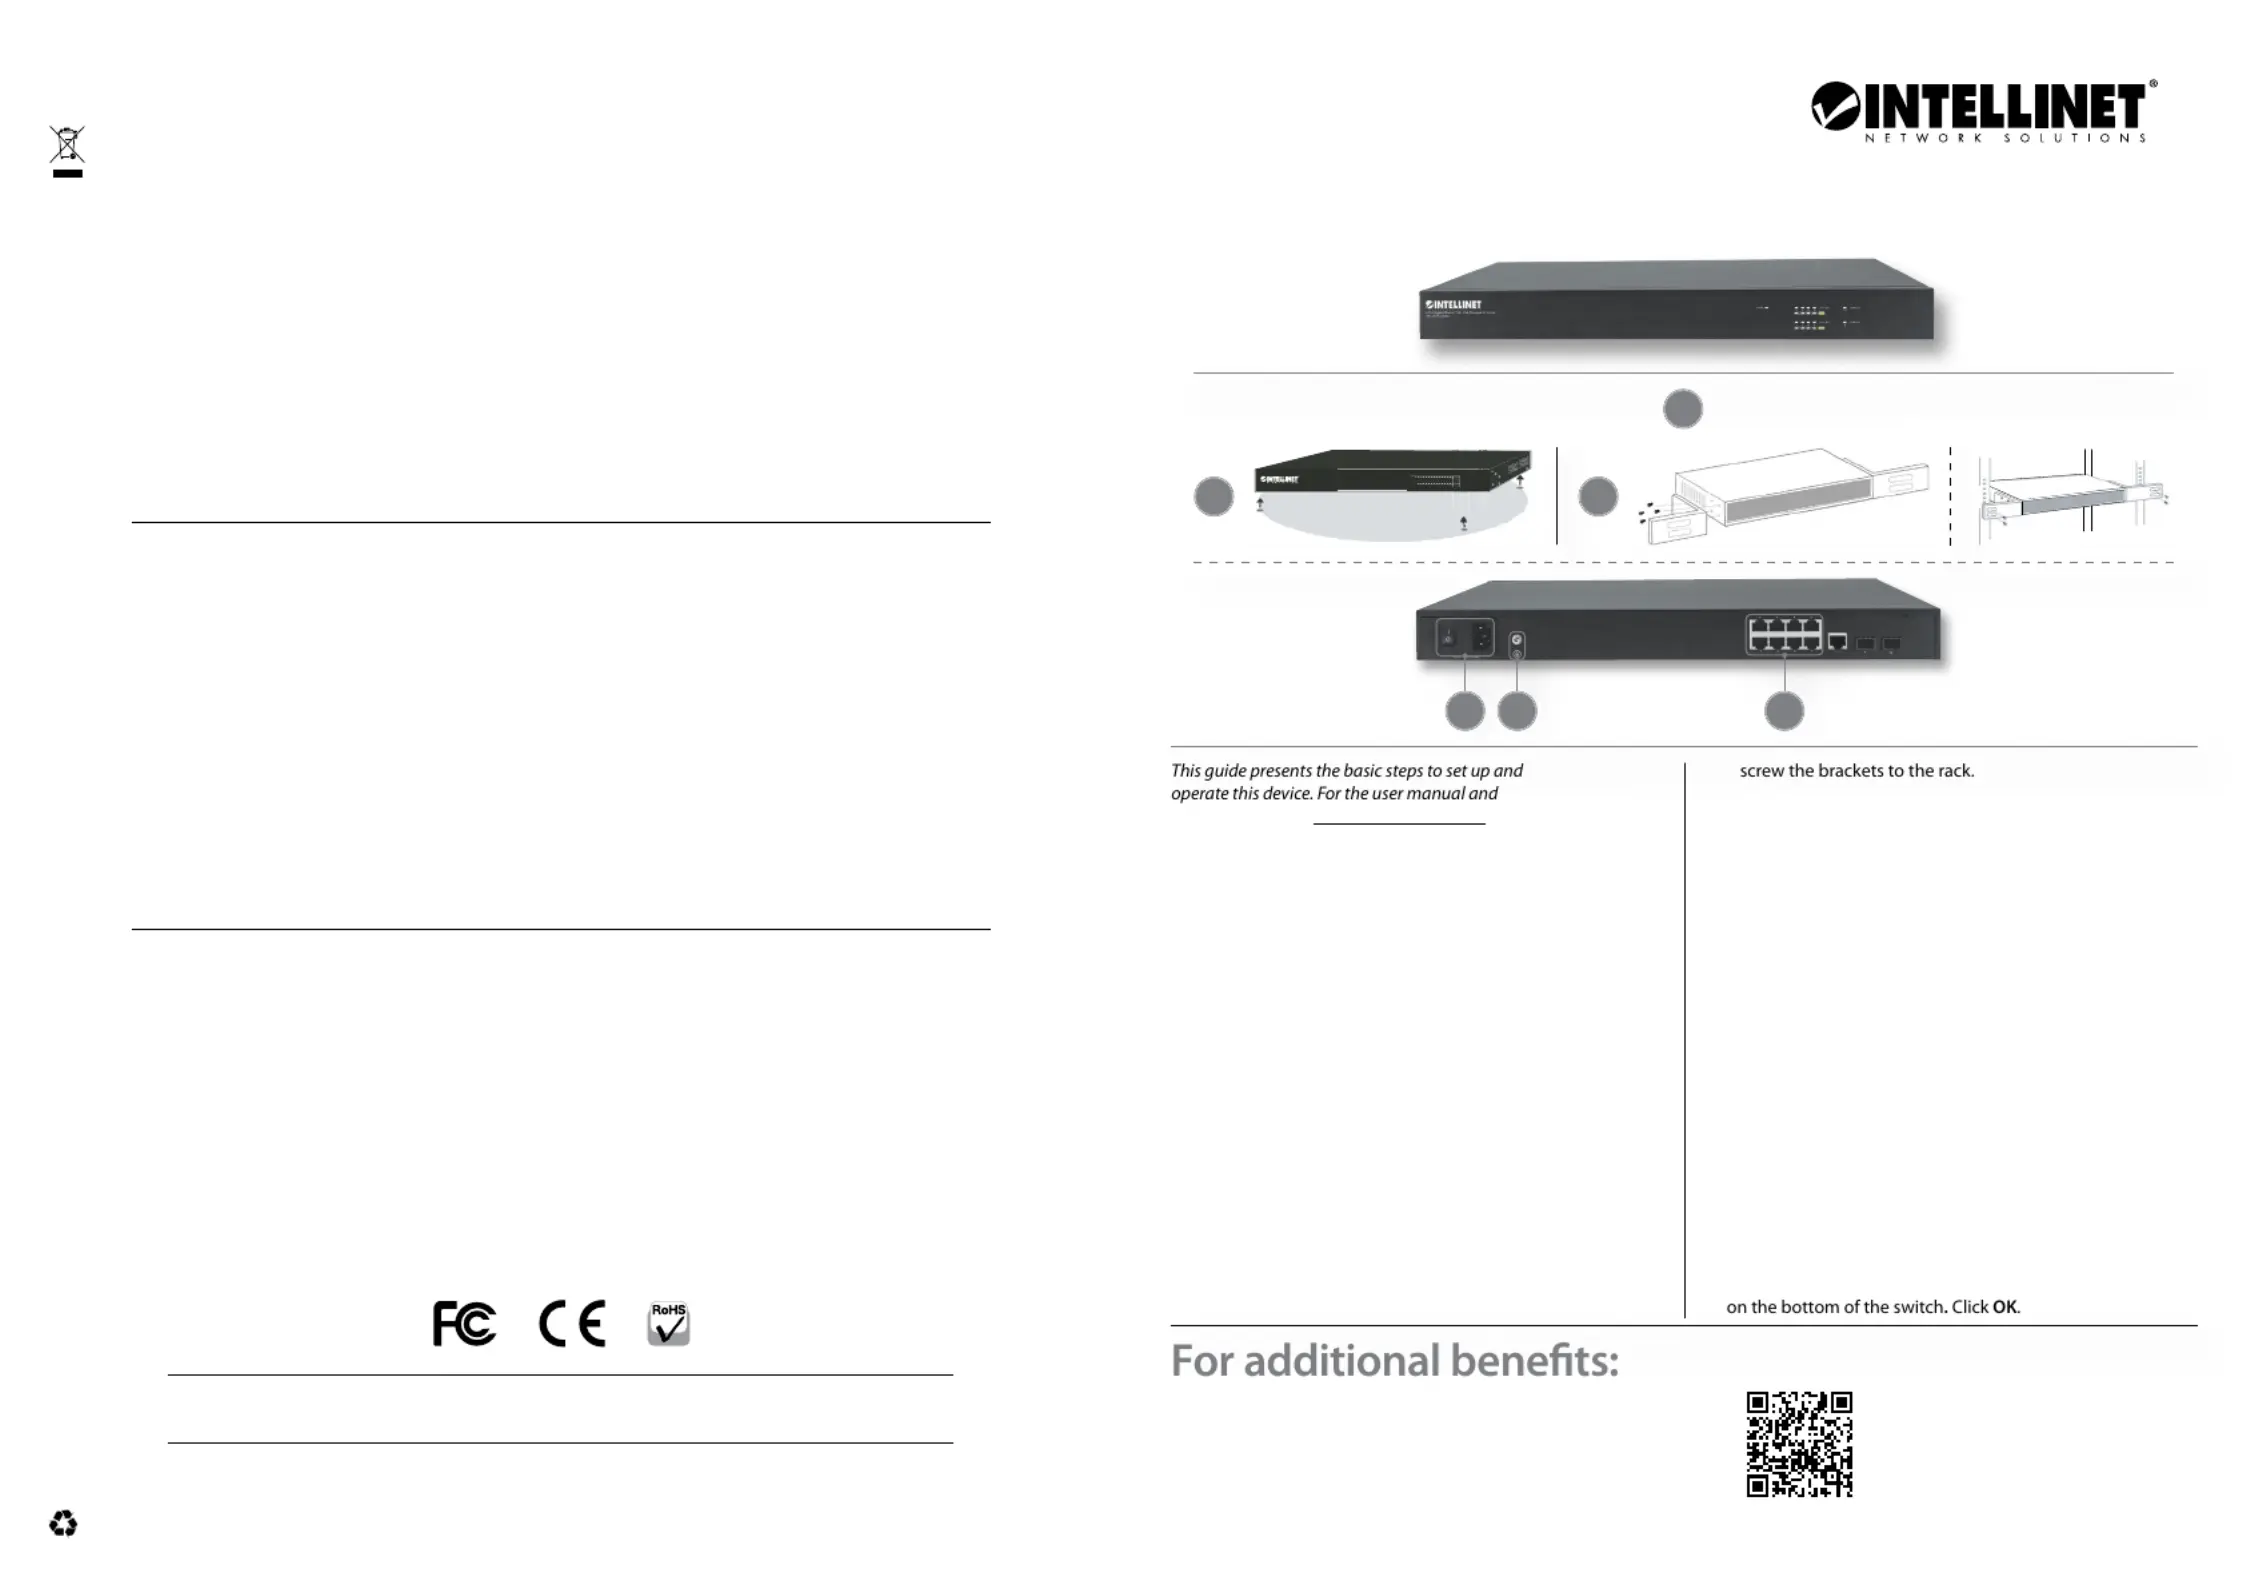
PoE+ Web-Managed AV
Switch with 2 SFP Uplinks
Instructions Model 561433
specifications, visit .intellinetnetwork.com
A) Placement
a - Desktop
Prior to use, it is recommended that the
switch be placed/positioned:
• On a level surface that can support the weight of the
switch (and any other items that need to be considered);
• With a minimum of 25 mm (approx. 1”) of clearance
on the top and sidesfor adequate ventilation;
• Away from sources of electrical noise: radios,
transmitters, broadband amplifiers, etc.;
• Where it cannot be affected by excessive moisture.
Attach the rubber feet to the bottom of each
corner of the switch to increase stability.
b - Rackmount
The switch includes brackets and screws
for optional rack mounting.
1 Attach the mounting brackets on the switch’s
side panels (one on each side) and secure
them with the screws provided.
2 Position the switch in the rack and
B) Grounding
ATTENTION:When installing unit, connect the chassis ground
first; when uninstalling unit, disconnect chassis ground last.
Wire the grounding terminal to an earth-
grounding object to prevent power spikes.
C) Connections
Cat5/5e/6 UTP/STP cables provide optimal performance;
if a status LED doesn’t indicate a link or activity,
check the corresponding device for proper setup and
operation (see user manual for descriptions).
D) Power
Use the included power cord to connect the device (on the
rear panel) to an AC outlet. Confirm that the power LED
on the front panel is lit. Turn the power switch to On (I).
E) Web-Based Management
1 Open your Web browser.
2 http://Enter and the IP address of the switch in the Address
field. The default management IP address is .192.168.0.1
3 EnterPress to display the Login screen. In the
Username field, enter ; in the Password admin
field, enter the found in the sticker serial number
WASTE ELECTRICAL & ELECTRONIC EQUIPMENT
DISPOSAL OF ELECTRIC AND ELECTRONIC EQUIPMENT
(Applicable In The European Union And Other European Countries With Separate Collection Systems)
ENGLISH: This symbol on the product or its packaging means that
this product must not be treated as unsorted household waste.
In accordance with EU Directive 2012/19/EU on Waste Electrical
and Electronic Equipment (WEEE), this electrical product must be
disposed of in accordance with the user’s local regulations for electrical
or electronic waste. Please dispose of this product by returning it to your
local point of sale or recycling pickup point in your municipality.
DEUTSCH: Dieses auf dem Produkt oder der Verpackung angebrachte Symbol
zeigt an, dass dieses Produkt nicht mit dem Hausmüll entsorgtwerden darf. In
Übereinstimmung mit der Richtlinie 2012/19/EU des Europäischen Parlaments
und des Rates über Elektro- und Elektronik-Altgeräte (WEEE) darf dieses
Elektrogerät nicht im normalen Hausmüll oder dem Gelben Sack entsorgt
werden. Wenn Sie dieses Produkt entsorgen möchten, bringen Sie es bitte zur
Verkaufsstelle zurück oder zum Recycling-Sammelpunkt Ihrer Gemeinde.
ESPAÑOL: Este símbolo en el producto o su embalaje indica que el producto
no debe tratarse como residuo doméstico. De conformidad con la Directiva
2012/19/EU de la UE sobre residuos de aparatos eléctricos y electrónicos
(RAEE), este producto eléctrico no puede desecharse se con el resto de
residuos no clasificados. Deshágase de este producto devolviéndolo a su
punto de venta o a un punto de recolección municipal para su reciclaje.
FRANÇAIS: Ce symbole sur Ie produit ou son emballage signifie que ce
produit ne doit pas être traité comme un déchet ménager. Conformément
à la Directive 2012/19/EU sur les déchets d’équipements électriques et
électroniques (DEEE), ce produit électrique ne doit en aucun cas être
mis au rebut sous forme de déchet municipal non trié. Veuillez vous
débarrasser de ce produit en Ie renvoyant à son point de vente ou au point
de ramassage local dans votre municipalité, à des fins de recyclage.
POLSKI: Jeśli na produkcie lub jego opakowaniu umieszczono ten symbol,
wówczas w czasie utylizacji nie wolno wyrzucać tego produktu wraz z
odpadami komunalnymi. Zgodnie z Dyrektywą Nr 2012/19/EU w sprawie
zużytego sprzętu elektrycznego i elektronicznego (WEEE), niniejszego
produktu elektrycznego nie wolno usuwać jako nie posortowanego
odpadu komunalnego. Prosimy o usuniecie niniejszego produktu
poprzez jego zwrot do punktu zakupu lub oddanie do miejscowego
komunalnego punktu zbiórki odpadów przeznaczonych do recyklingu.
ITALIANO: Questo simbolo sui prodotto o sulla relativa confezione indica
che il prodotto non va trattato come un rifiuto domestico. In ottemperanza
alla Direttiva UE 2012/19/EU sui rifiuti di apparecchiature elettriche ed
elettroniche (RAEE), questa prodotto elettrico non deve essere smaltito come
rifiuto municipale misto. Si prega di smaltire il prodotto riportandolo al punto
vendita o al punto di raccolta municipale locale per un opportuno riciclaggio.
WARRANTY INFORMATION • GARANTIEINFORMATIONEN • GARANTÍA • GARANTIE • GWARANCJI • GARANZIA
intellinetnetwork.com
EN MÉXICO: Póliza de Garantía Intellinet Network Solutions — Datos del importador y responsable ante el consumidor IC Intracom México, S.A.P.I. de
C.V. • Av. Interceptor Poniente # 73, Col. Parque Industrial La Joya, Cuautitlán Izcalli, Estado de México, C.P. 54730, México. • Tel. (55)1500-4500
La presente garantía cubre los siguientes productos contra cualquier defecto de fabricación en sus materiales y mano de obra.
A Garantizamos los productos de limpieza, aire comprimido y consumibles, por 60 dias a partir de la fecha de entrega, o por
el tiempo en que se agote totalmente su contenido por su propia función de uso, lo que suceda primero.
B Garantizamos los productos con partes móviles por 3 años.
C Garantizamos los demás productos por 5 años (productos sin partes móviles), bajo las siguientes condiciones:
1 Todos los productos a que se refiere esta garantía, ampara su cambio físico, sin ningún cargo para el consumidor.
2 El comercializador no tiene talleres de servicio, debido a que los productos que se garantizan no
cuentan con reparaciones, ni refacciones, p1-ya que su garantía es de cambio físico.
3 La garantía cubre exclusivamente aquellas partes, equipos o sub-ensambles que hayan sido instaladas de fábrica y no incluye en
ningún caso el equipo adicional o cualesquiera que hayan sido adicionados al mismo por el usuario o distribuidor.
Para hacer efectiva esta garantía bastará con presentar el producto al distribuidor en el domicilio donde fue adquirido o en el domicilio de IC Intracom México,
S.A.P.I. de C.V., junto con los accesorios contenidos en su empaque, acompañado de su póliza debidamente llenada y sellada por la casa vendedora (indispensable
el sello y fecha de compra) donde lo adquirió, o bien, la factura o ticket de compra original donde se mencione claramente el modelo, número de serie (cuando
aplique) y fecha de adquisición. Esta garantía no es válida en los siguientes casos: Si el producto se hubiese utilizado en condiciones distintas a las normales; si el
producto no p1-ha sido operado conforme a los instructivos de uso; o si el producto p1-ha sido alterado o tratado de ser reparado por el consumidor o terceras personas.
REGULATORY STATEMENTS
FCC Class B
This equipment has been tested and found to comply with the limits for a Class B digital device, pursuant to Part 15 of Federal Communications Commission
(FCC) Rules. These limits are designed to provide reasonable protection against harmful interference in a residential installation. This equipment generates,
uses and can radiate radio frequency energy, and if not installed and used in accordance with the instructions may cause harmful interference to radio
communications. However, there is no guarantee that interference will not occur in a particular installation. If this equipment does cause harmful interference
to radio or television reception, which can be determined by turning the equipment off and on, the user is encouraged to try to correct the interference
by one or more of the following measures: reorient or relocate the receiving antenna; increase the separation between the equipment and the receiver;
connect the equipment to an outlet on a circuit different from the receiver; or consult the dealer or an experienced radio/TV technician for help.
CE
ENGLISH :This device complies with the requirements of CE 2014/30/EU and/or 2014/35/EU. The Declaration of Conformity for is available at:
DEUTSCH :Dieses Gerät enspricht der CE 2014/30/EU und / oder 2014/35/EU. Die Konformitätserklärung für dieses Produkt finden Sie unter:
ESPAÑOL :Este dispositivo cumple con los requerimientos de CE 2014/30/EU y / o 2014/35/EU. La declaración de conformidad esta disponible en:
FRANÇAIS :Cet appareil satisfait aux exigences de CE 2014/30/EU et / ou 2014/35/EU. La Déclaration de Conformité est disponible à:
POLSKI :Urządzenie spełnia wymagania CE 2014/30/EU I / lub 2014/35/EU. Deklaracja zgodności dostępna jest na stronie internetowej producenta:
ITALIANO :Questo dispositivo è conforme alla CE 2014/30/EU e / o 2014/35/EU. La dichiarazione di conformità è disponibile al:
support.intellinet-network.com/barcode/561433
All trademarks and trade names are the property of their respective owners. © IC Intracom. All rights reserved.
Intellinet Network Solutions is a trademark of IC Intracom, registered in the U.S. and other countries.
INT_561433_QIG_0121_REV_5.11Printed on recycled paper.
North America
IC Intracom America
550 Commerce Blvd.
Oldsmar, FL 34677 USA
Asia & Africa
IC Intracom Asia
4-F, No. 77, Sec. 1, Xintai 5th Rd.
Xizhi Dist., New Taipei City 221, Taiwan
Europe
IC Intracom Europe
Löhbacher Str. 7, D-58553
Halver, Germany
or go to: register.intellinet-network.com/r/561433
Scan to
register your
product warranty
Important: Read before use. • Importante: Leer antes de usar.
B
D
C
A
a
b
Produktspezifikationen
| Marke: | Intellinet |
| Kategorie: | Schalter |
| Modell: | 561433 |
| Breite: | 440 mm |
| Tiefe: | 200 mm |
| Gewicht: | 3200 g |
| Mitgelieferte Kabel: | AC |
| Produktfarbe: | Schwarz |
| Höhe: | 44 mm |
| AC Eingangsspannung: | 100 - 240 V |
| AC Eingangsfrequenz: | 50 - 60 Hz |
| Betriebstemperatur: | 0 - 40 °C |
| Relative Luftfeuchtigkeit in Betrieb: | 20 - 85 % |
| Netzstandard: | IEEE 802.1D, IEEE 802.1p, IEEE 802.1s, IEEE 802.1w, IEEE 802.3, IEEE 802.3ab, IEEE 802.3ad, IEEE 802.3af, IEEE 802.3at, IEEE 802.3az, IEEE 802.3u, IEEE 802.3x |
| Unterstützte Sicherheitsalgorithmen: | HTTPS, SNMP, SNMPv3, SSH, SSH-2 |
| Quality of Service (QoS) Support: | Ja |
| Zertifizierung: | FCC B, CE |
| Vollduplex: | Ja |
| Power over Ethernet (PoE): | Ja |
| Warentarifnummer (HS): | 85176990 |
| Stromverbrauch (max.): | 270 W |
| Betriebsanleitung: | Ja |
| Gehäusematerial: | Metall |
| LED-Anzeigen: | Activity, Link, PoE, Power |
| Temperaturbereich bei Lagerung: | -10 - 70 °C |
| Switch-Typ: | Managed |
| Anzahl der basisschaltenden RJ-45 Ethernet Ports: | 8 |
| Basic Switching RJ-45 Ethernet Ports-Typ: | Gigabit Ethernet (10/100/1000) |
| Auto MDI/MDI-X: | Ja |
| 10G-Unterstützung: | Nein |
| Kupfer Ethernet Verkabelungstechnologie: | 10BASE-T, 100BASE-TX, 1000BASE-T |
| MAC-Adressentabelle: | 8000 Eintragungen |
| Routing-/Switching-Kapazität: | 20 Gbit/s |
| Rack-Einbau: | Ja |
| Web-basiertes Management: | Ja |
| Port-Spiegelung: | Ja |
| Link Aggregation: | Ja |
| Spannbaum-Protokoll: | Ja |
| VLAN-Unterstützung: | Ja |
| Store-and-Forward: | Ja |
| Auto-Negotiation-Funktion: | Ja |
| Virtuelle LAN-Funktionen: | Tagged VLAN |
| Unterstützung Datenflusssteuerung: | Ja |
| Ratenbeschränkung: | Ja |
| Broadcast-Sturmkontrolle: | Ja |
| Transferrate: | 14.88 Mpps |
| Datenpaket-Pufferspeicher: | 4.1 MB |
| Menge SFP-Modul-Steckplätze: | 2 |
| Anzahl Power over Ethernet plus (PoE+) Anschlüsse: | 8 |
| Gesamtleistung Power over Ethernet (PoE): | 255 W |
| Rackmontageset: | Ja |
| Power over Ethernet (PoE) Leistung pro Anschluss: | 30 W |
| IGMP-Snooping: | Ja |
Brauchst du Hilfe?
Wenn Sie Hilfe mit Intellinet 561433 benötigen, stellen Sie unten eine Frage und andere Benutzer werden Ihnen antworten
Bedienungsanleitung Schalter Intellinet

10 August 2025
10 August 2025
10 August 2025
10 August 2025
10 August 2025
16 Juli 2025
16 Juli 2025
16 Juli 2025
16 Juli 2025
16 Juli 2025
Bedienungsanleitung Schalter
Neueste Bedienungsanleitung für -Kategorien-
31 März 2026
30 März 2026
25 März 2026
22 März 2026
22 März 2026
21 März 2026
20 März 2026
20 März 2026
19 März 2026
19 März 2026