Intermatic IG3240FMP33 Bedienungsanleitung
Intermatic Nicht kategorisiert IG3240FMP33
Lies die bedienungsanleitung für Intermatic IG3240FMP33 (2 Seiten) kostenlos online; sie gehört zur Kategorie Nicht kategorisiert. Dieses Handbuch wurde von 7 Personen als hilfreich bewertet und erhielt im Schnitt 4.2 Sterne aus 8 Bewertungen. Hast du eine Frage zu Intermatic IG3240FMP33 oder möchtest du andere Nutzer dieses Produkts befragen? Stelle eine Frage
Seite 1/2
IG3240FMP33 FLUSHMOUNT KIT
1. Turn the power to the electrical panel OFF.
2. Remove the cover from the electrical panel.
3. Locate a 1/2” knockout in the electrical panel that is appropriate
for this installation.
4. Remove the 1/2” knockout.
5. Align the template furnished in this kit with the selected panel
knockout and mark the wall for cutting as indicated.
Note: Be sure that the edge of the FLUSH PLATE will clear the
edge of the electrical panel cover.
6. Cut the hole as marked.
7. Realign the template with the hole in the wall, mark and drill the
locations indicated for the mounting holes.
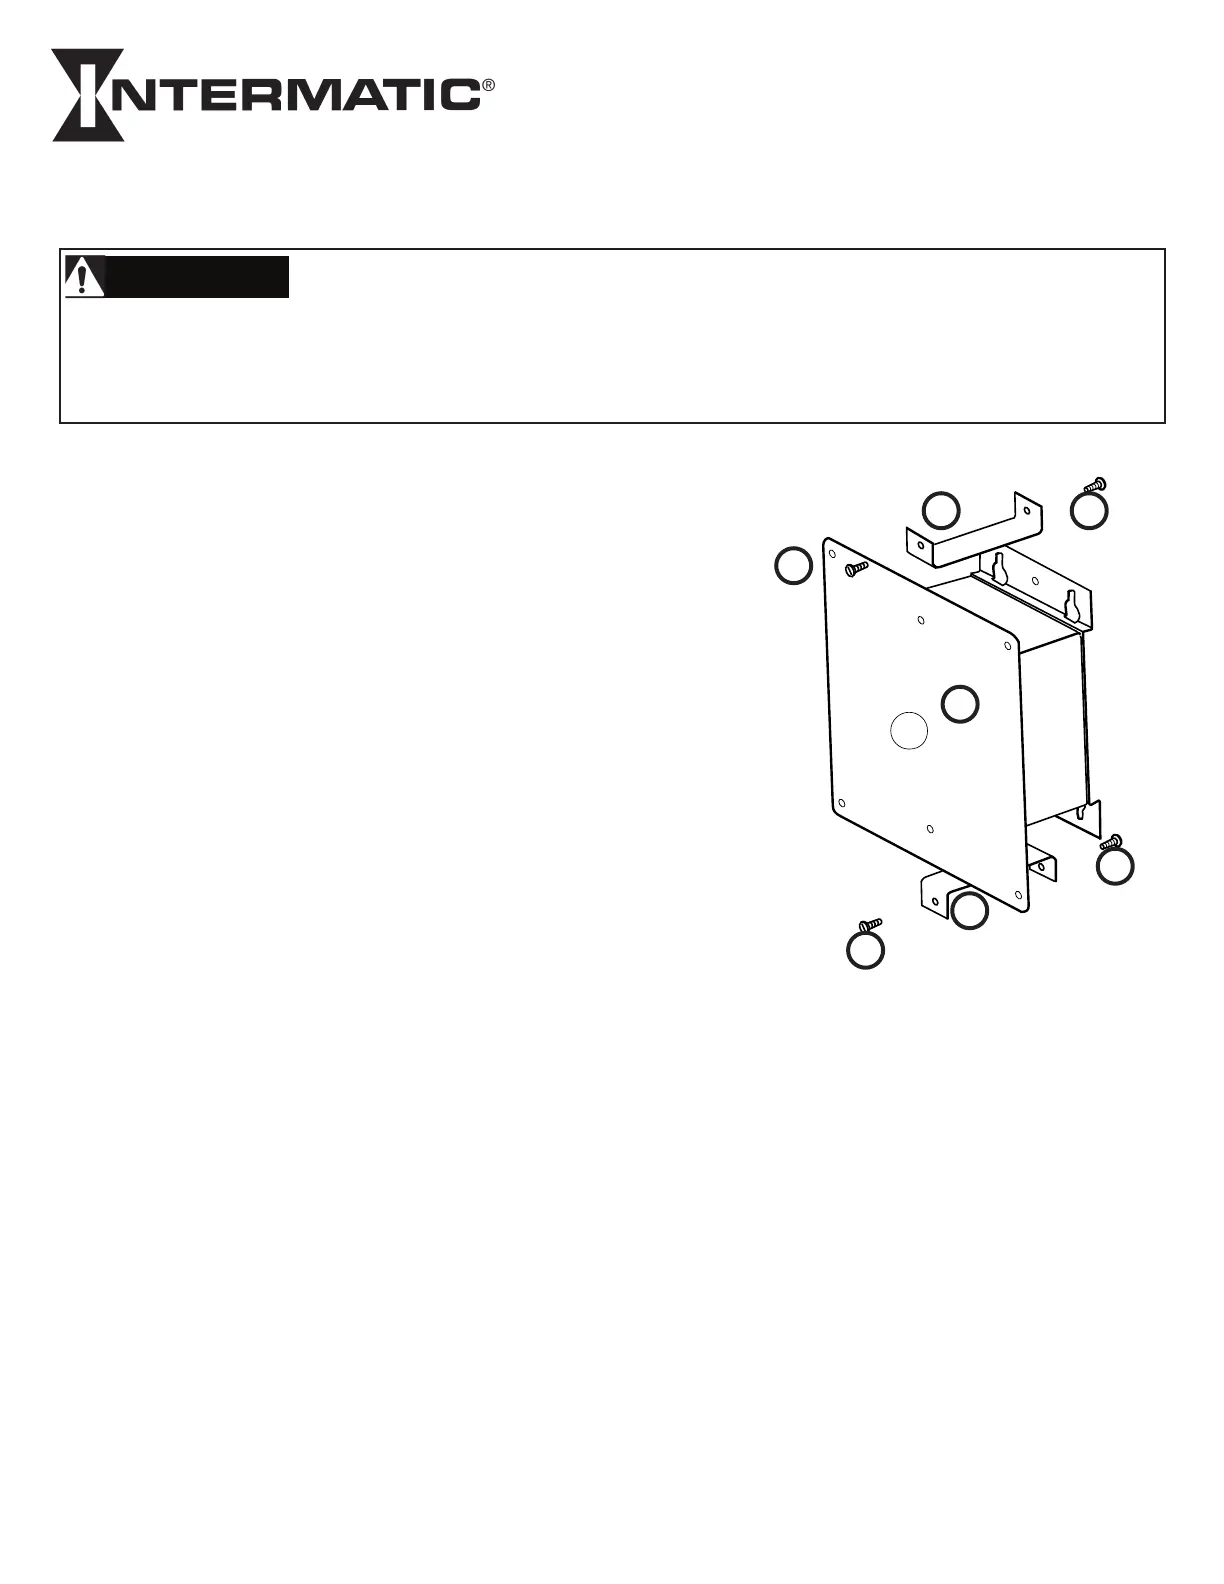
8. Mount the two standoff brackets ( B ) to the rear flange of the
IG3240RC3 using two of the self tapping screws supplied. The
screws will cut a thread into the brackets as they are inserted.
8. Cut a proper length of metal or flexible conduit as required by
the National Electrical Code and local electrical codes of your
area.
9. Attach the conduit to the IG3240RC3 by passing the lead wires
through it and securing the conduit to the IG3240RC3 in accor-
dance with national and local standards.
10. Pass the IG3240RC3 lead wires through the knockout in the
electrical cabinet and secure the conduit to the cabinet.
11. Attach the Flush Plate Cover (A) to the brackets already
secured to the IG3240RC3 using the remaining two self tapping
screws. Note: Make sure that the Cover Plate is positioned to
allow the LED Indicators to show through the opening.
12. Secure the IG3240RC3 and attached Flush Plate to the wall
using the screws and anchors supplied. Apply self stick label
to front of flush mount plate.
13. Connect the wires from the IG3240RC3 in accordance with
instructions given in the MODEL IG3240RC3 INSTALLATION
INSTRUCTIONS.
14. Replace the electrical panel cover.
15. Turn power to the electrical panel ON.
Read these instructions and the INSTALLATION INSTRUCTIONS
for the IG3240RC3 BEFORE attempting to work on either unit.
INTERMATIC INCORPORATED
SPRING GROVE, ILLINOIS 60081
www.intermatic.com
158--01052
INSTALLATION INSTRUCTIONS
Risk of Electric Shock
WARNING
•TurnoffpowertotheelectricserviceorpanelandtoequipmenttobeprotectedbeforeinstallinganySurge
ProtectiveDevice.
•InstallationandServicetobeperformedbyaqualiedlicensedelectrician.
•AllwiringmustcomplywithallstateandlocalelectricalcodesincludingtheNationalElectricCodeand/or
CanadianElectricCode.
A
B
C
C
B
C
C
CONTENTS
A COVER PLATE
B STANDOFF BRACKETS - 2
C SELF TAPPING SCREWS - 4
NOT SHOWN
PLASTIC ANCHORS -4
SHEET METAL SCREWS - 4
Produktspezifikationen
| Marke: | Intermatic |
| Kategorie: | Nicht kategorisiert |
| Modell: | IG3240FMP33 |
Brauchst du Hilfe?
Wenn Sie Hilfe mit Intermatic IG3240FMP33 benötigen, stellen Sie unten eine Frage und andere Benutzer werden Ihnen antworten
Bedienungsanleitung Nicht kategorisiert Intermatic

5 November 2025
5 November 2025
4 September 2025
3 September 2025
20 August 2025
20 August 2025
4 August 2025
2 August 2025
2 August 2025
2 August 2025
Bedienungsanleitung Nicht kategorisiert
Neueste Bedienungsanleitung für -Kategorien-
3 April 2026
3 April 2026
3 April 2026
3 April 2026
3 April 2026
3 April 2026
3 April 2026
3 April 2026
3 April 2026
3 April 2026