Medeli CP203 Bedienungsanleitung
Lies die bedienungsanleitung für Medeli CP203 (2 Seiten) kostenlos online; sie gehört zur Kategorie Klavier. Dieses Handbuch wurde von 17 Personen als hilfreich bewertet und erhielt im Schnitt 5.0 Sterne aus 9 Bewertungen. Hast du eine Frage zu Medeli CP203 oder möchtest du andere Nutzer dieses Produkts befragen? Stelle eine Frage
Seite 1/2
COMPACT PIANO
OWNER’S MANUAL
THE FCC REGULATION WARNING (for the USA)
NOTE: This equipment has been tested and found to comply with the limits for a Class B digital device, pur-
suant to Part 15 of the FCC Rules. These limits are designed to provide reasonable protection against harmful
interference in a residential installation. This equipment generates, uses, and can radiate radio frequency ener-
gy and, if not installed and used in accordance with the instructions, may cause harmful interference to radio
communications. However, there is no guarantee that interference will not occur in a particular installation. If
this equipment does cause harmful interference to radio or television reception, which can be determined by
turning the equipment o and on, the user is encouraged to try to correct the interference by one or more of
the following measures:
Reorient or relocate the receiving antenna.
Increase the separation between the equipment and receiver.
Connect the equipment into an outlet on a circuit dierent from that to which the receiver is connected.
Consult the dealer or an experienced radio/TV technician for help.
If items such as cables are included with this equipment, you must use those included items.
Unauthorized changes or modication to this system can void the user’s authority to operate this equipment.
CAUTION
The normal function of the product may be disturbed by Strong Electro Magnetic Interference.
If so, simply reset the product to resume normal operation by following the owner’s manual. In
case the function could not resume, please use the product in other location.
Keep this manual
After reading this manual, please keep it for later reference.
PRECAUTIONS
Location
Using the unit in the following locations can result in a malfunction.
In direct sunlight
Locations of extreme temperature or humidity
Excessively dusty or dirty locations
Locations of excessive vibration
Close to magnetic elds
Power Supply
Please connect the designated AC adapter to an AC outlet of the correct voltage.
Do not connect it to an AC outlet of voltage other than that for which your unit is intended.
Interference with other electrical devices
Radios and televisions placed nearby may experience reception interference.
Operate this unit at a suitable distance from radios and televisions.
Care
If the exterior becomes dirty, wipe it with a clean, dry cloth. Do not use liquid cleaners
such as benzene or thinner, or cleaning compounds or ammable polishes.
Handling
To avoid breakage, do not apply excessive force to the switches or controls.
Keeping foreign matter out of your equipment
Never set any container with liquid in it near this equipment. If liquid gets into the equipment,
it could cause a breakdown, re, or electrical shock.
Be careful not to let metal objects get into the equipment.
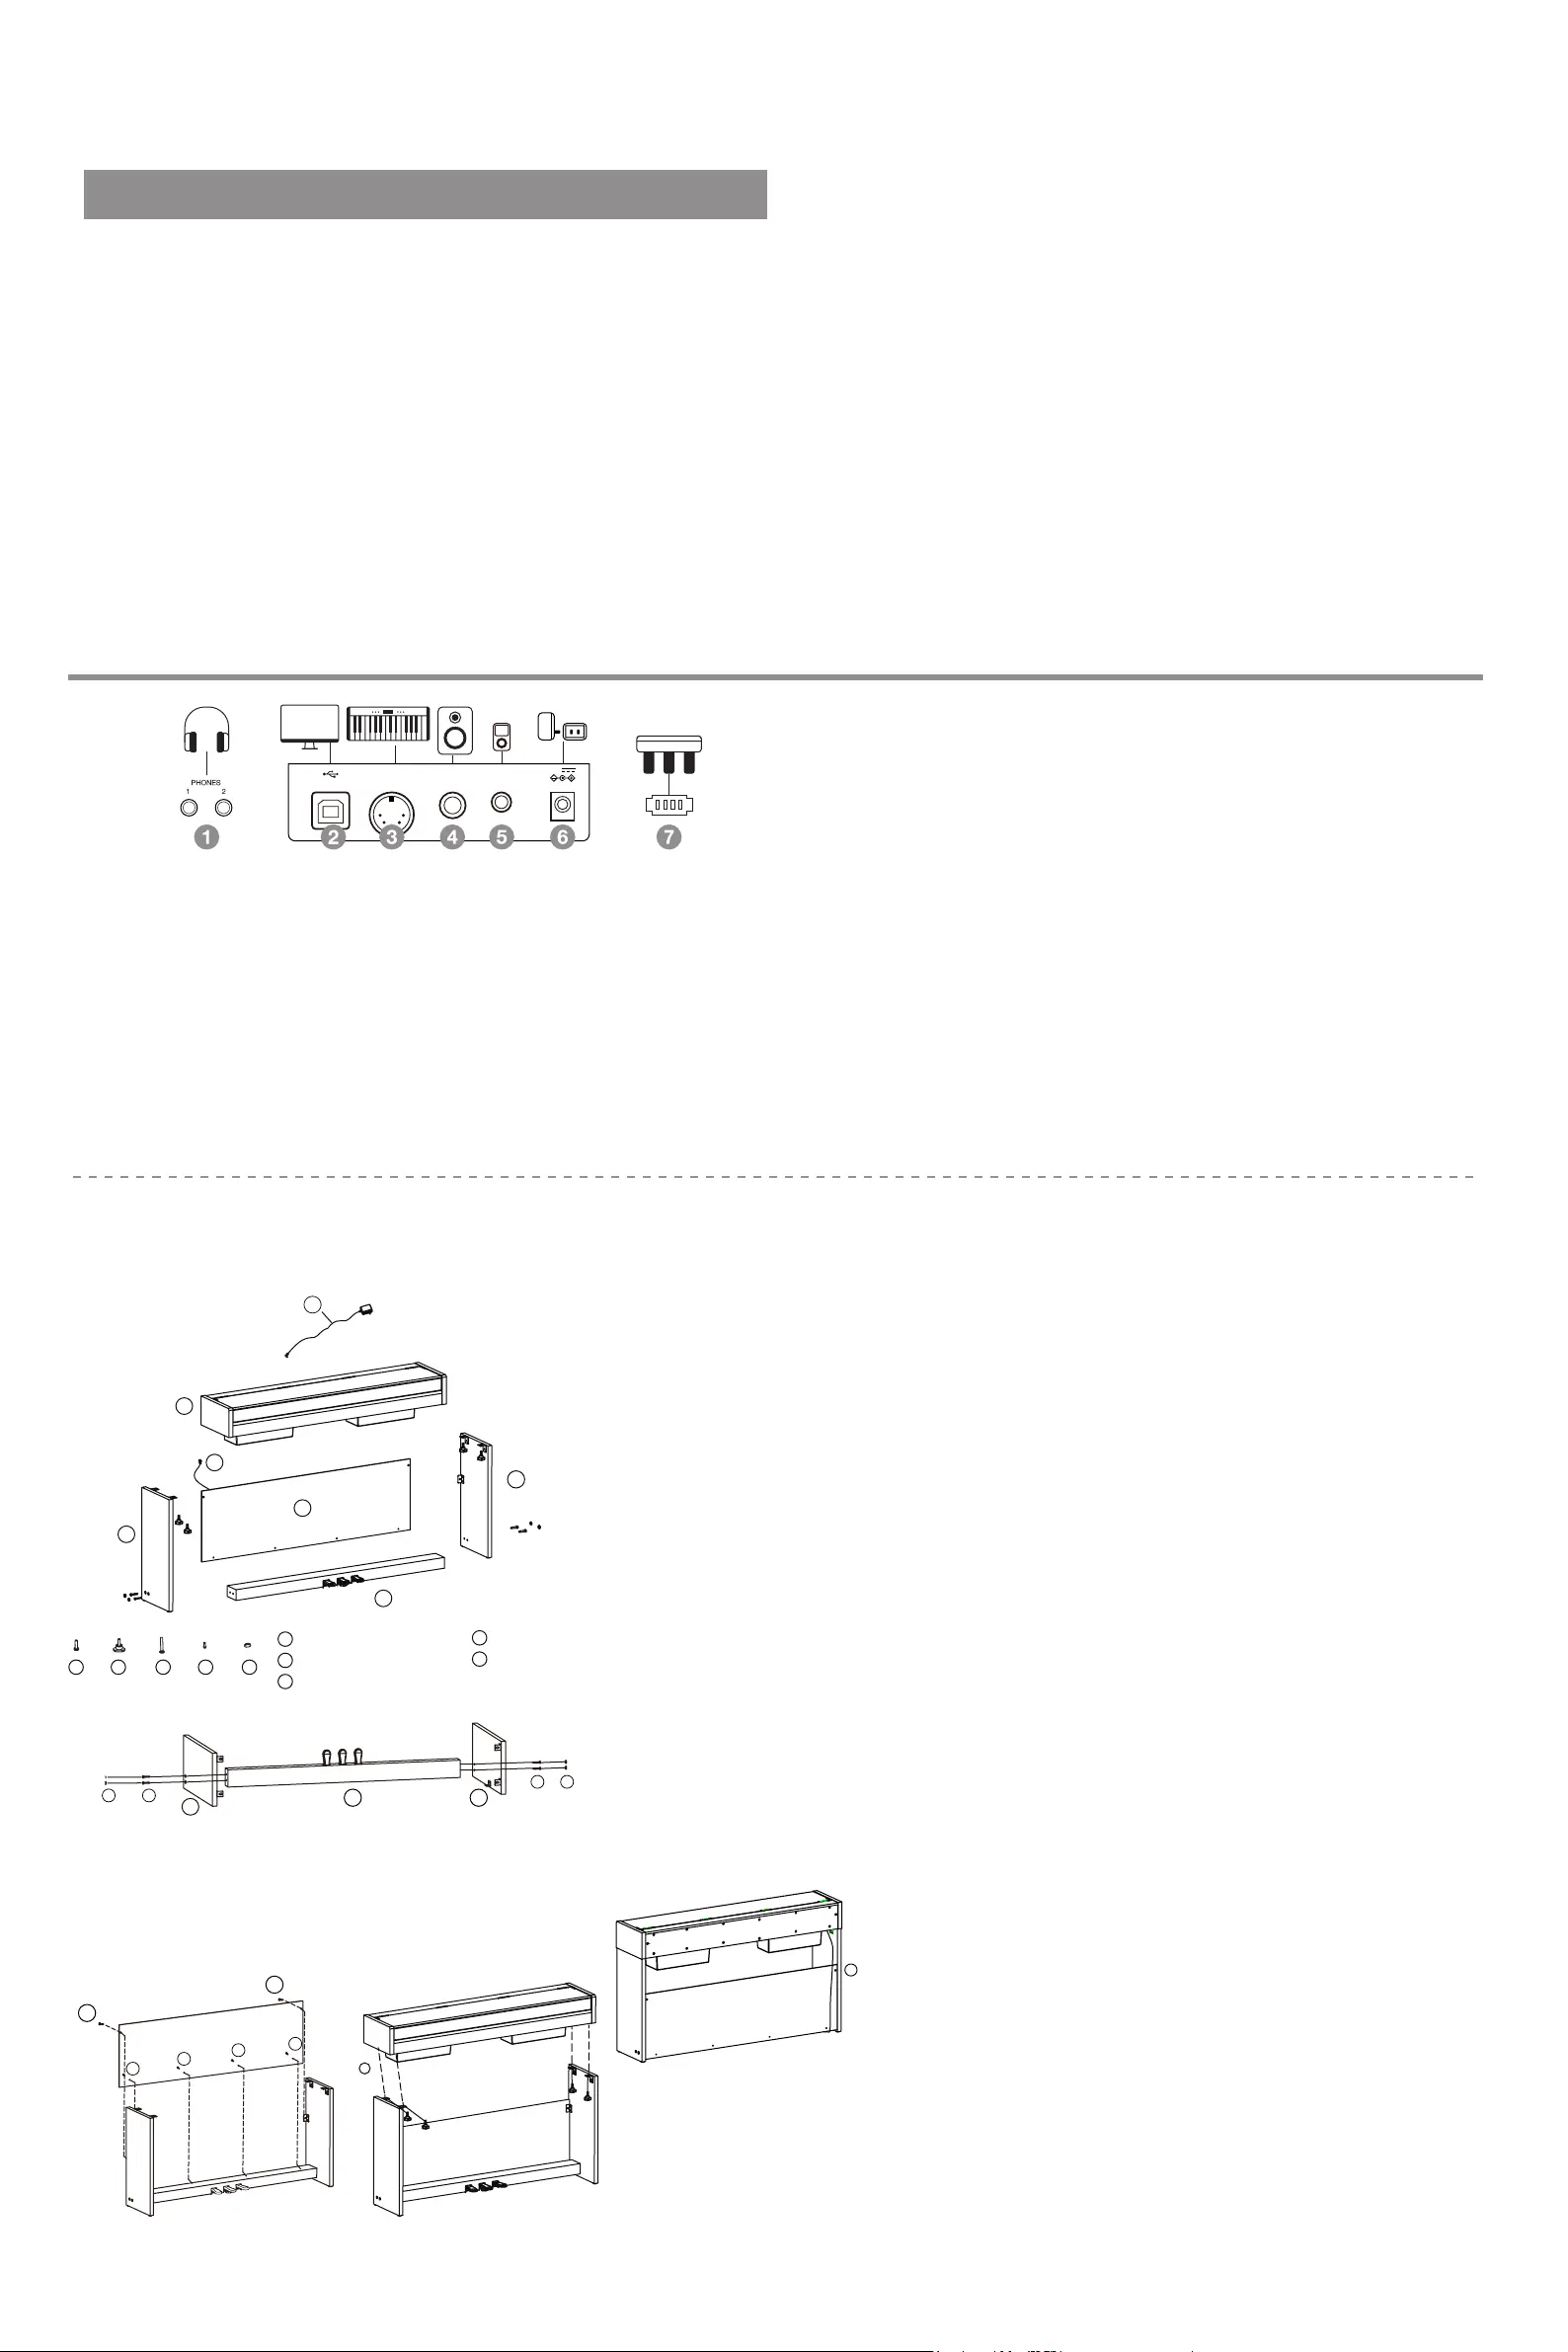
1. PHONE Jacks
For connecting to head-
phones. When headphones
are connected, to PHONES
2, the internal speakers will
be muted.
2. USB Jack
For connecting to a com-
puter or a mobile device via
cable. An additional adapter
may be needed to connect
to mobile devices.
51
52
53
54
55
56
57
58
59
60
61
62
63
64
65
66
67
68
69
70
71
72
73
74
75
76
77
78
79
80
81
82
83
84
85
86
87
88
89
90
91
92
93
94
95
96
97
98
99
100
Specications
Keyboard
88 Weighted,
graded hammer action
Touch Response
5 types, O
Polyphony
192 notes (max)
Sound
30
Layer
Left, Right 1, Right 2
Split
Yes
Twinova
Yes
Metronome / Rhythm
50
Metronome / Rhythm Control
Start / Stop
Metronome / Rhythm volume
Tempo
5 - 320
Eect
D.A.S.
Reverb (2 types)
Chorus (1 type)
Song
100
Sequencer
1 User song
(1 melody track)
Connectivity
2 Headphones,
Unit Pedal,
MIDI Out, USB MIDI,
Aux In, Line Out
Power
12V
Amplier
20W x 2
Speaker
12cm x 2
5.8cm x 2
Dimension (WDH)
135.2 x 29.8 x 78.8 cm
Weight
40.5 kg
6. DC IN Jack
For connecting the specifed
power adapter.
7. Unit Pedal Jack
For connecting an optional
unit pedal (Soft Pedal, Soste-
nuto Pedal and Sustain Pedal)
to the pedal jack located on
the bottom of the instrument.
3. MIDI OUT Jack
For connecting to an external
MIDI device.
4. LINE OUT Jack
For connecting to the INPUT
jack of external audio equip-
ment such as a stereo sound
system.
5. AUX IN Jack
For connecting to the OUTPUT
jack of external audio source
such as an MP3 player.
1
2
3
4
5
6
7
8
9
10
11
12
13
14
15
16
17
18
19
20
21
22
23
24
25
26
27
28
29
30
31
32
33
34
35
36
37
38
39
40
41
42
43
44
45
46
47
48
49
50
Sound List
1 German Grand
2 Bright German Grand
3 Japanese Grand
4 Warm Grand
5 Electric Grand
6 Honky Tonk
7 Vintage EP
8 Warm EP
9 Reed EP
10 Dark EP
11 FM EP
12 Crystal EP
13 Clavinet
14 Harpsichord
15 Tonewheel Organ
16 Classic Organ
17 Church Organ
18 Accordion
19 Synth Pad
20 Strings
21 Choir
22 Square Lead
23 Saw Lead
24 FM Pad
25 Bell
26 Celesta
27 Nylon Guitar
28 Electric Bass
29 Acoustic Bass
30 Synth Bass
Metronome /
Rhythm List
Song List
1 Simple Count
2 4/4 Beat
3 2/4 Beat
4 3/4 Beat
5 3/8 Beat
6 6/8 Beat
7 5/4 Beat
8 5/8 Beat
9 7/8 Beat
10 10/8 Beat
11 8Beat 1
12 8Beat 2
13 16Beat 1
14 16Beat 2
15 Rock
16 Ska
17 Slow Rock
18 70’s Rock
19 Texas Rock
20 Sweet Ballad
21 6/8 Soul
22 Fusion Shue
23 Adult Ballad
24 Organic Ballad
25 Tango
26 Slow Waltz
27 Cha Cha
28 Rumba
29 Samba
30 Techno 1
31 Hip Hop
32 Techno 2
33 Classic Disco
34 Funk 1
35 Funk 2
36 Swing 1
37 Swing 2
38 Funky Jazz
39 Bernard Shue
40 Bluegrass
41 Country Step
42 Country Folk
43 Bossa Nova
44 Latin
45 Mambo
46 Waltz
47 Vienna Waltz
48 Polka
49 March
50 6/8 March
Sonata No.17
Sonata No.14
Sonata No.8
Sonata No.25
Sonata No.20
Fur Elise
Menuett G-Dur 4
Prelude C Major
Prelude No.2
Gavotte No.5
Minuet G Major
Prelude C-Sharp
Prelude E Major
Prelude C Minor
Invention No.13
Invention No.1
Sonata K.545 1st
Sonata K.333 1st
Sonata K.333 3rd
Rondo alla Turca
Ah, Vous Dirai-je
Perpetuum Mobile
Impromptu
Moments Musicaux
Serenade
Arabesque
La Chevaleresque
Tarentelle
La Gracieuse
Sonatina Op.36-1
Sonatina Op.36-2
Sonatina Op.36-3
Sonatina Op.36-4
Etude C Major
Etude E Major
Black Key
Revolutionary
Etude A-Flat
Etude F Minor
Nocturne B-Flat
Nocturne E-Flat
Nocturne F Minor
Impromptu A Flat
Fantaisie-Improm
Raindrop
Preludes C Minor
Waltz E-Flat
Waltz C-Sharp
Minute Waltz
Mazurkas F Major
Sweet Remember
May Breezes
Spring Song
Venetianisches
Lost Illusions
Barcarolle
Christmas
Italian Polka
Traumerei
The Happy Farmer
May, Sweet May
Winter Time I
Intermezzo
Brahms Waltz
Arabesques No.1
Clair De Lune
Perludes No.8
Doctor
Reverie
Cakewalk
Arietta
Buttery
Lyric Waltz
Schos Gavotte
Schos Doll’s
Gymnopedies
Je Te Veux
Fast Dance
Gypsy Rondo
Liebestraum
The Sapin
Lyric Rondo
Humoresque
La Priere
To A Wild Rose
Fontaine, La
Blumenlied
Le Coucou
Minuet
Warblings
Gavotte
Dance Steps
Salut D’ Amour
Le Cygne
Paloma, La
Rialto Ripples
Chicken Pecking
Maple Leaf Rag
Entertainer
Peacherine
CP203_OM06EN
6
7
8
9
10
Screw M6X12 (2 PCS)
Hand screw (4 PCS)
Screw 6X50 (4 PCS)
6
7
8
Screw 4X15 (4 PCS)
Screw cap (4PCS)
9
10
Setup Guide
Before you proceed to assemble the piano, prepare a Philip’s screwdriver
(not supplied). It is recommended that the entire procedure is handled by
two persons. Make sure you have the following parts, which are supplied in
the package.
A. Make sure the components are in the right directions before assem-
bling. Lay down the side panels (2 & 3), place the foot pedal unit (4)
between them, apply 4 pieces of screws (8) (2 on each side)to x the side
panels to the foot pedal unit, cover the caps (10) over the screw tops (2 on
each side), lift up the assembled side walls and foot pedal unit together to
the standing position.
B. Place the back board against the
stand completed in Step A, then use
screw (9) and screw (6) to x it to the
stand.
C. Put the piano body on the top
of the stand assembled in Step B,
then, use hand screw(7) x it.
D. Connect the pedal cable
to the pedal jack at the rear
bottom of the piano. The setup
is completed, now the piano
is ready to connect to power
supply.
3
4
8
10
10
8
6
6
9
9
9
9
12
1
2
11
5
3
4
7
11
2
MIDI OUTAUX INLINE OUT
12V
Produktspezifikationen
| Marke: | Medeli |
| Kategorie: | Klavier |
| Modell: | CP203 |
Brauchst du Hilfe?
Wenn Sie Hilfe mit Medeli CP203 benötigen, stellen Sie unten eine Frage und andere Benutzer werden Ihnen antworten
Bedienungsanleitung Klavier Medeli

11 September 2025
1 September 2025
1 September 2024
28 August 2024
28 August 2024
28 August 2024
28 August 2024
28 August 2024
28 August 2024
27 August 2024
Bedienungsanleitung Klavier
Neueste Bedienungsanleitung für -Kategorien-
3 April 2026
2 April 2026
1 März 2026
1 März 2026
27 Februar 2026
27 Februar 2026
26 Februar 2026
25 Februar 2026
30 Dezember 2026
30 Dezember 2026