ODYS Connect 8+ Bedienungsanleitung
Lies die bedienungsanleitung für ODYS Connect 8+ (1 Seiten) kostenlos online; sie gehört zur Kategorie Tablette. Dieses Handbuch wurde von 50 Personen als hilfreich bewertet und erhielt im Schnitt 4.6 Sterne aus 7 Bewertungen. Hast du eine Frage zu ODYS Connect 8+ oder möchtest du andere Nutzer dieses Produkts befragen? Stelle eine Frage
Seite 1/1
ODYSCONNECT8+QUICKSTARTGUIDE
Introduction
ODYS
CONNECT8+isaMIDwithfullcolorscreen.
Althoughthisproductissafe,pleaseobservetheinformationandwarningsfromtheusermanual.
Theusermanualisinstalledatthedevicesinternalmemoryandcanbeaccessedoverthe
mainmenu.Pleaserefertotheusermanualfordetailedinstructions,conformityand
supportinformation.
‐Toopentheuser’s
manualpleasetaponthemanualiconyoucanseeatthehomescreen
toopenthefolderwherethemanualsarestoredin.
TurningOn/Off
Toturnonthedevice,pressandholdthePowerbuttonontheunituntilyou‐seethebootupscreen
thenmayrelease.Ittakeafewminutestothestartupsystem,pleasewaitbeforeyouproceed.
Toturnoffthedevice,pressandholdthePowerbuttonuntil
youseetheoption“PowerOff”,tapon
“PowerOff”andtapthenon“OK”.
Tip:Thisdevicewillsleepwiththescreenoffifitstaysinactiveforafewseconds.Youcanbrieflypress
thethePowerbuttontoturnonscreenandwakeitup.
PowerOnandOfftheDisplay
‐Shortlypressthe[Power]buttontoturnoffthedisplay.
‐Pressthe[Power]buttonagainshortlyturnthedisplayonagain.
LanguageSetting
‐ConfirmthetworequestsatthetapingatbeginningbyOK.
‐Tapon[Settings]andselect[Language&Input]
‐
Tapon[Language]andselectyourdesiredlanguageontherightside.
GettingStarted
1.HeadphonejackAudiooutputconnectionforhead‐phones
Note:Speakeroutputisautomaticallydisabledwhenheadphonesare
connectedtotheplayer.
2.2.0MicroUSBHi‐
speed
Connecttodataacomputertotransfer(e.g.,music,videos,photos,files).
SupportUSBstick,Surfstick,KeyBoardandMouse.
Note:
A
OTGsupportingadaptorcableisrequired(optional)
3.SimCardSlotAccommodatesanySimCard.
4.MicroSDCardSlotAccommodatesanystandardSD/SDHCmemorycard.
5.Microphone
6.PowerButtonPressandtoturntheholdthepowerswitchonoffordevice;
Brieflypresstheswitchtoturnthescreenonoroff.
Pressandtoholdfor10Secondsresetandrestartthedeviseifitfreezes
orotherwisebehavesabnormal.
7.ChargeIndicator
8.FrontCameraFront‐facingcamerafortakingavatarpictures
9.Volumekey+Shortlypresstoincreasevolumelevel.
10.Volumekey‐Shortlypresstodecreasevolumelevel.
11.RearCameraRear‐facingcamerafortakingpictures
12.Speaker
ChargingBattery
Thedevicehas‐abuiltinrechargeablebattery.Noextrabatteryinstallationisrequired.Justcharge
thebattery.devicewhenitindicateslow
Tochargethethebattery,connectthetodeviceanystandardwalloutletviaUSBportusingthe
poweradaptor.aboutIttakes5hourstofullycharge
thebattery.
Note:
a.adviceWetouseonlythedeliveredpoweradapterwiththistablet.
b.Youcanoperatethedeviceevenwhenitisbeingcharged.Butforextendedbatterylife,itis
suggestedNOTtousethedevicewhenitischarging.
c.Itisrecommendedtothechargethebatterybeforeyouusethedeviceforfirsttime.
d.beusedFormaximumperformance,lithiumion‐batteriesneedtooften.Ifyoudon’tusethe
deviceoften,besuretorechargethebatteryatleastoncepermonth.
e.Shouldtherechargeablebatteryofthedevicedischargecompletely,connectthedevice(usingthe
adapter)tothemainpowersourceforapproximately‐510minutesbeforeattemptingnormal
operation.
f.someIncases,deviceswhichhavebeenchargedforlongerperiodsoftimemaynotbeabletobe
switchedbackandon.ShouldthisoccuryouhavetomakeaReset.Pressholdfor10Secondsto
resetandrestartthedevice.
Touchscreen
Thetouchscreenisacapacitivedisplayanddesignedforprecisionand
respondsbestwhentouchedwiththesmallestpointpossible.Usethe
flatpadofyourfingertotouchthescreen.
ConnectviaUSB
Pleasenote:Onlyuseconnectingcablewithamaximumlengthof
80cm.PleasemakesurewhenconnectingtheUSBadapteror
connectorcablesattentiontothecorrectalignmentoftheconnector
beforeinsertingitintotheUSBsocketinsertionontheunit.Incorrect
maycausedamagetoplugandsocket.
Onthesideofoftheplugthereareusuallysmallsizeshooks
thatsecurethefixation.
Payspecialattentiononofthepositionthehooks,theyshow
upwardswhenconnectingcableswhilethescreenisabove.
InstallingMemoryCard
Thisdevicecanreadfilesdirectlyfrommemorycardand
USBmemory.
Tousememoryacard,cardfindtheslotatthesideof
thedeviceandtheninsertthememorycardintotheslot
inthecorrectorientationorConnectUSBMemoryusing
theprovidedUSBadaptorcable.To
accessthefiles
storedinthethememorycard,enterExplorermodeby
tappingtheExplorericonandselectthe“SDCard”
directory.
‐CheckthattheMicroSDcardisinthecorrectposition
withthecontactpinfacingdownwardsasillustrated.You
maydamagethecardandthereader
ifMicroSDcardisnotinsertedincorrectposition.
‐PushtheMicroSDcardintothecardslotuntilitclicks.
‐ToremoveMicroSDcard,pushthecardonceagainuntilitclicks.
Note:WerecommendusingonlyMicroSDorSDHCcardsupto32GBcapacity.
‐WhenaMicroSDcardisinsertedfrominorejectedthedevice,itmaytakethefewsecondsfor
devicetoupdatethecontent.
‐PleaseavoidinsertingorejectingMicroSDcardwhenotheroperationisrunningasthismaycause
thesystemhang.
‐DoNotremovethecardifthecontentcardinsidetheisbeingplayed.Thiswillhaltthe
operationofthedeviceandmightcauseasystemhang.
‐OnlyusetheprovidedUSBadaptorcabletoattachUSBmemorydevices.
‐Pleaseuseyourfingernailstoproperlyinsertorremovethecard.
InstallingSIMcard
TouseaSIMSIMcard,findthetheandcardslotatbacksideofthedevicetheninsertthecardinto
thetheslotincorrectorientation
‐CheckthattheSIMcardisinthecorrectpositionwiththecontactpinfacingdownwardsas
illustrated.Youmaydamagethe
cardandtheposition.readerifisSIMcardnotinsertedincorrect
‐PushtheSIMcardintothecardslotuntilitclicks.
‐ToremoveSIMcard,pushtheSIMcardonceagainuntilitclicks.
Note:TheSIMCardcanonlyberecognizedifthedevicewasturnedoffwhileinserting.
MicroSIMCardsarenotsupported.
TransferringFiles
Beforereadingorplayingfiles,youneedtototransfermediafilesfromacomputerthedevice.
(1)suppliedConnectthedevicetotheacomputerwithUSBcable.
(2)Onceconnected,oneremovablediskItdrivewillshowonyourcomputer.representstheinternal
memoryofthethedeviceand
memorycardinsertedintothedevice.Nowyoucancopyfilesfromor
toasthesediskdrivejustyouwouldonyourharddrive.
3)Disconnectthethedevicefromcomputer.
Note:‐ThepreinstalledapplicationsandAndroidOSoccupyaconsiderablepartofcapacity–nearlymorethan
1GB,itisnormalhugethatyouseedifferencebetweenavailablememoryspaceandtotalcapacity.
Caution!ThedevicesupportsAdobeDRMcontents.AdobeDigitalEditions(ADE)isrequired.Pleaserefertothe
user’smanualforcloserinformation’sonhowtouseDRMprotectedfiles.
Screenlock
Thescreenautomaticallyturnsoffandafterlocksitselfasetperiodoftime.
Whenthescreenturnedoff,pressthethePowerbuttontolightupscreen.
Pushthelockicon
anddragittotheopenlockattherightsideto
unlock.
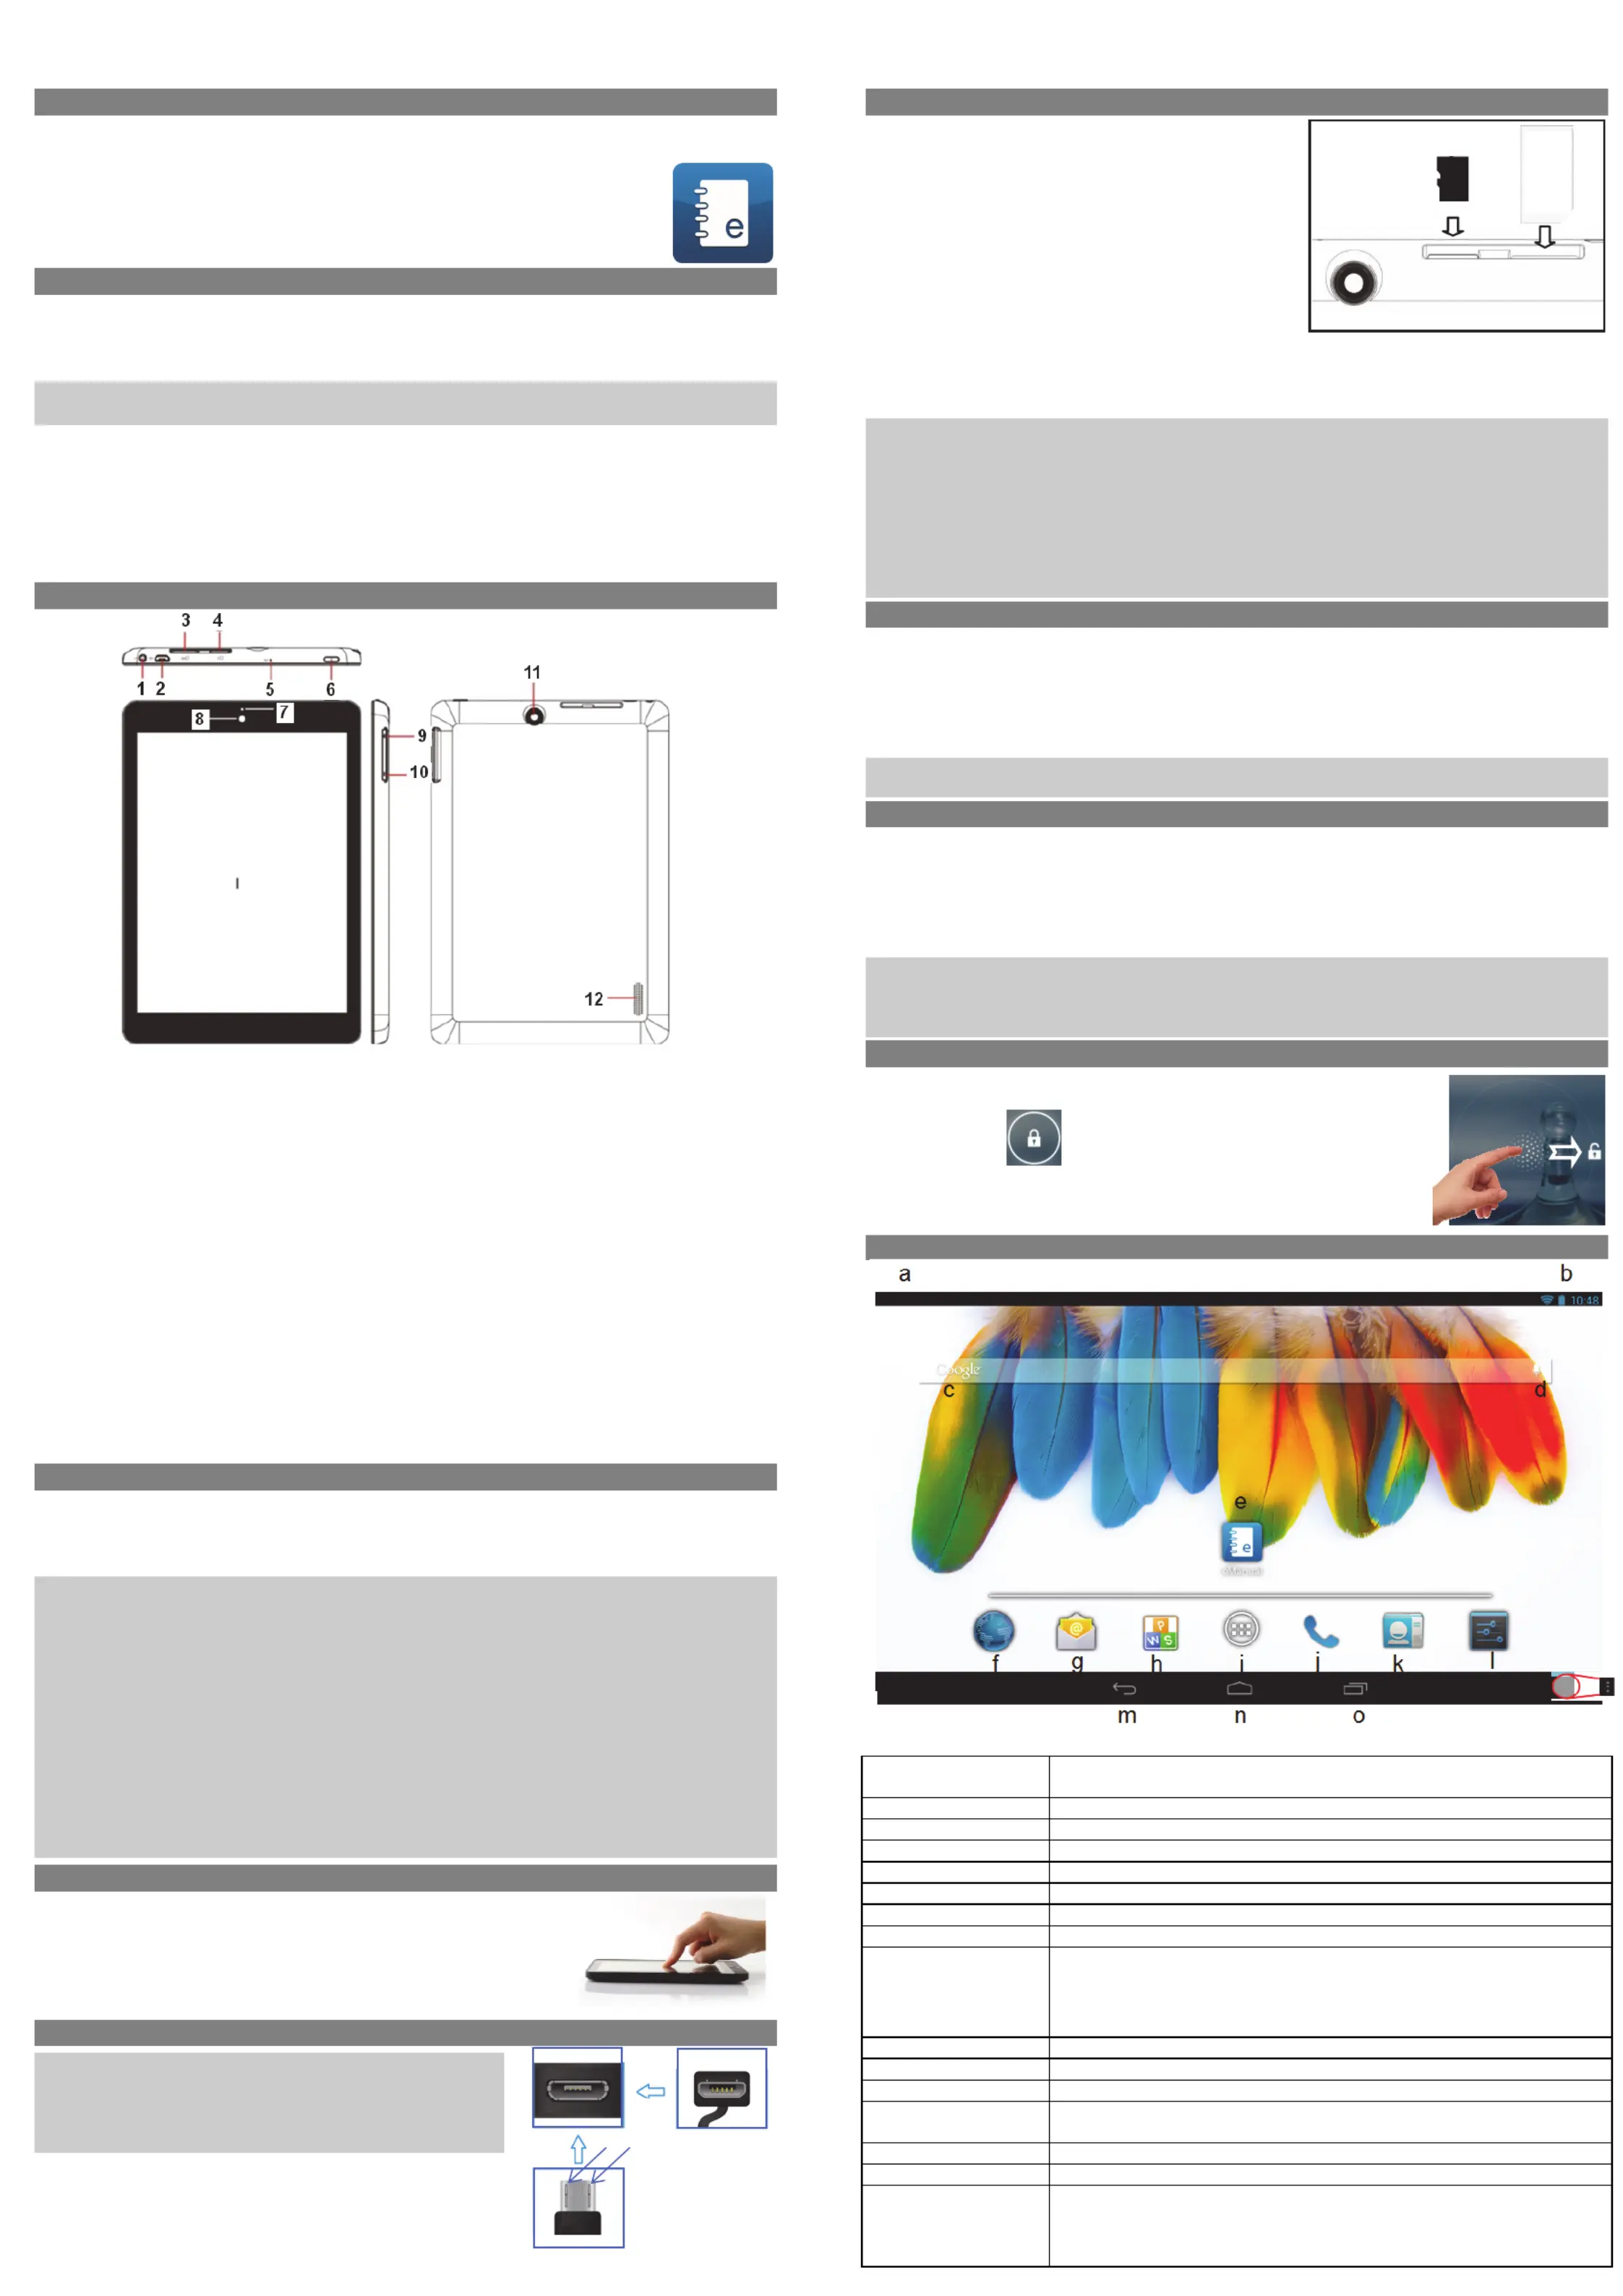
Home Screen
a.SystemHintsInformstheuserifattachedmemoryorupdatesareandavailableothersystem
statusinformation’s
b.Systemsettings
c.GoogleSearchBar
d.GoogleVoiceSearch
e.ebookeManualManualinformat
f.BrowserTaptotolaunchtheBrowservisityourfavoritewebsites.
g.E‐MailToopenthemailclient
h.KingsoftOffice
i.ApplicationsiconTaponthisicontorevealallapplicationsinstalledonyourTablet
- YoucancopytheapplicationsontotheHomescreenbypressing
andholdingontheiricons.
- YoucandeletetheapplicationfromtheHomeScreenbydragging
theiriconstotheCrossthatappearsatthetopofthescreen.
j.Telephone
k.Contacts
l.SystemSettings
m.BacksoftkeyTaptotothethethereturnpreviousscreen.Ifkeyboardisonscreen,taptoclose
thekeyboard.
n.HomesoftkeyTaptotothereturnhomescreen.
o.RunningappsShowappswhicharecurrentlyrunninginbackground.
p.MenusoftKeyTaptoviewtheoptionmenu
Note:WhenyouTaptheMenukeyfromwithinanapplication,youwillseethe
optionsforthatapplication.Butyouwillnotseethemonstartscreen.
Caution!Someappsmayshowthisiconatthetoprightcorner.
v1.0
Top
Bottom
Hooks
Screen
p
Backside
SimSlotCardMicroSDSlot
Camera
Provicer
523503423048WD
MC
UM
TS/GSM
SIM
Produktspezifikationen
| Marke: | ODYS |
| Kategorie: | Tablette |
| Modell: | Connect 8+ |
| Bildschirmdiagonale: | 7.85 " |
| Eingebautes Mikrofon: | Ja |
| Eingebaute Lautsprecher: | Ja |
| Installiertes Betriebssystem: | Android |
| Anzahl Prozessorkerne: | 4 |
| E-Mail: | Ja |
| Mobile Netzwerkverbindung: | Ja |
| GPS: | Ja |
| WLAN-Standards: | 802.11b, 802.11g, Wi-Fi 4 (802.11n) |
| Bluetooth: | Ja |
| Kopfhörer-Anschluss: | 3,5 mm |
| Akku-/Batteriekapazität: | - mAh |
| Akku-/Batteriebetriebsdauer: | - h |
| Breite: | 198 mm |
| Tiefe: | 136.5 mm |
| Gewicht: | 383 g |
| AC-Netzadapter: | Ja |
| Mitgelieferte Kabel: | USB |
| Produktfarbe: | Schwarz |
| Akkuladezeit: | 5 h |
| Akku-/Batterietechnologie: | Lithium Polymer (LiPo) |
| Höhe: | 9.65 mm |
| Anzahl eingebauter Lautsprecher: | 1 |
| Schnellstartübersicht: | Ja |
| Netzteil Ausgangsspannung: | 5 V |
| AC-Adapter Ausgangssstrom: | 1.5 A |
| Netzteil Eingansgsspannung: | 100 - 240 V |
| Frontkamera: | Ja |
| Gerätetyp: | Mobiles Tablet |
| Natives Seitenverhältnis: | 4:3 |
| Intel® Wireless-Display (Intel® WiDi): | Nein |
| Kopfhörerausgang: | Ja |
| Mikrofon-Eingang: | Nein |
| Netzteilfrequenz: | 50/60 Hz |
| Maximale Video-Auflösung: | - Pixel |
| Formfaktor: | Tablet |
| Grafikkarte: | Mali 400 MP2 |
| Prozessor-Taktfrequenz: | 1.3 GHz |
| Prozessor: | MT8382 |
| Standort-Position: | Ja |
| Interne Speicherkapazität: | 8 GB |
| Kompatible Speicherkarten: | MicroSD (TransFlash), MicroSDHC |
| Max. Speicherkartengröße: | 32 GB |
| Plattform: | Android |
| Rückkamera-Typ: | Einzelne Kamera |
| Auflösung Rückkamera (numerisch): | 2 MP |
| Auflösung Frontkamera (numerisch): | - MP |
| Mobilfunknetzgenerierung: | 3G |
| 3G-Standards: | WCDMA |
| Speicherkapazität: | 1 GB |
| Interner Speichertyp: | DDR3-SDRAM |
| Integrierter Kartenleser: | Ja |
| Art des Touchscreens: | Kapazitiv |
| Rückkamera: | Ja |
| Top WLAN-Standard: | Wi-Fi 4 (802.11n) |
| Anzahl Micro-USB 2.0 Anschlüsse: | 1 |
| Intel® Turbo-Boost-Technologie: | Nein |
| Tastatur enthalten: | Nein |
| LED-Hintergrundbeleuchtung: | Ja |
| Version des Betriebsystems: | 4.2.2 |
| Speichermedien: | Flash |
| Videoaufnahme: | Ja |
| 2G-Standards: | GSM |
| Gesamtspeicherkapazität: | 8 GB |
| Kombinierter Kopfhörer-/Mikrofon-Anschluss: | Nein |
| SmartCard-Slot: | Nein |
| Unterstützte Navigationsfunktion (A-GPS): | Ja |
| Intel® Small-Business-Advantage (Intel® SBA): | Nein |
| Intel® Hyper-Threading-Technik (Intel® HT Technology): | Nein |
| Intel® Identity-Protection-Technologie (Intel® IPT): | Nein |
| Intel® Smart-Response-Technologie: | Nein |
| Intel® My-WiFi-Technik (Intel® MWT): | Nein |
| Intel® Anti-Theft Technologie (Intel® AT): | Nein |
| Docking-Connector: | Nein |
| Intel® Smart-Connect-Technik: | Nein |
| Intel® Rapid-Start-Technologie: | Nein |
| Display-Auflösung: | 1024 x 768 Pixel |
| Ethernet/LAN: | Nein |
Brauchst du Hilfe?
Wenn Sie Hilfe mit ODYS Connect 8+ benötigen, stellen Sie unten eine Frage und andere Benutzer werden Ihnen antworten
Bedienungsanleitung Tablette ODYS

1 September 2025
1 September 2024
1 September 2024
1 September 2024
25 November 2023
21 Mai 2023
2 Mai 2023
Bedienungsanleitung Tablette
Neueste Bedienungsanleitung für -Kategorien-
28 März 2026
27 März 2026
26 März 2026
17 März 2026
15 März 2026
13 März 2026
12 März 2026
2 März 2026
25 Februar 2026
22 Februar 2026