OmniMount AB2 HTS Bedienungsanleitung
OmniMount Sprecher-Unterstützung AB2 HTS
Lies die bedienungsanleitung für OmniMount AB2 HTS (2 Seiten) kostenlos online; sie gehört zur Kategorie Sprecher-Unterstützung. Dieses Handbuch wurde von 29 Personen als hilfreich bewertet und erhielt im Schnitt 4.8 Sterne aus 9 Bewertungen. Hast du eine Frage zu OmniMount AB2 HTS oder möchtest du andere Nutzer dieses Produkts befragen? Stelle eine Frage
Seite 1/2
�
�
�
Ceiling
Wall
Wall
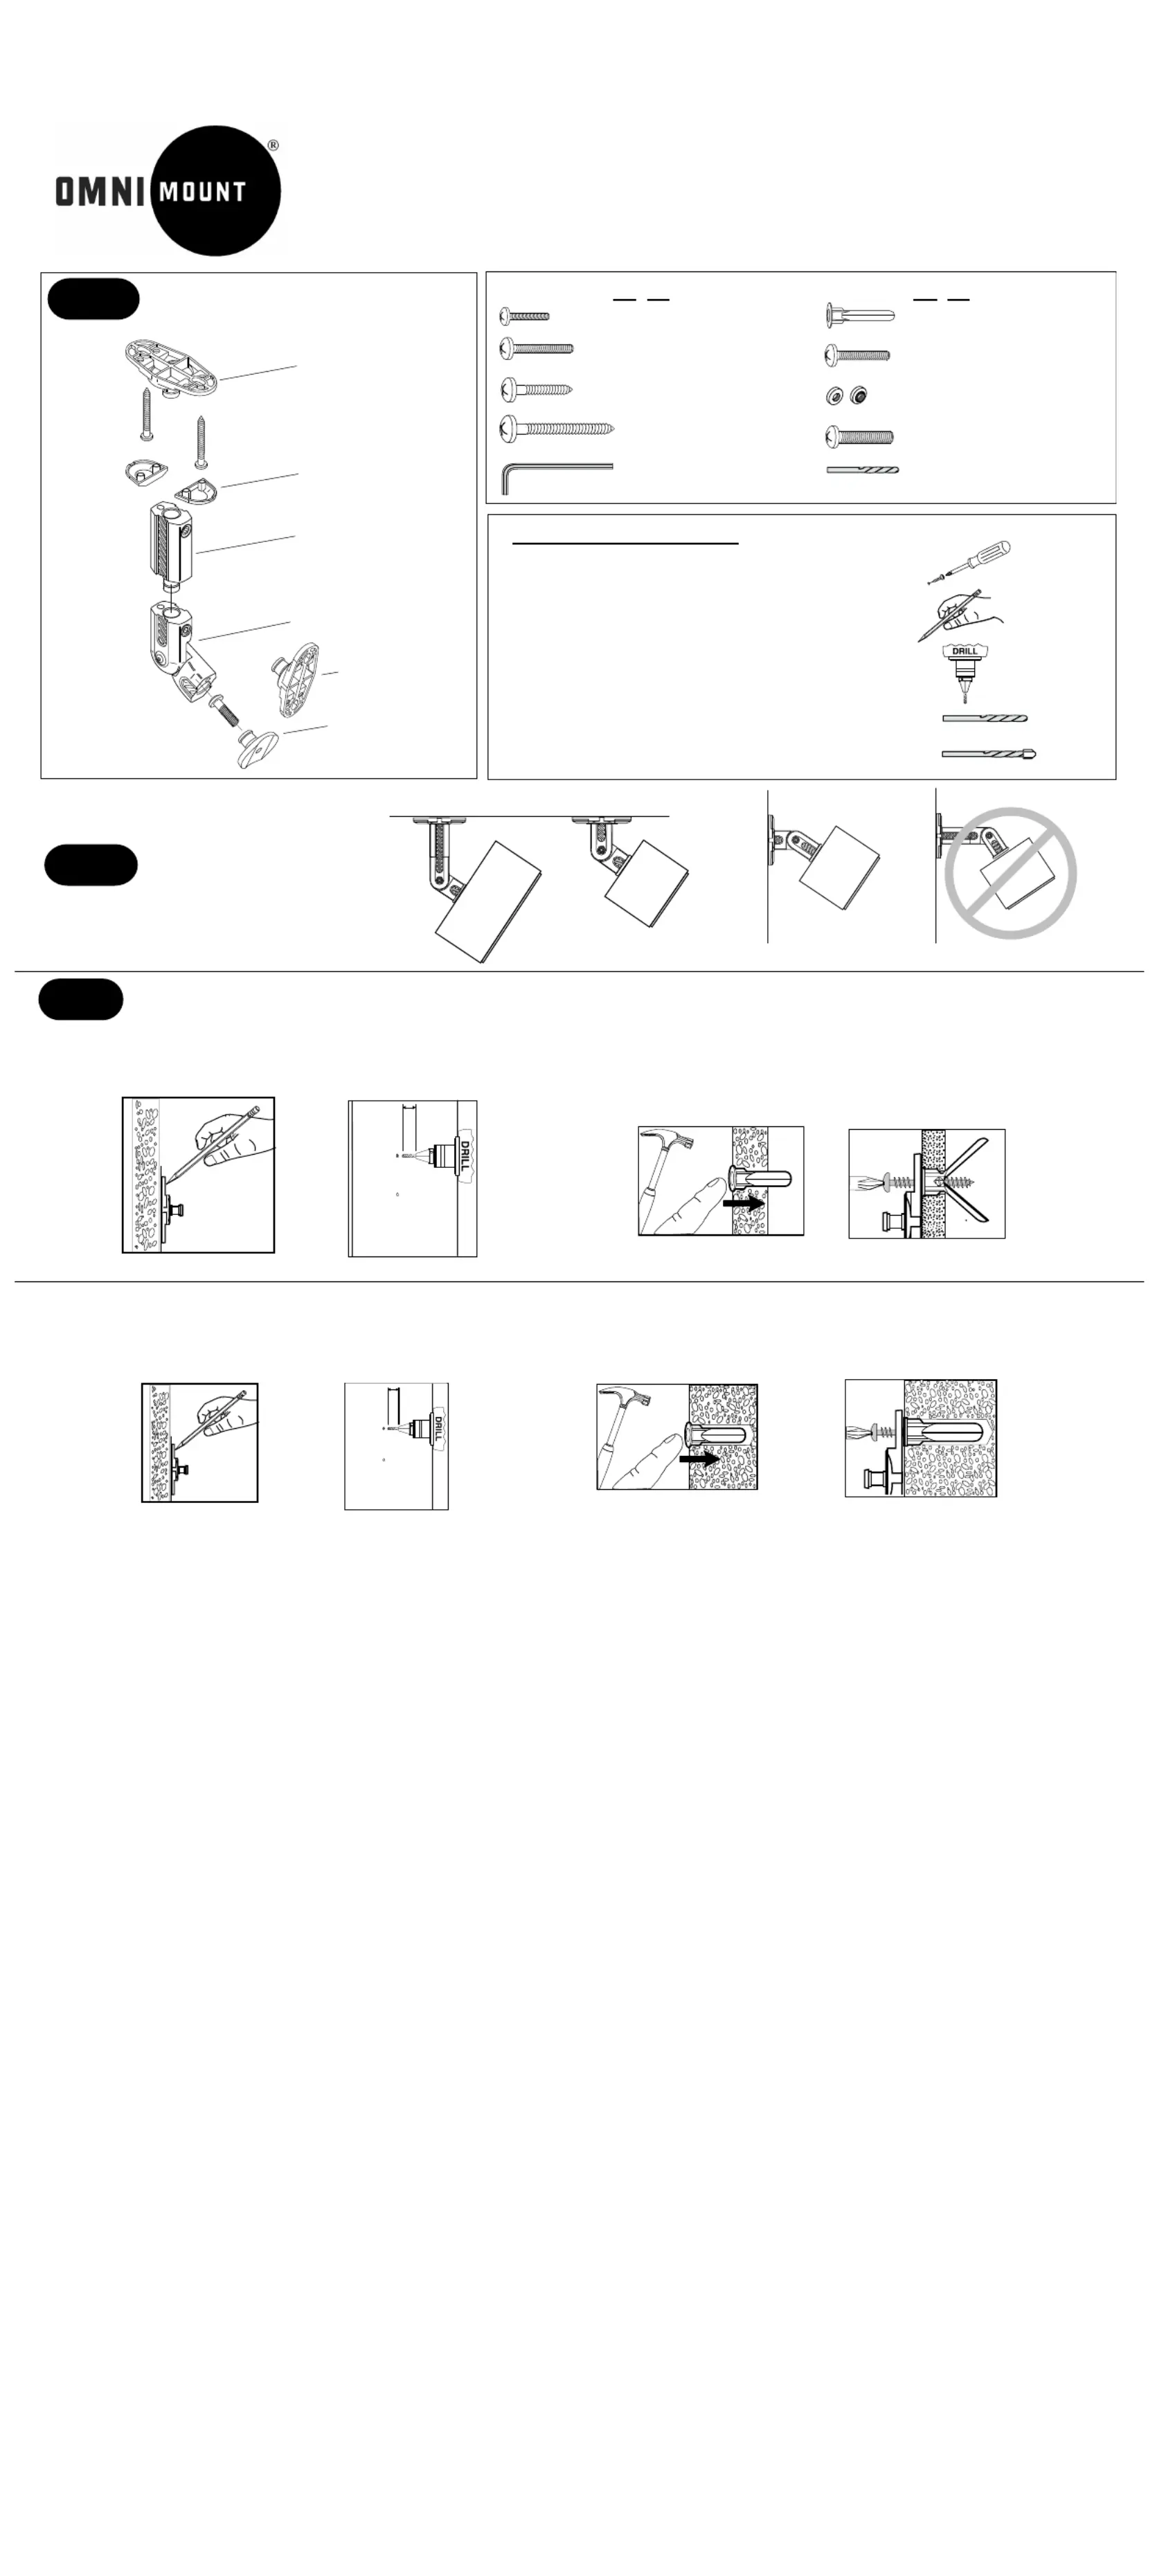
Step 1 Identify parts
Additional installation tools
Phillips Head Screw Driver
Pencil
Electric Drill
Drill Bits: 1/8'' drill bit for drywall
5/16'' masonry bit for cement wall applications
Step 3 Installation of the wall plate
Mounting to drywall.
1. Use the wall plate as a template and mark the screw hole locations onto the surface using a pencil.
2. Drill into the drywall with a 1/4'' drill bit. Insert the anchors into the hole as shown in fig. 3.
3. Secure with the #12 x 1-3/4'' screws, see fig. 4.
Mounting to solid concrete or cinder block.
1. Drill into the surface with a 3/16'' masonry drill bit 1-3/4" deep and insert the anchors into the holes as shown in Fig. 3
2. Secure wall plate with the #12 x 1-3/4" , see fig. 4.
1/8”
5/16''mason bit
�
�
These fasteners and tools are provided
3/32''
�
Step 2
Decide on location
�
Extension
Adjusting knuckle
Speaker plate
Mounting plate (1)
Screw covers
Mounting plate (2)
g. 3
g. 3
(1) (5) M4 X 12mm Phillips
pan head machine screw
(1) (5) M5 X 12mm Phillips pan
head machine screw
(2) (10) #12 X 3/4" Phillips pan
head self-tapping screw
(2) (10) #12 X 1-3/4'' Phillips pan
head self-tapping screw
(1) (5) 5/32'' Hex key
(2) (10) Plastic anchor
(1) (5) 8-32 X 5/8'' Phillips pan
head machine screw
(1) (5) Circular nut (PEM)
8-32 thread
(1) (5) 1/4-20 X 1" Phillips pan
head machine screw
(1) (2) 3/32'' Drill bit
g. 4
g. 4
�
�
�
AB2/AB2 HTS INSTALLATION INSTRUCTIONS
�
1 3/4"
�
1 3/4"
�
�
�
AB2 HTSAB2 HTS
Knurled side
Produktspezifikationen
| Marke: | OmniMount |
| Kategorie: | Sprecher-Unterstützung |
| Modell: | AB2 HTS |
| Produktfarbe: | Schwarz |
| Höchstgewichtskapazität: | 3.6 kg |
| Verpackungsart: | Master Carton |
| Anzahl enthaltener Produkte: | 5 Stück(e) |
| Bruttogewicht äußerer Karton: | 4.7 kg |
| Höhe (cm): | 21.6 cm |
| Länge (cm): | 49.5 cm |
| Breite (cm): | 15.2 cm |
| Drehwinkel: | 360 ° |
Brauchst du Hilfe?
Wenn Sie Hilfe mit OmniMount AB2 HTS benötigen, stellen Sie unten eine Frage und andere Benutzer werden Ihnen antworten
Bedienungsanleitung Sprecher-Unterstützung OmniMount

7 August 2025
6 August 2025
24 Juli 2025
23 Juli 2025
23 Juli 2025
23 Juli 2025
23 Juli 2025
21 Juli 2025
21 Juli 2025
21 Juli 2025
Bedienungsanleitung Sprecher-Unterstützung
Neueste Bedienungsanleitung für -Kategorien-
30 März 2026
27 März 2026
20 März 2026
26 Februar 2026
24 Februar 2026
21 Februar 2026
20 Februar 2026
17 Januar 2026
27 Dezember 2025
21 Dezember 2025